vue3 知识
vue3介绍
Vue3的变化:
? ? 1、vue3完全兼容vue2,但是vue3不建议用vue2的写法
?? ?2、拥抱TypeScript,ts完全兼容js
? ? 3、组合式API和配置项API
? ? ?? ?????????vue2 是配置项api
? ? ? ? ????????vue3 组合式api
vue3项目创建和启动
# 创建vue3项目:
?? ?????????vue-cli ? 官方不太建议用了
? ? ????????vite ? ? ?目前官方推荐:新一代前端构建工具# vue-cli创建:
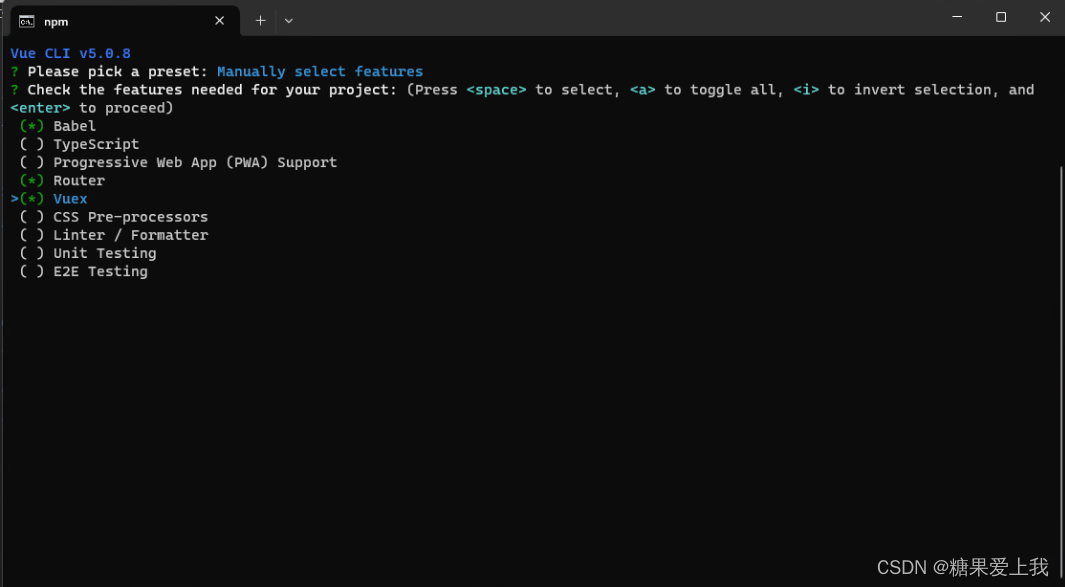
?? ?????命令行中:vue create vue3_demo001
? ? ????其他跟之前一样,只是选vue版本选3版本
# vue3的项目简单解释:
// main.js
import { createApp } from 'vue'  // 通过 createApp创建vue实例
import App from './App.vue' ?// 根组件
import router from './router' // vue-router
import store from './store' // vuex

var vue = createApp(App) // 创建vue实例
vue.use(store)// 使用vuex
vue.use(router)// 使用vue-router
vue.mount('#app')// 挂在index.html中得div
# 其他写起来跟之前写vue2完全一致,vue3是兼容的
# vite创建vue3(速度快)
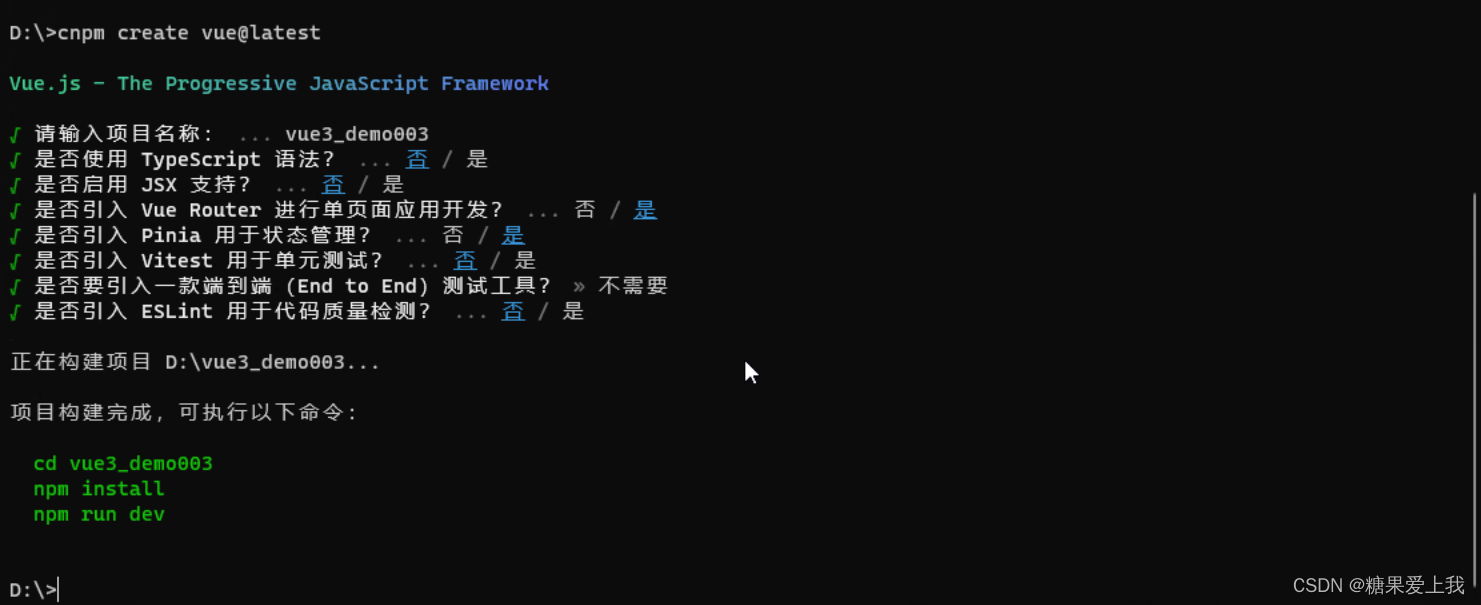
? ? 不管是创建项目还是运行项目速度都很快,因为它按需编译,不再等待整个应用编译完成cnpm create vite vue3_demo002 //创建项目 ? ? cnpm install? // 打开项目,安装依赖 ? ?? npm run dev // 运行项目# 使用vite和vue3创建项目的文件简单解释:
// main.js?? ?
import { createApp } from 'vue'
import './style.css'
import App from './App.vue'
createApp(App).mount('#app') # 没有使用第三方插件
// HelloWorld.vue ? 组合式api写法,跟之前不一样了 <script setup> import { ref } from 'vue' defineProps({ msg: String, }) const count = ref(0) </script> <template> <h1>{{ msg }}</h1> ? ? <div class="card"> ? ? ? ? <button type="button" @click="count++">count is {{ count }}</button> ? ? </div> </template># 实现:创建vue2一样,自由选择一些插件, 在vue3上,建议使用 pinia 做状态管理
# 常用的第三方插件,自己选即可:
????????????????????????npm create vue@latest ? ?
setup函数
# vue3_demo001 :vue-cli创建的---写法跟之前vue2一样
? ?vue3_demo002 :vite创建,但是没有状态管理器和路由
? ?vue3_demo003:vite创建,有状态管理器和路由# setup 函数,只有vue3中有:
? ? ????????setup为Vue3.0中一个新的配置项,值为一个函数
? ????????? setup是所有Composition API(组合API)编写的位置
? ????????? 组件中所用到的:数据、方法等等,均要配置在setup中
? ? setup函数的返回值:返回一个对象,对象中的属性、方法, 在模板中均可以直接使用
# 注意:
? ? 1、尽量不要与Vue2.x配置混用
? ? 2、Vue2.x配置(data、methos、computed...)中可以访问到setup中的属性、方法
? ? 3、但在setup中不能访问到Vue2.x配置(data、methos、computed...)。
? ? 4、如果有重名, setup优先
<template>
  <div class="home">
    <h1>setup函数的使用</h1>
    {{ name }}--{{ age }}
    <button @click="add">点我年龄+1</button>
  </div>
</template>

<script>
import HelloWorld from '@/components/HelloWorld.vue'

export default {
  name: 'HomeView',
  setup() {
    let age = 19
    let add = () => {
      // 默认不是响应式的
      age++
    }
    return {name, age, add}
  },
}
</script>
vue3之ref
# 1、ref 用来做 基础变量 [数字,字符串,布尔] 的响应式
?????????reactive?用来做对象 [数组,字典] 的响应式<script> import { ref,reactive } from "vue"; export default { name: 'HomeView', setup(){ let name = ref('zjq') let age = ref('21') let add = () => { age.value++ console.log(age.value) } let handleChange = (newname) => { name.value = newname } return {name,age,add,handleChange} }} </script># 2、在子组件中暴露
<script setup>
    import {ref, reactive,} from "vue";
    const helloworld = ref()   // 变量名必须跟 在组件上定义的名字一致
    function handleClick() {
          console.log(helloworld.value) // helloworld.value拿到组件对象
          // 使用组件对象的属性和方法,需要子组件暴露---》只能用子组件暴露的
          helloworld.value.add()
          console.log(helloworld.value.person.name)}
</script>

<template>
  <HelloWorld ref="helloworld"></HelloWorld>
  <button @click="handleClick">点我看控制台</button>
</template>
vue3之toRefs
#?响应式:
????????toRefs 可以把对象内部的所有值,都做成响应式
????????改这些变量会影响到原来对象中得值const person = reactive({name: 'lqz', age: 19}) let {name, age:nl} = toRefs(person) // 等同于: name=ref(lqz) age=ref(19) // let {name, age} = person // 等同于: name=lqz age=19 function add() { nl.value++ console.log(nl.value) }# 结构赋值:
let person = {name: 'lqz', age: 19}
let {name, age} = person //  普通解构赋值,name=person.name   age=person.age
let {name:a, age} = person // 重命名解构赋值:a=person.name   age=person.age
console.log(a)
console.log(age)
# 对象解压:
<script> import {toRefs, reactive,} from 'vue' export default { name: 'HomeView', setup() { let data = reactive({ name: 'lqz', age: 19, hobby: '篮球' }) let xx = {...toRefs(data)} // {name:lqz,age:19,bobby:篮球} // 可以把对象解压 return {...toRefs(data), count} // {name:lqz,age:19,bobby:篮球,count:0} },} </script>#?toRef的使用:
const person = reactive({name: 'lqz', age: 19})
// const name=toRefs(person) ?//{name:ref(name),age:ref(age)}
const name = toRef(person, 'name') ?//name=ref(person.name)
function change() {
? name.value = 'xxx'
}
vue3之reactive
<template>
  <div class="home">
    <h1>setup函数的使用</h1>
    <p>用户名:{{ userInfo.name }}</p>
    <p>年龄:{{ userInfo.age }}</p>
    <p>爱好:{{ userInfo.hobby }}</p>
    <button @click="handleAdd">点我年龄+1</button>
  </div>
</template>

<script>
import {ref, reactive} from 'vue'

export default {
  name: 'HomeView',
  setup() {
    let userInfo = reactive({
      name: 'lqz',
      age: 19,
      hobby: '篮球'
    })
    let handleAdd = () => {
      userInfo.age++
      console.log(userInfo)
    }
    return {userInfo, handleAdd}
  },
}
</script>
#?ref和reactive总结:
?ref函数:
? ? 作用: 定义一个响应式的数据
? ? 语法: let xxx = ref(initValue)
? ? 创建一个包含响应式数据的引用对象(reference对象,简称ref对象)。
? ? JS中操作数据: xxx.value
? ? 模板中读取数据: 不需要.value,直接:<div>{{xxx}}</div>
reactive函数:
? ? 作用: 定义一个对象类型的响应式数据(基本类型不要用它,要用ref函数)
? ? 语法:let 代理对象= reactive(接收一个对象,返回一个代理对象
? ? reactive定义的响应式数据是“深层次的”,对象无论多少层,都可以
vue3之axio
# 安装:
cnpm install axios# 在?setup?中直接发送请求
import axios from 'axios'
const filmList = reactive({result:[]})
axios.get('http://127.0.0.1:8000/film/').then(res => {
? console.log(res.data)
? filmList.result = res.data.results
})
# async 和 await?的使用
const filmList = reactive({result: []})
async function load() {
? // await必须写在被async修饰的函数中,也可以写在setup函数中
? let response = await axios.get('http://127.0.0.1:8000/film/')
? filmList.result = response.data.results
}
load()
# axios?的拦截器
?? ?请求发出之前的拦截器
? ? 请求响应回来的拦截器
? ? ?? ?判断状态码是不是100,如果是100,继续走,不是100,直接弹错误
计算属性computed
? let person=reactive({name:lqz,age:19})
? ? # 1 只取值
? ? person.hobby=computed(()=>{
? ? ? return person.name+person.age
? ? })
? ? # 2 取值和赋值
? ? person.hobby=computed({
? ? ? get(){
? ? ? ? return 'xxxx'
? ? ? },
? ? ? set(newValue){
? ? ? }
? ? })
<template>
  <div class="home">
    <h1>计算属性:computed</h1>
    <p>姓:<input type="text" v-model="person.firstName"></p>
    <p>名:<input type="text" v-model="person.lastName"></p>
    <p>全名:{{ person.fullName }}</p>
    <p>全名修改:<input type="text" v-model="person.fullName"></p>
  </div>
</template>

<script>
import {ref, reactive, computed} from 'vue'
export default {
  name: 'HomeView',
  setup() {
    let person = reactive({
      firstName: '',
      lastName: ''
    })
    // 计算属性---》修改值
    person.fullName = computed({
      get() {
        return person.firstName +person.lastName
      },
      set(newValue) {
        console.log(newValue)
        person.firstName=newValue.substring(0,1)
        person.lastName=newValue.slice(1)
      }
    })
    return {person}
  },
}
</script>
监听属性watch
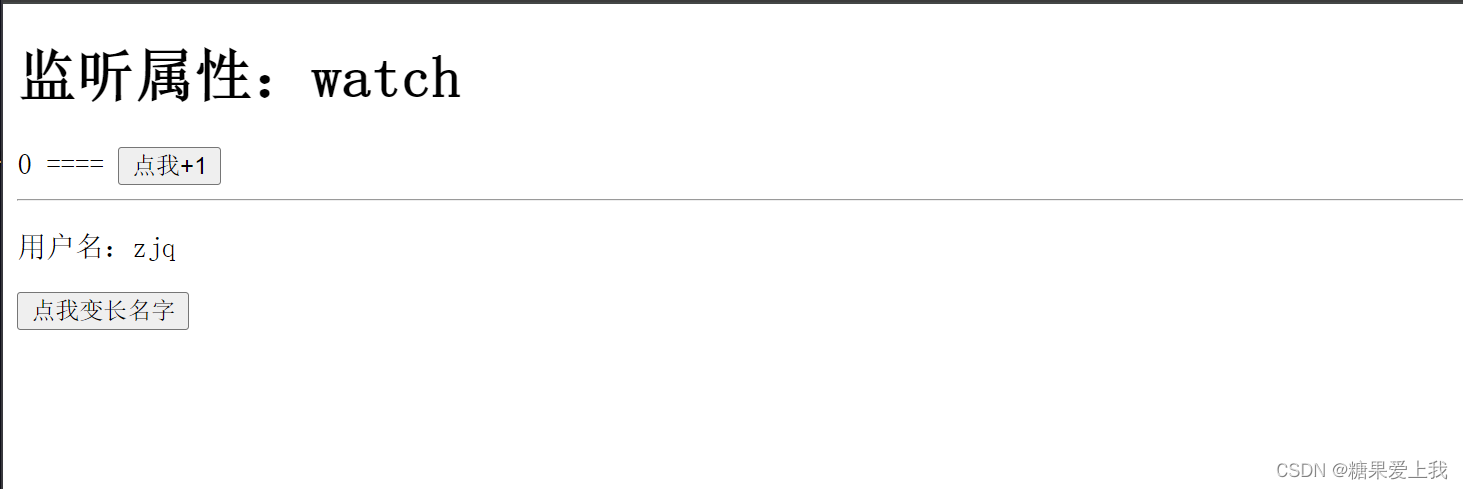
<template>
  <div class="home">
    <h1>监听属性:watch</h1>
    {{ age }} ====
    <button @click="handleClick">点我+1</button>
    <hr>
    <p>用户名:{{ userInfo.name }}</p>
    <button @click="handleChange">点我变长名字</button>
  </div>
</template>

<script>
import {ref, reactive, watch, computed} from 'vue'

export default {
  name: 'HomeView',
  setup() {
    let age = ref(0)
    let handleClick = () => {
      age.value++
    }
    // 1 监听基本类型
    watch(age, (newValue, oldValue) => {
      console.log(oldValue)
      console.log(newValue)
    })
    // 2 监听对象
    let userInfo = reactive({
      name: 'zjq',
      age: 19
    })
    let handleChange = () => {
      userInfo.name = '谢谢谢谢谢寻寻寻寻'
    }
    watch(() => userInfo.name, (newValue, oldValue) => {
      console.log('名字变了:' + userInfo.name)
    })
    // 3 同时监听多个变量变化
     watch([age,], (newValue, oldValue) => {
      console.log('age或msg变化了', newValue, oldValue)
    })
    return {age, handleClick, userInfo, handleChange}
  },
}
</script>
生命周期
vue2 : 8个生命周期钩子
? ? ? beforeCreate:组件创建之前实现这个:组件html,js--》html和js都是空的
? ? ? created:组件创建完成后:js就有值了,html还是空的 ?(向后端发送ajax请求)
? ? ? beforeMount:挂载模板之前,js有值,模板(html) 还是空的(向后端发送ajax请求)
? ? ? mounted:挂载完成:js有值,模板有值
? ? ? beforeUpdate:只要页面发送变化或js变量发生变化,就会触发它的执行
? ? ? updated:刷新之后执行
? ? ??beforeDestroy:被销毁之前执行 ?(资源清理性工作)
? ? ??destroyed:被销毁之后执行
vue3 中变成:
? ? beforeDestroy改名为 beforeUnmount
? ? destroyed改名为 unmounted
?Vue3.0也提供了 Composition API 形式的生命周期钩子,与Vue2.x中钩子对应关系如下:
? ? ? ? beforeCreate===>setup()
? ? ? ? created=======>setup()
? ? ? ? beforeMount ===>onBeforeMount
? ? ? ? mounted=======>onMounted
? ? ? ? beforeUpdate===>onBeforeUpdate
? ? ? ? updated =======>onUpdated
? ? ? ? beforeDestroy==>onBeforeUnmount
? ? ? ? destroyed=====>onUnmounted<template> <div class="home"> <h1>生命周期</h1> {{ name }} <br> <button @click="handleClick">点我变名字</button> </div> </template> <script> import {ref,reactive,watch,computed,onBeforeMount,onMounted,onBeforeUpdate,onUpdated,onBeforeUnmount,onUnmounted} from 'vue' import axios from 'axios' export default { name: 'HomeView', setup() { //1 这里写的代码,就是 beforeCreate,没有数据[变量没定义],没挂载 console.log('beforeCreate') // 2 这里写代码,就是created,有数据,变量定义了,没挂载 let name = ref('lqz') axios.get('http://127.0.0.1:8000/film/').then(res => { name.value = res.data.msg }) // 3 onMounted onMounted(() => { console.log('挂载完了') }) // 4 onUpdated onUpdated(() => { console.log('页面更新') }) // 5 onUnmounted onUnmounted(() => { console.log('组件销毁') }) let handleClick = () => { name.value = 'afdasdfasdfasdf' } return {name, handleClick} },} </script>
setup写法
# 以后都使用组合式api
# 典型写法:
????????<script setup lang="js" name="组件名字">
????????</script>不需要return,它会自动return
如果注册局部组件,只需要导入组件即可,在template中就可以使用了
# 以后只需要在 setup 内,写变量,写函数即可?? ?const age=ref(0) ? ? function add(){ ? ? ? age.value++ ? ? }# vue-router的使用
路由跳转:? ? import {useRouter, useRoute} from 'vue-router' ? ? const router = useRouter() // 就是以前的this.$router ?? ?const route = useRoute() ?// 就是以前的this.$route路由注册---跟之前一模一样
路由的api---跟之前一样:
? ? ????????router.push({name:'home'})路由嵌套,跟之前一样
路由守卫跟之前一样:
? ? ?? ?????????router.beforeEach()<template> <h1>我是首页</h1> <div>{{ name }}</div> <button @click="handleChange">点我变名字</button> <button @click="load">点我加载</button> <div v-for="film in filmList"> <p>{{ film.name }}</p> </div> <HelloWorld msg="lqz is handsome"></HelloWorld> <RouterLink to="/about"><button>点我跳转到about</button></RouterLink> <button @click="handleGo">点我跳转到about</button> {{ store.count }} <button @click="handleAdd">点击+1</button> </template> <script setup lang="js"> //1 以后这里面写的,就相当于 写在setup函数中,现在不需要返回,在template都能用到 import {ref,reactive} from 'vue' let name = ref('lqz') let handleChange = () => { name.value = 'sadfasdfafs' console.log(name) } // 2 加载电影数据 import {ref, reactive} from 'vue' import axios from 'axios' let filmList = reactive([]) //发送ajax let load = () => { axios.get('http://127.0.0.1:8000/film/').then(res => { filmList = res.data.results console.log(filmList) }) } // 3 注册组件 import HelloWorld from '@/components/HelloWorld.vue' // 4 路由跳转 setup中没有this了---》想用谁,就是导入谁 this.$router.push() // 用不了了 import {useRouter, useRoute} from 'vue-router' const router = useRouter() const route = useRoute() let handleGo = () => { router.push('/about?name=lqz') } </script>
pinia和elementui-plus
# 之前用vuex,vue3上还可以用,但是使用 pinia 更好
import {useCounterStore} from '@/stores/counter'
const store = useCounterStore()
console.log(store.count)
# elementui-plus
npm install element-plus --save// main.js中: import ElementPlus from 'element-plus' import 'element-plus/dist/index.css' app.use(ElementPlus)
登录练习
使用setup写法
elmentui 登录 显示电影
没登录不允许访问首页--->重定向到登录
今日思维导图:?
本文来自互联网用户投稿,该文观点仅代表作者本人,不代表本站立场。本站仅提供信息存储空间服务,不拥有所有权,不承担相关法律责任。 如若内容造成侵权/违法违规/事实不符,请联系我的编程经验分享网邮箱:chenni525@qq.com进行投诉反馈,一经查实,立即删除!
- Python教程
- 深入理解 MySQL 中的 HAVING 关键字和聚合函数
- Qt之QChar编码(1)
- MyBatis入门基础篇
- 用Python脚本实现FFmpeg批量转换
- LeetCode刷题--- 字母大小写全排列
- Jmeter 性能 —— 电商系统TPS计算!
- 寒武纪显卡实现softmax算子
- SpringSecurity认证登录成功后获取角色菜单
- 全新Facebook养号指南,怎么做才能不被封号?
- $(this) 和 this 关键字在 jQuery 的不同
- Oracle 将字符串第一个遇到指定值替换成其他或全量替换
- Uniapp软件库源码-全新带勋章等
- BigDecimal中使用ROUND_HALF_UP进行四舍五入
- Adobe illustrator各版本安装指南


