Nginx网站服务
- 学会Nginx网站服务的基本构建
- 了解Nginx访问控制实现的方法
- 掌握Nginx部署虚拟主机的方法
在各种网站服务器软件中,除了 Apache HTTP Server?外,还有一款轻量级的?HTTP 服务器软件——Nginx?,由俄罗斯的?Igor Sysoev?开发,其稳定、高效的特性逐渐被越来越 多的用户认可。本章将讲解 Nginx?服务的基本构建、访问控制方式、虚拟主机的搭建,还有应用广泛的 LNMP?架构服务器的部署方式,并对?PHP_FPM?模块如何支持?PHP?语言进行讨论
1.1 Nginx服务基础
????????Nginx(发音为?[engine x]?)专为性能优化而开发,其最知名的优点是它的稳定性和低系统资源消耗,以及对 HTTP?并发连接的高处理能力(单台物理服务器可支持?30000?~?50000 个并发请求)。正因为如此,大量提供社交网络、新闻资讯、电子商务及虚拟主机等服务的企业纷纷选择 Nginx?来提供?Web?服务
????????本节将介绍 Nginx?的安装配置方法
1.1.1 Nginx 1.12安装及运行控制
????????Nginx 安装文件可以从官方网站?http://www.nginx.org/?下载。下面以?Nginx1.22.0 为例,介绍 Nginx?的安装和运行控制
1. 编译安装Nginx
(1)安装支持软件
????????Nginx 的配置及运行需要?pcre?、?zlib?等软件包的支持,因此应预先安装这些软件的开发包(devel?),以便提供相应的库和头文件,确保?Nginx?的安装顺利完成
[root@node2 ~]# yum -y install pcre-devel zlib-devel gcc++ gcc
(2)创建运行用户、组
?????????Nginx 服务程序默认以 nobody?身份运行,建议为其创建专门的用户账号,以便更准确地控制其访问权限,增加灵活性、降低安全风险。例如,创建一个名为 nginx?的用户,不建 立宿主文件夹,也禁止登录到 Shell?环境
[root@node2 ~]# useradd -M -s /sbin/nologin nginx(3)编译安装Nginx
????????配置Nginx?的编译选项时,将安装目录设为?/usr/local/nginx?,运行用户和组均设为?nginx?;启用 http_stub_status_module?模块以支持状态统计,便于查看服务器的连接信息。具体选项根据实际需要来定,配置前可参考“./configure --help”?给出的说明
[root@node2 ~]# tar zxvf nginx-1.22.1.tar.gz
[root@node2 ~]# cd nginx-1.22.1/
[root@node2 nginx-1.22.1]# ./configure --prefix=/usr/local/nginx --user=nginx --group=nginx --with-http_stub_status_module
[root@node2 nginx-1.22.1]# make && make install
????????为了使 Nginx?服务器的运行更加方便,可以为主程序?nginx?创建链接文件,以便管理员直接执行“nginx”?命令就可以调用?Nginx?的主程序
[root@node2 nginx-1.22.1]# ln -s /usr/local/nginx/sbin/nginx /usr/local/sbin/[root@node2 nginx-1.22.1]# ls -l /usr/local/sbin/nginx
lrwxrwxrwx. 1 root root 27 1月   5 11:08 /usr/local/sbin/nginx -> /usr/local/nginx/sbin/nginx
[root@node2 nginx-1.22.1]#
2. Nginx的运行控制
(1)检查配置文件
????????与 Apache?的主程序?httpd?类似,?Nginx?的主程序也提供了?“-t”?选项用来对配置文件进行检查,以便找出不当或错误的配置。配置文件 nginx.conf?默认位于安装目录下的?conf/?子目录中。若要检查位于其他位置的配置文件,可使用“-c”?选项来指定路径
[root@node2 ~]# nginx -t
nginx: the configuration file /usr/local/nginx/conf/nginx.conf syntax is ok
nginx: configuration file /usr/local/nginx/conf/nginx.conf test is successful
[root@node2 ~]#
(2)启动、停止Nginx
????????直接运行 Nginx?即可启动?Nginx?服务器,这种方式将使用默认的配置文件,若要改用 其他配置文件,需添加“-c?配置文件路径?”?选项来指定路径。需要注意的是,若服务器中已装?第?有 httpd?等其他?Web?服务软件,应采取措施(修改端口、停用或卸载)避免冲突
[root@node2 ~]# nginx
????????通过检查 Nginx?程序的监听状态,或者在浏览器中访问此?Web?服务(默认页面将显示 “Welcome to nginx!”),可以确认?Nginx?服务是否正常运行
[root@node2 ~]# netstat -anpt | grep nginx
tcp        0      0 0.0.0.0:80              0.0.0.0:*               LISTEN      69254/nginx: master
[root@node2 ~]# yum -y install elinks

????????主程序 Nginx?支持标准的进程信号,通过?kill?或?killall?命令发送?HUP?信号表示重载配置, QUIT 信号表示退出进程,?KILL?信号表示杀死进程。例如,若使用?killall?命令,重载配置、停止服务的操作分别如下所示(通过“-s”?选项指定信号种类)
[root@node2 ~]# killall -s HUP nginx    //选项-s HUP 等同于-1
[root@node2 ~]# killall -s QUIT nginx    //选项-s QUIT 等同于-3
????????当 Nginx?进程运行时,?PID?号默认存放在?logs/?目录下的?nginx.pid?文件中,因此若改用kill 命令,也可以根据?nginx.pid?文件中的?PID?号来进行控制
(3)添加Nginx系统服务
[root@node2 ~]# vim /etc/init.d/nginx
#!/bin/bash
#chkconfig: - 99 20
PROG="/usr/local/nginx/sbin/nginx"
PIDF="/usr/local/nginx/logs/nginx.pid"
case "$1" in
        start)
          $PROG
        ;;
        stop)
          kill -s QUIT $(cat $PIDF)
        ;;
        restart)
          $0 stop
          $0 start
        ;;
        reload)
          kill -s HUP $(cat $PIDF)
        ;;
        *)
          echo "Usage: $0 {start|stop|restart|reload}"
        exit 1
esac
exit 0
[root@node2 ~]# chmod +x /etc/init.d/nginx
[root@node2 ~]# chkconfig --add nginx
[root@node2 ~]# systemctl status nginx
● nginx.service - (null)
   Loaded: loaded (/etc/rc.d/init.d/nginx; bad; vendor preset: disabled)
   Active: inactive (dead)
     Docs: man:systemd-sysv-generator(8)
[root@node2 ~]#
????????这样一来,就可以 systemctl?命令来启动、停止、重启、重载?Nginx?服务器了,方法是在执行时添加相应的 start?、?stop?、?restart?、?reload?参数
1.1.2 配置文件nginx.conf
????????在 Nginx?服务器的主配置文件?/usr/local/nginx/conf/nginx.conf?中,包括全局配置、?I/O事件配置和 HTTP?配置这三大块内容,配置语句的格式为?“?关键字 值?;”?(末尾以分号表示结束),以“#”?开始的部分表示注释
1. 全局配置
?????????由各种配置语句组成,不使用特定的界定标记。全局配置部分包括 Nginx?服务的运行用户、工作进程数、错误日志、PID?存放位置等基本设置
#user  nobody;        //运行用户
worker_processes  1;            //工作进程数量

#error_log  logs/error.log;        //错误日志文件的位置
#error_log  logs/error.log  notice;
#error_log  logs/error.log  info;

#pid        logs/nginx.pid;        //PID文件的位置
????????上述配置中,worker_processes?表示工作进程的数量。如果服务器有多块?CPU?或者使用多核处理器,可以参考 CPU?核心总数来指定工作进程数。如果网站访问量需求并不大,一般设为 1?就够用了。其他三项配置均已有注释,表示采用默认设置,例如,?Nginx?的运行用户实际是编译时指定的 nginx?,若编译时未指定则默认为?nobody
2. I/O事件配置
????????使用“events { }”?界定标记,用来指定?Nginx?进程的?I/O?响应模型、每个进程的连接数等设置。对于 2.6?及以上版本的内核,建议使用?epoll?模型以提高性能;每个进程的连接数应根据实际需要来定,一般在 10000?以下(默认为?1024?)
events {
    use epoll;        //使用epoll模型
    worker_connections  4096;        //每个进程处理4096个连接
}
????????若工作进程数为 8?,每个进程处理?4096?个连接,则允许?Nginx?正常提供服务的连接数已超过 3?万个(?4096×8=32768?),当然具体还要看服务器硬件、网络带宽等物理条件的性能表现
3. HTTP配置
????????使用“http { }”?界定标记,包括访问日志、?HTTP?端口、网页目录、默认字符集、连接保持,以及后面要讲到的虚拟 Web?主机、?PHP?解析等一系列设置,其中大部分配置语句都包含在子界定标记“server { }”?内
http {
    include       mime.types;
    default_type  application/octet-stream;
    server {                                    //web服务的监听配置
        listen       80;                        //监听地址及端口
        server_name  www.aaa.com;               //网站名称(aaa)
        charset utf-8                           //网页的默认字符集

        #charset koi8-r;

        #access_log  logs/host.access.log  main;

        location / {                            //根目录的配置
            root   html;
            index  index.html index.php;        //安装默认首页
        }

        #error_page  404              /404.html;

        # redirect server error pages to the static page /50x.html
        #
        error_page   500 502 503 504  /50x.html;    //内部错误的反馈页面
        location = /50x.html {                    //错误页面配置
            root   html;
        }
    }
}
述配置中,listen?语句允许同时限定?IP?地址,采用?“IP?地址?:?端口?”?形式。?root?语句用来设置特定访问位置(如“location /”?表示根目录)的网页文档路径,默认为?Nginx?安装目录下的 html/?子目录,根据需要可改为?/var/www/html?等其他路径
1.1.3 访问状态统计
????????Nginx 内置了?HTTP_STUB_STATUS?状态统计模块,用来反馈当前的?Web?访问情况。配置编译参数时可添加--with-http_stub_status_module?来启用此模块支持,可以使用命令/usr/local/nginx/sbin/nginx -V 查看已安装的?Nginx?是否包含?HTTP_STUB_STATUS?模块
????????要使用 Nginx?的状态统计功能,除了启用内建模块以外,还需要修改?nginx.conf?配置文件,指定访问位置并添加 stub_status?配置代码
server {
        listen       80;
        server_name  www.aaa.com;
        charset utf-8

        #charset koi8-r;

        #access_log  logs/host.access.log  main;

        location / {
            root   html;
            index  index.html index.php;
        }

        location /status {            //访问位置为/status
            stub_status    on;       //打开状态统计功能
            access_log    off;       //关闭此位置的日志记录
        }
????????新的配置生效以后,在浏览器中访问 Nginx?服务器的?/status?网站位置,可以看到当前的状态统计信息,如图所示。其中,“Active connections”表示当前的活动连接数( 1?);而“server accepts handled requests”?表示已经处理的连接信息,三个数字依次表示已处理的连接数(1?)、成功的?TCP?握手次数( 1 )、已处理的请求数( 2?)

1.2 Nginx访问控制
1.2.1 基于授权的访问控制
1. 基于授权的访问控制简介
????????Nginx 与?Apahce 一样,可以实现基于用户授权的访问控制,当客户端想要访问相应网站或者目录时,要求用户输入用户名和密码才能正常访问,配置步骤与 Apache 基本一致。概括为以下几个步骤
- 生成用户密码认证文件
- 修改主配置文件相应目录,添加认证配置项
- 重启服务,访问测试
2. 基于授权的访问控制步骤
? ? ? ? (1)使用?htpasswd?生成用户认证文件,如果没有该命令,可使用?yum?安装?httpd-tools 软件包,用法与 Apache?认证时方式相同,如:?htpasswd -c /usr/local/nginx/passwd.db test。?在/usr/local/nginx/?目录下生成了?passwd.db?文件,用户名是?test,?密码输入?2?次。在 passwd.db 中生成用户和密码的密文
[root@node2 ~]# yum -y install httpd-tools
[root@node2 ~]# htpasswd -c /usr/local/nginx/passwd.db test
New password:
Re-type new password:
Adding password for user test
[root@node2 ~]# cat /usr/local/nginx/passwd.db
test:$apr1$x5x0mgJ7$3t7bCokcPV.7aDKQhLfjj0
[root@node2 ~]#
(2)修改密码文件权限为400,将所有者改为nginx,设置Nginx的运行用户能读取
[root@node2 ~]# chmod 400 /usr/local/nginx/passwd.db
[root@node2 ~]# chown nginx /usr/local/nginx/passwd.db
[root@node2 ~]# ll -d /usr/local/nginx/passwd.db
-r--------. 1 nginx root 43 1月   5 12:19 /usr/local/nginx/passwd.db
[root@node2 ~]#
(3)修改配置文件nginx.conf,添加相对应认证配项
[root@node2 ~]# vim /usr/local/nginx/conf/nginx.conf
server {
        listen       80;
        server_name  www.aaa.com;
        charset utf-8;

        #charset koi8-r;

        #access_log  logs/host.access.log  main;

        location / {
            root   html;
            index  index.html index.php;
            auth_basic "secret";
            auth_basic_user_file /usr/local/nginx/passwd.db;
        }

        location /status {
            stub_status    on;
            access_log    off;
        }
(4)检查语法,重启服务
[root@node2 ~]# nginx -t
nginx: the configuration file /usr/local/nginx/conf/nginx.conf syntax is ok
nginx: configuration file /usr/local/nginx/conf/nginx.conf test is successful
[root@node2 ~]# systemctl restart nginx
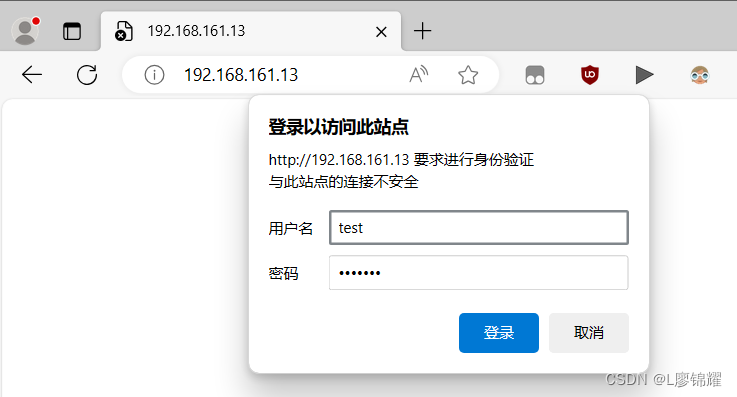
(5)用浏览器访问地址,检验控制效果,如图所示。需要输入用户名和密码进行访问,验证通过后才能访问到页面

1.2.2 基于客户端的访问控制
1. 基于客户端的访问控制简介
????????基于客户端的访问控制是通过客户端 IP?地址,决定是否允许对页面访问。?Nginx?基于客户端的访问控制要比 Apache?简单,规则如下:
- deny IP/IP段:拒绝某个IP或IP段的客户端访问
- allow IP/IP段:允许某个IP或IP段的客户端访问
- 规则从上往下执行,如匹配则停止,不再往下匹配
2. 基于客户端的访问控制步骤
(1)修改主配置文件nginx.conf添加相应配置项
server {
        listen       80;
        server_name  www.aaa.com;
        charset utf-8;

        #charset koi8-r;

        #access_log  logs/host.access.log  main;

        location / {
            root   html;
            index  index.html index.php;
            auth_basic "secret";
            auth_basic_user_file /usr/local/nginx/passwd.db;
            deny 192.168.161.12;        //客户端IP
            allow all;
        }

        location /status {
            stub_status    on;
            access_log    off;
        }
Deny 192.168.161.12 表示这个IP地址访问会被拒绝,其他IP客户端正常访问
(2)重启服务器访问地址,页面已经访问不到,如图所示?

1.3 Nginx虚拟主机
1. 基于IP的虚拟主机
(1)一台主机如果有多个?IP?地址,可以设置每一个?IP?对应一个站点。主机安装多个网卡可以有多个 IP?,这里采用虚拟?IP?的方式使主机有多个?IP?
[root@node2 ~]# ip addr show dev ens33 | grep inet
    inet 192.168.161.13/24 brd 192.168.161.255 scope global noprefixroute ens33
    inet6 fe80::2ffd:5682:73d6:ecd4/64 scope link noprefixroute
[root@node2 ~]#
目前只有一个网卡,IP地址是192.168.161.13。再配置一个虚拟IP为192.168.161.100
[root@node2 ~]# ifconfig ens33:0 192.168.161.100
[root@node2 ~]# ip addr show dev ens33 | grep inet
    inet 192.168.161.13/24 brd 192.168.161.255 scope global noprefixroute ens33
    inet 192.168.161.100/24 brd 192.168.161.255 scope global secondary ens33:0
    inet6 fe80::2ffd:5682:73d6:ecd4/64 scope link noprefixroute
[root@node2 ~]#
(?2?)以?/var/www/html/testcom?和?/var/www/html/btcom?为两个站点的根目录,修改?Nginx 的配置文件,使基于 IP?的虚拟主机生效。这里省略了和基于域名虚拟主机的相同配置代码
[root@node2 ~]# vim /usr/local/nginx/conf/nginx.conf

    server {
        listen      192.168.161.13:80;
        server_name      www.aaa.com;
        charset     utf-8;
        access_log  logs/www.aaa.access.log;
        location / {
            root    /var/www/html/bdqncom;
            index   index.html index.htm;
        }
        error_page   500 502 503 504  /50x.html;
        location = /50x.html {
            root   html;
        }
    }
    server {
        listen      192.168.161.100:80;
        server_name      www.bbb.com;
        charset     utf-8;
        access_log  logs/www.bbb.access.log;
        location / {
            root    /var/www/html/accpcom;
            index   index.html index.htm;
        }
        error_page   500 502 503 504  /50x.html;
        location = /50x.html {
            root   html;
        }
    }

[root@node2 ~]# nginx -t
nginx: the configuration file /usr/local/nginx/conf/nginx.conf syntax is ok
nginx: configuration file /usr/local/nginx/conf/nginx.conf test is successful
[root@node2 ~]#
[root@node2 ~]# systemctl restart nginx
(?3?)分别访问?2?个?IP?地址,如图所示,查看是否访问到不同的页面,测试配置是否成功


本文来自互联网用户投稿,该文观点仅代表作者本人,不代表本站立场。本站仅提供信息存储空间服务,不拥有所有权,不承担相关法律责任。 如若内容造成侵权/违法违规/事实不符,请联系我的编程经验分享网邮箱:chenni525@qq.com进行投诉反馈,一经查实,立即删除!
- Python教程
- 深入理解 MySQL 中的 HAVING 关键字和聚合函数
- Qt之QChar编码(1)
- MyBatis入门基础篇
- 用Python脚本实现FFmpeg批量转换
- 并发编程(五)
- Shell三剑客:awk(awk编辑编程)四
- 图纸加密软件哪一款好用?怎么收费?
- 第三章 给lvm分区扩容企业案例(不加硬盘,直接加容量,根目录从10G增加100G)
- 【S2ST】UnitY: Two-pass Direct Speech-to-speech Translation with Discrete Units
- 模型之预测人口增长
- git变更关联的远程仓库
- 「吴恩达」机器学习笔记 - 改进梯度下降的技术
- 视频分割软件,视频批量分割,轻松搞定
- Python入门-组合数据类型(序列,列表)