LeNet网络分析与demo实例
发布时间:2023年12月24日
参考自?
- up主的b站链接:霹雳吧啦Wz的个人空间-霹雳吧啦Wz个人主页-哔哩哔哩视频
- 这位大佬的博客?Fun'_机器学习,pytorch图像分类,工具箱-CSDN博客
网络分析:
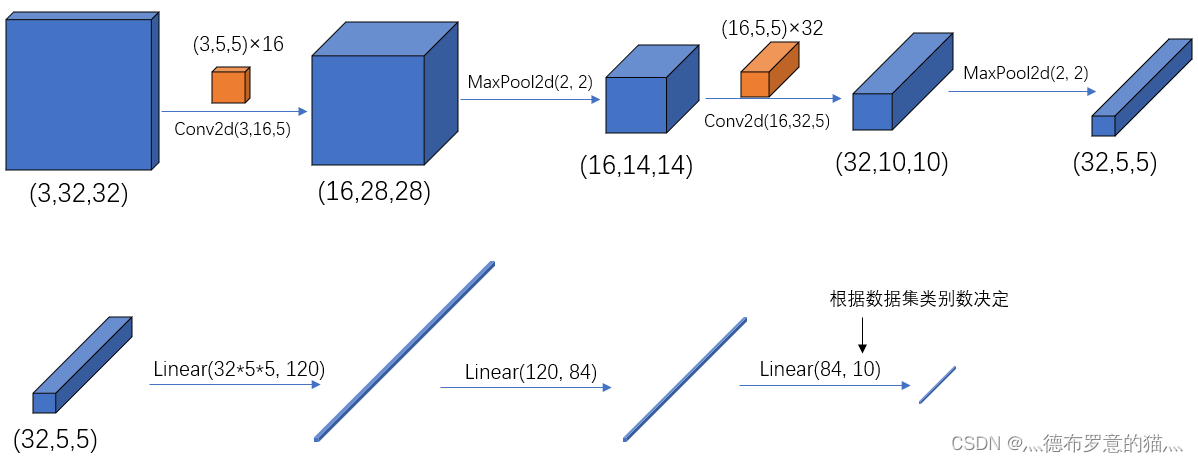
最好是把这个图像和代码对着来看然后进行分析的时候比较快

# 使用torch.nn包来构建神经网络.
import torch.nn as nn
import torch.nn.functional as F

class LeNet(nn.Module): 					# 继承于nn.Module这个父类
    def __init__(self):						# 初始化网络结构
        super(LeNet, self).__init__()    	# 多继承需用到super函数
        self.conv1 = nn.Conv2d(3, 16, 5)
        self.pool1 = nn.MaxPool2d(2, 2)
        self.conv2 = nn.Conv2d(16, 32, 5)
        self.pool2 = nn.MaxPool2d(2, 2)
        self.fc1 = nn.Linear(32*5*5, 120)
        self.fc2 = nn.Linear(120, 84)
        self.fc3 = nn.Linear(84, 10)

    def forward(self, x):			 # 正向传播过程
        x = F.relu(self.conv1(x))    # input(3, 32, 32) output(16, 28, 28)
        x = self.pool1(x)            # output(16, 14, 14)
        x = F.relu(self.conv2(x))    # output(32, 10, 10)
        x = self.pool2(x)            # output(32, 5, 5)
        x = x.view(-1, 32*5*5)       # output(32*5*5)
        x = F.relu(self.fc1(x))      # output(120)
        x = F.relu(self.fc2(x))      # output(84)
        x = self.fc3(x)              # output(10)
        return x
Conv1:
输入矩阵? : 32*32*3
卷积层:5*5*3? ?16个
输出:(32-5)/1+1 = 28? ? 28*28*16
MaxPool:
输入矩阵:28*28*16
2*2最大下采样
输出:14*14*16
Conv2:
输入矩阵? : 14*14*16
卷积层:5*5*16? ?32个
输出:(14-5)/1+1 = 10? ? 10*10*32
MaxPool:
输入矩阵:10*10*32
2*2最大下采样
输出:5*5*32
全连接Linear:
Linear(32*5*5,120)
Linear(120,84)
Linear(120,10)最后这个数字要取决于你要分几类
经卷积后的输出层尺寸计算公式为:
Output=?(W?F+2P)/S?+1
输入图片大小 W×W(一般情况下Width=Height)
Filter大小 F×F
步长 S
padding的像素数 P
经过上述分析就可以pytorch构建网络了:
import torch.nn as nn
import torch.nn.functional as F
import numpy as np

class Reshape(nn.Module):
    def forward(self,x):
        return x.view(-1,1,28,28)

class LeNet(nn.Module):
    def __init__(self):
        super(LeNet,self).__init__()

        self.conv1 = nn.Conv2d(in_channels=1,out_channels=6,kernel_size=5,padding=2)#输入数据的维度 卷积核的个数(即输出数据的维度) 卷积核的大小5*5
        self.pool1 = nn.MaxPool2d(2,2)#池化层的大小,步长
        self.conv2 = nn.Conv2d(6,16,5)
        self.pool2 = nn.MaxPool2d(2,2)
        self.fc1 = nn.Linear(16*5*5,120)
        self.fc2 = nn.Linear(120,84)
        self.fc3 = nn.Linear(84,10)

    def forward(self,x):
        x = F.relu(self.conv1(x))       #input(1,28,28) output(6,28,28)
        x = self.pool1(x)               # output(6,14,14) 池化层不改变数据的维度 (w - f + 2*p)/s+1 w为输入图片大小,f为卷积核的大小,p为填充否,s为步长 计算可得输出图片的大小
        x = F.relu(self.conv2(x))       #output(16,10,10)
        x = self.pool2(x)               #output(16,5,5)
        x = x.view(-1,16*5*5)           #output(16*5*5) 展成一列向量进行操作
        x = F.relu(self.fc1(x))         #output(120)
        x = F.relu(self.fc2(x))         #output(84)
        x = F.relu(self.fc3(x))         #output(10)
        return x

import torch
input1 = torch.rand([32,1,28,28])
model = LeNet()
print(model)
output = model(input1)
数据集介绍
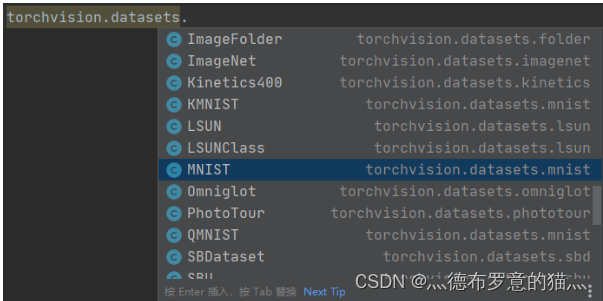
利用torchvision.datasets函数可以在线导入pytorch中的数据集,包含一些常见的数据集如MNIST等

# 导入10000张测试图片
test_set = torchvision.datasets.CIFAR10(root='./data',
										train=False,	# 表示是数据集中的测试集
                                        download=False,transform=transform)
# 加载测试集
test_loader = torch.utils.data.DataLoader(test_set,
										  batch_size=10000, # 每批用于验证的样本数
										  shuffle=False, num_workers=0)
# 获取测试集中的图像和标签,用于accuracy计算
test_data_iter = iter(test_loader)
test_image, test_label = test_data_iter.next()
2.2 训练过程
epoch? ?: 对训练集的全部数据进行一次完整的训练,称为 一次 epoch
batch? ?: 由于硬件算力有限,实际训练时将训练集分成多个批次训练,每批数据的大小为 batch_size
iteration 或 step :? ?对一个batch的数据训练的过程称为 一个 iteration 或 step
训练过程
net = LeNet()						  				# 定义训练的网络模型
loss_function = nn.CrossEntropyLoss() 				# 定义损失函数为交叉熵损失函数
optimizer = optim.Adam(net.parameters(), lr=0.001)  # 定义优化器(训练参数,学习率)

for epoch in range(5):  # 一个epoch即对整个训练集进行一次训练
    running_loss = 0.0
    time_start = time.perf_counter()

    for step, data in enumerate(train_loader, start=0):   # 遍历训练集,step从0开始计算
        inputs, labels = data 	# 获取训练集的图像和标签
        optimizer.zero_grad()   # 清除历史梯度

        # forward + backward + optimize
        outputs = net(inputs)  				  # 正向传播
        loss = loss_function(outputs, labels) # 计算损失
        loss.backward() 					  # 反向传播
        optimizer.step() 					  # 优化器更新参数

        # 打印耗时、损失、准确率等数据
        running_loss += loss.item()
        if step % 1000 == 999:    # print every 1000 mini-batches,每1000步打印一次
            with torch.no_grad(): # 在以下步骤中(验证过程中)不用计算每个节点的损失梯度,防止内存占用
                outputs = net(test_image) 				 # 测试集传入网络(test_batch_size=10000),output维度为[10000,10]
                predict_y = torch.max(outputs, dim=1)[1] # 以output中值最大位置对应的索引(标签)作为预测输出
                accuracy = (predict_y == test_label).sum().item() / test_label.size(0)

                print('[%d, %5d] train_loss: %.3f  test_accuracy: %.3f' %  # 打印epoch,step,loss,accuracy
                      (epoch + 1, step + 1, running_loss / 500, accuracy))

                print('%f s' % (time.perf_counter() - time_start))        # 打印耗时
                running_loss = 0.0

print('Finished Training')

# 保存训练得到的参数
save_path = './Lenet.pth'
torch.save(net.state_dict(), save_path)
?
测试:
# 导入包
import torch
import torchvision.transforms as transforms
from PIL import Image
from model import LeNet

# 数据预处理
transform = transforms.Compose(
    [transforms.Resize((32, 32)), # 首先需resize成跟训练集图像一样的大小
     transforms.ToTensor(),
     transforms.Normalize((0.5, 0.5, 0.5), (0.5, 0.5, 0.5))])

# 导入要测试的图像(自己找的,不在数据集中),放在源文件目录下
im = Image.open('horse.jpg')
im = transform(im)  # [C, H, W]
im = torch.unsqueeze(im, dim=0)  # 对数据增加一个新维度,因为tensor的参数是[batch, channel, height, width]

# 实例化网络,加载训练好的模型参数
net = LeNet()
net.load_state_dict(torch.load('Lenet.pth'))

# 预测
classes = ('plane', 'car', 'bird', 'cat',
           'deer', 'dog', 'frog', 'horse', 'ship', 'truck')
with torch.no_grad():
    outputs = net(im)
    predict = torch.max(outputs, dim=1)[1].data.numpy()
print(classes[int(predict)])
输出即为预测的标签。
其实预测结果也可以用?softmax?表示,输出10个概率:
with torch.no_grad():
    outputs = net(im)
    predict = torch.softmax(outputs, dim=1)
print(predict)
输出结果中最大概率值对应的索引即为 预测标签 的索引。
tensor([[2.2782e-06, 2.1008e-07, 1.0098e-04, 9.5135e-05, 9.3220e-04, 2.1398e-04,
         3.2954e-08, 9.9865e-01, 2.8895e-08, 2.8820e-07]])
文章来源:https://blog.csdn.net/m0_60921016/article/details/135178572
本文来自互联网用户投稿,该文观点仅代表作者本人,不代表本站立场。本站仅提供信息存储空间服务,不拥有所有权,不承担相关法律责任。 如若内容造成侵权/违法违规/事实不符,请联系我的编程经验分享网邮箱:chenni525@qq.com进行投诉反馈,一经查实,立即删除!
本文来自互联网用户投稿,该文观点仅代表作者本人,不代表本站立场。本站仅提供信息存储空间服务,不拥有所有权,不承担相关法律责任。 如若内容造成侵权/违法违规/事实不符,请联系我的编程经验分享网邮箱:chenni525@qq.com进行投诉反馈,一经查实,立即删除!
最新文章
- Python教程
- 深入理解 MySQL 中的 HAVING 关键字和聚合函数
- Qt之QChar编码(1)
- MyBatis入门基础篇
- 用Python脚本实现FFmpeg批量转换
- 【Java 进阶篇】Jedis 操作 Set 与 SortedSet 详解
- [ElPagination] Deprecated usages detected, please refer to the el-pagination doc
- 明道云引领企业变革与创新
- C++_Lambda表达式的完整介绍
- Volcano Scheduler(Plugins&Actions)调度器源码解析
- Linux内核--网络协议栈(四)内核网络协议栈
- 奥迦插件23.12.5支持32和64位图色模拟(和大漠插件类似)
- Qlik Sense Ports
- torch中 squeeze 和 unsqueeze 的不同用法
- Druid连接池工具公式化SQL附踩坑记录