web component - 使用HTML Templates和Shadow DOM构建现代UI组件
Web Component是一种用于构建可重用的UI组件的技术。它使用标准化的浏览器API,包括Custom Elements、Shadow DOM和HTML Templates来实现组件化开发方式。这些API都是现代浏览器原生支持的,因此不需要引入第三方库或框架即可使用。
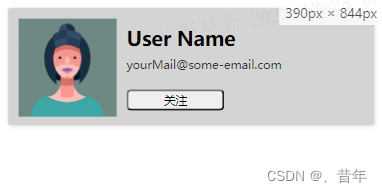
在这篇博客中,我们将介绍如何使用Web Component技术构建一个名为UserCard的UI组件。这个组件可以显示用户的头像、姓名和电子邮件地址,并提供一个关注按钮。当用户点击关注按钮时,组件会触发一个自定义事件,允许开发者处理按钮点击事件。
首先,让我们来看看这个组件的代码:
<!DOCTYPE html>
<html lang="en">
<head>
  <meta charset="UTF-8">
  <meta name="viewport" content="width=device-width, initial-scale=1.0">
  <title>Document</title>
</head>
<body>
  <!-- 使用template写模板 -->
  <template id="card-template">
    <div class="user-card-container">
      <img />
      <div class="content">
        <div class="name"></div>
        <div class="email"></div>
        <button class="follow-btn"></button>
      </div>
    </div>
  </template>

  <user-card
    id="user-card-id"
    userId="1"
    image="https://semantic-ui.com/images/avatar2/large/kristy.png"
    name="User Name"
    email="yourMail@some-email.com"
    hasFollow="false"
    handleFollowEvent="handleFollowEvent"
  ></user-card>

  <script src="./user-card.js"></script>
  <script>
    const userCard = document.getElementById('user-card-id')

    /** 监听组件事件 */
    userCard.addEventListener('follow-event', (e) => {
      const functionName = e.detail.method
      this[functionName] && this[functionName](e.detail.data)
    })

    /** 修改按钮状态  */
    function handleFollowEvent(data) {
      userCard.setAttribute('hasFollow', userCard.getAttribute('hasFollow') === 'true' ? 'false' : 'true')
    }
  </script>
</body>
</html>
class UserCard extends HTMLElement {

  constructor() {
    super()
    this.shadow = this.attachShadow({ mode: 'open' })
  }

  /** 内容挂载时候回调 */
  connectedCallback() {
    this.render()
  }

  /** 指定监听的属性列表 */
  static get observedAttributes() {
    return ['hasfollow']
  }

  /** 监听属性变化 */
  attributeChangedCallback(name, newValue, oldValue) {
    // 加上newValue判断是防止第一次传属性就执行了
    if (newValue && newValue !== oldValue) {
      this.processDomRender()
    }
  }

  /** 具体的渲染函数 */
  render() {
    this.shadowRoot.innerHTML = '<link rel="stylesheet" href="./user-card.css">'
    // 把模板内容挂在上shadow dom
    this.processDomRender()
  }

  /** 仅render dom */
  processDomRender() {
    const userCardContainer = this.shadowRoot.querySelector('.user-card-container')
    userCardContainer && this.shadowRoot.removeChild(userCardContainer)
    this.shadowRoot.appendChild(this.getContent())
    this.setContent()
  }

  /** 获取模板 */
  getContent() {
    const template = document.getElementById('card-template')
    // 拷贝模板,但是不改动模板的内容
    const content = template.content.cloneNode(true)
    return content
  }

  /** 把组件传下来的属性挂载到shadow dom上 */
  setContent() {
    this.shadowRoot.querySelector('img').setAttribute('src', this.getAttribute('image'))
    this.shadowRoot.querySelector('.name').innerHTML = this.getAttribute('name')
    this.shadowRoot.querySelector('.email').innerHTML = this.getAttribute('email')
    this.shadowRoot.querySelector('.follow-btn').innerHTML = this.getAttribute('hasFollow') === 'true' ? '已关注' : ' 关注'
    // 按钮点击事件
    this.shadowRoot.querySelector('.follow-btn').addEventListener('click', () => {
      const event = new CustomEvent('follow-event', {
        detail: {
          method: this.getAttribute('handleFollowEvent'),
          data: {
            id: this.getAttribute('userId'),
          },
        },
      })
      this.dispatchEvent(event)
    })
  }
}

customElements.define('user-card', UserCard)
.user-card-container {
  height: 120px;
  display: flex;
  background-color: #d4d4d4;
  border: 1px solid #d5d5d5;
  box-shadow: 1px 1px 5px rgba(0, 0, 0, 0.1);
  border-radius: 3px;
  overflow: hidden;
  padding: 10px;
  box-sizing: border-box;
}

.user-card-container img {
  height: 100px;
  width: 100px;
}

.user-card-container .content {
  margin: 10px;
  flex: 1;
  display: flex;
  flex-direction: column;
}

.user-card-container .content .name {
  font-size: 20px;
  font-weight: 600;
  line-height: 1;
  margin: 0;
  margin-bottom: 5px;
}
.user-card-container .content .email {
  padding: 5px 0;
  font-size: 12px;
  opacity: 0.75;
  line-height: 1;
  margin: 0;
  margin-bottom: 15px;
}
.user-card-container .content .follow-btn {
  width: 100px;
  font-size: 12px;
  border-radius: 5px;
  text-transform: uppercase;
}
这个组件使用了三个Web Component的API:Custom Elements、Shadow DOM和HTML Templates。Custom Elements用于定义一个自定义元素UserCard,Shadow DOM用于封装组件内部的样式和结构,防止外部样式干扰组件,HTML Templates则用于定义组件的模板。
在构造函数中,我们使用attachShadow方法创建了一个shadowRoot,并将其挂载到自定义元素上。接着,在connectedCallback方法中,我们调用了render方法来渲染组件。
在render方法中,我们首先将组件的CSS样式引入到shadowRoot中。接着,我们调用processDomRender方法来渲染组件的结构和内容。
在processDomRender方法中,我们首先使用querySelector方法查找user-card-container元素是否已经存在,如果存在,则将其从shadowRoot中删除。接着,我们调用getContent方法获取组件的模板,并将其添加到shadowRoot中。最后,我们调用setContent方法将组件的属性挂载到shadowRoot中。
在getContent方法中,我们使用querySelector方法获取id为card-template的模板,并使用cloneNode方法创建一个模板副本。由于模板是HTML5的新特性,因此我们需要为HTML文件添加声明来确保浏览器正确解析模板。
在setContent方法中,我们使用getAttribute方法获取组件的属性,并将其挂载到shadowRoot中。我们还为关注按钮添加了一个点击事件,并在事件处理程序中触发了一个自定义事件。
最后,在JavaScript代码中,我们使用addEventListener方法监听组件的follow-event事件,并在事件处理程序中调用handleFollowEvent方法来处理按钮点击事件。当用户点击关注按钮时,handleFollowEvent方法将切换hasFollow属性,并重新渲染组件。
效果图如下


这是一个简单的Web Component示例,它介绍了如何使用Custom Elements、Shadow DOM和HTML Templates API来构建可重用的UI组件。通过使用这些API,我们可以将组件内部的样式和结构封装起来,防止外部样式干扰组件,并使开发者能够轻松地重复使用和维护组件。
本文来自互联网用户投稿,该文观点仅代表作者本人,不代表本站立场。本站仅提供信息存储空间服务,不拥有所有权,不承担相关法律责任。 如若内容造成侵权/违法违规/事实不符,请联系我的编程经验分享网邮箱:chenni525@qq.com进行投诉反馈,一经查实,立即删除!
- Python教程
- 深入理解 MySQL 中的 HAVING 关键字和聚合函数
- Qt之QChar编码(1)
- MyBatis入门基础篇
- 用Python脚本实现FFmpeg批量转换
- 腾讯云怎么领取免费云服务器?
- 安装Kubernetes1.23、kubesphere3.4、若依项目自动打包部署到K8S记录
- 【python基础】(二):常用数据结构及其用法
- 跨域请求:Go语言下的“通天大道”
- mysql常用操作
- vue3知识点大全
- Nvidia 推出了一款新型芯片,专为在家中运行人工智能而设计
- 知识点整理[(GraphGeo) DATA AND PROBLEM DEFINITION]
- 基于鸿蒙OS开发一个前端应用
- 重构改善既有代码的设计-学习(一):封装