性能测试分析案例-CPU使用率很高,但是TOP命令找不到应用
环境准备
预先安装 docker、sysstat、perf、ab 等工具,如 apt install docker.io sysstat linux-tools-common apache2-utils
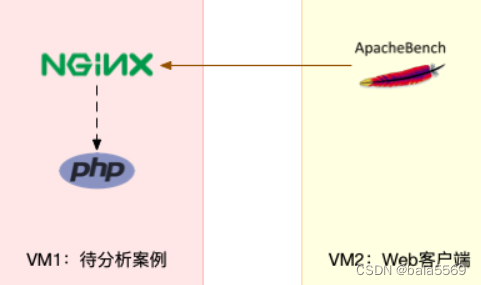
这个案例要用到两台虚拟机,如下图所示:

操作和分析
在第一个终端,执行下面的命令运行 Nginx 和 PHP 应用:
cd /usr/local/docker/
docker run --name nginx -p 10000:80 -itd feisky/nginx:sp
docker run --name phpfpm -itd --network container:nginx feisky/php-fpm:sp
然后,在第二个终端,使用 curl 访问 http://[VM1 的 IP]:10000,确认 Nginx 已正常启动。你应该可以看到 It works! 的响应。
# xxx.xxx.xxx.xxx是安装docker镜像的IP地址
$ curl http://xxx.xxx.xxx.xxx:10000/
It works!
接着,我们来测试一下这个 Nginx 服务的性能。在第二个终端运行下面的 ab 命令。要注意,与上次操作不同的是,这次我们需要并发 100 个请求测试 Nginx 性能,总共测试 1000 个请求。
# 并发500个请求测试Nginx性能,总共测试2000个请求
$ ab -c 500 -n 2000 http://xxx.xxx.xxx.xxx:10000/
This is ApacheBench, Version 2.3 <$Revision: 1807734 $>
Copyright 1996 Adam Twiss, Zeus Technology Ltd, http://www.zeustech.net/
Licensed to The Apache Software Foundation, http://www.apache.org/

Benchmarking xxx.xxx.xxx.xxx (be patient)
Completed 200 requests
Completed 400 requests
Completed 600 requests
Completed 800 requests
Completed 1000 requests
Completed 1200 requests
Completed 1400 requests
Completed 1600 requests
Completed 1800 requests
Completed 2000 requests
Finished 2000 requests


Server Software:        nginx/1.15.4
Server Hostname:        xxx.xxx.xxx.xxx
Server Port:            10000

Document Path:          /
Document Length:        9 bytes

Concurrency Level:      500
Time taken for tests:   18.489 seconds
Complete requests:      2000
Failed requests:        8
   (Connect: 0, Receive: 0, Length: 8, Exceptions: 0)
Non-2xx responses:      8
Total transferred:      345048 bytes
HTML transferred:       19152 bytes
Requests per second:    108.17 [#/sec] (mean)
Time per request:       4622.251 [ms] (mean)
Time per request:       9.245 [ms] (mean, across all concurrent requests)
Transfer rate:          18.22 [Kbytes/sec] received

Connection Times (ms)
              min  mean[+/-sd] median   max
Connect:       43  597 1649.6     50    7206
Processing:   121 2889 4037.7   1021   16163
Waiting:      121 2888 4037.7   1019   16163
Total:        194 3486 4814.3   1075   18445

Percentage of the requests served within a certain time (ms)
  50%   1075
  66%   2008
  75%   2231
  80%   4199
  90%  12327
  95%  15885
  98%  18205
  99%  18319
 100%  18445 (longest request)

...
Requests per second: 108.17 [#/sec] (mean) 并发是500,每秒平均请求数有点少,才108
这次,我们在第二个终端,将测试的并发请求数改成 20,同时把请求时长设置为 10 分钟(-t 600)。这样,当你在第一个终端使用性能分析工具时, Nginx 的压力还是继续的。
继续在第二个终端运行 ab 命令:
$ ab -c 20 -t 600 http://xxx.xxx.xxx.xxx:10000/
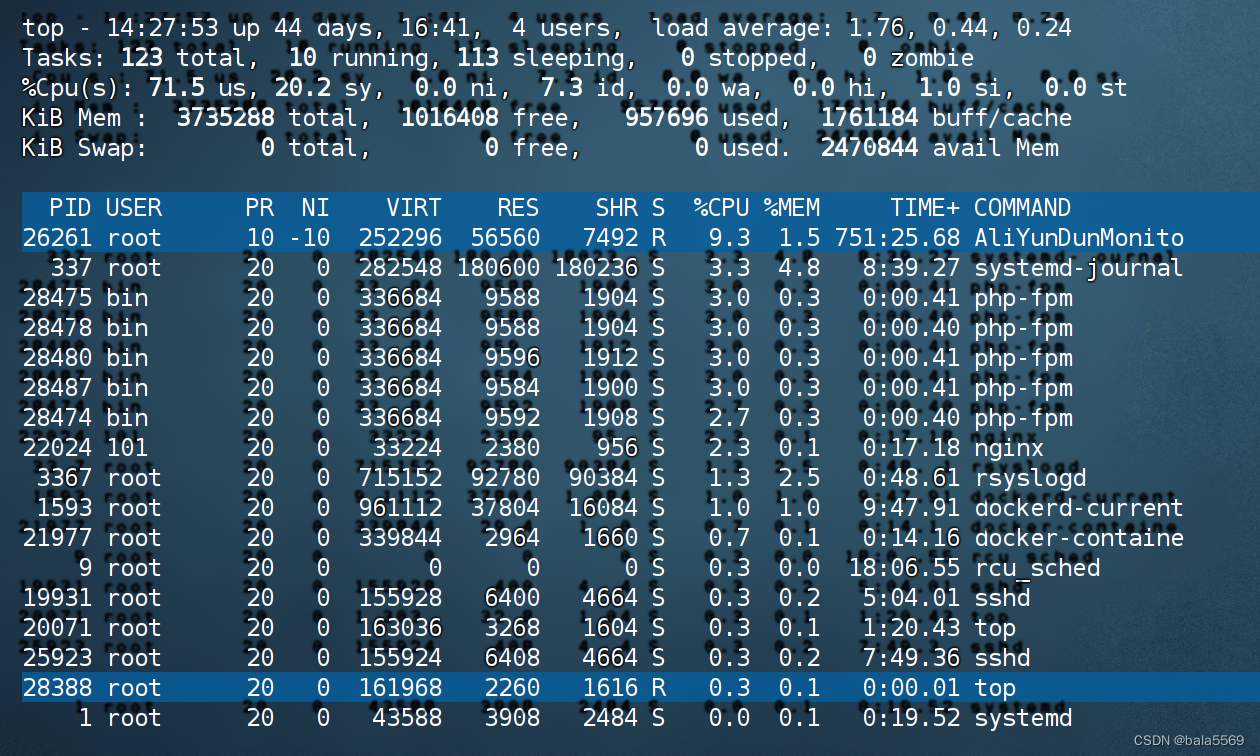
然后,我们在第一个终端运行 top 命令,观察系统的 CPU 使用情况:

有些奇怪,113个进行sleeping, 在R状态就是top进程,nginx,php-fpm进行是S 状态,CPU 使用率71.5有些高,但是下面进程使用的CPU加起来也不到71.5%
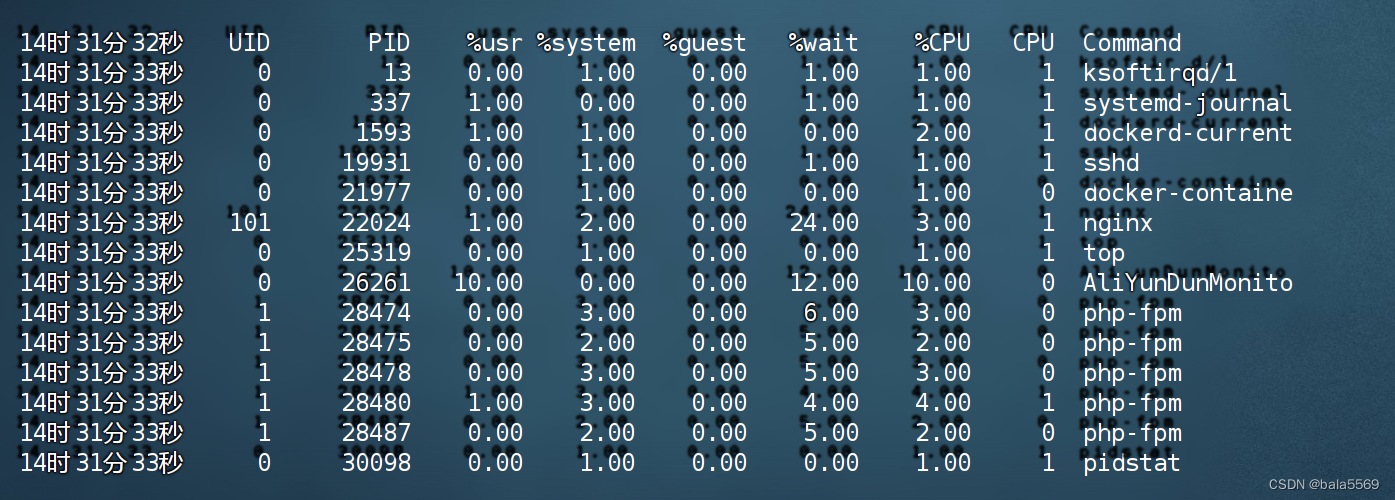
我们还是在第一个终端,运行 pidstat 命令:
pidstat 1

nginx,php-fpm CPU使用率也不高
这时候就有疑问了CPU用户使用率71.5%是哪个进程在使用呢?要用什么工具找到占用CPU用户使用率大的进程呢?
top、pidstat等工具延迟有点大,不容易看到CPU使用率大的进程
使用perf工具来找到占用CPU使用率大的进程
继续在第二个终端运行 ab 命令:
$ ab -c 20 -t 600 http://xxx.xxx.xxx.xxx:10000/
然后,我们在第一个终端运行 perf命令,观察系统的 CPU 使用情况:
# 记录性能事件,等待大约15秒后按 Ctrl+C 退出
$ perf record -g

# 查看报告
$ perf report
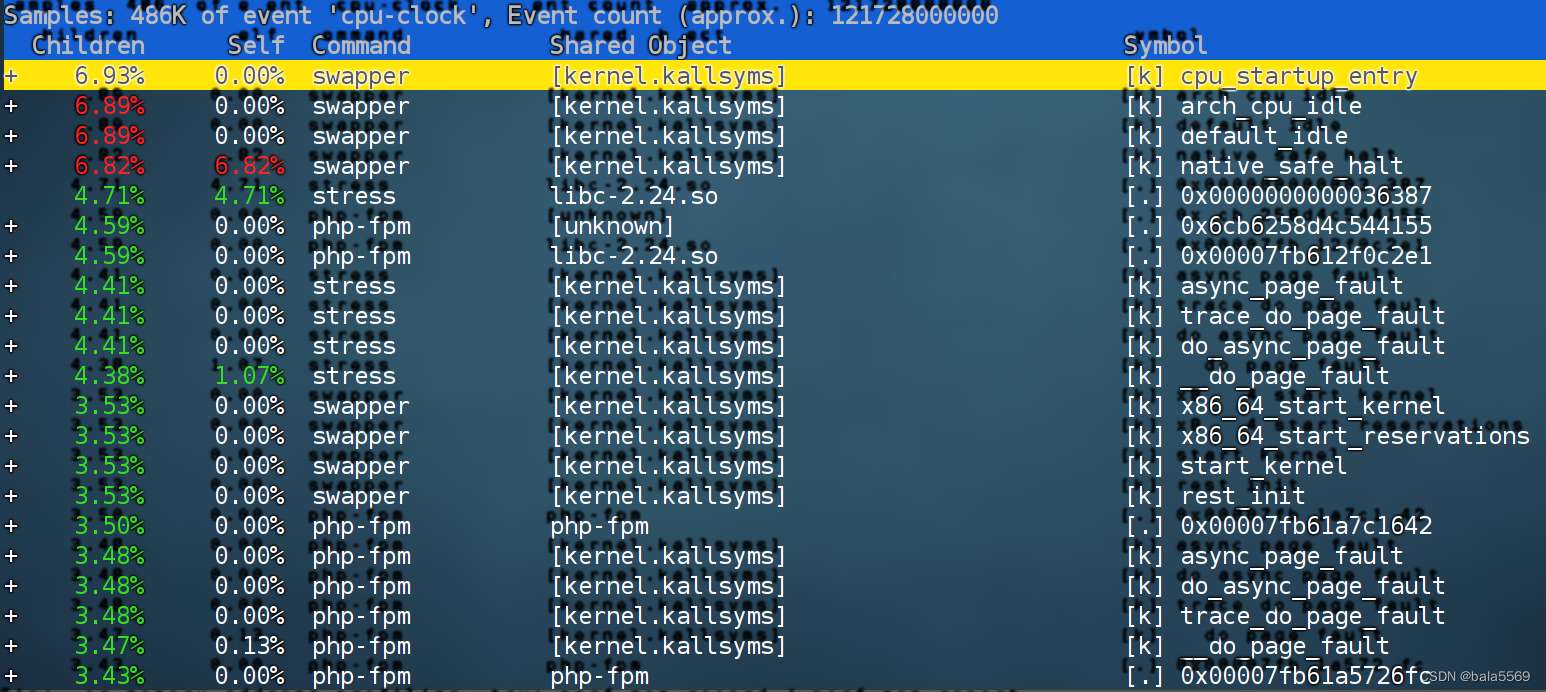
这样,你就可以看到下图这个性能报告:

占用了CPU的进程有swapper,stress,php-fpm
1.swapper进程是什么?
swapper 跟 SWAP 没有任何关系
它只在系统初始化时创建 init 进程,之后,它就成了一个最低优先级的空闲任务
也就是说,当 CPU 上没有其他任务运行时,就会执行 swapper
所以,你可以称它 为“空闲任务”
2.为什么有stress进程,是不是php源码里面
打开另外一个终端输入如下命令
# 拷贝源码到本地
$ docker cp phpfpm:/app .

# grep 查找看看是不是有代码在调用stress命令
$ grep stress -r app
app/index.php:// fake I/O with stress (via write()/unlink()).
app/index.php:$result = exec("/usr/local/bin/stress -t 1 -d 1 2>&1", $output, $status);

$ cat app/index.php
<?php
// fake I/O with stress (via write()/unlink()).
$result = exec("/usr/local/bin/stress -t 1 -d 1 2>&1", $output, $status);
if (isset($_GET["verbose"]) && $_GET["verbose"]==1 && $status != 0) {
  echo "Server internal error: ";
  print_r($output);
} else {
  echo "It works!";
}
?>
从代码中可以看到,给请求加入 verbose=1 参数后,就可以查看 stress 的输出。
$ curl http://192.168.0.10:10000?verbose=1
Server internal error: Array
(
    [0] => stress: info: [23166] dispatching hogs: 0 cpu, 0 io, 0 vm, 1 hdd
    [1] => stress: FAIL: [23167] (563) mkstemp failed: Permission denied
    [2] => stress: FAIL: [23166] (394) <-- worker 23167 returned error 1
    [3] => stress: WARN: [23166] (396) now reaping child worker processes
    [4] => stress: FAIL: [23166] (400) kill error: No such process
    [5] => stress: FAIL: [23166] (451) failed run completed in 0s
)
看错误消息 mkstemp failed: Permission denied ,以及 failed run completed in 0s。原来 stress 命令并没有成功,它因为权限问题失败退出了。
正是由于权限错误,大量的 stress 进程在启动时初始化失败,进而导致用户 CPU 使用率的升高。
优化就很简单了,只要修复权限问题,并减少或删除 stress 的调用,就可以减轻系统的 CPU 压力。
有个问题是为什么刚开始不用perf直接查找进程呢?
用perf查找进程,你就会觉得swapper占用了CPU用户使用率,而不会觉得是stress,从Top命令看到sleeping进程数, 接着用pidstat也找不到CPU用户使用率的进程,用perf就能知道是stress进程
案例结束时,不要忘了清理环境,执行下面的 Docker 命令,停止案例中用到的 Nginx 进程:
$ docker rm -f nginx phpfpm
本文来自互联网用户投稿,该文观点仅代表作者本人,不代表本站立场。本站仅提供信息存储空间服务,不拥有所有权,不承担相关法律责任。 如若内容造成侵权/违法违规/事实不符,请联系我的编程经验分享网邮箱:chenni525@qq.com进行投诉反馈,一经查实,立即删除!
- Python教程
- 深入理解 MySQL 中的 HAVING 关键字和聚合函数
- Qt之QChar编码(1)
- MyBatis入门基础篇
- 用Python脚本实现FFmpeg批量转换
- cpp_11_虚函数_多态_纯虚函数
- 【运维路不弯】亚马逊云科技Lambda服务使用python3.10作为运行时,同时使用requests和boto3包报错解决办法
- 海塞矩阵(Hessian matrix)全解
- 1、数据类型-二进制及数值类型的存储
- RT-Thread 18. 互斥量避免优先级反转
- 一年百模大战下来,有哪些技术趋势和行业真相逐渐浮出水面?
- 智能分析网关V4+太阳能供电模式,搭建鱼塘养殖远程视频监控方案
- hyperf 二十三 分页
- 读算法霸权笔记03_操控与恐吓
- 响应式编程