vue之router-link页面跳转及传参
发布时间:2023年12月22日
vue之router-link页面跳转及传参
<router-link> 是用于在 Vue.js 应用程序中进行路由导航的组件。它可以用来生成具有正确链接的<a> 标签,让用户点击后能够导航到其他页面。
要在使用 <router-link> 进行页面跳转时传递参数,你可以使用 to 属性和路由对象的 query 或 params 属性来实现。下面是一些示例代码:
根据路由的路径跳转及传参(query)
路由路径
{
    path: '/destination',	//路由路径
    component: () => import('@/views/destination'), //页面位置
    hidden: true	//默认隐藏
}
传递参数
<template>
  <div>
    <!-- 在 to 属性中使用对象形式传递参数 -->
    <router-link :to="{ path: '/destination', query: { id: 123, name: 'example' } }">
      Go to Destination
    </router-link>
  </div>
</template>
上面的示例中,/destination 是目标路由的路径,query 属性被用来传递参数。点击链接后,URL 将类似于 /destination?id=123&name=example。
接收参数
<template>
  <div>
    <p>ID: {{ $route.query.id }}</p>
    <p>Name: {{ $route.query.name }}</p>
  </div>
</template>

<script>
export default {
  mounted() {
    console.log(this.$route.query.id); // 访问 query 中的参数
    console.log(this.$route.query.name);
  }
};
</script>
根据路由的名称跳转及传参(params)
路由路径
{
    path: '/destination',	//路由路径
    name: 'destination',	//路由名称
    component: () => import('@/views/destination'), //页面位置
    hidden: true	//默认隐藏
}
传递参数
<template>
  <div>
    <!-- 在 to 属性中使用对象形式传递参数 -->
    <router-link :to="{ name: 'destination', params: { id: 123, name: 'example' } }">
      Go to Destination
    </router-link>
  </div>
</template>
这个示例中,使用了路由的名称 destination,并通过 params 属性传递了参数。注意,这种方式需要在路由配置中定义了对应名称的路由,并且参数会被作为 URL 的一部分,如 /destination/123/example。
接收参数
<template>
  <div>
    <p>ID: {{ $route.params.id }}</p>
    <p>Name: {{ $route.params.name }}</p>
  </div>
</template>

<script>
export default {
  mounted() {
    console.log(this.$route.params.id); // 访问 params 中的参数
    console.log(this.$route.params.name);
  }
};
</script>
根据store传参
根据store传参就是页面跳转的时候将参数放入store中
在vue中,store用于管理状态、共享数据以及在各个组件之间管理外部状态,store是vuex应用的核心,也就是一个容器,包含着应用中大部分的状态,更改store中的状态唯一方法是提交mutation。关于具体使用方法可参考若依前后端分离中的前端代码(照葫芦画瓢)。
若依前后端分离:https://gitee.com/y_project/RuoYi-Vue

路由路径
{
    path: '/destination',	//路由路径
    component: () => import('@/views/destination'), //页面位置
    hidden: true	//默认隐藏
}
传递参数
<template>
  <div>
    <!-- 在 to 属性中使用路由路径跳转 -->
    <router-link :to="'/destination'">
      <span @click="setDestinationParams">Go to Destination</span>
    </router-link>
  </div>
</template>

<script>
export default {
  methods: {
    setDestinationParams() {
      var params = { id: 123, name: 'example' }
      this.$store.dispatch("destination/setDestination", params);
    },
  }
};
</script>
参数放入store中
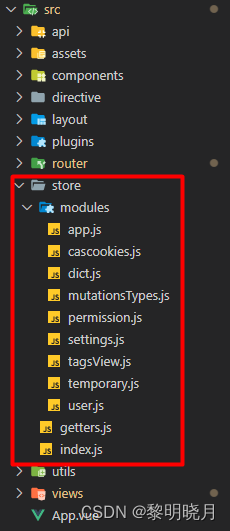
编写destination.js放在src/store/modules中
const state = {
  params: {}
}
const mutations = {
  //放入参数
  SET_DESTINATION: (state, params) => {
      state.params=params
  },
  //清楚参数中的某个属性值
  REMOVE_DESTINATION: (state, key) => {
    delete state.params[key];
  },
  //清除参数
  CLEAN_DESTINATION: (state) => {
    state.params = {}
  }
}
//调用方法
const actions = {
  // 设置临时数据
  setDestination({ commit }, data) {
    commit('SET_DESTINATION', data)
  },
  // 删除临时数据的属性
  removeDestination({ commit }, key) {
    commit('REMOVE_DESTINATION', key)
  },
  // 清空临时数据
  cleanDestination({ commit }) {
    commit('CLEAN_DESTINATION')
  }
}

export default {
  namespaced: true,
  state,
  mutations,
  actions
}
为了方便调用,将参数引入getters.js
const getters = {
  ......
  destination: state => state.destination.params,
  ......
}
export default getters
将getters.js放入index.js
import Vue from 'vue'
import Vuex from 'vuex'
import getters from './getters'
import destination from './modules/destination'

Vue.use(Vuex)

const store = new Vuex.Store({
  modules: {
    destination
  },
  getters
})

export default store
接收参数
<template>
  <div>
    <p>ID: {{ id }}</p>
    <p>Name: {{ name }}</p>
  </div>
</template>

<script>
export default {
  data() {
  	return {
		id:null,
		name:"",
    }
  },
  mounted() {
    console.log(this.$store.getters.destination.id);
    console.log(this.$store.getters.destination.name);
    this.id=this.$store.getters.destination.id;
    this.name=this.$store.getters.destination.name;
  },

  //离开此页面时触发(刷新页面或者进入其他页面,若是不想清除,注释此方法即可)
  beforeRouteLeave(to, from, next) {
    //页面切换时清除临时跳转参数
    this.$store.dispatch("destination/cleanDestination");
    next();

    // 这里需要elementui的支持,如果使用其他界面组件自行替换即可
    // this.$confirm("正在离开本页面,本页面内所有未保存数据都会丢失", "警告", {
    //   confirmButtonText: "确定",
    //   cancelButtonText: "取消",
    //   type: "warning",
    // })
    //   .then(() => {
    //     // 正常跳转
    //     next();
    //   })
    //   .catch(() => {
    //     // 如果取消跳转地址栏会变化,这时保持地址栏不变
    //     window.history.go(1);
    //   });
  },
};
</script>
文章来源:https://blog.csdn.net/weixin_42949219/article/details/134734904
本文来自互联网用户投稿,该文观点仅代表作者本人,不代表本站立场。本站仅提供信息存储空间服务,不拥有所有权,不承担相关法律责任。 如若内容造成侵权/违法违规/事实不符,请联系我的编程经验分享网邮箱:chenni525@qq.com进行投诉反馈,一经查实,立即删除!
本文来自互联网用户投稿,该文观点仅代表作者本人,不代表本站立场。本站仅提供信息存储空间服务,不拥有所有权,不承担相关法律责任。 如若内容造成侵权/违法违规/事实不符,请联系我的编程经验分享网邮箱:chenni525@qq.com进行投诉反馈,一经查实,立即删除!
最新文章
- Python教程
- 深入理解 MySQL 中的 HAVING 关键字和聚合函数
- Qt之QChar编码(1)
- MyBatis入门基础篇
- 用Python脚本实现FFmpeg批量转换
- new和delete表达式的工作步骤
- 17. C++ static、const 和 static const 类型成员变量声明以及初始化
- 汽车制造厂批量使用成华制造弹簧平衡器
- 38条Web测试经验分享
- Java学习苦旅(二十四)——Java中的内部类
- 携程基于Jira Cloud的敏捷项目管理实践
- 题记(3)--连通图的判断
- Python+Django 构建实验室药品管理和预警系统【源码】
- mistune,一个无敌的 Python 库!
- DC-6靶场