SpringBoot + 自定义注解 + AOP 打造通用开关
前言
最近在工作中迁移代码的时候发现了以前自己写的一个通用开关实现,发现挺不错,特地拿出来分享给大家。
为了有良好的演示效果,我特地重新建了一个项目,把核心代码提炼出来加上了更多注释说明,希望xdm喜欢。
案例
1、项目结构

2、引入依赖
<dependencies>
        <dependency>
            <groupId>org.springframework.boot</groupId>
            <artifactId>spring-boot-starter-web</artifactId>
        </dependency>

        <dependency>
            <groupId>org.springframework.boot</groupId>
            <artifactId>spring-boot-starter-aop</artifactId>
        </dependency>

        <dependency>
            <groupId>org.springframework.boot</groupId>
            <artifactId>spring-boot-starter-data-redis</artifactId>
        </dependency>

        <dependency>
            <groupId>org.projectlombok</groupId>
            <artifactId>lombok</artifactId>
            <optional>true</optional>
        </dependency>
        <dependency>
            <groupId>org.springframework.data</groupId>
            <artifactId>spring-data-redis</artifactId>
        </dependency>
    </dependencies>
3、yml配置
连接Redis的配置修改成自己的
server:
  port: 8888

spring:
  redis:
    database: 6
    host: XX.XX.XX.XX
    port: 6379
    password:
    jedis:
      pool:
        max-active: 100
        max-wait: -1ms
        max-idle: 50
        min-idle: 1
4、自定义注解
这里稍微说明下,定义了一个key对应不同功效的开关,定义了一个val作为开关是否打开的标识,以及一个message作为消息提示。
package com.wang.annotation;
import com.wang.constant.Constant;

import java.lang.annotation.ElementType;
import java.lang.annotation.Retention;
import java.lang.annotation.RetentionPolicy;
import java.lang.annotation.Target;
/**
 * @projectName: spring-study
 * @package: com.wang.annotation
 * @className: ServiceSwitch
 * @author: wangwujie
 * @description: TODO
 * @date: 2024-1-18 10:30
 */

@Target({ElementType.METHOD})  // 作用在方法上
@Retention(RetentionPolicy.RUNTIME)  // 运行时起作用
public @interface ServiceSwitch {

    /**
     * 业务开关的key(不同key代表不同功效的开关)
     * {@link Constant.ConfigCode}
     */
    String switchKey();

    // 开关,0:关(拒绝服务并给出提示),1:开(放行)
    String switchVal() default "0";

    // 提示信息,默认值可在使用注解时自行定义。
    String message() default "当前请求人数过多,请稍后重试。";
}
5、AOP核心实现
核心实现中我专门加了详细的注释说明,保证大家一看就懂,而且把查询开关的方式列举出来供大家自己选择。
package com.wang.aop;

import com.wang.annotation.ServiceSwitch;
import com.wang.constant.Constant;
import com.wang.exception.BusinessException;
import com.wang.utils.Result;
import lombok.AllArgsConstructor;
import lombok.extern.slf4j.Slf4j;
import org.aspectj.lang.ProceedingJoinPoint;
import org.aspectj.lang.annotation.Around;
import org.aspectj.lang.annotation.Aspect;
import org.aspectj.lang.annotation.Pointcut;
import org.aspectj.lang.reflect.MethodSignature;
import org.springframework.data.redis.core.StringRedisTemplate;
import org.springframework.http.HttpStatus;
import org.springframework.stereotype.Component;

import java.lang.reflect.Method;

/**
 * @projectName: spring-study
 * @package: com.wang.aop
 * @className: ServiceSwitchAOP
 * @author: wangwujie
 * @description: TODO
 * @date: 2024-1-18 10:32
 */

@Aspect
@Component
@Slf4j
@AllArgsConstructor
public class ServiceSwitchAOP {

    private final StringRedisTemplate redisTemplate;

    /**
     * 定义切点,使用了@ServiceSwitch注解的类或方法都拦截
     */
    @Pointcut("@annotation(com.wang.annotation.ServiceSwitch)")
    public void pointcut() {
    }

    @Around("pointcut()")
    public Object around(ProceedingJoinPoint point) {

        // 获取被代理的方法的参数
        Object[] args = point.getArgs();
        // 获取被代理的对象
        Object target = point.getTarget();
        // 获取通知签名
        MethodSignature signature = (MethodSignature) point.getSignature();

        try {

            // 获取被代理的方法
            Method method = target.getClass().getMethod(signature.getName(), signature.getParameterTypes());
            // 获取方法上的注解
            ServiceSwitch annotation = method.getAnnotation(ServiceSwitch.class);

            // 核心业务逻辑
            if (annotation != null) {

                String switchKey = annotation.switchKey();
                String switchVal = annotation.switchVal();
                String message = annotation.message();

            /*
              获取配置项说明
              这里有两种方式:1、配置加在Redis,查询时从Redis获取;
                          2、配置加在数据库,查询时从表获取。(MySQL单表查询其实很快,配置表其实也没多少数据)
              我在工作中的做法:直接放到数据库,但是获取配置项的方法用SpringCache缓存,
                           然后在后台管理中操作配置项,变更时清理缓存即可。
                           我这么做就是结合了上面两种各自的优点,因为项目中配置一般都是用后台管理来操作的,
                           查表当然更舒适,同时加上缓存提高查询性能。
             */

                // 下面这块查询配置项,大家可以自行接入并修改。
                // 数据库这么查询:String configVal = systemConfigService.getConfigByKey(switchKey);
                // 这里我直接从redis中取,使用中大家可以按照意愿自行修改。
                String configVal = redisTemplate.opsForValue().get(Constant.ConfigCode.REG_PAY_SWITCH);
                if (switchVal.equals(configVal)) {
                    // 开关打开,则返回提示。
                    return new Result<>(HttpStatus.FORBIDDEN.value(), message);
                }
            }

            // 放行
            return point.proceed(args);

        } catch (Throwable e) {
            throw new BusinessException(e.getMessage(), e.getMessage());
        }
    }
}
6、定义常量
主要用来存放各种开关的key
package com.wang.constant;

/**
 * @projectName: spring-study
 * @package: com.wang.constant
 * @className: Constant
 * @author: wangwujie
 * @description: TODO
 * @date: 2024-1-18 10:31
 */

public class Constant {

    // .... 其他业务相关的常量 ....

    // 配置相关的常量
    public static class ConfigCode {

        // 挂号支付开关(0:关,1:开)
        public static final String REG_PAY_SWITCH = "reg_pay_switch";
        // 门诊支付开关(0:关,1:开)
        public static final String CLINIC_PAY_SWITCH = "clinic_pay_switch";

        // 其他业务相关的配置常量
        // ....
    }
}
7、使用注解
我们定义一个服务来使用这个开关,我设定了一个场景是挂号下单,也就是把开关用在支付业务这里。
因为支付场景在线上有可能出现未知问题,比如第三方rpc调用超时或不响应,或者对方业务出现缺陷,导致我方不断出现长款,那么我们此时立马操作后台将支付开关关掉,能最大程度止损。
package com.wang.service;

import com.wang.annotation.ServiceSwitch;
import com.wang.constant.Constant;
import com.wang.utils.Result;
import org.springframework.http.HttpStatus;
import org.springframework.stereotype.Service;

/**
 * @projectName: spring-study
 * @package: com.wang.service
 * @className: RegService
 * @author: wangwujie
 * @description: TODO
 * @date: 2024-1-18 10:32
 */
@Service
public class RegService {

    /**
     * 挂号下单
     */
    @ServiceSwitch(switchKey = Constant.ConfigCode.REG_PAY_SWITCH)
    public Result createOrder() {

        // 具体下单业务逻辑省略....

        return new Result(HttpStatus.OK.value(), "挂号下单成功");
    }
}
8、统一返回类Result
设置统一请求返回Result,以及ResultCode枚举类,用来处理统一返回请求参数。
package com.wang.utils;

/**
 * @projectName: spring-study
 * @package: com.wang.utils
 * @className: ResultCode
 * @author: wangwujie
 * @description: TODO
 * @date: 2024-1-18 10:46
 */
public enum ResultCode {
    SUCCESS(0, "Success"),
    ERROR(1, "Error");
    // 其他状态码...

    private final int code;
    private final String message;

    ResultCode(int code, String message) {
        this.code = code;
        this.message = message;
    }

    public int getCode() {
        return code;
    }

    public String getMessage() {
        return message;
    }
    }
package com.wang.utils;

import lombok.Data;

/**
 * @projectName: spring-study
 * @package: com.wang.utils
 * @className: Result
 * @author: wangwujie
 * @description: TODO
 * @date: 2024-1-18 10:34
 */
@Data
public class Result<T> {
    private int code;
    private String message;
    private T data;

    public Result(int code, String message) {
        this.code = code;
        this.message = message;
    }

    public Result(int code, String message,T data) {
        this.code = code;
        this.message = message;
        this.data = data;
    }

    // 构造方法,getter和setter省略

    public static <T> Result<T> success() {
        return new Result<>(ResultCode.SUCCESS.getCode(), ResultCode.SUCCESS.getMessage());
    }

    public static <T> Result<T> success(T data) {
        return new Result<>(ResultCode.SUCCESS.getCode(), ResultCode.SUCCESS.getMessage(), data);
    }

    public static <T> Result<T> error(ResultCode resultCode) {
        return new Result<>(resultCode.getCode(), resultCode.getMessage());
    }

    public static <T> Result<T> error(ResultCode resultCode, String message) {
        return new Result<>(resultCode.getCode(), message);
    }
}
9、全局异常处理
设置全局异常BusinessException类,以及全局异常处理类GlobalExceptionHandler。
package com.wang.exception;

/**
 * @projectName: spring-study
 * @package: com.wang.exception
 * @className: BusinessException
 * @author: wangwujie
 * @description: TODO
 * @date: 2024-1-18 14:26
 */
public class BusinessException extends RuntimeException {

    private final String code;

    public BusinessException(String code, String message) {
        super(message);
        this.code = code;
    }

    public String getCode() {
        return code;
    }
}
package com.wang.exception;

/**
 * @projectName: spring-study
 * @package: com.wang.exception
 * @className: GlobalExceptionHandler
 * @author: wangwujie
 * @description: TODO
 * @date: 2024-1-18 14:22
 */
import com.wang.utils.Result;
import org.springframework.http.HttpStatus;
import org.springframework.http.ResponseEntity;
import org.springframework.web.bind.annotation.ControllerAdvice;
import org.springframework.web.bind.annotation.ExceptionHandler;
import org.springframework.web.bind.annotation.ResponseStatus;

@ControllerAdvice
public class GlobalExceptionHandler {

    @ExceptionHandler(BusinessException.class)
    @ResponseStatus(HttpStatus.BAD_REQUEST)
    public ResponseEntity<Result<Object>> handleBusinessException(BusinessException ex) {
        Result<Object> result = new Result<>(Integer.getInteger(ex.getCode()), ex.getMessage(), null);
        return new ResponseEntity<>(result, HttpStatus.BAD_REQUEST);
    }

    // 可以添加其他异常处理方法...

}
8、测试效果-controller
好了,接下来我们定义一个接口来测试效果如何。
package com.wang.controller;

/**
 * @projectName: spring-study
 * @package: com.wang.controller
 * @className: RegController
 * @author: wangwujie
 * @description: TODO
 * @date: 2024-1-18 10:33
 */
import com.wang.service.RegService;
import com.wang.utils.Result;
import lombok.AllArgsConstructor;
import org.springframework.web.bind.annotation.GetMapping;
import org.springframework.web.bind.annotation.RequestMapping;
import org.springframework.web.bind.annotation.RestController;

@RestController
@RequestMapping("/api")
@AllArgsConstructor
public class RegController {

    private final RegService regService;

    @GetMapping("/createOrder")
    public Result createOrder() {

        return regService.createOrder();
    }
}
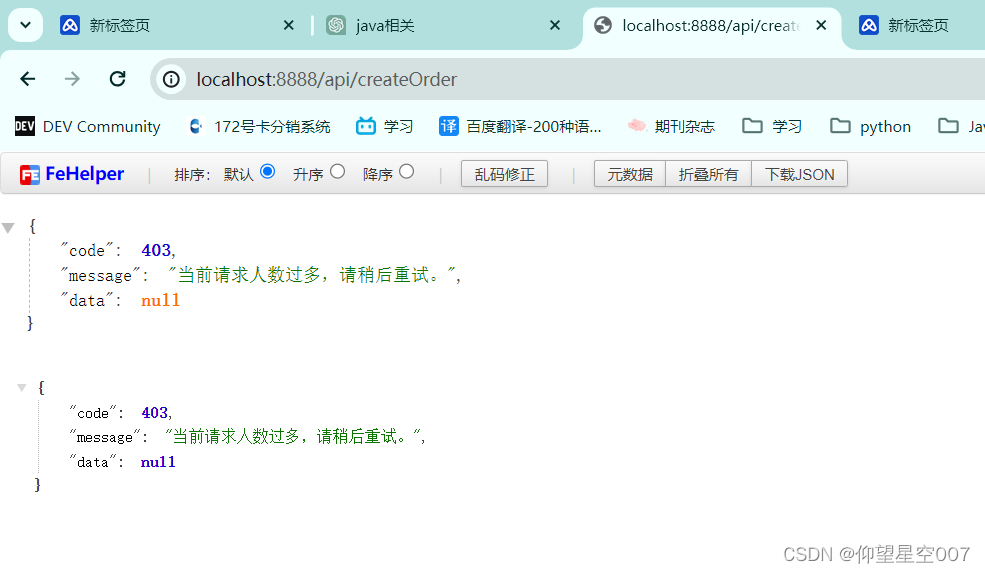
Redis中把开关加上去(实际工作中是后台添加的哈),此时开关是1,表示开关打开。

调接口,可以发现,目前是正常的业务流程。

接下来,我们假定线上出了问题,要立马将开关关闭。(还是操作Redis,实际工作中是后台直接关掉哈)
我们将其改为0,也就是表示开关给关闭。


这里要记住一点,提示可以自定义,但是不要直接返回给用户系统异常,给一个友好提示即可。
总结
文中使用到的技术主要是这些:SpringBoot、自定义注解、AOP、Redis、Lombok。
其中,自定义注解和AOP是核心实现,Redis是可选项,你也可以接入到数据库。
lombok的话大家可以仔细看代码,我用它帮助省略了所有@Autowaird,这样就使用了官方及IDEA推荐的构造器注入方式。
好了,今天的小案例,xdm学会了吗。
本文来自互联网用户投稿,该文观点仅代表作者本人,不代表本站立场。本站仅提供信息存储空间服务,不拥有所有权,不承担相关法律责任。 如若内容造成侵权/违法违规/事实不符,请联系我的编程经验分享网邮箱:chenni525@qq.com进行投诉反馈,一经查实,立即删除!
- Python教程
- 深入理解 MySQL 中的 HAVING 关键字和聚合函数
- Qt之QChar编码(1)
- MyBatis入门基础篇
- 用Python脚本实现FFmpeg批量转换
- GEE——使用cart机器学习方法对Landsat影像条带修复以NDVI和NDWI为例(全代码)
- 数据管理系统-week6-结构化查询语言(SQL)简介
- python深度学习—第6章(波斯美女)
- wxWidgets实战:wxRadioButton切换不同查找面板
- 第六章 Internet基础——教案(附PPT)
- Pandas实战100例 | 案例 26: 检测异常值
- js判断是否到T+N的时间限制
- 最系统的幂等性方案:一锁二判三更新
- Unity3D UGUI图集打包与动态使用(TexturePacker)
- 如何发挥 Sketch在UI和UX设计中的作用