Vue快速入门
一、简介
Vue (读音 /vju/,类似于 view)
是中国的大神尤雨溪开发的,为数不多的国人开发的世界顶级开源软件。
是一套用于构建用户界面的渐进式框架 。Vue 被设计为可以自底向上逐层应用。
MVVM响应式编程模型,避免直接操作DOM , 降低DOM操作的复杂性。
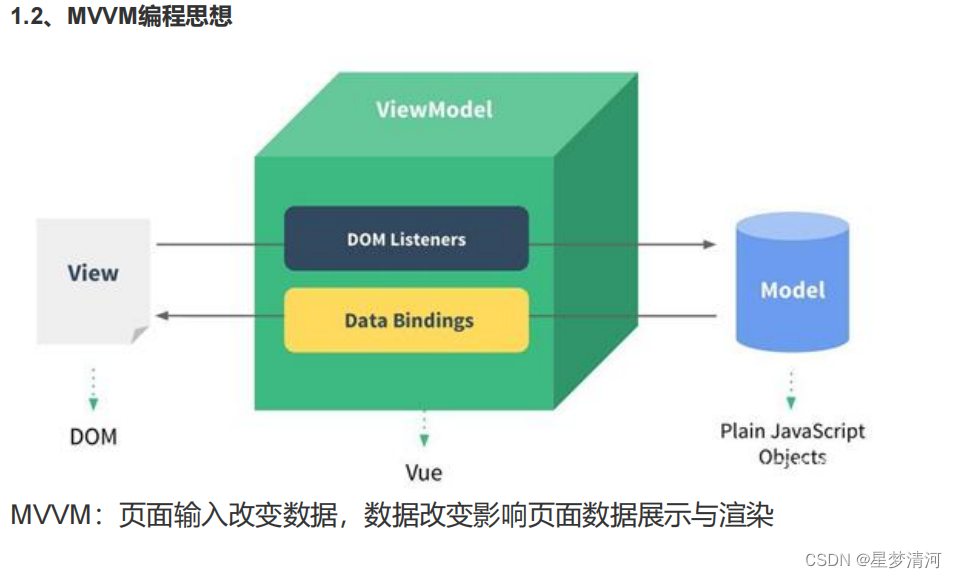
M(model):普通的javascript数据对象
V(view):前端展示页面
VM(ViewModel):用于双向绑定数据与页面,对于我们的课程来说,就是vue的实例。
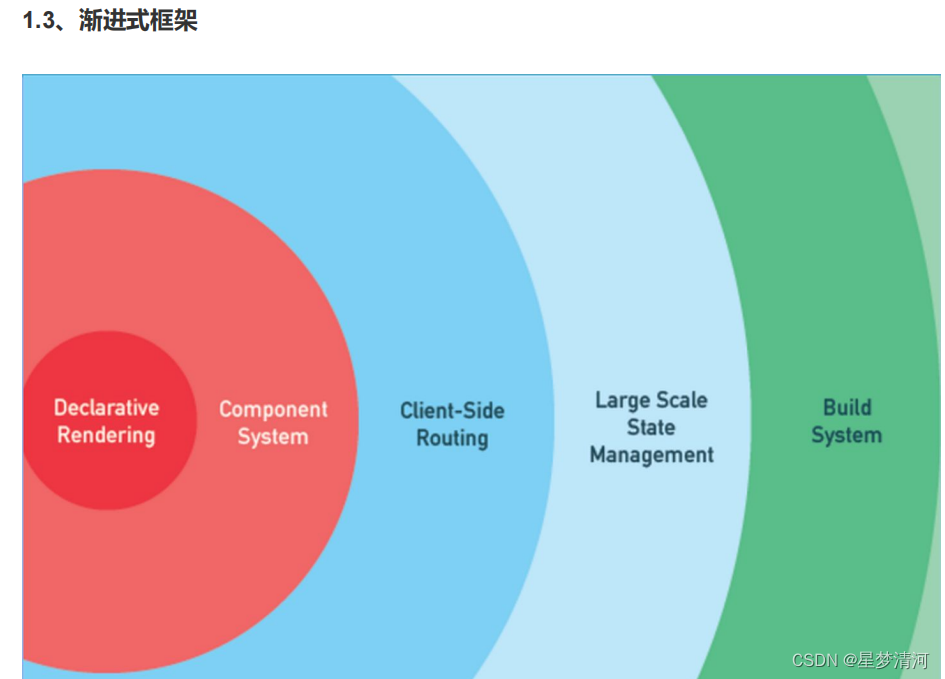
“渐进式框架” 非常简单,就是用你想用或者能用的功能特性,你不想用的部分功能可以先不用。VUE不强求你一次性
- 场景一:公司刚开始一个项目,技术人员对Vue的掌握也不足够。那么我们就不能使用VUE了么?当然不是,
如果你只是使用VUE做些基础操作,如:页面渲染、表单处理提交功能,那还是非常简单的,成熟技术人员上手
也就一两天。完全可以用它去代替jquery。并不需要你去引入其他复杂特性功能。 - 场景二:我们项目用了VUE,使用的效果也挺好。那么我们想逐渐实现代码组件化,实现代码的复用,或者是
基于组件原型的跨项目的代码复用。那么我们就可以引入VUE的components组件特性了。 - 场景三:我们的项目规模逐渐的变大了,我们可能会逐渐用到前端路由、状态集中管理、并最终实现一个高度工程化的前端项目。这些功能特性我们可以逐步引入,当然不用也可以。
所以VUE的适用面很广,你可以用它代替老项目中的JQuery。也可以在新项目启动初期,有限的使用VUE的功能特性,
从而降低上手的成本。
二、Vue—Hello World

1 <!DOCTYPE html>
2 <html lang="en">
3
4 <head>
5 <meta charset="UTF‐8">
6 <meta name="viewport" content="width=device‐width, initial‐scale=1.0">
7 <meta http‐equiv="X‐UA‐Compatible" content="ie=edge">
8 <title>Document</title>
9 </head>
10
11 <body>
12
13 <div id="app">
14 <h1> {{name}} ,非常帅</h1>
15 </div>
16
17 <script src="./node_modules/vue/dist/vue.js"></script>
18
19 <script>
20 //1、vue声明式渲染
21 let vm = new Vue({
22 el: "#app",//绑定元素
23 data: { //封装数据
24 name: "张三"
25 }
26 });
27 </script>
28 </body>
29
30 </html>
三、指令

3.1 v-text/v-html:指定标签体
- v-text : 当作纯文本
v-text是元素的 InnerText 属性,它的作用和之前我们使用的 {{}} 一样,用于数据绑定;
1
2 <!DOCTYPE html>
3 <html lang="en">
4 <head>
5 <meta charset="UTF‐8">
6 <meta name="viewport" content="width=device‐width, initial‐scale=1.0">
7 <meta http‐equiv="X‐UA‐Compatible" content="ie=edge">
8 <title>Document</title>
9 </head>
10 <body>
11 <div id="app">
12 <div v‐text="message"></div>
13 </div>
14 </body>
15 <script src="https://unpkg.com/vue/dist/vue.js"></script>
16 <script>
17 var vm = new Vue({
18 el: '#app',
19 data: {
20 message: "Hello!"
21 },
22 })
23 </script>
24 </html>
- v--html : 将value作为html标签来解析
v-html是元素的 innerHTML,它用于绑定一段 html 标签;
1
2
3 <!DOCTYPE html>
4 <html lang="en">
5 <head>
6 <meta charset="UTF‐8">
7 <meta name="viewport" content="width=device‐width, initial‐scale=1.0">
8 <meta http‐equiv="X‐UA‐Compatible" content="ie=edge">
9 <title>Document</title>
10 </head>
11 <body>
12 <div id="app">
13 <div v‐html="message"></div>
14 </div>
15 </body>
16 <script src="https://unpkg.com/vue/dist/vue.js"></script>
17 <script>
18 var vm = new Vue({
19 el: '#app',
20 data: {
21 message: "<div>您好,我是徐庶!</div>",
22 }
23 })
24 </script>
25 </html>
3.2 v-if/v-else/v-show
vue提供了v--if和v--show两个指令来控制页面元素的显示和隐藏。我们先通过一段代码来看一下使用两个指令各有什么效果:
- v--if : 如果vlaue为true, 当前标签会输出在页面中
- v--show: 就会在标签中添加display样式, 如果vlaue为true, display=block, 否则是none
- v-else : 与v-if一起使用, 如果value为false, 将当前标签输出到页面中
1 <!DOCTYPE html>
2 <html lang="en">
3 <head>
4 <meta charset="UTF‐8">
5 <meta name="viewport" content="width=device‐width, initial‐scale=1.0">
6 <meta http‐equiv="X‐UA‐Compatible" content="ie=edge">
7 <title>Document</title>
8 </head>
9 <body>
10 <div id="app">
11 <div>
12 <button>我是添加按钮,我一直在</button>
13 </div>
14 <div>
15 <button id="show" v‐show="deleteButton">我是删除按钮,我通过v‐show控制显隐</button>
16 <button v‐on:click="deleteButton = true">设置显示</button>
17 <button v‐on:click="deleteButton = false">设置隐藏</button>
18 </div>
19 <div>
20 <button id="if" v‐if="editButton">我是修改按钮,我通过v‐if控制显隐</button>
21 <button v‐on:click="editButton = true">设置显示</button>
22 <button v‐on:click="editButton = false">设置隐藏</button>
23 </div>
24 </div>
25 </body>
26 <script src="https://unpkg.com/vue/dist/vue.js"></script>
27 <script type="text/javascript">
28 var vm = new Vue({
29 el: '#app',
30 data() {
31 return {
32 deleteButton: true,
33 editButton: true
34 }
35 }
36 })
37 </script>
38 </html>
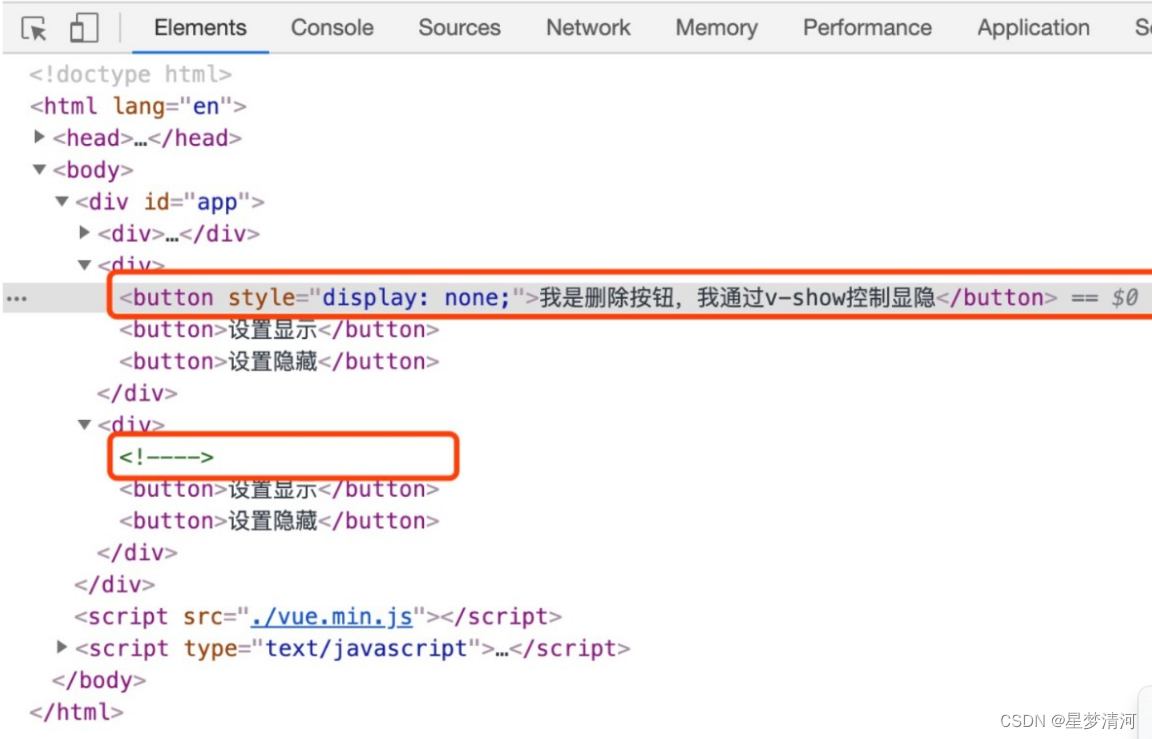
上面我们已经了解了v-if的使用方法。事实上,v-if的条件渲染和JavaScript条件判断语
句中的if、else、else if非常类似。
- v--else、v--else--if : 与v--if一起使用, 如果value为false, 将当前标签输出到页面中
1 <!DOCTYPE html>
2 <html lang="en">
3 <head>
4 <meta charset="UTF‐8">
5 <meta name="viewport" content="width=device‐width, initial‐scale=1.0">
6 <meta http‐equiv="X‐UA‐Compatible" content="ie=edge">
7 <title>Document</title>
8 </head>
9 <body>
10 <div id="app">
11 <div v‐if="number === 1">
12 A
13 </div>
14 <div v‐else‐if="number === 2">
15 B
16 </div>
17 <div v‐else>
18 C
19 </div>
20 </div>
21 </body>
22 <script src="https://unpkg.com/vue/dist/vue.js"></script>
23 <script type="text/javascript">
24 var vm = new Vue({
25 el: '#app',
26 data() {
27 return {
28 number: 1
29 }
30 }
31 })
32 </script>
33 </html>
3.3 v-for:遍历
v--for 用于列表的循环渲染。
基本语法:v--for=“item in data”,data 可以是数组或者对象,接下来我们介绍对两种数据类型的循环。
- 遍历数组 : v--for=“person in persons” $index
1 <!DOCTYPE html>
2 <html lang="en">
3 <head>
4 <meta charset="UTF‐8">
5 <meta name="viewport" content="width=device‐width, initial‐scale=1.0">
6 <meta http‐equiv="X‐UA‐Compatible" content="ie=edge">
7 <title>Document</title>
8 </head>
9 <body>
10 <div id="app">
11 <ul>
12 <li v‐for="item in music">{{item.name}}</li>
13 </ul>
14 </div>
15 </body>
16 <script src="https://unpkg.com/vue/dist/vue.js"></script>
17 <script type="text/javascript">
18 var vm = new Vue({
19 el: '#app',
20 data() {
21 return {
22 // 要循环的数组
23 music: [
24 { name: '青花瓷' },
25 { name: '阳光总在风雨后' },
26 { name: '十年' }
27 ]
28 }
29 }
30 })
31 </script>
32 </html>
33
- 遍历对象 : v--for=“value in person” $key
1 <!DOCTYPE html>
2 <html lang="en">
3 <head>
4 <meta charset="UTF‐8">
5 <meta name="viewport" content="width=device‐width, initial‐scale=1.0">
6 <meta http‐equiv="X‐UA‐Compatible" content="ie=edge">
7 <title>Document</title>
8 </head>
9 <body>
10 <div id="app">
11 <ul>
12 <li v‐for="item in obj">{{item}}</li>
13 </ul>
14 </div>
15 </body>
16 <script src="https://unpkg.com/vue/dist/vue.js"></script>
17 <script type="text/javascript">
18 var vm = new Vue({
19 el: '#app',
20 data() {
21 return {
22 obj: {
23 name: '句号',
24 age: 18,
25 sex: '男'
26 }
27 }
28 }
29 })
30 </script>
31 </html>
3.4 v-on:绑定时间监听
有时候,我们需要给元素绑定事件,vue 中提供了指令 v--on 来进行事件的绑定。用法:
- v--on:事件名=“方法”,例如:v--on:click=“alert”。
v--on:事件名, 可以缩写为: @事件名
1 <!DOCTYPE html>
2 <html lang="en">
3 <head>
4 <meta charset="UTF‐8">
5 <meta name="viewport" content="width=device‐width, initial‐scale=1.0">
6 <meta http‐equiv="X‐UA‐Compatible" content="ie=edge">
7 <title>Document</title>
8 </head>
9 <body>
10 <div id="app">
11 <button v‐on:click="hello">hello</button>
12 </div>
13 </body>
14 <script src="https://unpkg.com/vue/dist/vue.js"></script>
15 <script type="text/javascript">
16 var vm = new Vue({
17 el: '#app',
18 data: {},
19 methods: {
20 hello() {
21 alert('hello')
22 }
23 }
24 })
25 </script>
26 </html>
3.5 v-bind:属性绑定
- v-bind用于给元素的属性赋值。v-bind后面是 :属性名=[变量名]。例如:v-bind:title=“message”:很多属性值是不支持表达式的, 就可以使用v--bind.
代码解释:
在 HTML 代码第 2 行,我们使用了 v--bind 指令给 div 标签的 title 属性赋值。
在 HTML 代码第 6 行,我们使用了 v--bind 指令给 a 标签的 href 属性赋值。
在 HTML 代码第 9 行,我们使用了 v--bind 指令给 img 标签的 src 属性赋值。
在 HTML 代码第 12 行,我们使用了 v--bind 指令给 bitton 标签的 disabled 属性赋值。
1 <!DOCTYPE html>
2 <html lang="en">
3 <head>
4 <meta charset="UTF‐8">
5 <meta name="viewport" content="width=device‐width, initial‐scale=1.0">
6 <meta http‐equiv="X‐UA‐Compatible" content="ie=edge">
7 <title>Document</title>
8 </head>
9 <body>
10 <div id="app">
11 <div v‐bind:title="title">
12 鼠标悬停查看消息!
13 </div>
14 <div>
15 <a v‐bind:href="href">图灵学院</a>
16 </div>
17 <div>
18 <img v‐bind:src="src"/>
19 </div>
20 <div>
21 <button v‐bind:disabled="disabled">禁用按钮</button>
22 </div>
23 </div>
24 </body>
25 <script src="https://unpkg.com/vue/dist/vue.js"></script>
26 <script type="text/javascript">
27 var vm = new Vue({
28 el: '#app',
29 data: {
30 title: "您好,我是徐庶老师,欢迎来到图灵学院!希望你可以在图灵学院学到更多的东西!",
31 href: 'https://www.tulingxueyuan.cn/',
32 src: 'http://img2.mukewang.com/szimg/5df1deec09ba554712000676‐360‐202.png',
33 disabled: true
34 }
35 })
36 </script>
37 </html>
vue 还提供了指令 v--bind 的简写方式,可以直接通过:属性名的方式。
v--bind:src=“src” <=> :src=“src”
- v-model:双向数据绑定:
1 <!DOCTYPE html>
2 <html lang="en">
3 <head>
4 <meta charset="UTF‐8">
5 <meta name="viewport" content="width=device‐width, initial‐scale=1.0">
6 <meta http‐equiv="X‐UA‐Compatible" content="ie=edge">
7 <title>Document</title>
8 </head>
9 <body>
10 <div id="app">
11 <div>
12 <label>年龄:</label>
13 <input v‐model="age"/>
14 </div>
15 <div>当前输入的年龄是: {{age}}</div>
16 <button @click="add">加一岁</button>
17 <button @click="alertYear">弹出年龄</button>
18 </div>
19 </body>
20 <script src="https://unpkg.com/vue/dist/vue.js"></script>
21 <script type="text/javascript">
22 var vm = new Vue({
23 el: '#app',
24 data: {
25 age: 10
26 },
27 methods: {
28 add(){
29 this.age = this.age + 1;
30 },
31 alertYear() {
32 alert(this.age)
33 }
34 }
35 })
36 </script>
37 </html>
38
四、计算属性和侦听器
- 计算属性 VS 方法
如果不使用计算属性,在 methods 里定义了一个方法,也可以实现相同的效果,甚至该方法还可以接受参数,使用起来
更灵活。
既然 methods 同样可以解决模板中复杂逻辑计算的问题,那么为什么还需要使用计算属性呢?
原因就是:计算属性是基于它的依赖缓存的。前面我们介绍过,计算属性的改变取决于其所依赖数据的变化,所以只要
依赖数据不发生改变,计算属性就不会更新。当我们重复获取计算属性时它也不会重复计算,只会获取缓存的值。而我
们每次调用 methods 都会重新计算一遍,这样将会消耗一部分性能。当然,如何你不希望对数据进行缓存,那么可以用
方法来代替。 - 侦听器
通过侦听器来监听数据的变化,进行相应的逻辑处理。
如何监听对象类型数据的某个属性进行侦听。
五、组件化基础
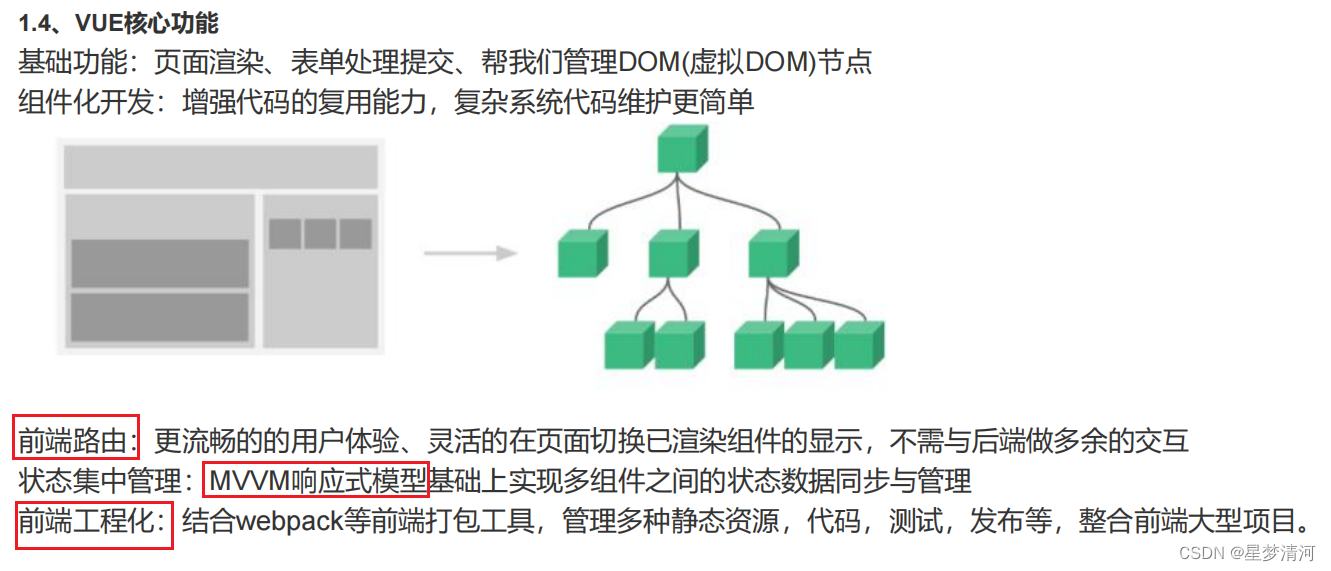
组件是 Vue.js 最强大的功能之一,组件可以扩展 HTML 元素,封装可重用的代码。组件系统让我们可以用独立可复用的小组件来构建大型应用,几乎任意类型的应用的界面都可以抽象为一个组件树;
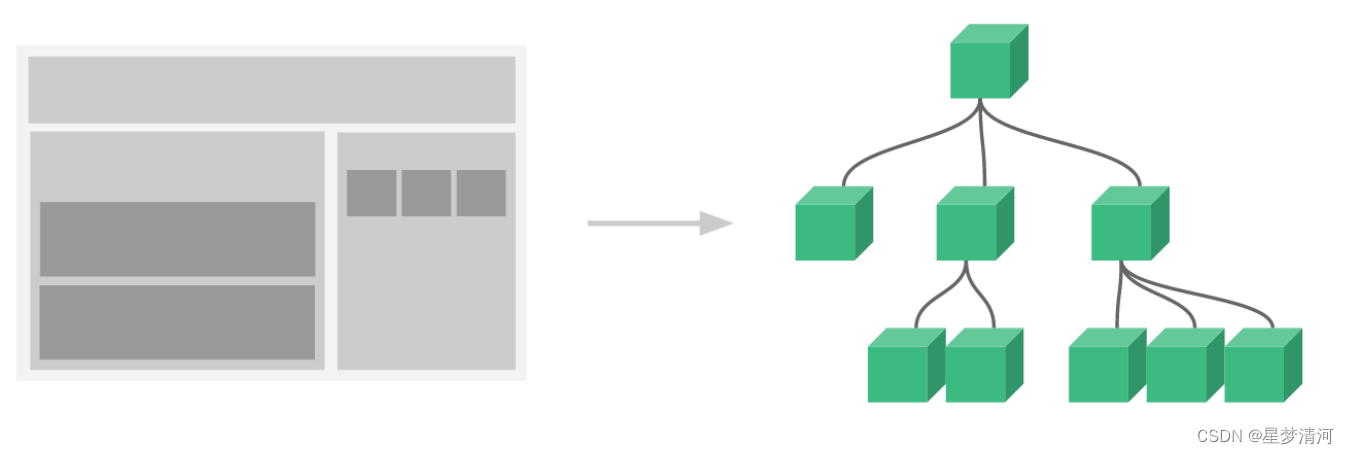
在编写组件时,我们需要不断思考如何提高组件的可复用性。
组件是可复用的 Vue 实例, 我们可以把页面中在多个场景中重复使用的部分,抽出为一个组件进行复用。组件大大提高了代码的复用率。
全局组件注册。
我们可以通过调用 Vue.component 的方式来定义全局组件,它接收两个参数:1. 组件名,2. 组件属性对象。
属性对象:组件的属性对象即为 Vue 的实例对象属性。
全局组件可以在任何其他组件内使用,所以当我们设计的组件,需要在不同地方使用的时候,我们应当注册全局组件。
1 // 注册
2 // 驼峰命名
3 Vue.component('MyComponentName', {/* */})
4 // 短横线命名
5 Vue.component('my‐component‐name', {/* */})
6 ......
7 // 使用
8 <my‐component‐name></my‐component‐name>
9 // 也可以使用自闭和的方式
10 <my‐component‐name />
具体实例:
1
2 <!DOCTYPE html>
3 <html lang="en">
4 <head>
5 <meta charset="UTF‐8">
6 <meta name="viewport" content="width=device‐width, initial‐scale=1.0">
7 <meta http‐equiv="X‐UA‐Compatible" content="ie=edge">
8 <title>Document</title>
9 </head>
10 <body>
11 <div id="app">
12 <my‐component></my‐component>
13 <my‐component />
14 </div>
15 </body>
16 <script src="https://unpkg.com/vue/dist/vue.js"></script>
17 <script type="text/javascript">
18 Vue.component('myComponent', {
19 template: '<div>Hello !</div>'
20 })
21 var vm = new Vue({
22 el: '#app',
23 data() {
24 return {}
25 }
26 })
27 </script>
28 </html>
代码解释:
JS 代码第 3-5 行,我们注册了一个全局组件 myComponent,并在 html 内使用两种方式引用了该组件。
局部组件注册
我们也可以在 Vue 实例选项中注册局部组件,这样组件只能在这个实例中使用。局部组件的注册利用 Vue 实例
的 components 对象属性,以组件名作为 key 值,以属性对象作为 value。由于局部组件只能在当前的 Vue 实例中使用,
所以当我们设计的组件不需要在其他组件内复用时,可以设计为局部组件。
1 //注册
2 components: {
3 'MyComponentName': {
4 template: '<div>Hello !</div>'
5 }
6 }
7 ......
8 // 使用
9 <my‐component‐name></my‐component‐name>
10 // 也可以使用自闭和的方式
11 <my‐component‐name />
具体实例:
1 <!DOCTYPE html>
2 <html lang="en">
3 <head>
4 <meta charset="UTF‐8">
5 <meta name="viewport" content="width=device‐width, initial‐scale=1.0">
6 <meta http‐equiv="X‐UA‐Compatible" content="ie=edge">
7 <title>Document</title>
8 </head>
9 <body>
10 <div id="app">
11 <my‐component></my‐component>
12 <my‐component />
13 </div>
14 </body>
15 <script src="https://unpkg.com/vue/dist/vue.js"></script>
16 <script type="text/javascript">
17 var vm = new Vue({
18 el: '#app',
19 components: {
20 'myComponent': {
21 template: '<div>Hello !</div>'
22 }
23 }
24 })
25 </script>
26 </html>
六、生命周期和钩子函数
生命周期
我们来看一下官网给的 Vue 生命周期的图:
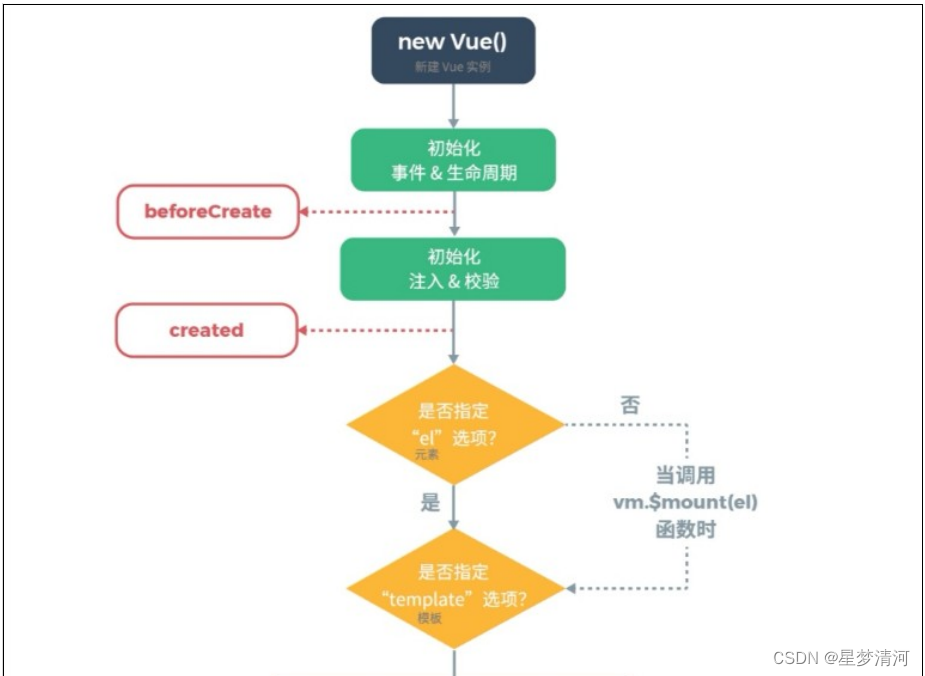
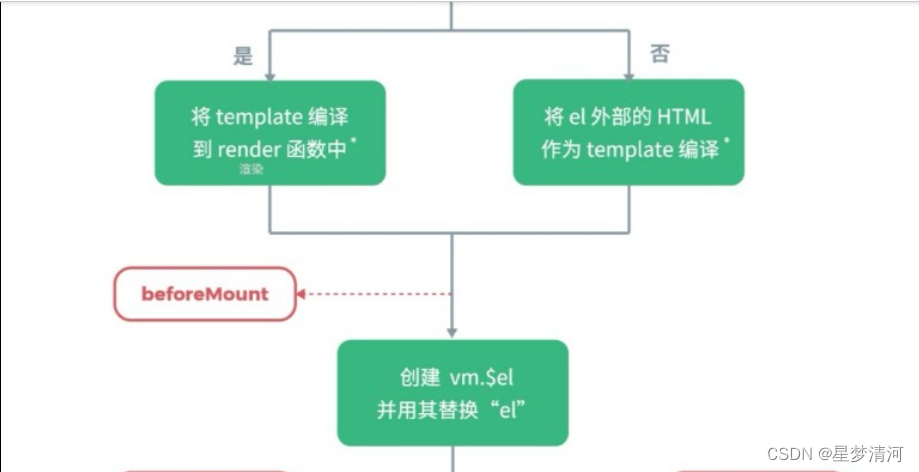
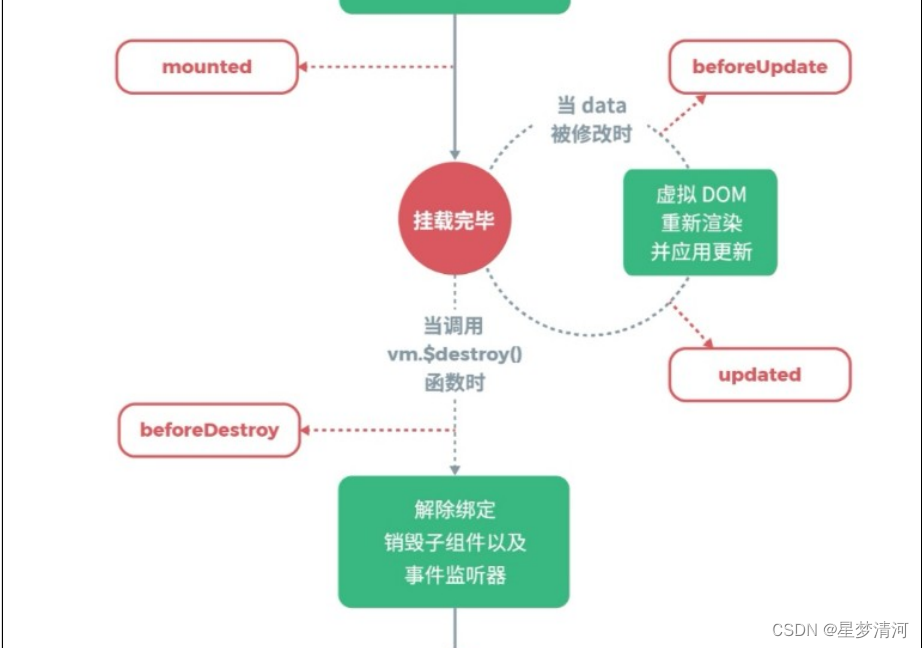

从上面这幅图中,我们可以看到 vue 生命周期可以分为八个阶段,分别是:
- beforeCreate(创建前)
- created(创建后)
- beforeMount (载入前)
- mounted(载入后)
- beforeUpdate(更新前)
- updated(更新后)
- beforeDestroy(销毁前)
- destroyed(销毁后)
- 创建前(beforeCreate)
在实例初始化之后,此时的数据观察和事件机制都未形成,不能获得 DOM 节点。 - 创建后(created)
实例已经创建完成之后被调用。在这一步,实例已完成以下的配置:数据观测(data observer),属性和方法的运算,watch/event 事件回调。然而,挂载阶段还没开始。 - 载入前(beforeMount)
在挂载开始之前被调用:这个过程是在模版已经在内存中编译完成, render 函数首次被调用,此时完成了虚拟 DOM 的构建,但并未被渲染。 - 载入后(mounted)
这个过程在模版挂载之后被调用,页面完成渲染,所以在这之后,我们可以操作和访问 DOM 元素。 - 更新前(beforeUpdate)
当数据更新时调用,在这一阶段 DOM 会和更改过的内容同步。 - 更新后(updated)
由于数据更改导致的虚拟 DOM 重新渲染和打补丁,在这之后会调用该钩子。当这个钩子被调用时,组件 DOM 已经更新,所以你现在可以执行依赖于 DOM 的操作。然而在大多数情况下,你应该避免在此期间更改状态,因为这可能会导致更新无限循环。 - 销毁前(beforeDestroy)
实例销毁之前调用。在这一步,实例仍然完全可用。 - 销毁后(destroyed)
Vue 实例销毁后调用。调用后,Vue 实例指示的所有东西都会解绑定,所有的事件监听器会被移除,所有的子实例也会被销毁。
1 <!DOCTYPE html>
2 <html lang="en">
3 <head>
4 <meta charset="UTF‐8">
5 <meta name="viewport" content="width=device‐width, initial‐scale=1.0">
6 <meta http‐equiv="X‐UA‐Compatible" content="ie=edge">
7 <title>Document</title>
8 </head>
9 <body>
10 <div id = "app">
11 {{ name }}
12 <button @click="updateName">更新</button>
13 <button @click="destroy">销毁</button>
14 </div>
15 </body>
16 <script src="https://unpkg.com/vue/dist/vue.js"></script>
17 <script type = "text/javascript">
18 var vm = new Vue({
19 el: '#app',
20 data: {
21 name:'hello !'
22 },
23 methods : {
24 updateName() {
25 console.log('准备修改名字啦!')
26 this.name = 'hello 慕课!'
27 },
28 destroy(){
29 vm.$destroy()
30 }
31 },
32 beforeCreate() {
33 // 此时页面数据未初始化
34 console.log('beforeCreate:' + this.name) // beforeCreate: undefined
35 },
36 created() {
37 // 页面数据已经初始化
38 console.log('created:' + this.name) // beforeCreate: hello !
39 },
40 beforeMount() {
41 console.log('beforeMount:' + this.name) // beforeCreate: hello !
42 },
43 mounted() {
44 console.log('mounted:' + this.name) // beforeCreate: hello !
45 },
46 // 点击更新按钮后会先触发 beforeUpdate
47 beforeUpdate() {
48 console.log('beforeUpdate:' + this.name) // beforeCreate: hello 慕课!
49 },
50 updated() {
51 console.log('updated:' + this.name) // updated hello 慕课 !
52 },
53 // 点击销毁按钮后会先触发 beforeDestroy
54 beforeDestroy(){
55 console.log('beforeDestroy: before destroy') // beforeDestroy: before destroy
56 },
57 destroyed(){
58 console.log('destroyed: success') // destroyed: success
59 // 在这之后点击页面 更新 按钮将无任何效果
60 }
61 });
62 </script>
63 </html>
Vue Router
Vue Router 是 Vue.js 官方的路由管理器。它和 Vue.js 的核心深度集成,让构建单页面应用变得易如反掌。 — 官方定义VueRouter 是 SPA(单页应用)的路径管理器,它允许我们通过不同的 URL 访问不同的内容。
1 npm install vue‐router
1 <!DOCTYPE html>
2 <html lang="en">
3 <head>
4 <meta charset="UTF‐8">
5 <meta name="viewport" content="width=device‐width, initial‐scale=1.0">
6 <meta http‐equiv="X‐UA‐Compatible" content="ie=edge">
7 <title>Document</title>
8 </head>
9 <body>
10 <div id="app">
11 <div>
12 <router‐link to="/index">首页</router‐link>
13 <router‐link to="/article">文章</router‐link>
14 </div>
15 <router‐view></router‐view>
16 </div>
17 </body>
18
19 <script src="https://unpkg.com/vue/dist/vue.js"></script>
20 <script src="https://unpkg.com/vue‐router/dist/vue‐router.js"></script>
21 <script type="text/javascript">
22
23 const Index = Vue.component('index', {
24 template: '<div>Hello,欢迎使用慕课网学习 Vue 教程!</div>',
25 })
26
27 const Article = Vue.component('myArticle', {
28 template: `<ul><li>1. Vue 计算属性的学习</li><li>2. React 基础学习</li></ul>`,
29 })
30
31 const routes = [
32 { path: '/index', component: Index },
33 { path: '/article', component: Article }
34 ]
35
36 const router = new VueRouter({
37 routes: routes
38 })
39
40 var vm = new Vue({
41 el: '#app',
42 router: router,
43 data() {
44 return {}
45 }
46 })
47 </script>
48 </html>
axios
官网:http://www.axios-js.com/zh-cn/docs/
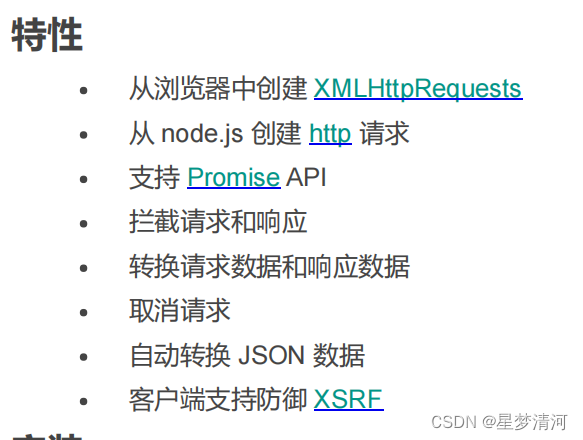
Axios 是一个基于 promise 的 HTTP 库,可以用在html和 vue、nodejs 中。

执行Get请求:
1 // 上面的请求也可以这样做
2 axios.get('/user', {
3 params: {
4 ID: 12345
5 }
6 })
7 .then(function (response) {
8 console.log(response);
9 })
10 .catch(function (error) {
11 console.log(error);
12 });
执行POST请求
1 axios.post('/user', {
2 firstName: 'Fred',
3 lastName: 'Flintstone'
4 })
5 .then(function (response) {
6 console.log(response);
7 })
8 .catch(function (error) {
9 console.log(error);
10 });
执行多个并发请求
1 function getUserAccount() {
2 return axios.get('/user/12345');
3 }
4
5 function getUserPermissions() {
6 return axios.get('/user/12345/permissions');
7 }
8
9 axios.all([getUserAccount(), getUserPermissions()])
10 .then(axios.spread(function (acct, perms) {
11 // 两个请求现在都执行完成
12 }));
七、使用Vue脚手架进行模块化开发

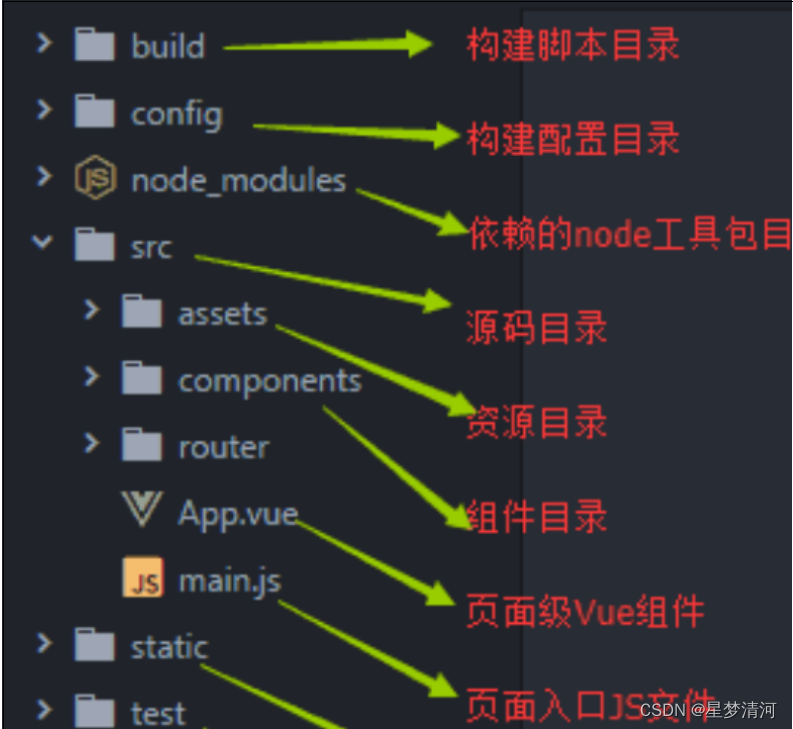
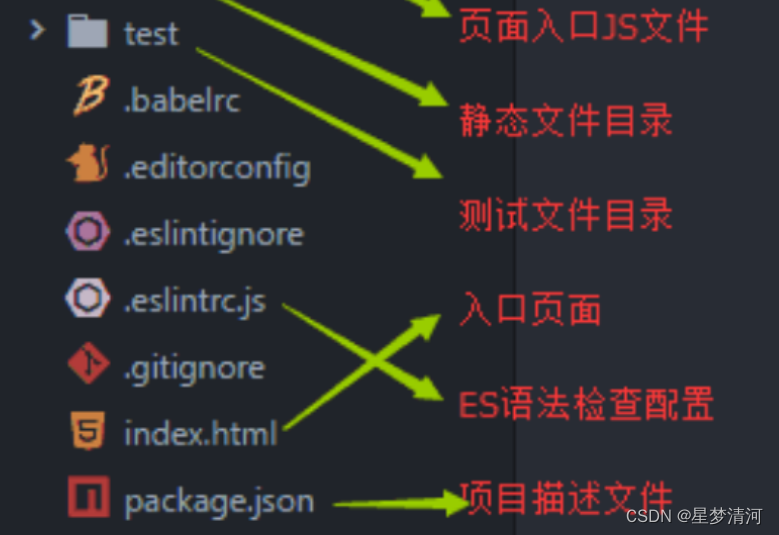
创建项目
1 vue init webpack 项目名
2 // 确认项目名
3 // 输入项目描述
4 // 作者
5 // 让选择创建方式 默认 回车
6 // 选择是否安装vue‐router y
7 // 是否安装eslint n
8 // unit test n
9 // e2e test n
10 // 选择NPM
11 进行安装....
在vscode中打开
本文来自互联网用户投稿,该文观点仅代表作者本人,不代表本站立场。本站仅提供信息存储空间服务,不拥有所有权,不承担相关法律责任。 如若内容造成侵权/违法违规/事实不符,请联系我的编程经验分享网邮箱:chenni525@qq.com进行投诉反馈,一经查实,立即删除!
- Python教程
- 深入理解 MySQL 中的 HAVING 关键字和聚合函数
- Qt之QChar编码(1)
- MyBatis入门基础篇
- 用Python脚本实现FFmpeg批量转换
- 广告推广数据流畅,腾讯智能表API无代码集成
- 数据链路层(Data Link Layer)
- Leetcode—92.反转链表II【中等】
- cadence中统计高电平波形的两种方法(transient measurement和value cross函数)
- Linux——进程间通信(管道)
- NodeJS安装教程
- arduino+oled显示器显示中文显示温度湿度
- ssm基于移动平台的河长系统(程序+开题)
- java集合(4)
- 数据治理认证大揭秘:CDMP、CDGA与CDGP,你了解多少?

