第二次作业+第三次作业
发布时间:2024年01月20日
第二次作业+第三次作业
第二次作业
题目:
网站需求:
?
1.基于域名[www.openlab.com](http://www.openlab.com)可以访问网站内容为 welcome to openlab!!!
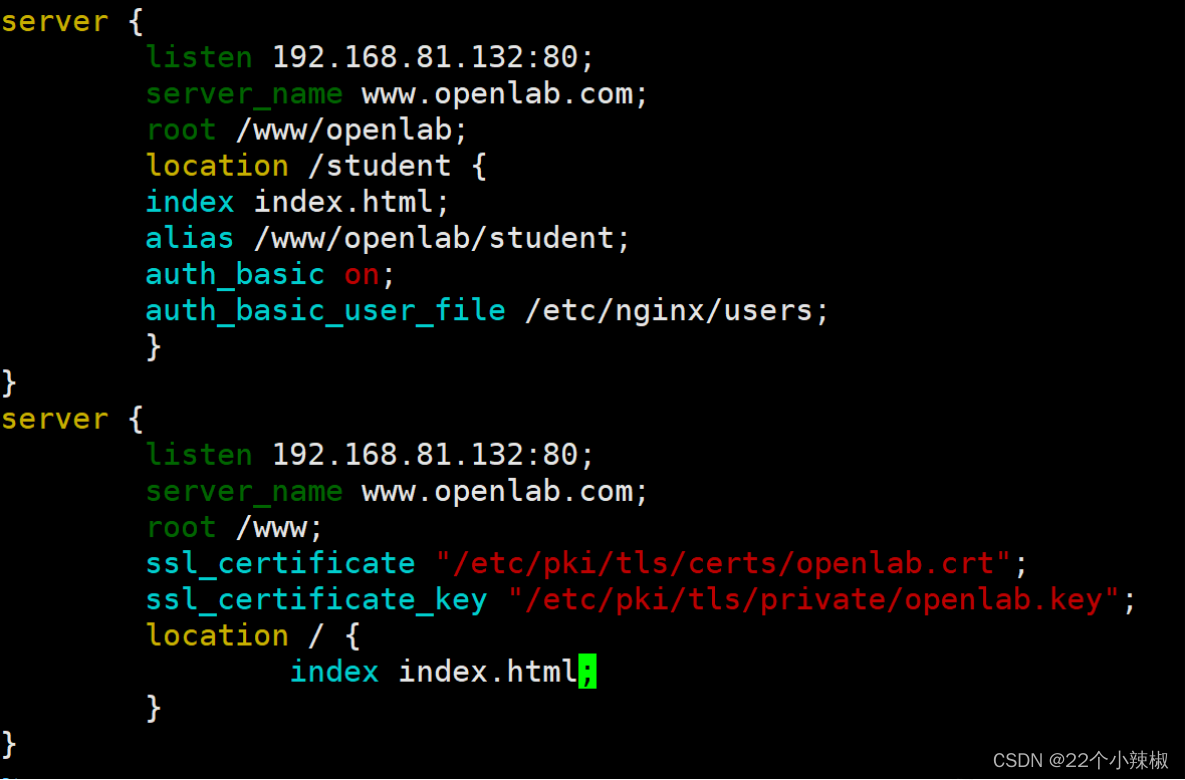
2.给该公司创建三个子界面分别显示学生信息,教学资料和缴费网站,基于[www.openlab.com/student](http://www.openlab.com/student) 网站访问学生信息,[www.openlab.com/data](http://www.openlab.com/data)网站访问教学资料,网站访问缴费网站(http://www.openlab.com/money网站访问缴费网站)。
?
3.要求 (1)学生信息网站只有song和tian两人可以访问,其他用户不能访问。
?
      (2)访问缴费网站实现数据加密基于https访问。
?
步骤如下
1.关闭防火墙和关闭unix规则
[root@localhost ~]# systemctl stop firewalld
[root@localhost ~]# setenforce 0
当然还可以查看一下是否关闭好;
[root@localhost ~]# systemctl status firewalld
?
2.开启nginx,并查看一下(我这里是安装好了的)
[root@localhost ~]# systemctl start nginx
[root@localhost ~]# ps -aux | grep nginx  --- 查看是否在运行nginx;
?
3.在conf.d下面创建一个以.conf结尾的文件并写入信息
[root@localhost conf.d]# vim /etc/nginx/conf.d/openlab.conf
写入:
    server {
 ? ? ?  listen 192.168.81.132:80;
 ? ? ?  root /www/name/openlab;
 ? ? ?  server_name www.openlab.com;
 ? ? ?  location / {
 ? ? ? ? ? ? ?  index index.html;
 ? ? ?  }
}
保存并退出!
?
4.重启一下nginx
[root@localhost conf.d]# systemctl restart nginx
?
5.根据配置,需要创建自定义文件
[root@localhost conf.d]# mkdir /www/openlab -pv
?
6.写入网站里面存放的信息
[root@localhost conf.d]# echo welcome to openlab\!\!\! > /www/openlab/index.html
[root@localhost conf.d]# ll /www/openlab  --- 查看一下是否创建成功;
注意:有符号的需要用\一起写!!!!!
?
7.去本地主机域名/etc/hosts修改
192.168.81.132  www.openlab.com
?
8.修改主界面标签
[root@localhost ~]# semanage fcontext -a -t httpd_sys_content_t /www/openlab/index.html
[root@localhost ~]# restorecon /www/openlab/index.html
?
[root@localhost ~]# ll -Z /www/openlab/index.html  --- 查看一下
-rw-r--r--. 1 root root unconfined_u:object_r:httpd_sys_content_t:s0 22  1月 18 09:16 /www/openlab/index.html
注意:缺少semanage命令,直接执行yum install semanage 没有包存在
通过以下命令可查到命令对应的包
重要命令:
[root@localhost ~]# yum whatprovides /usr/sbin/semanage
?
Last metadata expiration check: 0:00:42 ago on 2024年01月18日 星期四 09时25分04秒.
policycoreutils-python-utils-3.3-8.oe2203sp3.noarch : Policy core
 ? ? ...: python utilities for selinux
Repo ? ? ?  : OS
Matched from:
Filename ?  : /usr/sbin/semanage
?
policycoreutils-python-utils-3.3-8.oe2203sp3.noarch : Policy core
 ? ? ...: python utilities for selinux
Repo ? ? ?  : everything
Matched from:
Filename ?  : /usr/sbin/semanage
?
[root@localhost ~]# yum install policycoreutils-python-utils-3.3-8.oe2203sp3.noarch
9.实现与客户端的测试连接
[root@localhost conf.d]# curl www.openlab.com
welcome to openlab!!!
证明该网站已经创建好啦!
10.创建三个子目录:学生信息、教学资源、缴费网站
[root@localhost ~]# mkdir /www/openlab/{data,money,student} -pv
10.写入信息
[root@localhost ~]# echo this is data > /www/openlab/data/index.html
[root@localhost ~]# echo this is student > /www/openlab/student/index.html
[root@localhost ~]# echo this is money > /www/openlab/money/index.html
?
11.三个子界面也要更改标签
#对/www下面所有文件标签进行修改;此方法好处:不需要restorecon
[root@localhost ~]# chcon -t httpd_sys_content_t /www -R
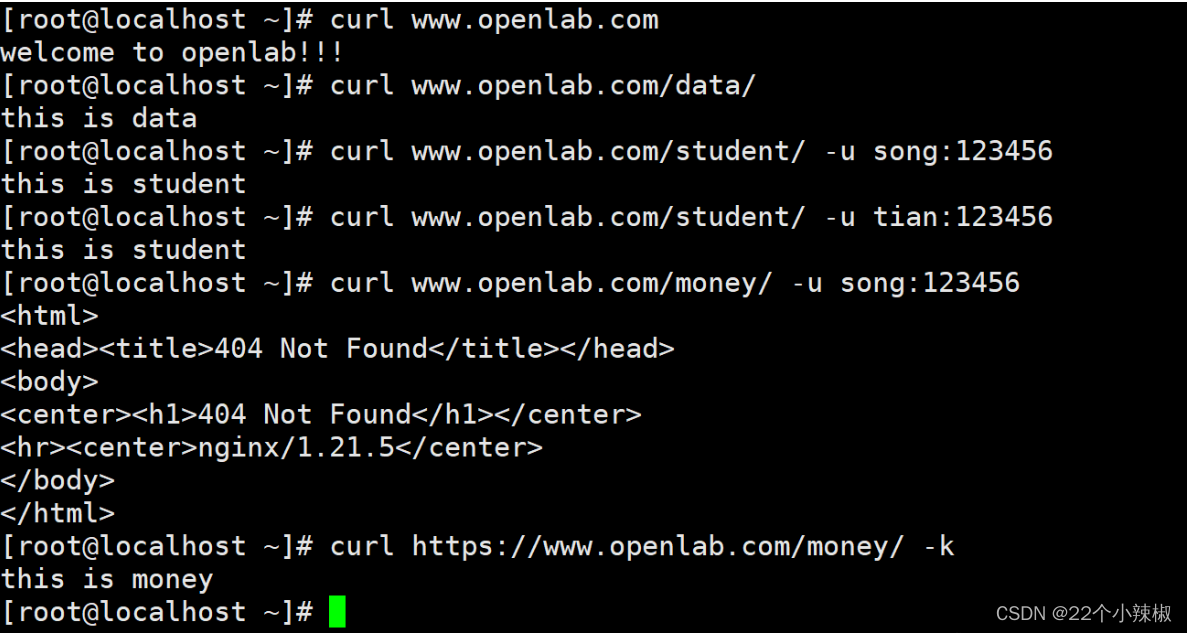
12.查看一下三个子界面,看看是否能正常访问!
13.song和tian可以访问student网站,所以要对该网站进行修改
14.创建/etc/nginx/users文件
首先要安装httpd
[root@localhost ~]# yum install httpd-tools
之后创建文件并添加用户song
[root@localhost ~]# htpasswd -c /etc/nginx/users song
New password:
Re-type new password:
Adding password for user song
?
添加用户tian
[root@localhost ~]# htpasswd  /etc/nginx/users tian
New password:
Re-type new password:
Adding password for user tian
注意:创建第二个用户的时候,不要用-c,用了-c会覆盖前面那个用户!!!
15.重启服务加载配置,并测试一下
[root@localhost ~]# systemctl restart nginx
[root@localhost ~]# curl www.openlab.com/student/ -u song:123456
this is student
[root@localhost ~]# curl www.openlab.com/student/ -u song:123456
this is student
16.对money进行处理,但是它是要加密,所以我们要单独弄一个网站!
由于在前面的步骤里面,我把money弄在了第一个服务器里面,以明文形式访问,所以我要删除那条记录!
[root@localhost ~]# rm -rf /www/openlab/money/
然后再/www下面重新创建一个目录!
[root@localhost ~]# mkdir /www/money
[root@localhost ~]# echo this is money > /www/money/index.html
17.然后创建证书和私钥文件!
[root@localhost ~]# openssl  genrsa  -out  /etc/pki/tls/private/openlab.key
[root@localhost ~]# openssl req -utf8 -new -key /etc/pki/tls/private/openlab.key  -x509 -days 365 -out /etc/pki/tls/certs/openlab.crt
18.重启nginx服务
[root@localhost ~]# systemctl restart nginx
19.最后测试一下!!
注意:money是加密文件,所以访问的时候加-k忽略证书安全信息!!!!
第三次作业
题目:
架设一台NFS服务器,并按照以下要求配置
1、开放/nfs/shared目录,供所有用户查询资料
2、开放/nfs/upload目录,为192.168.xxx.0/24网段主机可以上传目录,
并将所有用户及所属的组映射为nfs-upload,其UID和GID均为210
3、将/home/tom目录仅共享给192.168.xxx.xxx这台主机,并只有用户tom可以完全访问该目录
步骤如下
要用到两台,服务端和客户端!
1.安装nfs-utils
[root@localhost ~]# yum install nfs-utils-2:2.5.4-15.oe2203sp3.x86_64
注意:有时候找不到安装源,就用yum provides nfs-utils 查看一下!
?
2.创建一个文件
[root@localhost ~]# vim /etc/exports
/nfs/share *(ro)
/nfs/upload 192.168.81.0/24 (rw, all_squash,anonuid=210,anongid=210)
/home/tom 192.168.81.129(rw)
保存并退出~
?
3.创建自己配置的文件
[root@localhost ~]# mkdir /nfs/{shared,upload} -pv
4.让/nfs/upload文件下的都有有权限 [root@localhost ~]# chmod o+w /nfs/upload/ ? 5.所有用户及所属的组映射为nfs-upload,其UID和GID均为210 基于系统用户创建 [root@localhost ~]# useradd -r -u 210 nfs-upload6.将/home/tom目录仅共享给192.168.xxx.xxx这台主机,并只有用户tom可以完全访问该目录 [root@localhost ~]# useradd tom7.重启一下 [root@localhost ~]# systemctl restart nfs-server8.让用户端去访问一下信息 A.下载nfs-utils [root@localhost ~]# yum install nfs-utils ? B.创建目录 [root@localhost ~]# mkdir /1 /2 /3C.将服务端创建的三个文件挂载到客户端上 [root@localhost ~]# mount 192.168.81.132:/nfs/shared /1 [root@localhost ~]# mount 192.168.81.132:/nfs/upload /2 [root@localhost ~]# mount 192.168.81.132:/home/tom /38.进行客户端测试
文章来源:https://blog.csdn.net/m0_74543941/article/details/135708821
本文来自互联网用户投稿,该文观点仅代表作者本人,不代表本站立场。本站仅提供信息存储空间服务,不拥有所有权,不承担相关法律责任。 如若内容造成侵权/违法违规/事实不符,请联系我的编程经验分享网邮箱:chenni525@qq.com进行投诉反馈,一经查实,立即删除!
本文来自互联网用户投稿,该文观点仅代表作者本人,不代表本站立场。本站仅提供信息存储空间服务,不拥有所有权,不承担相关法律责任。 如若内容造成侵权/违法违规/事实不符,请联系我的编程经验分享网邮箱:chenni525@qq.com进行投诉反馈,一经查实,立即删除!
最新文章
- Python教程
- 深入理解 MySQL 中的 HAVING 关键字和聚合函数
- Qt之QChar编码(1)
- MyBatis入门基础篇
- 用Python脚本实现FFmpeg批量转换
- windows环境下设置redis在后台运行
- PMP考试的通过标准是什么?
- 使用vue快速开发一个带弹窗的Chrome插件
- 【一文秒懂】Ftrace系统调试工具使用终极指南
- 记录一些高质量的网站,有关编程,ppt等方面
- 小爱音箱pro接入gpt
- vscode调用HTML文件
- Computer_composition_ch1 概述-计算机概要与技术
- 如何使用Forbidden-Buster绕过HTTP 401403访问限制
- libevent http-server示例


