esp32-cam使用SD卡/web端保存拍摄图片到本地
保存拍摄图片主要是想加在人脸识别这个项目中,所以先把人脸识别示例跑通,然后在把挂在sd卡的部分放进来,或者使用web端保存图片。
一、esp32-cam运行esp-who的人脸识别
esp-who项目地址:https://github.com/espressif/esp-who
esp32cam一般购买会赠送一个下载器,如果没有下载器,按下面的接线方式进入下载模式(记得短接IOD引脚,可以用一个跳线帽或者杜邦线),可进行烧录程序。(建议自己接线,使用下载器有时候就会报错A fatal error occurred: Failed to connect to ESP32: No serial data received.)
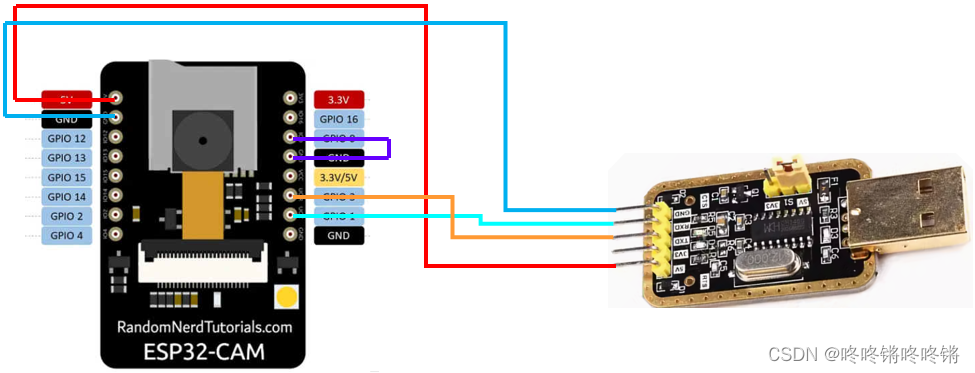
接线模式进行烧录流程如下:
1)按上方接好线以后,使用esp idf进行烧录
F:\esp-who\examples\human_face_detection\terminal  $ idf.py set-target esp32
F:\esp-who\examples\human_face_detection\terminal  $ idf.py flash monitor -p COM34
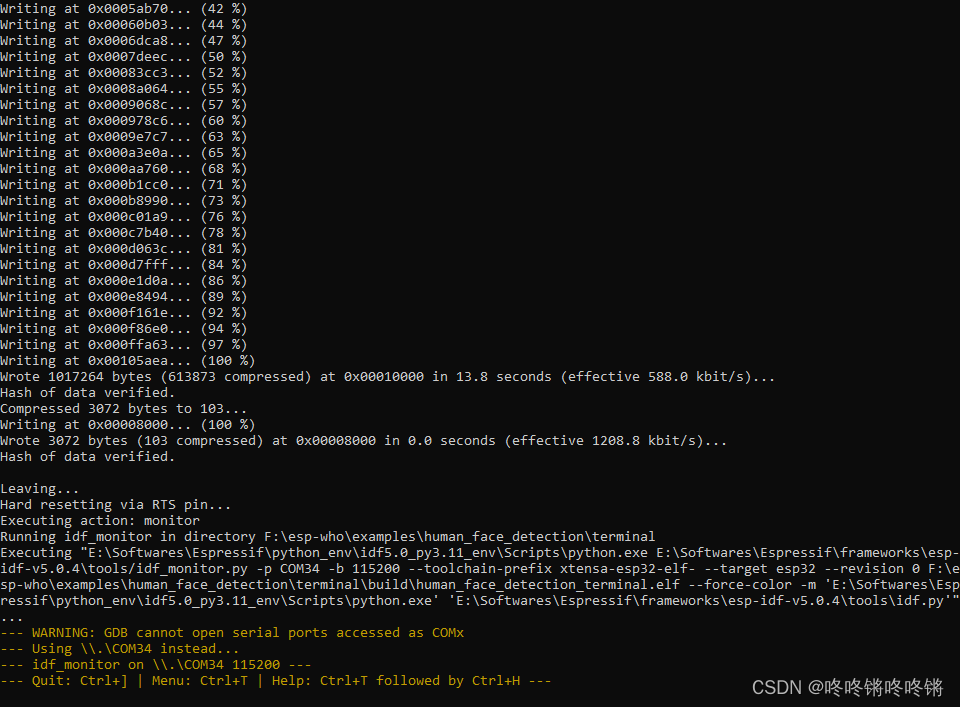
2)出现上面的界面时,把IOD的短接取消(拔掉跳线帽或杜邦线),同时按一下RST键,就能烧录成功了。
报错
在idf.py flash monitor的时候会报错camera: Camera probe failed with error 0x105(ESP_ERR_NOT_FOUND); who_camera: Camera init failed with error 0x105。
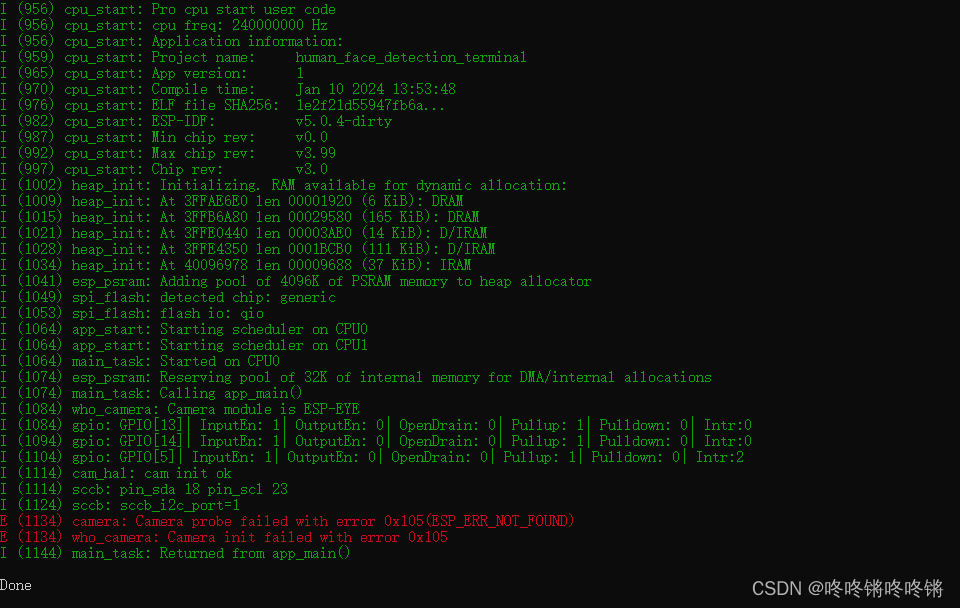
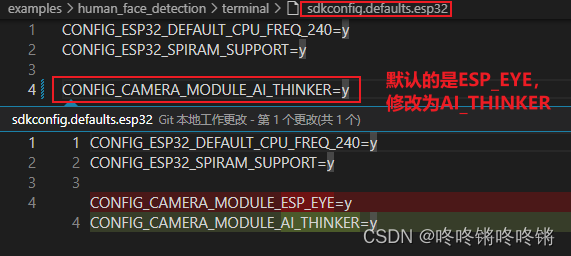
解决方法,做下面两处修改后再重新烧录idf.py flash monitor。
1)esp32默认的sdk配置文件,修改一下模组的名字。
2)idf.py menuconfig对I2C修改
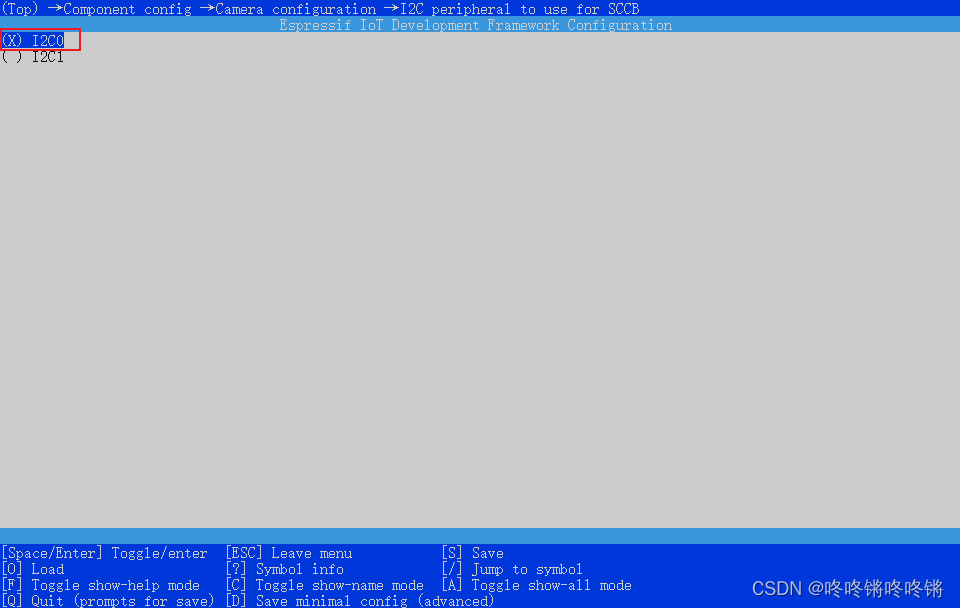
二、挂载sd卡到esp32-cam,并将拍摄的图片保存到sd卡
主要参考esp idf自带的示例Espressif\frameworks\esp-idf-v5.0.4\examples\storage\sd_card\sdmmc。
在esp-who\examples\human_face_detection\terminal的基础上修改下面几处:
(1)esp-who\examples\human_face_detection\terminal\main\app_main.cpp,在主函数中将sd卡挂载到系统中。
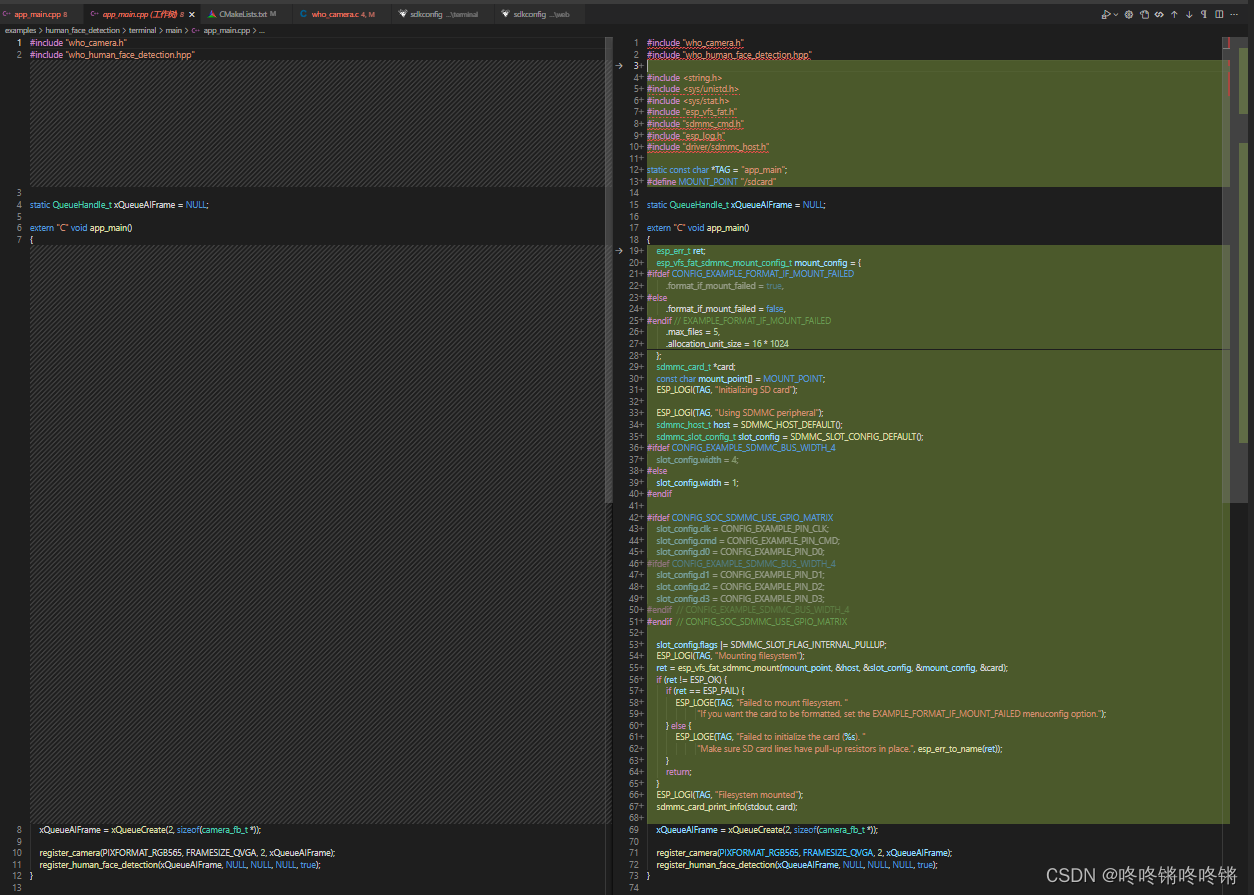
#include "who_camera.h"
#include "who_human_face_detection.hpp"

#include <string.h>
#include <sys/unistd.h>
#include <sys/stat.h>
#include "esp_vfs_fat.h"
#include "sdmmc_cmd.h"
#include "esp_log.h"
#include "driver/sdmmc_host.h"

static const char *TAG = "app_main";
#define MOUNT_POINT "/sdcard"

static QueueHandle_t xQueueAIFrame = NULL;

extern "C" void app_main()
{
    esp_err_t ret;
    esp_vfs_fat_sdmmc_mount_config_t mount_config = {
#ifdef CONFIG_EXAMPLE_FORMAT_IF_MOUNT_FAILED
        .format_if_mount_failed = true,
#else
        .format_if_mount_failed = false,
#endif // EXAMPLE_FORMAT_IF_MOUNT_FAILED
        .max_files = 5,
        .allocation_unit_size = 16 * 1024
    };
    sdmmc_card_t *card;
    const char mount_point[] = MOUNT_POINT;
    ESP_LOGI(TAG, "Initializing SD card");

    ESP_LOGI(TAG, "Using SDMMC peripheral");
    sdmmc_host_t host = SDMMC_HOST_DEFAULT();
    sdmmc_slot_config_t slot_config = SDMMC_SLOT_CONFIG_DEFAULT();
#ifdef CONFIG_EXAMPLE_SDMMC_BUS_WIDTH_4
    slot_config.width = 4;
#else
    slot_config.width = 1;
#endif

#ifdef CONFIG_SOC_SDMMC_USE_GPIO_MATRIX
    slot_config.clk = CONFIG_EXAMPLE_PIN_CLK;
    slot_config.cmd = CONFIG_EXAMPLE_PIN_CMD;
    slot_config.d0 = CONFIG_EXAMPLE_PIN_D0;
#ifdef CONFIG_EXAMPLE_SDMMC_BUS_WIDTH_4
    slot_config.d1 = CONFIG_EXAMPLE_PIN_D1;
    slot_config.d2 = CONFIG_EXAMPLE_PIN_D2;
    slot_config.d3 = CONFIG_EXAMPLE_PIN_D3;
#endif  // CONFIG_EXAMPLE_SDMMC_BUS_WIDTH_4
#endif  // CONFIG_SOC_SDMMC_USE_GPIO_MATRIX

    slot_config.flags |= SDMMC_SLOT_FLAG_INTERNAL_PULLUP;
    ESP_LOGI(TAG, "Mounting filesystem");
    ret = esp_vfs_fat_sdmmc_mount(mount_point, &host, &slot_config, &mount_config, &card);
    if (ret != ESP_OK) {
        if (ret == ESP_FAIL) {
            ESP_LOGE(TAG, "Failed to mount filesystem. "
                     "If you want the card to be formatted, set the EXAMPLE_FORMAT_IF_MOUNT_FAILED menuconfig option.");
        } else {
            ESP_LOGE(TAG, "Failed to initialize the card (%s). "
                     "Make sure SD card lines have pull-up resistors in place.", esp_err_to_name(ret));
        }
        return;
    }
    ESP_LOGI(TAG, "Filesystem mounted");
    sdmmc_card_print_info(stdout, card);

    xQueueAIFrame = xQueueCreate(2, sizeof(camera_fb_t *));

    register_camera(PIXFORMAT_RGB565, FRAMESIZE_QVGA, 2, xQueueAIFrame);
    register_human_face_detection(xQueueAIFrame, NULL, NULL, NULL, true);
}
(2)抓取图片的线程中增加保存图片到sd卡的步骤,修改代码esp-who\components\modules\camera\who_camera.c。
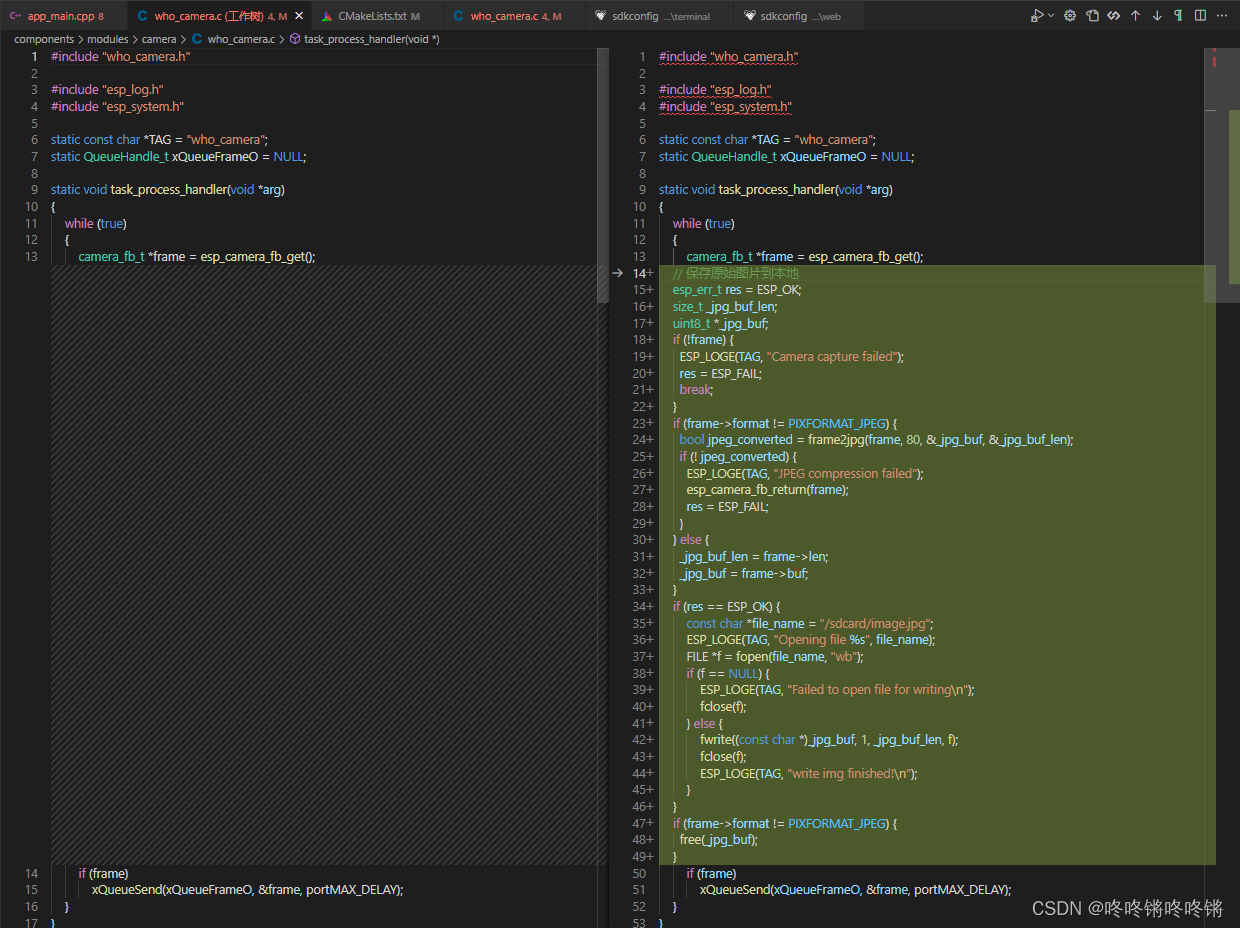
static void task_process_handler(void *arg)
{
    while (true)
    {
        camera_fb_t *frame = esp_camera_fb_get();
    // 保存原始图片到本地
    esp_err_t res = ESP_OK;
    size_t _jpg_buf_len;
    uint8_t *_jpg_buf;
    if (!frame) {
      ESP_LOGE(TAG, "Camera capture failed");
      res = ESP_FAIL;
      break;
    }
    if (frame->format != PIXFORMAT_JPEG) {
      bool jpeg_converted = frame2jpg(frame, 80, &_jpg_buf, &_jpg_buf_len);
      if (! jpeg_converted) {
        ESP_LOGE(TAG, "JPEG compression failed");
        esp_camera_fb_return(frame);
        res = ESP_FAIL;
      }
    } else {
      _jpg_buf_len = frame->len;
      _jpg_buf = frame->buf;
    }
    if (res == ESP_OK) {
        const char *file_name = "/sdcard/image.jpg";
        ESP_LOGE(TAG, "Opening file %s", file_name);
        FILE *f = fopen(file_name, "wb");
        if (f == NULL) {
            ESP_LOGE(TAG, "Failed to open file for writing\n");
            fclose(f);
        } else {
            fwrite((const char *)_jpg_buf, 1, _jpg_buf_len, f);
            fclose(f);
            ESP_LOGE(TAG, "write img finished!\n");
        }
    }
    if (frame->format != PIXFORMAT_JPEG) {
      free(_jpg_buf);
    }
        if (frame)
            xQueueSend(xQueueFrameO, &frame, portMAX_DELAY);
    }
}
(3)挂载sd卡用到了fatfs文件系统,esp-idf有自带fatfs组件,要想在自己的工程中调用则在CMake文件中直接添加组件的名字就行了,esp-who\components\modules\CMakeLists.txt。
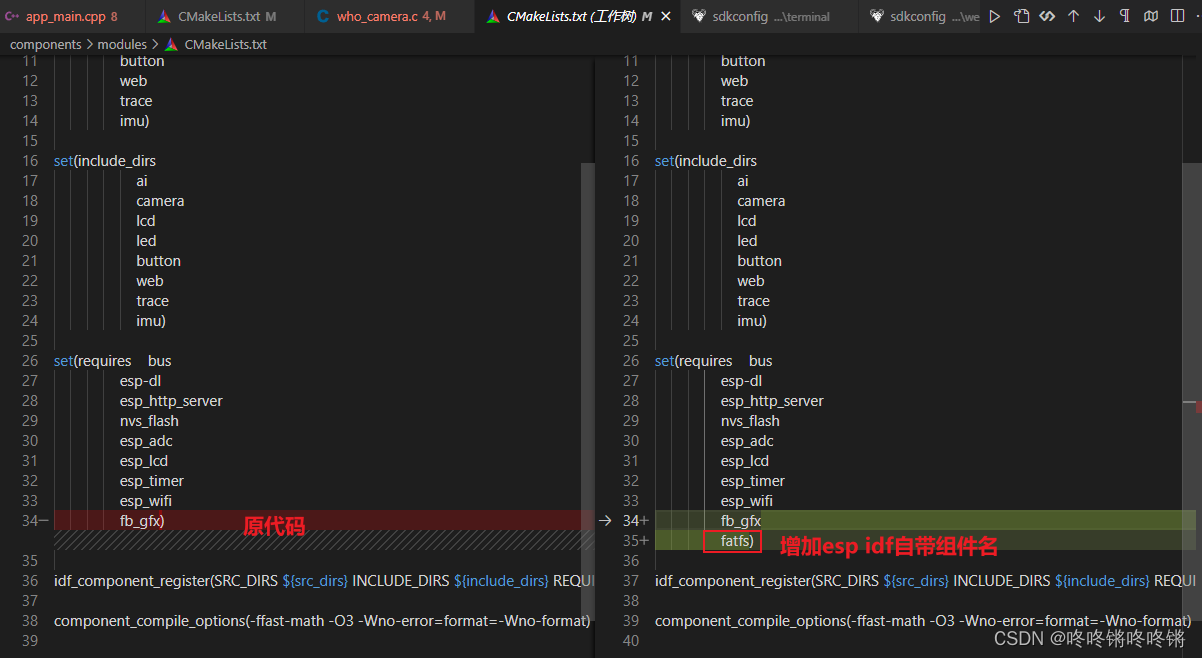
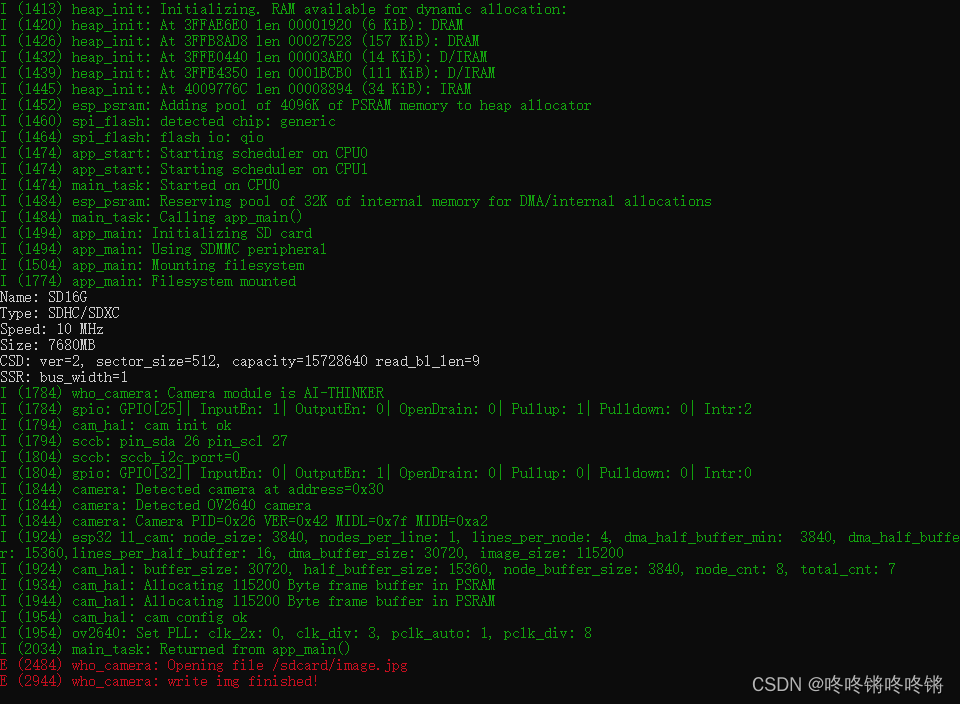
对上面三处都修改完毕后,再重新烧录idf.py flash monitor,这样拍摄的图片就保存到sd卡中了。
三、通过web示例对拍摄的图片进行保存
在esp-who\examples\human_face_detection\web的基础上修改下面几处:
(1)esp-who\examples\human_face_detection\web\sdkconfig.defaults.esp32配置文件中需要把模组名从ESP_EYE修改为AI_THINKER,并且增加可连接的WIFI的账号和密码。

(2)同样需要在idf.py set-target esp32后idf.py menuconfig修改I2C为I2C0。
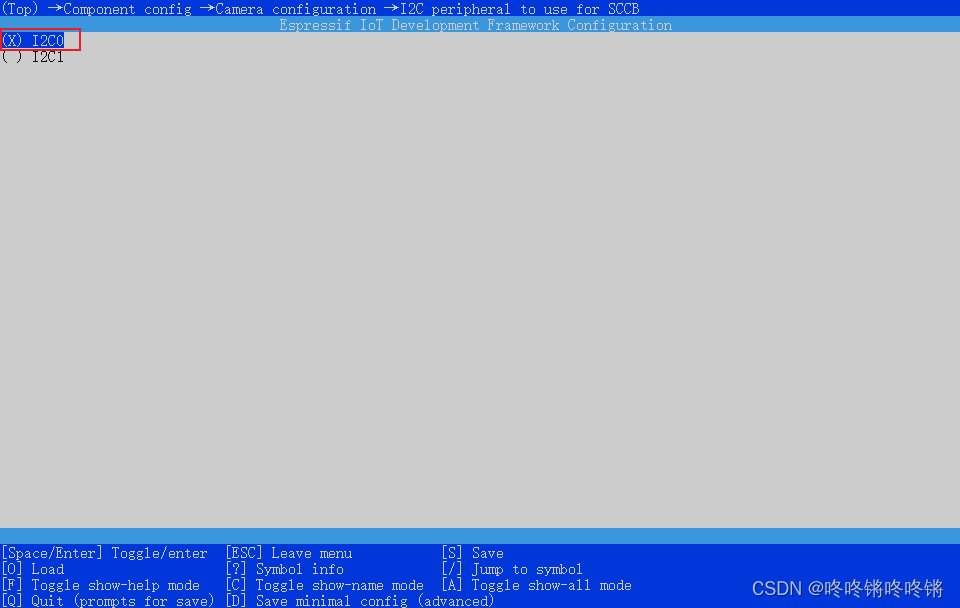
操作完毕就可以idf.py flash monitor烧录了。
F:\esp-who\examples\human_face_detection\web  $ idf.py set-target esp32
F:\esp-who\examples\human_face_detection\web  $ idf.py menuconfig # 修改I2C
F:\esp-who\examples\human_face_detection\web  $ idf.py flash monitor -p COM34
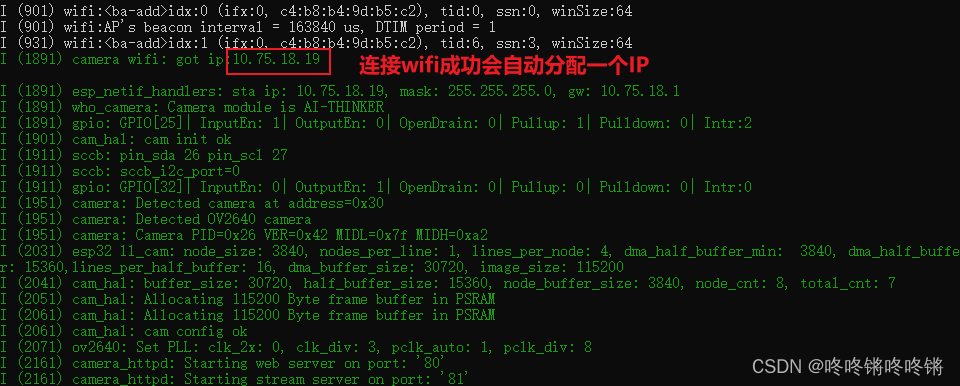
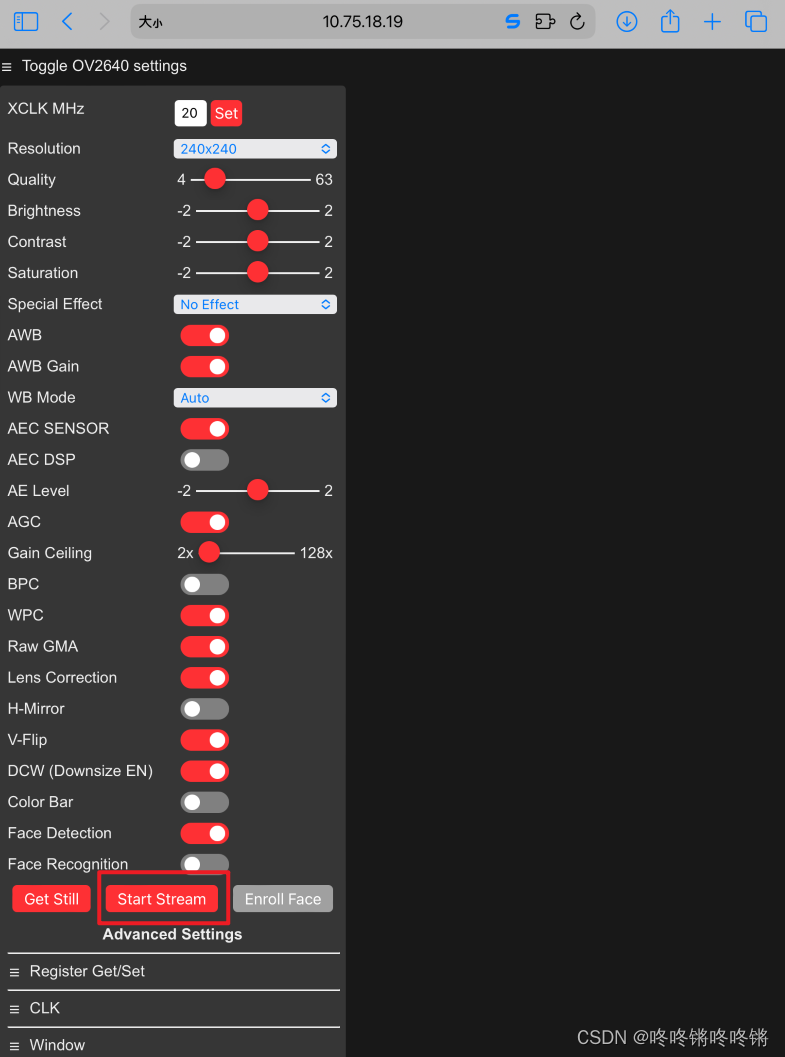
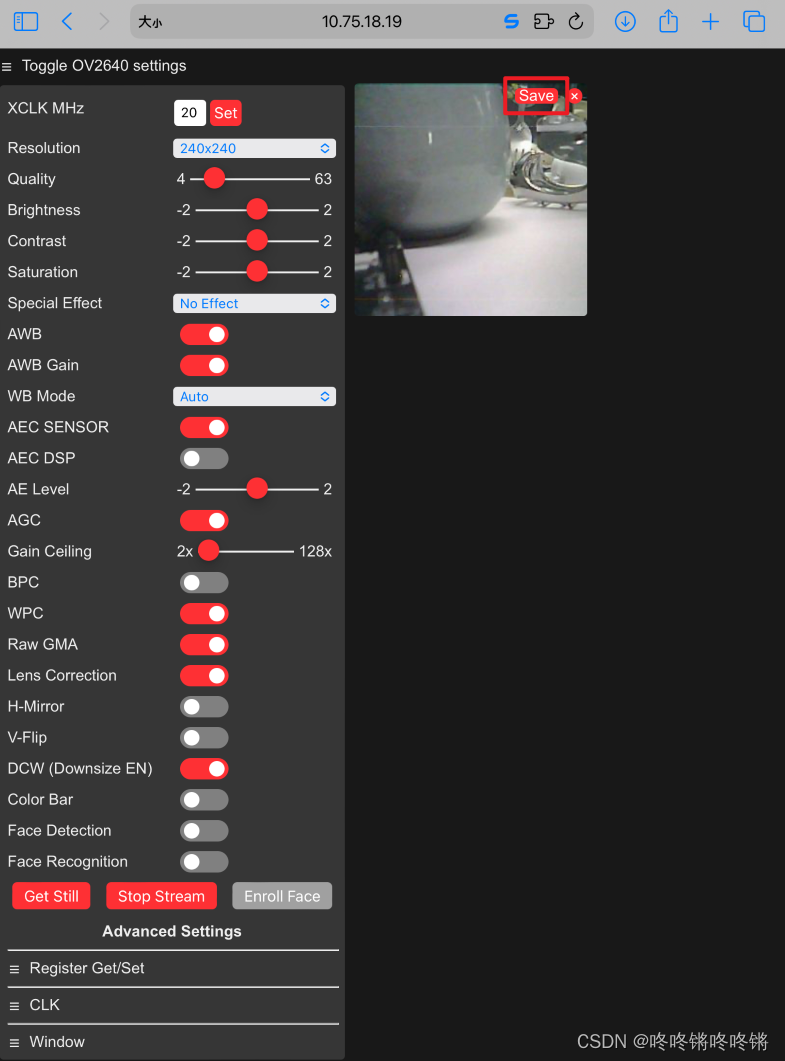
使用连接了同一个wifi的另一个设备网页端输入这个IP地址打开,点击左下角的Start Stream,就能出现实时的画面了,画面的右上角有个Save键,可以保存当前帧到本地。
本文来自互联网用户投稿,该文观点仅代表作者本人,不代表本站立场。本站仅提供信息存储空间服务,不拥有所有权,不承担相关法律责任。 如若内容造成侵权/违法违规/事实不符,请联系我的编程经验分享网邮箱:chenni525@qq.com进行投诉反馈,一经查实,立即删除!
- Python教程
- 深入理解 MySQL 中的 HAVING 关键字和聚合函数
- Qt之QChar编码(1)
- MyBatis入门基础篇
- 用Python脚本实现FFmpeg批量转换
- 软件测试和软件开发之间的关系及模型
- 测试基础知识
- 应用在LCD显示器电源插头里的氮化镓(GaN)MTC-65W1C
- k8s 中部署Jenkins
- JavaAwtSwing的JFrame的pack()方法,容器适配子组件大小,笔记231220
- 机器学习模型可解释性的结果分析
- 【Amazon Organizations 】策略管理委派给客户账号的操作实现
- 机器学习基本算法:算法流程和算法分类
- 卸载docker
- 开源C语言库Melon:红黑树