[Angular] 笔记 18:Angular Router
发布时间:2023年12月29日
chatgpt:
Angular 具有内置的大量工具、功能和库,功能强大且经过良好设计,如组件化架构、依赖注入、模块化系统、路由和HTTP客户端等。这些功能可以直接用于项目中,无需额外的设置或第三方库。这简化了开发流程,因为不必从头编写或集成许多常见的功能,而是可以利用Angular提供的工具快速启动和构建应用程序。
也就是说,Angular 是一种自带电池(Batteries Included)的框架,web 开发所需要的一切应用尽有,Router 是其中之一。
当创建Angular app时,使用命令 ng new <app-name>, Angular 接着会问要不要 Routing 功能 ? 选择 yes, 生成的 app 就会带有 routing 模块:

1. 注册 routes
app-routing.module.ts:
import { NgModule } from '@angular/core';
import { RouterModule, Routes } from '@angular/router';

// 这里注册两个 route:homepage route 和 通配符 route
const routes: Routes = [
  { path: '', component: HomeComponent, pathMatch: 'full' },
  { path: '**', component: NotfoundComponent },
];

@NgModule({
  imports: [RouterModule.forRoot(routes)],
  exports: [RouterModule],
})
export class AppRoutingModule {}
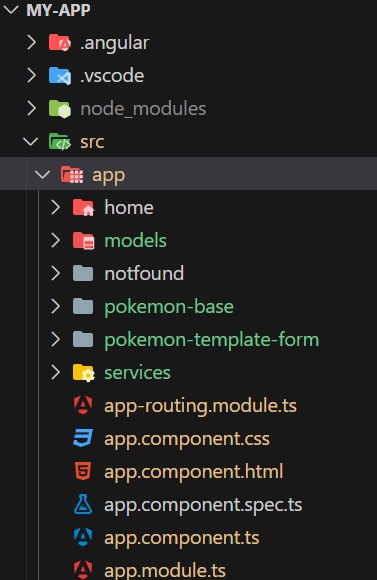
2. 生成与所注册的 routes 对应的两个组件

一个组件名称为 notfound, 另一个为 home.
奇怪的是上述视频中的方法不起作用,没法生成组件,使用 ng-cli 命令:
PS D:\Angular\my-app> ng generate component home --module=app.module.ts
CREATE src/app/home/home.component.html (19 bytes)
CREATE src/app/home/home.component.spec.ts (585 bytes)
CREATE src/app/home/home.component.ts (267 bytes)
CREATE src/app/home/home.component.css (0 bytes)
UPDATE src/app/app.module.ts (727 bytes)
PS D:\Angular\my-app> ng generate component notfound --module=app.module.ts
CREATE src/app/notfound/notfound.component.html (23 bytes)
CREATE src/app/notfound/notfound.component.spec.ts (613 bytes)
CREATE src/app/notfound/notfound.component.ts (283 bytes)
CREATE src/app/notfound/notfound.component.css (0 bytes)
UPDATE src/app/app.module.ts (813 bytes)
PS D:\Angular\Angular Tutorial For Beginners 2022\my-app>

3. 核对 index.html 内容
此文件中必须有:<base href="/"> 以及 <app-root></app-root>, 缺一不可,否则 routing 部分就不起作用。
<!doctype html>
<html lang="en">
<head>
  <meta charset="utf-8">
  <title>MyApp</title>
  <base href="/">
  <meta name="viewport" content="width=device-width, initial-scale=1">
  <link rel="icon" type="image/x-icon" href="favicon.ico">
</head>
<body>
  <app-root></app-root>
</body>
</html>
4. 连结 router 链接
app.component.html:
<router-outlet></router-outlet>
<div>
  <a routerLink="/"></a>
</div>
缺少了 router-outlet, routing 也会不起作用
5. Navbar interface
app.component.ts:
import { Component } from '@angular/core';
import { FormsModule } from '@angular/forms';

// navbar interface
interface Nav {
  link: string;
  name: string;
  exact: boolean;
}

@Component({
  selector: 'app-root',
  templateUrl: './app.component.html',
  styleUrls: ['./app.component.css'],
})
export class AppComponent {
  constructor() {}
}
6. 修改 app.component.html
将其中的 <a> 改成使用 for loop:
<router-outlet></router-outlet>
<div>
  <a
    *ngFor="let item of nav"
    [routerLink]="item.link"
    routerLinkActive="active"
    [routerLinkActiveOptions]="{ exact: item.exact }"
    >{{ item.name }}</a
  >
</div>
routerLinkActive 用于设置当前链接是否为 active,即所在页面是否与当前链接对应。
同时设置 app.component.css,设置 active 链接的背景色为红色:
.cool-bool {
    background: #0094ff;
}

.active {
    background-color: red;
}
7. 运行 ng serve:

文章来源:https://blog.csdn.net/ftell/article/details/135297025
本文来自互联网用户投稿,该文观点仅代表作者本人,不代表本站立场。本站仅提供信息存储空间服务,不拥有所有权,不承担相关法律责任。 如若内容造成侵权/违法违规/事实不符,请联系我的编程经验分享网邮箱:chenni525@qq.com进行投诉反馈,一经查实,立即删除!
本文来自互联网用户投稿,该文观点仅代表作者本人,不代表本站立场。本站仅提供信息存储空间服务,不拥有所有权,不承担相关法律责任。 如若内容造成侵权/违法违规/事实不符,请联系我的编程经验分享网邮箱:chenni525@qq.com进行投诉反馈,一经查实,立即删除!