【Spring源码分析】从源码角度去熟悉依赖注入(一)
从源码角度去熟悉依赖注入
其实在上篇阐述非懒加载单例Bean的实例化逻辑的时候,就有阐述过 AbstractAutowireCapableBeanFactory#createBean 的大概,它其实就阐述了一个 Bean 的生命周期:
- 加载BeanClass;
- 实例化前;
- 实例化;
- 后置处理合并后的 BeanDefinition,
MergedBeanDefinitionPostProcessor#postProcessMergedBeanDefinition(这不属于Bean的生命周期,但担任着很重要的角色) - 实例化后;
- 属性填充,这里的属性填充其实就是俺们说的依赖注入。
- 初始化前、初始化、初始化后。
- 硬要加上个结尾的话,就还有个销毁,一般用不着。
先阐述一下,就当上期博客的复习咯。
这期博客呢我们从源码的角度去看看属性填充(依赖注入)的内部实现。
首先阐明一下,像源码分析这种类型的博客呢,要么是自己熟悉原理,要么是自己看过,不然看起来会觉得好困难。
一、全局出发引出各种依赖注入策略
从上篇博客中的流程也可以知道属性填充在处理 MergedBeanDefinitionPostProcessor 之后:
			// 合并后的BeanDefinition的在处理
			applyMergedBeanDefinitionPostProcessors(mbd, beanType, beanName);

			// 属性填充
			populateBean(beanName, mbd, instanceWrapper);
接下来咱从 populateBean() 全局点的角度去引入各种属性注入的方式,下面是该方法的源码:
	@SuppressWarnings("deprecation")  // for postProcessPropertyValues
	protected void populateBean(String beanName, RootBeanDefinition mbd, @Nullable BeanWrapper bw) {

		// Give any InstantiationAwareBeanPostProcessors the opportunity to modify the
		// state of the bean before properties are set. This can be used, for example,
		// to support styles of field injection.
		// 实例化之后,属性设置之前
		// Spring 只是提供了这个生命周期阶段,但是实际上没有做任何处理
		if (!mbd.isSynthetic() && hasInstantiationAwareBeanPostProcessors()) {
			for (InstantiationAwareBeanPostProcessor bp : getBeanPostProcessorCache().instantiationAware) {
				if (!bp.postProcessAfterInstantiation(bw.getWrappedInstance(), beanName)) {
					return;
				}
			}
		}

		// 这是看 BeanDefinition 中是否已经有填充的属性了
		PropertyValues pvs = (mbd.hasPropertyValues() ? mbd.getPropertyValues() : null);

		// Spring 自己提供的填充策略
		int resolvedAutowireMode = mbd.getResolvedAutowireMode();
		if (resolvedAutowireMode == AUTOWIRE_BY_NAME || resolvedAutowireMode == AUTOWIRE_BY_TYPE) {
			// MutablePropertyValues是PropertyValues具体的实现类
			// 可以看见这里的 newPvs 和上面配置的 PropertyValues 是一起的
			MutablePropertyValues newPvs = new MutablePropertyValues(pvs);
			// Add property values based on autowire by name if applicable.
			if (resolvedAutowireMode == AUTOWIRE_BY_NAME) {
				autowireByName(beanName, mbd, bw, newPvs);
			}
			// Add property values based on autowire by type if applicable.
			if (resolvedAutowireMode == AUTOWIRE_BY_TYPE) {
				autowireByType(beanName, mbd, bw, newPvs);
			}
			pvs = newPvs;
		}


		// 下面是通过注解的方式进行注入的方式
		boolean hasInstAwareBpps = hasInstantiationAwareBeanPostProcessors();
		boolean needsDepCheck = (mbd.getDependencyCheck() != AbstractBeanDefinition.DEPENDENCY_CHECK_NONE);

		PropertyDescriptor[] filteredPds = null;
		if (hasInstAwareBpps) {
			if (pvs == null) {
				pvs = mbd.getPropertyValues();
			}
			for (InstantiationAwareBeanPostProcessor bp : getBeanPostProcessorCache().instantiationAware) {
				// 这里会调用AutowiredAnnotationBeanPostProcessor的postProcessProperties()方法,会直接给对象中的属性赋值
				// AutowiredAnnotationBeanPostProcessor内部并不会处理pvs,直接返回了
				PropertyValues pvsToUse = bp.postProcessProperties(pvs, bw.getWrappedInstance(), beanName);
				if (pvsToUse == null) {
					if (filteredPds == null) {
						filteredPds = filterPropertyDescriptorsForDependencyCheck(bw, mbd.allowCaching);
					}
					pvsToUse = bp.postProcessPropertyValues(pvs, filteredPds, bw.getWrappedInstance(), beanName);
					if (pvsToUse == null) {
						return;
					}
				}
				pvs = pvsToUse;
			}
		}
		if (needsDepCheck) {
			if (filteredPds == null) {
				filteredPds = filterPropertyDescriptorsForDependencyCheck(bw, mbd.allowCaching);
			}
			checkDependencies(beanName, mbd, filteredPds, pvs);
		}

		// 如果当前Bean中的BeanDefinition中设置了PropertyValues,那么最终将是PropertyValues中的值,覆盖@Autowired
		if (pvs != null) {
			applyPropertyValues(beanName, mbd, bw, pvs);
		}
	}
-
先是处理实例化后,Spring 没实例化后的逻辑,只是提供了这个生命周期阶段;
-
拿到 BeanDefinition 中已经有填充的属性,就是可以在 MergedBeanDefinitionPostProcessor 中去处理这个 BeanDefinition;比如下面这样自定义:
-
在上面拿到的基础上外加上解析是否通过
AUTOWIRE_BY_NAME或AUTOWIRE_BY_TYPE俩种模式下的填充的属性(PropertyValues); -
通过
InstantiationAwareBeanPostProcessor#postProcessProperties去填充属性,这里Spring主要是去解析注解填充(常用); -
最后将需要填充的属性进行个直接引用,通过 InstantiationAwareBeanPostProcessor#postProcessProperties 去填充属性的时候会直接去赋值操作,而最上面俩种是由最后处理,也就是说若俩种方式都使用了,上面的那种才有效,其中上面俩种需要提供对应的 setter 方法。
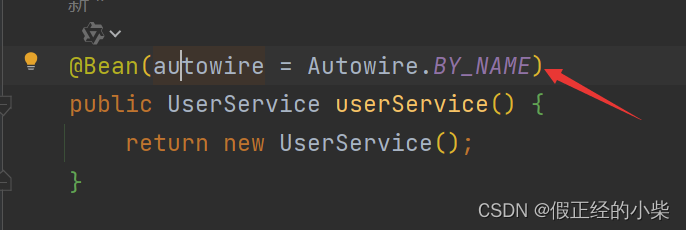
了解完上面这些就可以开始真正的源码分析环节了,前俩种属性填充其实没啥好说的,这里简单提一下 By_Name 和 By_Type 方式进行的填充源码:
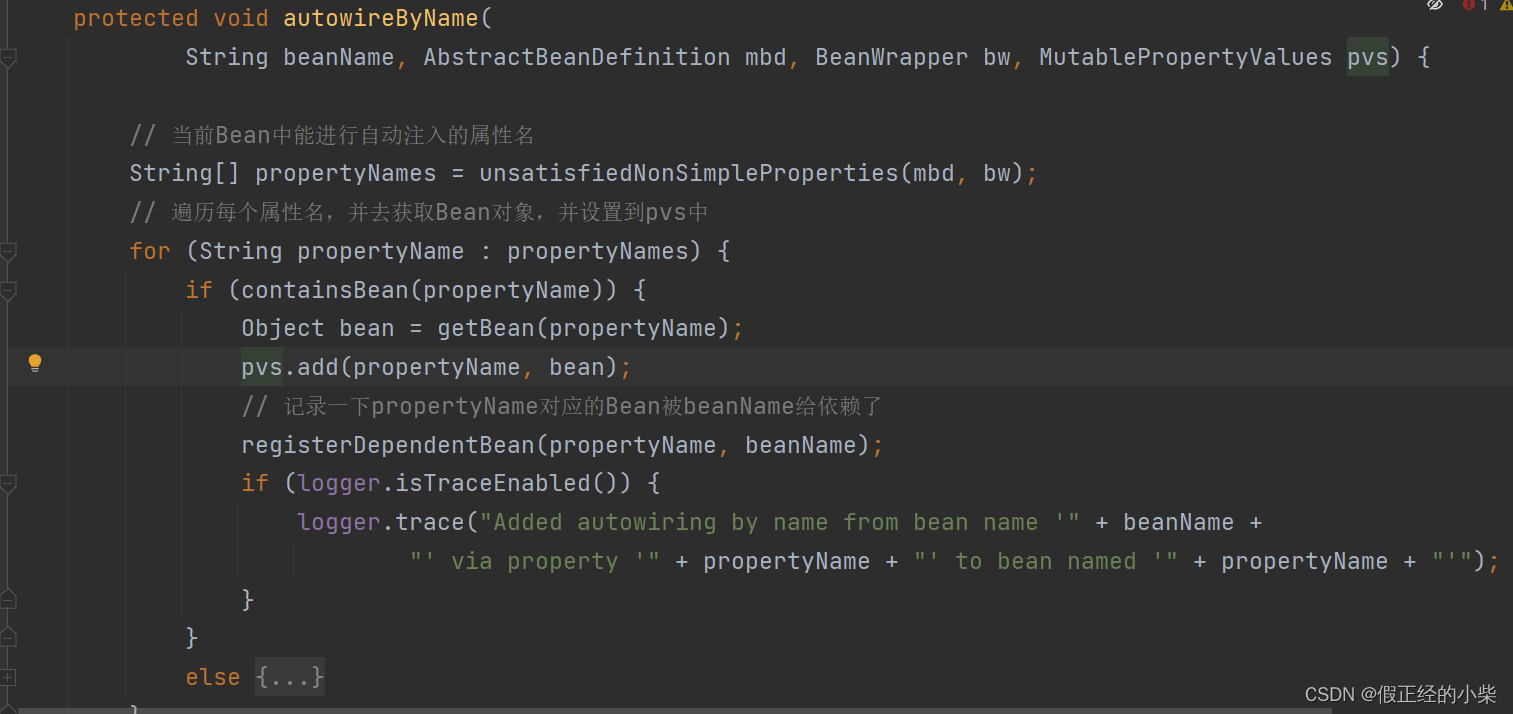
- 先是获取到可以注入的属性名(这里面的具体实现是先拿到属性的内省对象,然后遍历去将满足条件的属性返回)
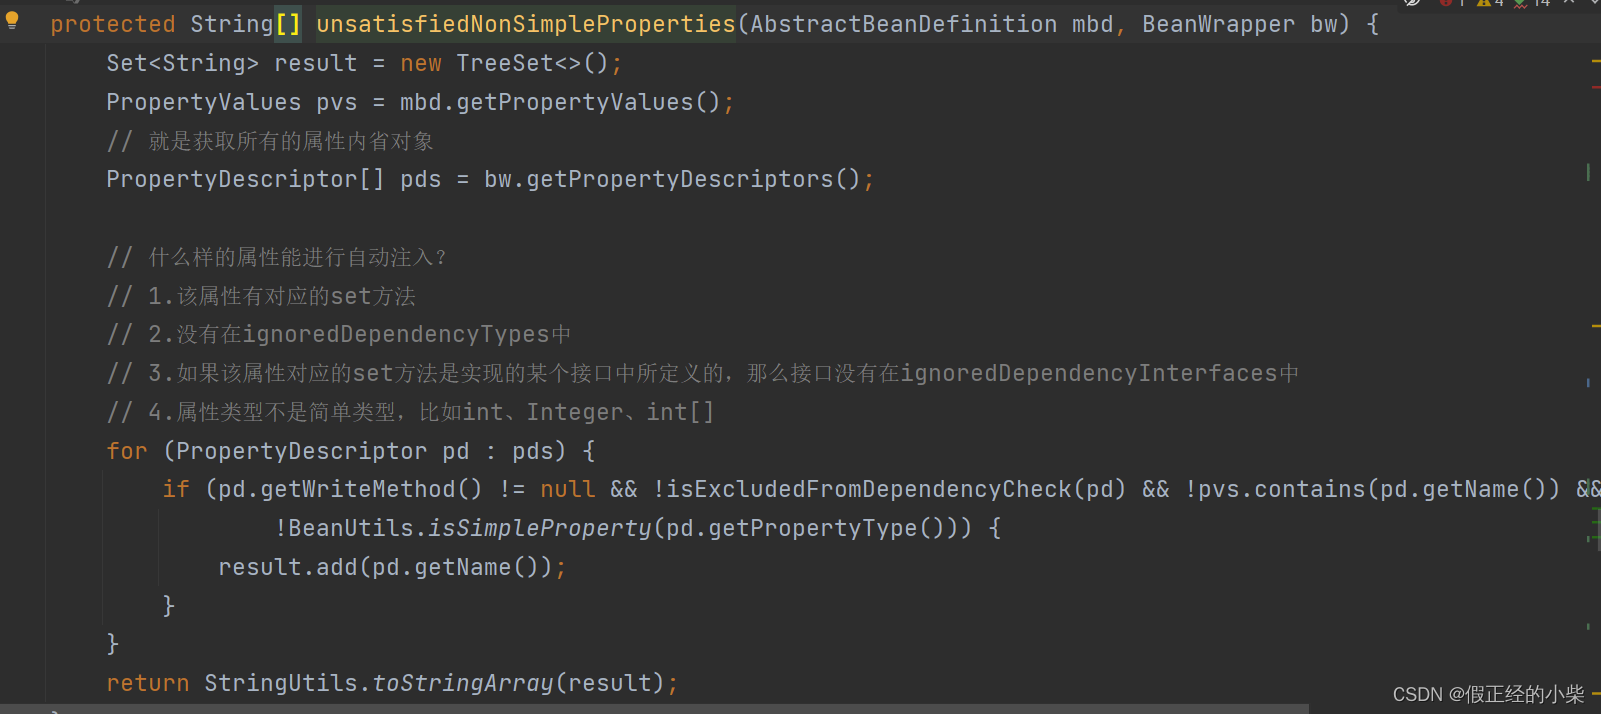
- 该属性有对应的set方法;
- 没有被 excludeFilters 所排除;
- 先前是没有填充过该属性的;
- 属性类型不是简单类型。
- 比如下面容器中有个 Number 简单类型的Bean;
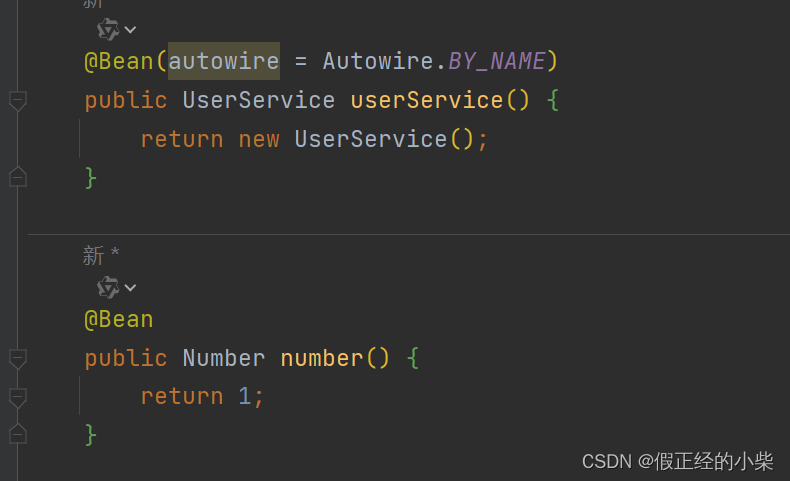
- 现在尝试注入到UserService中:
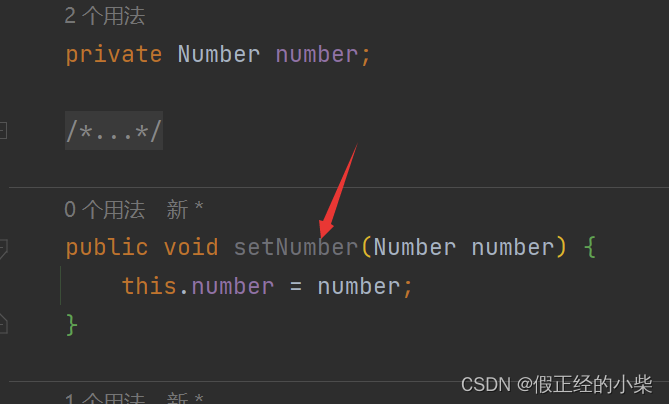
- 可以看见注入失败了

- 然后遍历返回的属性名,去获取对应的实例,然后放到 PropertyValues 对象中,由后续再直接去调用 setter 去填充。
它是有缺陷的,会把所有满足条件的 setter 方法都当做是去属性注入去调用,而且可以看见它是不让填充简单类型的实例对象的,所以就有了后续的注解式的方式。
二、@Autowired依赖注入源码分析
这里的源码逻辑和 InstantiationAwareBeanPostProcessor#postProcessPropertyValues 里实现的。其主要实现是在 AutowiredAnnotationBeanPostProcessor 中。
有必要去看一下该类的关系结构图:
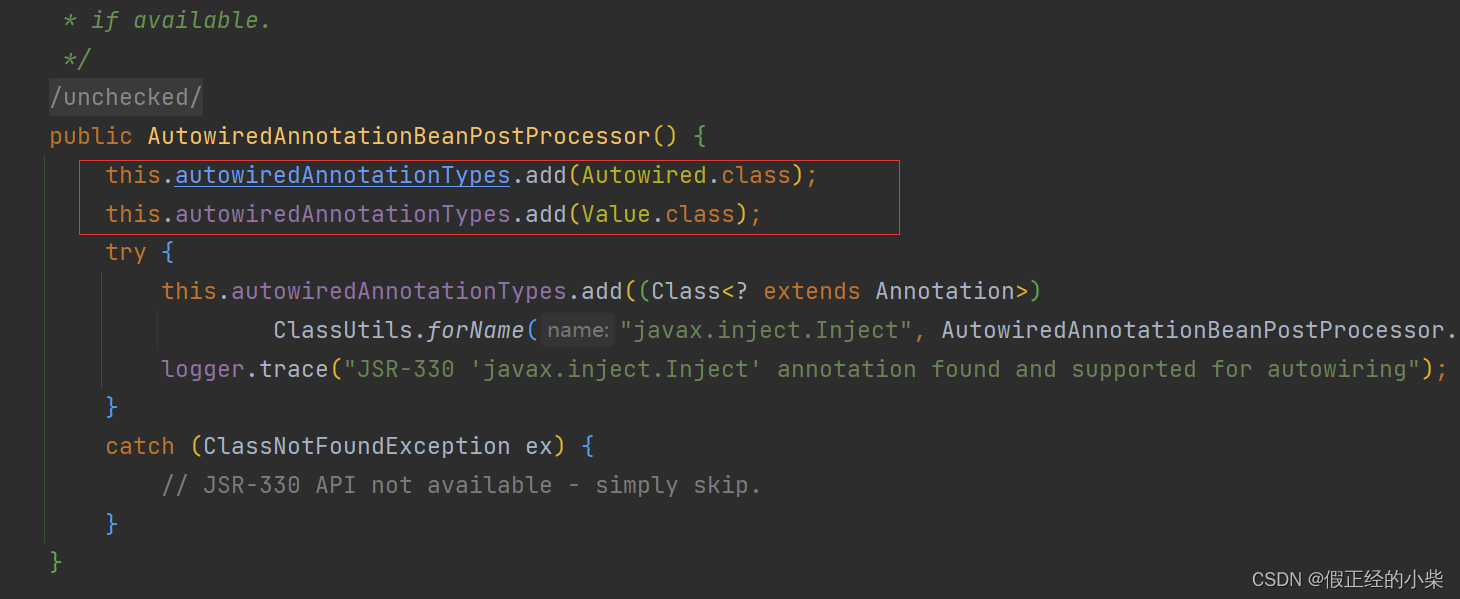
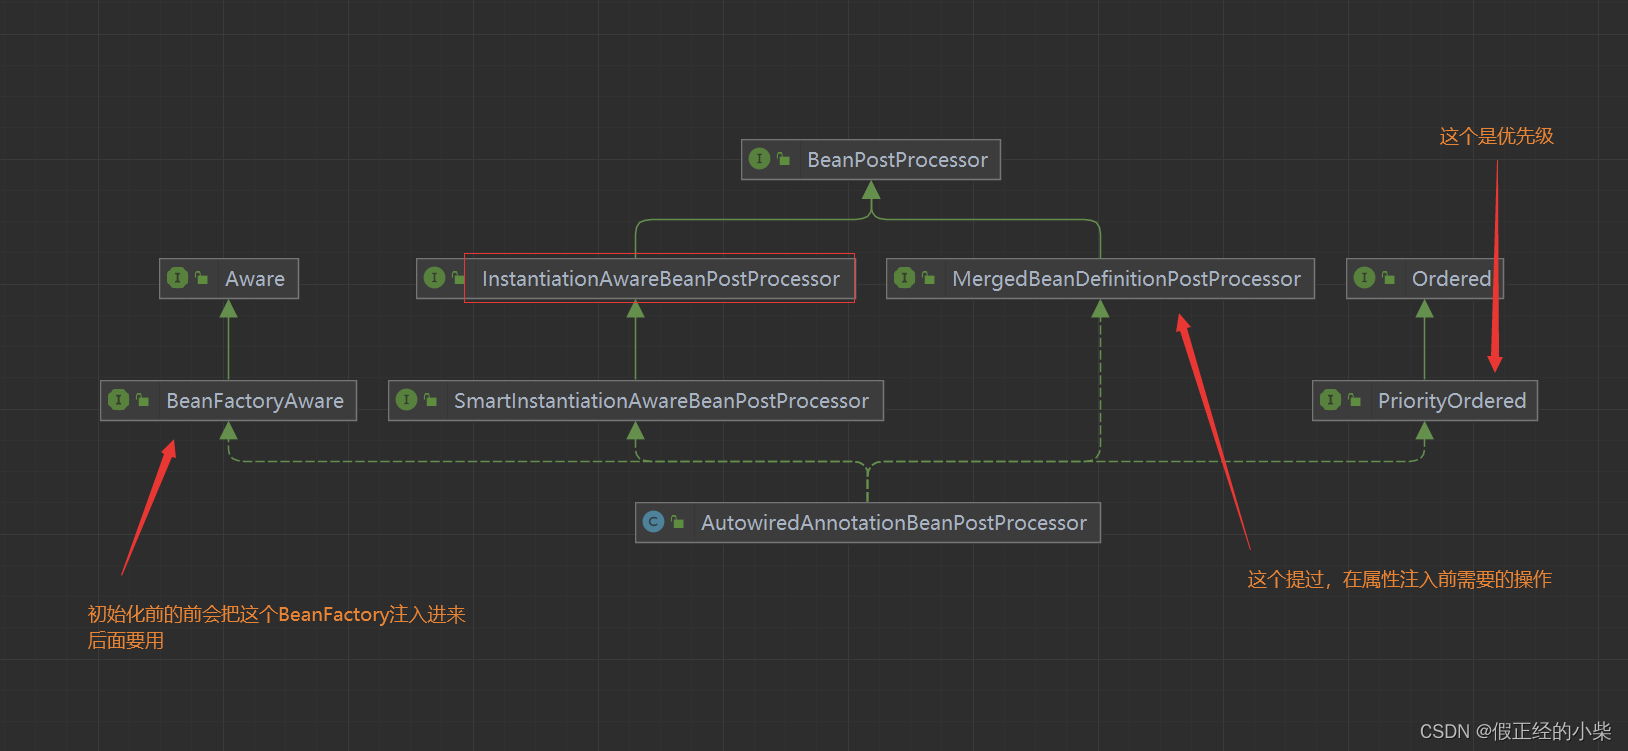 该 BeanPostProcessor 就一个无参构造,咱来看看,就是俺们希望看见的 @Autowired、@Value 注解。
 从上文中也清楚,是先执行的
 MergedBeanDefinitionPostProcessor#postProcessMergedBeanDefinition BeanDefinition 的再操作,再去进行属性注入。那我们看这个 BeanPostProcessor 源码,当然也是先去看 postProcessMergedBeanDefinition 方法。接下俩的分析如下:
	@Override
	public void postProcessMergedBeanDefinition(RootBeanDefinition beanDefinition, Class<?> beanType, String beanName) {
		// 找注入点(所有被@Autowired注解了的Field或Method)
		InjectionMetadata metadata = findAutowiringMetadata(beanName, beanType, null);
		// 将寻找到的注入点放入到 BeanDefinition 中
		metadata.checkConfigMembers(beanDefinition);
	}
findAutowiringMetadata 源码分析:
	private InjectionMetadata findAutowiringMetadata(String beanName, Class<?> clazz, @Nullable PropertyValues pvs) {
		// Fall back to class name as cache key, for backwards compatibility with custom callers.
		// 构造缓存 key,如果beanName不为空,就用beanName,否则用类的全限定名
		String cacheKey = (StringUtils.hasLength(beanName) ? beanName : clazz.getName());
		// Quick check on the concurrent map first, with minimal locking.
		InjectionMetadata metadata = this.injectionMetadataCache.get(cacheKey);
		if (InjectionMetadata.needsRefresh(metadata, clazz)) {
			synchronized (this.injectionMetadataCache) {
				metadata = this.injectionMetadataCache.get(cacheKey);
				if (InjectionMetadata.needsRefresh(metadata, clazz)) {
					if (metadata != null) {
						metadata.clear(pvs);
					}
					// 解析注入点并缓存
					metadata = buildAutowiringMetadata(clazz);
					// 存入本地缓存
					// 后续属性注入可以直接从这个缓存中获取
					this.injectionMetadataCache.put(cacheKey, metadata);
				}
			}
		}
		return metadata;
	}
也就是说咱得去看这里面的核心代码 buildAutowiringMetadata 它是如何去解析注入点的,拿到元数据然后放到本地缓存中,接下来是看源码环节:
	private InjectionMetadata buildAutowiringMetadata(final Class<?> clazz) {
		// 如果一个Bean的类型是String...,那么则根本不需要进行依赖注入
		// 准确的说是 clazz 的全限定名是以 java. 开头,比如 java.lang.String
		if (!AnnotationUtils.isCandidateClass(clazz, this.autowiredAnnotationTypes)) {
			return InjectionMetadata.EMPTY;
		}

		List<InjectionMetadata.InjectedElement> elements = new ArrayList<>();
		Class<?> targetClass = clazz;

		do {
			final List<InjectionMetadata.InjectedElement> currElements = new ArrayList<>();

			// 遍历targetClass中的所有Field
			ReflectionUtils.doWithLocalFields(targetClass, field -> {
				// field上是否存在@Autowired、@Value、@Inject中的其中一个
				MergedAnnotation<?> ann = findAutowiredAnnotation(field);
				if (ann != null) {
					// static filed不是注入点,不会进行自动注入
					if (Modifier.isStatic(field.getModifiers())) {
						if (logger.isInfoEnabled()) {
							logger.info("Autowired annotation is not supported on static fields: " + field);
						}
						return;
					}

					// 构造注入点
					boolean required = determineRequiredStatus(ann);
					currElements.add(new AutowiredFieldElement(field, required));
				}
			});

			// 遍历targetClass中的所有Method
			ReflectionUtils.doWithLocalMethods(targetClass, method -> {

				// 处理桥接方法
				Method bridgedMethod = BridgeMethodResolver.findBridgedMethod(method);
				if (!BridgeMethodResolver.isVisibilityBridgeMethodPair(method, bridgedMethod)) {
					return;
				}
				// method上是否存在@Autowired、@Value、@Inject中的其中一个
				MergedAnnotation<?> ann = findAutowiredAnnotation(bridgedMethod);
				if (ann != null && method.equals(ClassUtils.getMostSpecificMethod(method, clazz))) {
					// static method不是注入点,不会进行自动注入
					if (Modifier.isStatic(method.getModifiers())) {
						if (logger.isInfoEnabled()) {
							logger.info("Autowired annotation is not supported on static methods: " + method);
						}
						return;
					}
					// set方法最好有入参
					// 要是没参的话会打印日志信息,但是也会注入
					if (method.getParameterCount() == 0) {
						if (logger.isInfoEnabled()) {
							logger.info("Autowired annotation should only be used on methods with parameters: " +
									method);
						}
					}
					boolean required = determineRequiredStatus(ann);
					PropertyDescriptor pd = BeanUtils.findPropertyForMethod(bridgedMethod, clazz);
					currElements.add(new AutowiredMethodElement(method, required, pd));
				}
			});

			elements.addAll(0, currElements);
			targetClass = targetClass.getSuperclass();
		}
		while (targetClass != null && targetClass != Object.class);

		return InjectionMetadata.forElements(elements, clazz);
	}
- 总结流程
- 从该类开始不断遍历父类;
- 通过反射机制遍历所有的属性
- 看属性上面是不是有 @Autowired、@Value、@Inject 中的其中一个
- 排除属性是静态的,静态的属性类方面的成员,不属于实体级别的,不应该进行属性注入;
- 创建注入点
AutowiredFieldElement实体对象,然后放入到InjectedElement集。
- 通过反射机制遍历所有的方法
- 其他点和上面属性是一样的,如看方法上有无那些注解,排除方法是静态的…
- 然后创建注入点
AutowiredMethodElement实体对象,然后放入到InjectedElement集。
OK,也就是通过这咱就拿到了需要注入的属性和方法集,接下来就可以进行注入咯。
现咱去看看 InstantiationAwareBeanPostProcessor#postProcessPropertyValues ,这里指的是 AutowiredAnnotationBeanPostProcessor#postProcessPropertyValues
	@Override
	public PropertyValues postProcessProperties(PropertyValues pvs, Object bean, String beanName) {
		// 找注入点(所有被@Autowired注解了的Field或Method)
		InjectionMetadata metadata = findAutowiringMetadata(beanName, bean.getClass(), pvs);
		try {
			metadata.inject(bean, beanName, pvs);
		} catch (BeanCreationException ex) {
			throw ex;
		} catch (Throwable ex) {
			throw new BeanCreationException(beanName, "Injection of autowired dependencies failed", ex);
		}
		return pvs;
	}
- findAutowiringMetadata 方法找到对应需要注入的元数据对象,上面分析过,这里就是从本地缓存拿到的 InjectionMetadata 对象;
- 接下来直接进行注入~
注入 inject 方法实现其实很简单,就是遍历 InjectedElement 对象,然后依次调用它的 inject 进行遍历。
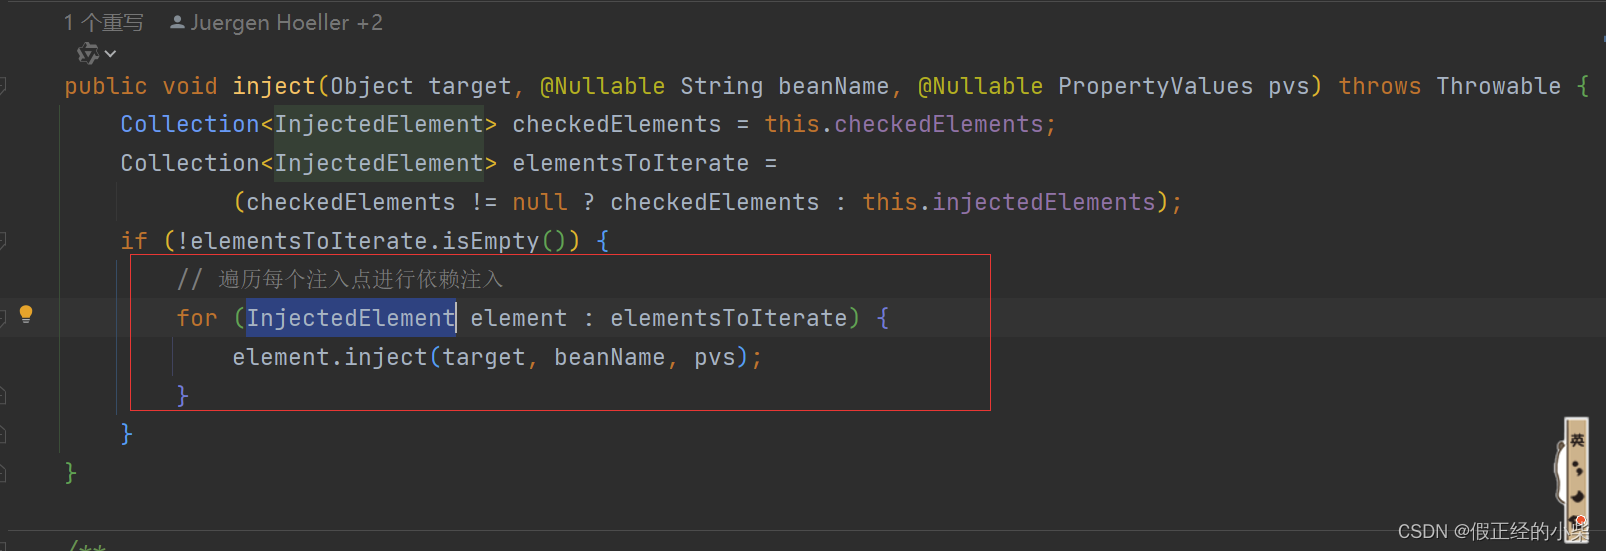
咱再过来看看 AutowiredFiledElement、AutowiredMethodElement、InjectedElement 之间的关系:

接下来就是看属性注入和方法注入是咋地实现的咯~
属性注入源码分析(AutowiredFieldElement.inject)
		@Override
		protected void inject(Object bean, @Nullable String beanName, @Nullable PropertyValues pvs) throws Throwable {

			Field field = (Field) this.member;
			Object value;
			if (this.cached) {
				// 对于原型Bean,第一次创建的时候,也找注入点,然后进行注入,此时cached为false,注入完了之后cached为true
				// 第二次创建的时候,先找注入点(此时会拿到缓存好的注入点),也就是AutowiredFieldElement对象,此时cache为true,也就进到此处了
				// 注入点内并没有缓存被注入的具体Bean对象,而是beanName,这样就能保证注入到不同的原型Bean对象
				try {
					value = resolvedCachedArgument(beanName, this.cachedFieldValue);
				} catch (NoSuchBeanDefinitionException ex) {
					// Unexpected removal of target bean for cached argument -> re-resolve
					value = resolveFieldValue(field, bean, beanName);
				}
			} else {
				// 根据filed从BeanFactory中查到的匹配的Bean对象
				value = resolveFieldValue(field, bean, beanName);
			}

			// 反射给filed赋值
			if (value != null) {
				ReflectionUtils.makeAccessible(field);
				field.set(bean, value);
			}
		}
- resolveFieldValue 方法,从 BeanFactory 中查询到对应的 Bean 对象;
- 反射进行属性赋值
方法注入源码分析(AutowiredMethodElement.inject)
		@Override
		protected void inject(Object bean, @Nullable String beanName, @Nullable PropertyValues pvs) throws Throwable {
			// 如果pvs中已经有当前注入点的值了,则跳过注入
			if (checkPropertySkipping(pvs)) {
				return;
			}
			Method method = (Method) this.member;
			Object[] arguments;
			if (this.cached) {
				try {
					arguments = resolveCachedArguments(beanName);
				} catch (NoSuchBeanDefinitionException ex) {
					// Unexpected removal of target bean for cached argument -> re-resolve
					arguments = resolveMethodArguments(method, bean, beanName);
				}
			} else {
				arguments = resolveMethodArguments(method, bean, beanName);
			}
			if (arguments != null) {
				try {
					ReflectionUtils.makeAccessible(method);
					method.invoke(bean, arguments);
				} catch (InvocationTargetException ex) {
					throw ex.getTargetException();
				}
			}
		}
- 排除掉 PropertyValues 已经有过的注入点,因为在上述提到过,是先进行的@Autowired 注入,然后再去 PropertyValues 的注入;(我不知道为啥属性注入那为什么不先排除,再看注不注入)
- resolveMethodArguments 找各个参数的对象;
- 反射调用对应的方法。
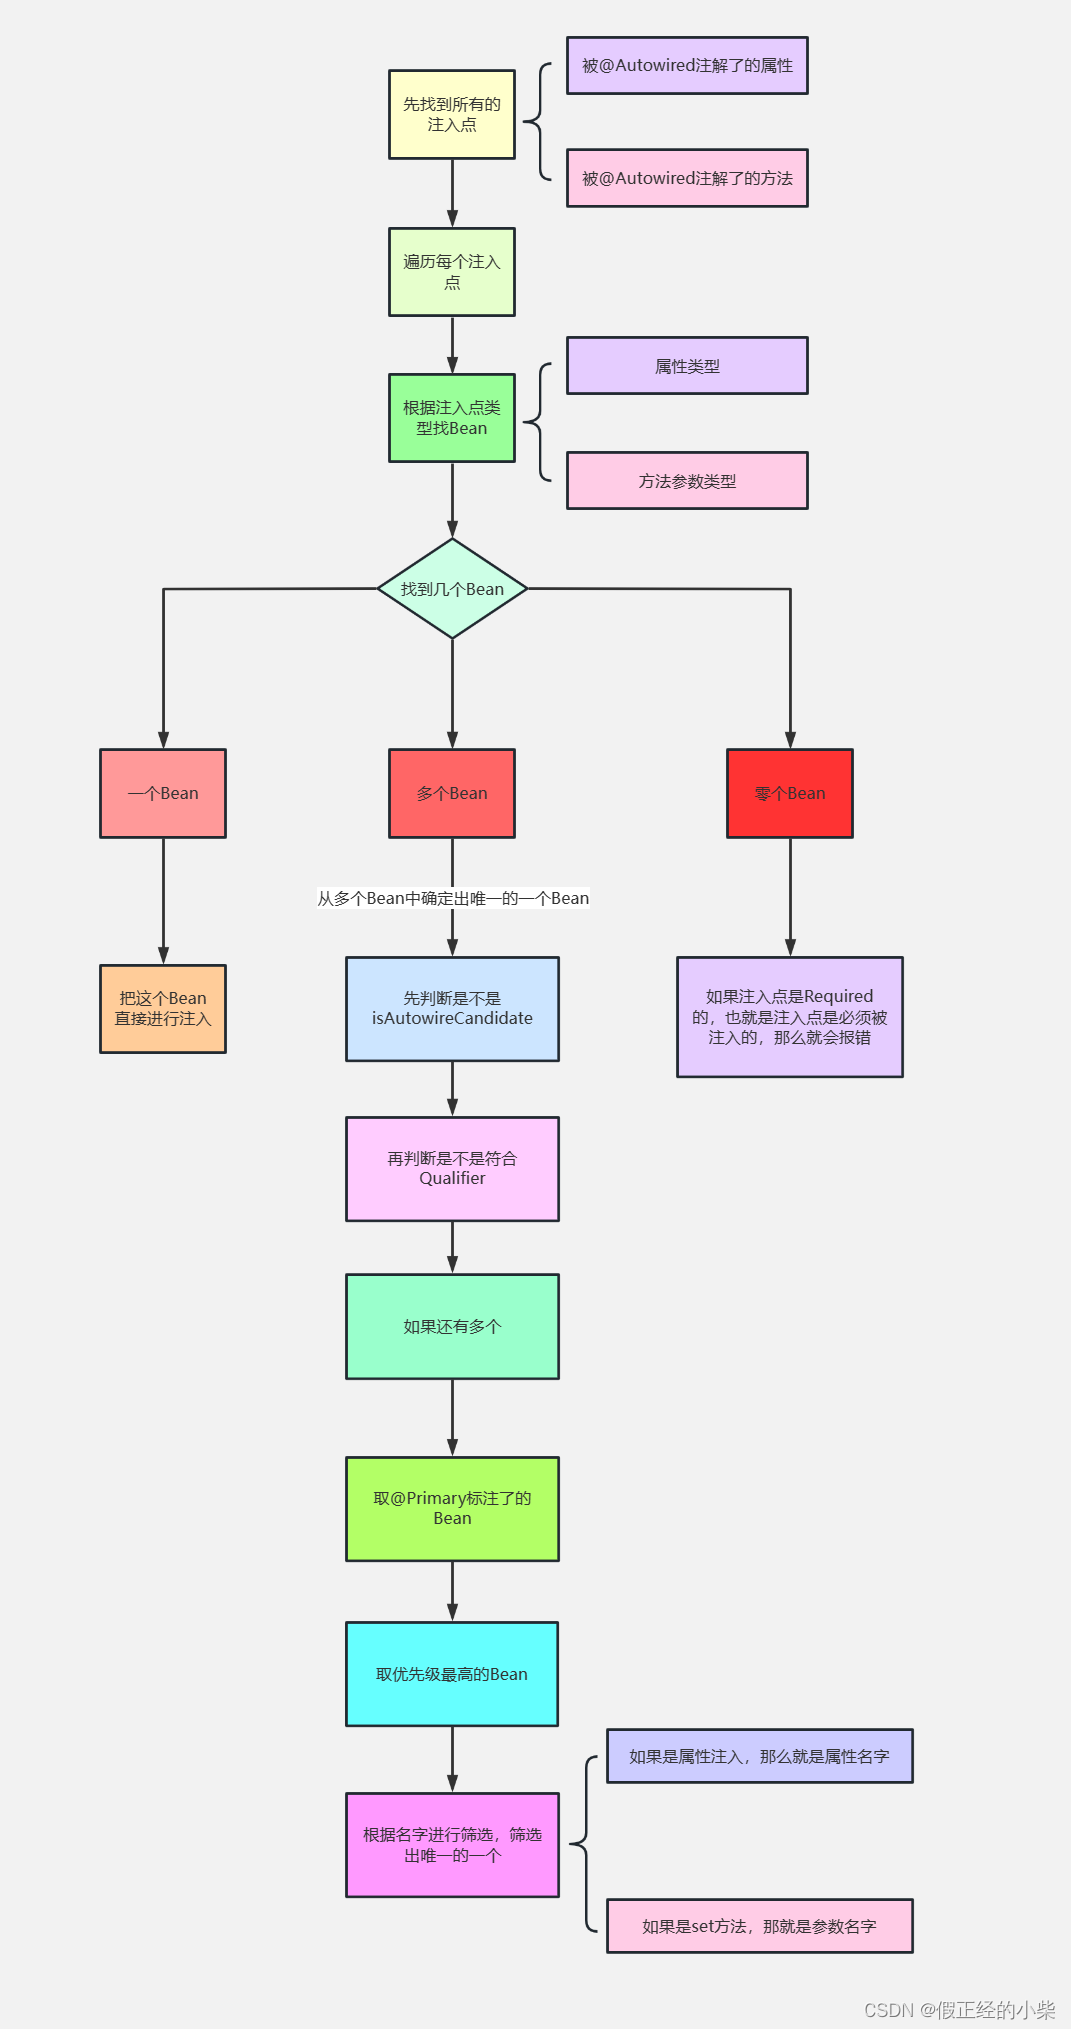
流程图
这篇已经很长了,现在只是阐述到根据注入点类型找 Bean,如何实现通过注入点类型找 Bean 还没阐述,再写下一篇博客进行阐述,都放这篇可能太长了。
本文来自互联网用户投稿,该文观点仅代表作者本人,不代表本站立场。本站仅提供信息存储空间服务,不拥有所有权,不承担相关法律责任。 如若内容造成侵权/违法违规/事实不符,请联系我的编程经验分享网邮箱:chenni525@qq.com进行投诉反馈,一经查实,立即删除!
- Python教程
- 深入理解 MySQL 中的 HAVING 关键字和聚合函数
- Qt之QChar编码(1)
- MyBatis入门基础篇
- 用Python脚本实现FFmpeg批量转换
- 如何用GOWIN创建FPGA工程
- 在laravel 项目中 composer.json 中 autoload 配置是什么作用
- OpenAI GPT应用商城正式上线!超300万个GPT应用供选择
- Springboot数据加密篇
- 让测试人头疼的web自动化之验证码识别彻底解决方案
- 关于gcc版本问题导致找不到filesystem以及GCC多版本切换
- C++-UI入门
- ensp与HCL共存问题
- python实现一维傅里叶变换——冈萨雷斯数字图像处理
- jssip挂断事件(ended),通话结束判断主叫挂断、被叫挂断还是系统挂断

