SpringBoot
Spring Boot
文章目录
- Spring Boot
- 任务一:SpringBoot的基本应用
- 任务二: SpringBoot原理剖析及高级
- 1.源码剖析-依赖管理-spring-boot-starter-parent
- 2.源码剖析-自动配置-SpringBootConfiguration
- 3.源码剖析-自动配置-AutoConfigurationPackage
- 4.源码剖析-自动配置-AutoConfigurationImportSelector
- 5.源码剖析-自动配置-ComponentScan
- 6.SpringBoot整合MyBatis-环境准备
- 7.SpringBoot整合MyBatis-注解方式
- 8.SpringBoot整合MyBatis-配置文件方式
- 9.SpringBoot整合Redis
- 10.SpringBoot支持的视图技术
- 11.Thymeleaf常用标签
- 12.Thymeleaf标准表达式
- 13.Thymeleaf基本使用
- 14.SpringBoot整合Thymeleaf
- 15.SpringBoot实战演练-Lombok
- 16.SpringBoot实战演练-基础环境准备
- 17.SpringBoot实战演练-业务逻辑实现
- 18.SpringBoot实战演练-查询功能实现
- 19.SpringBoot实战演练-增删改功能实现
- 20.SpringBoot项目部署
- 21.springboot 自测
任务一:SpringBoot的基本应用
1.SpringBoot内容介绍
2.约定优于配置
3.Spring Boot核心概念
4.Spring Boot入门案例
5.快速构建Spring Boot项目
springboot 启动类通常放在二级包下面,这样 springboot在做包扫描的时候,就可以扫描到启动类所在的包及其子包下的所有内容

6.Spring Boot 单元测试
6.1单元测试
-
单元测试
开发中,每完成成一个功能接口或业务方法的编写后,通常都会借助单元测试,验证该功能是否正确。Spring Boot对项目的单元测试提供了很好的支持,在使用时,需要提前在项目的pom.xml文件中添加spring-boot-starter-test 测试依赖启动器,可以通过相关注解实现单元测试。
实例:
-
添加spring-boot-starter-test 测试依赖启动器
-
在项目的pom.xml文件中添加spring-boot-starer-test测试依赖启动器,示例代码如下:
<dependency>
    <groupId>org.springframework.boot</groupId>
    <artifactId>spring-boot-starter-test</artifactId>
    <scope>test</scope>
</dependency>
注意:使用Spring Initialiizr 方式搭建的SpringBoot项目,会自动加入spring-boot-starter-test 测试依赖启动器,无需手动添
-
编写单元测试类和测试方法
使用Spring Initializr方式搭建的SpringBoot项目,会在 src/test/java 测试目录下自动创建与项目主程序启动类对应的单元测试类 (即启动类与单元测试类的项目路径相同)

package com.aifeng; import com.aifeng.controller.HelloController; import org.junit.jupiter.api.Test; import org.junit.runner.RunWith; import org.junit.runners.JUnit4; import org.springframework.beans.factory.annotation.Autowired; import org.springframework.boot.test.context.SpringBootTest; import org.springframework.test.context.junit4.SpringJUnit4ClassRunner; import org.springframework.test.context.junit4.SpringRunner; import java.time.temporal.JulianFields; @RunWith(SpringRunner.class) //@RunWith:运行器 |JUnit4.class: junit 测试运行环境| SpringJUnit4ClassRunner.class:spring 测试运行环境 | SpringRunner.class: springboot的测试运行环境 @SpringBootTest// 标记为 class Springbootdemo4ApplicationTests { /** * 需求:调用 HelloController的方法 * */ /* * 注入需要调用的类 * * */ @Autowired HelloController helloController; @Test void contextLoads() { String result = helloController.demo(); System.out.println(result); } -
-
7.SpringBoot项目热部署
热部署
- 添加项目依赖启动器:
<!-- 引入热部署依赖 -->
    <dependency>
        <groupId>org.springframework.boot</groupId>
        <artifactId>spring-boot-devtools</artifactId>
    </dependency>
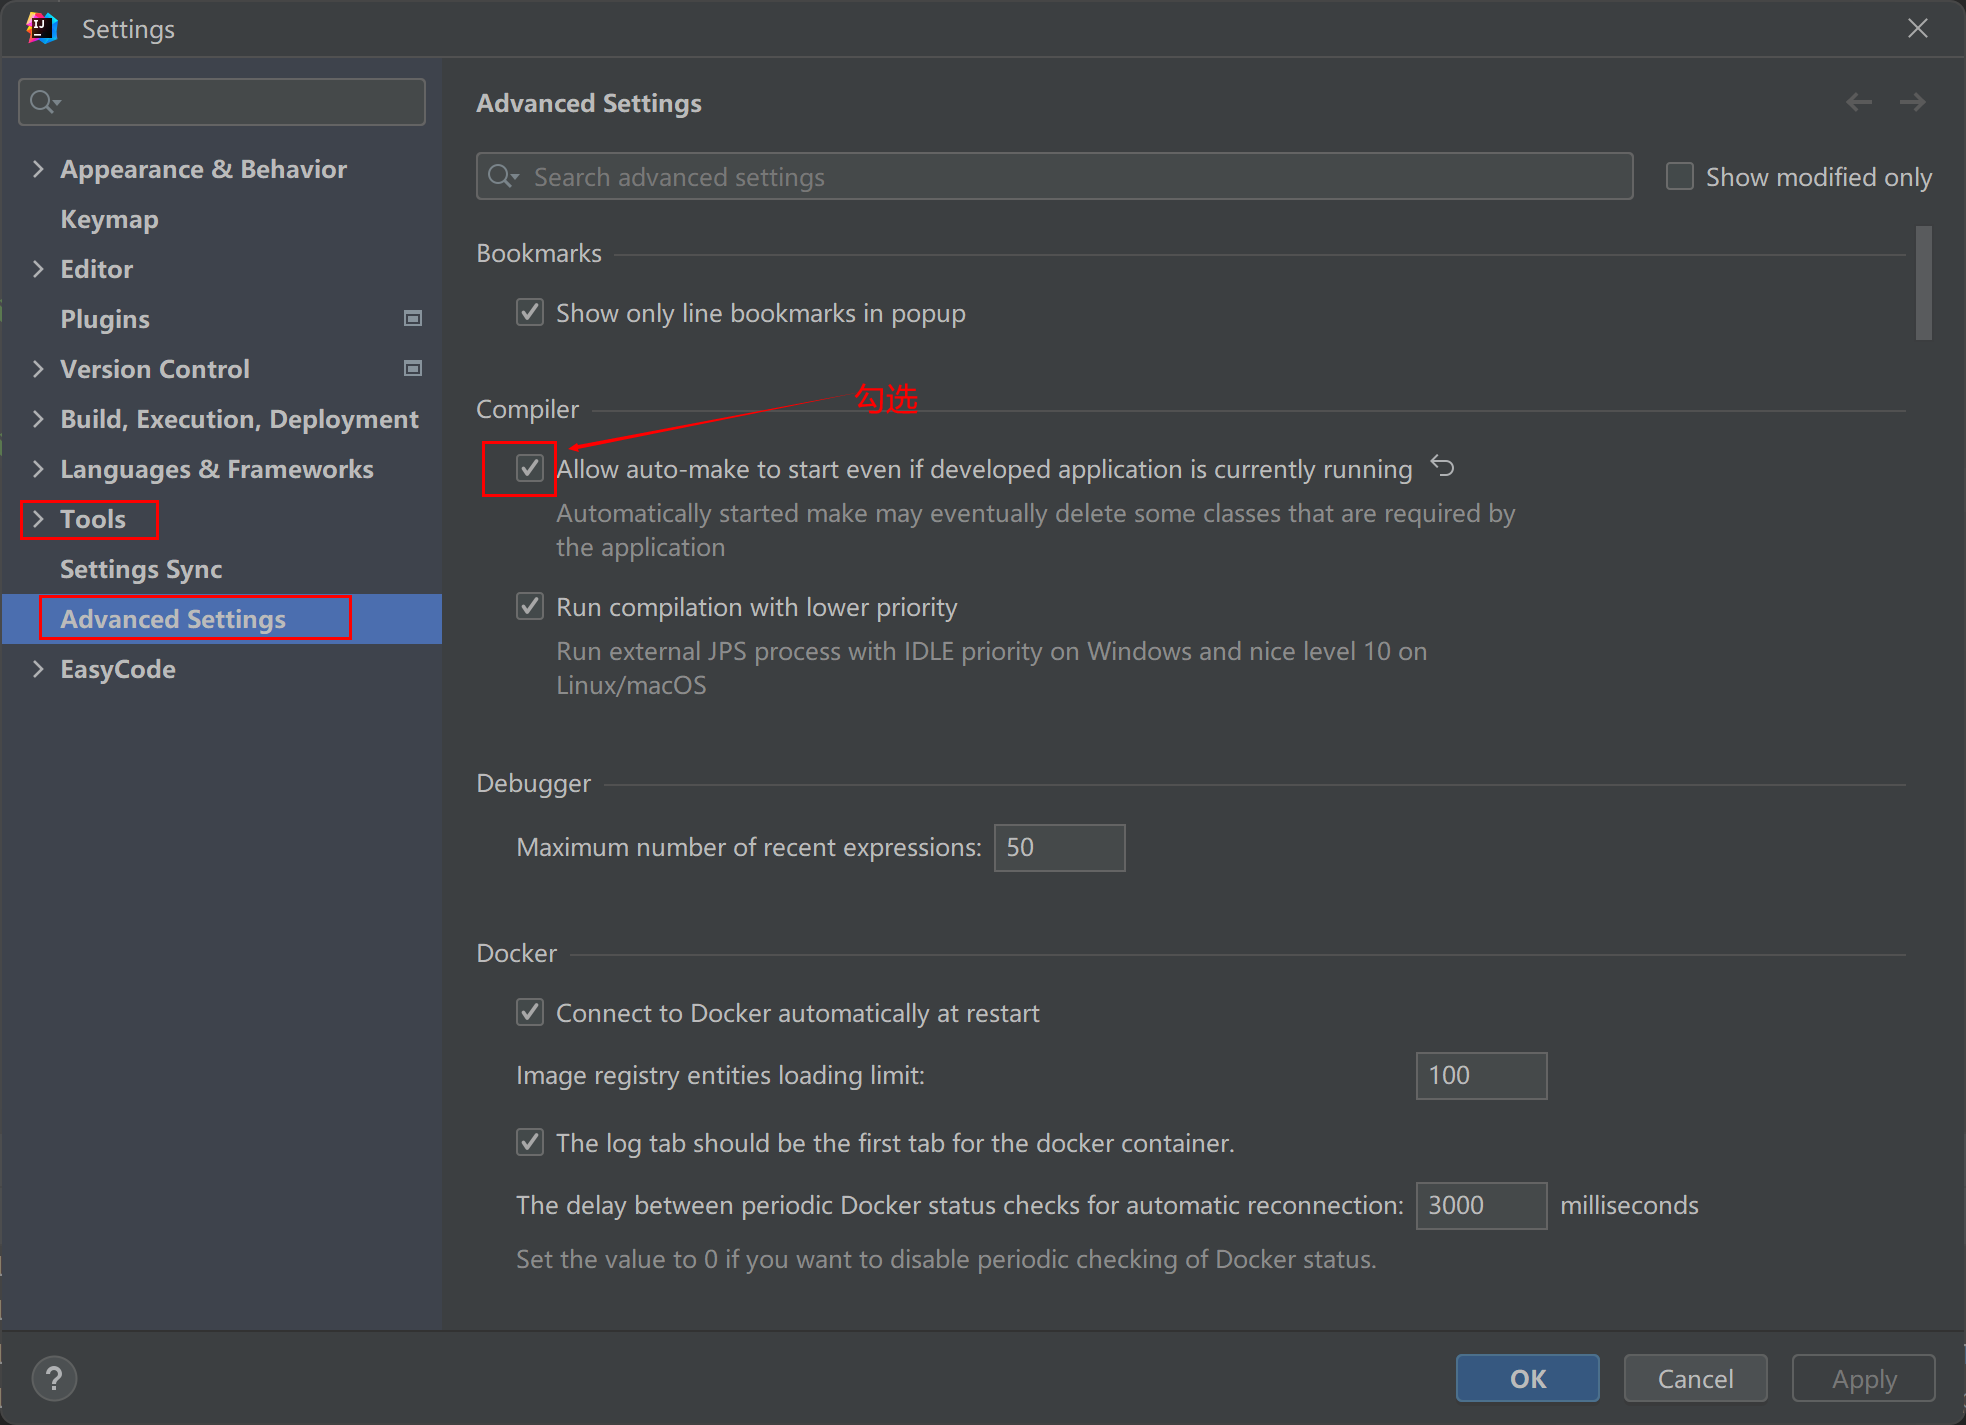
- 进行IDEA工具热部署的配置

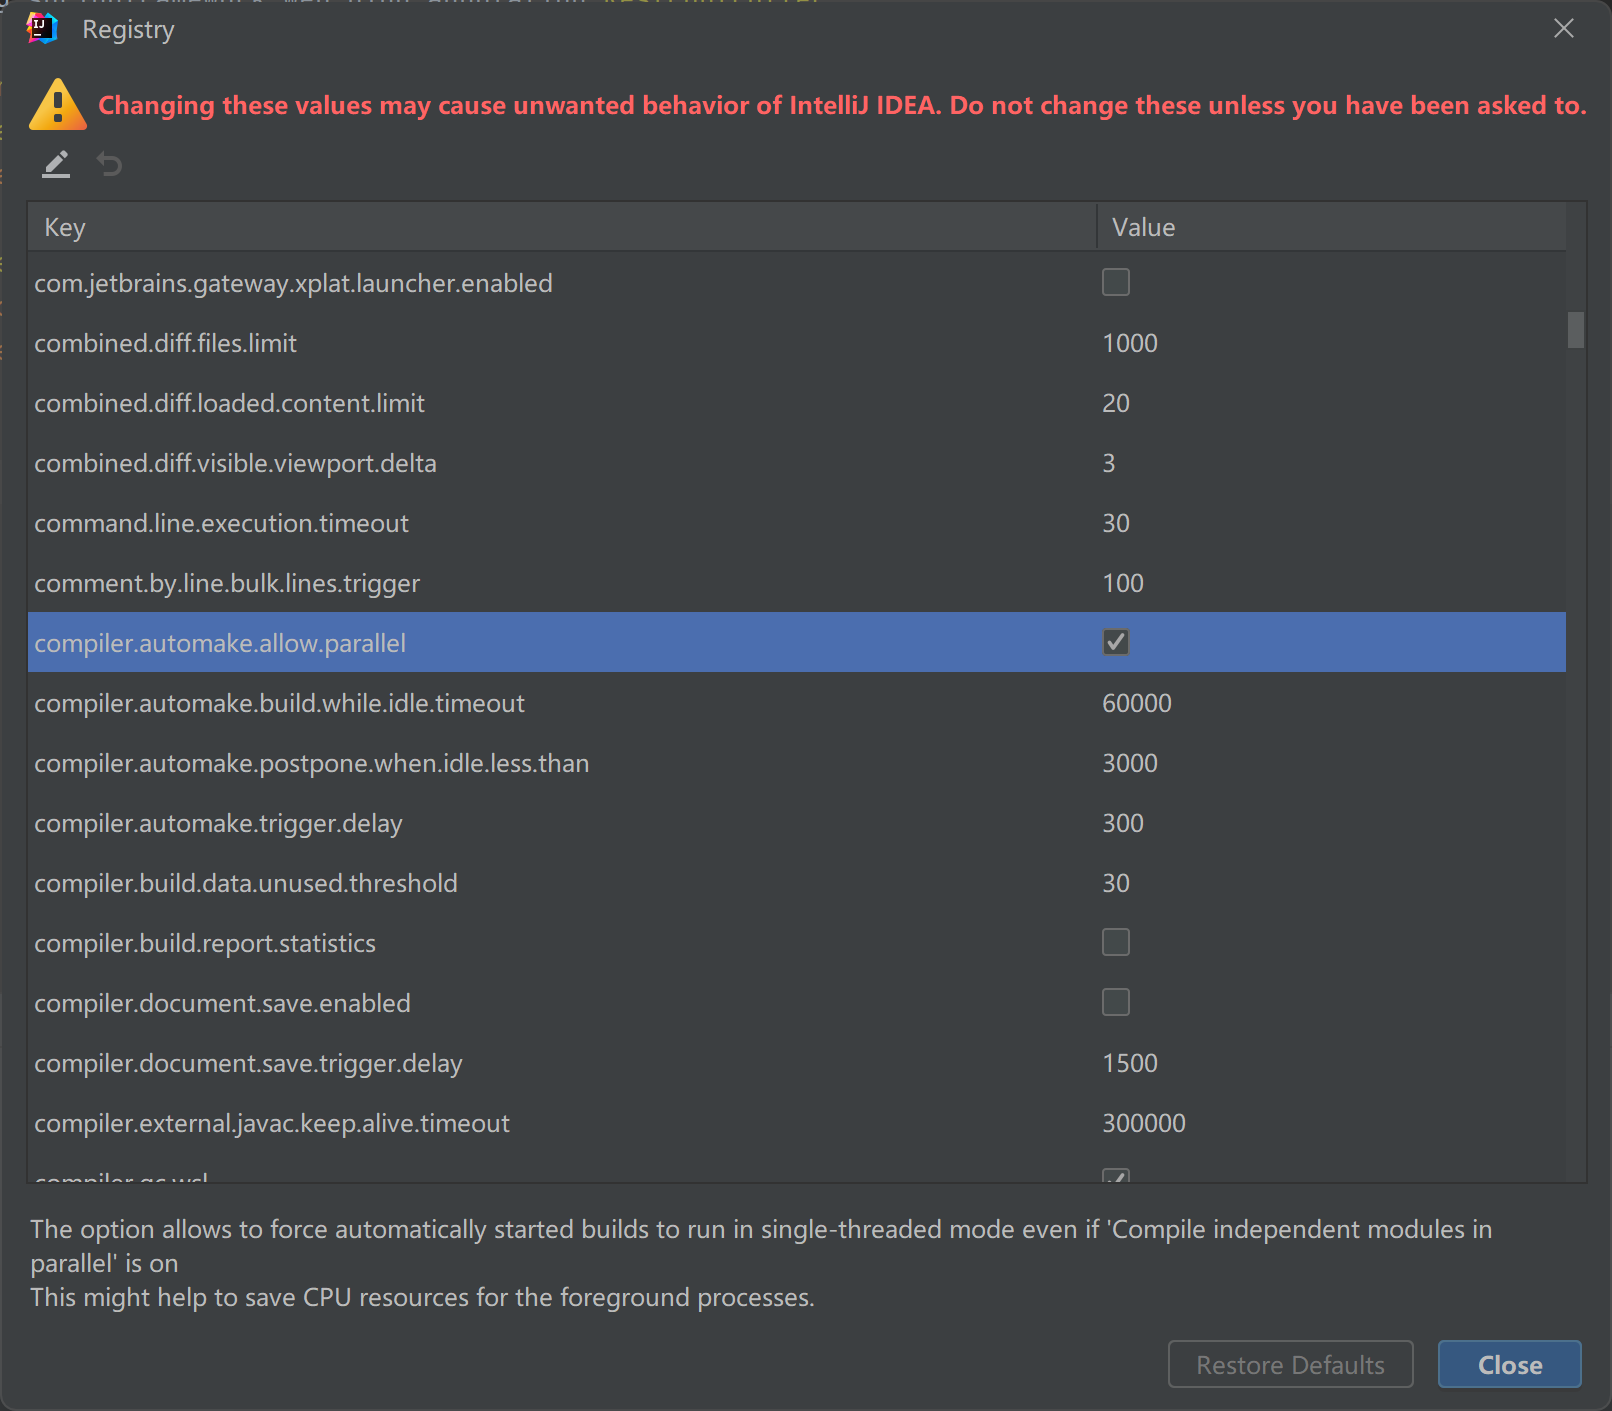
新版IDEA 配置自动编译(2023.1.4)
- 重新启动项目,编写测试更新代码
@RestController
@RequestMapping("/hello")
public class HelloController {

    @RequestMapping("/springboot")
    public String demo(){
        return "hello spring boot !!! 你好啊, i am  update !!!! you know i am update, yes i am update ";
    }
}
- 热部署测试
浏览器发送请求,查看返回结果与更新之后的一致

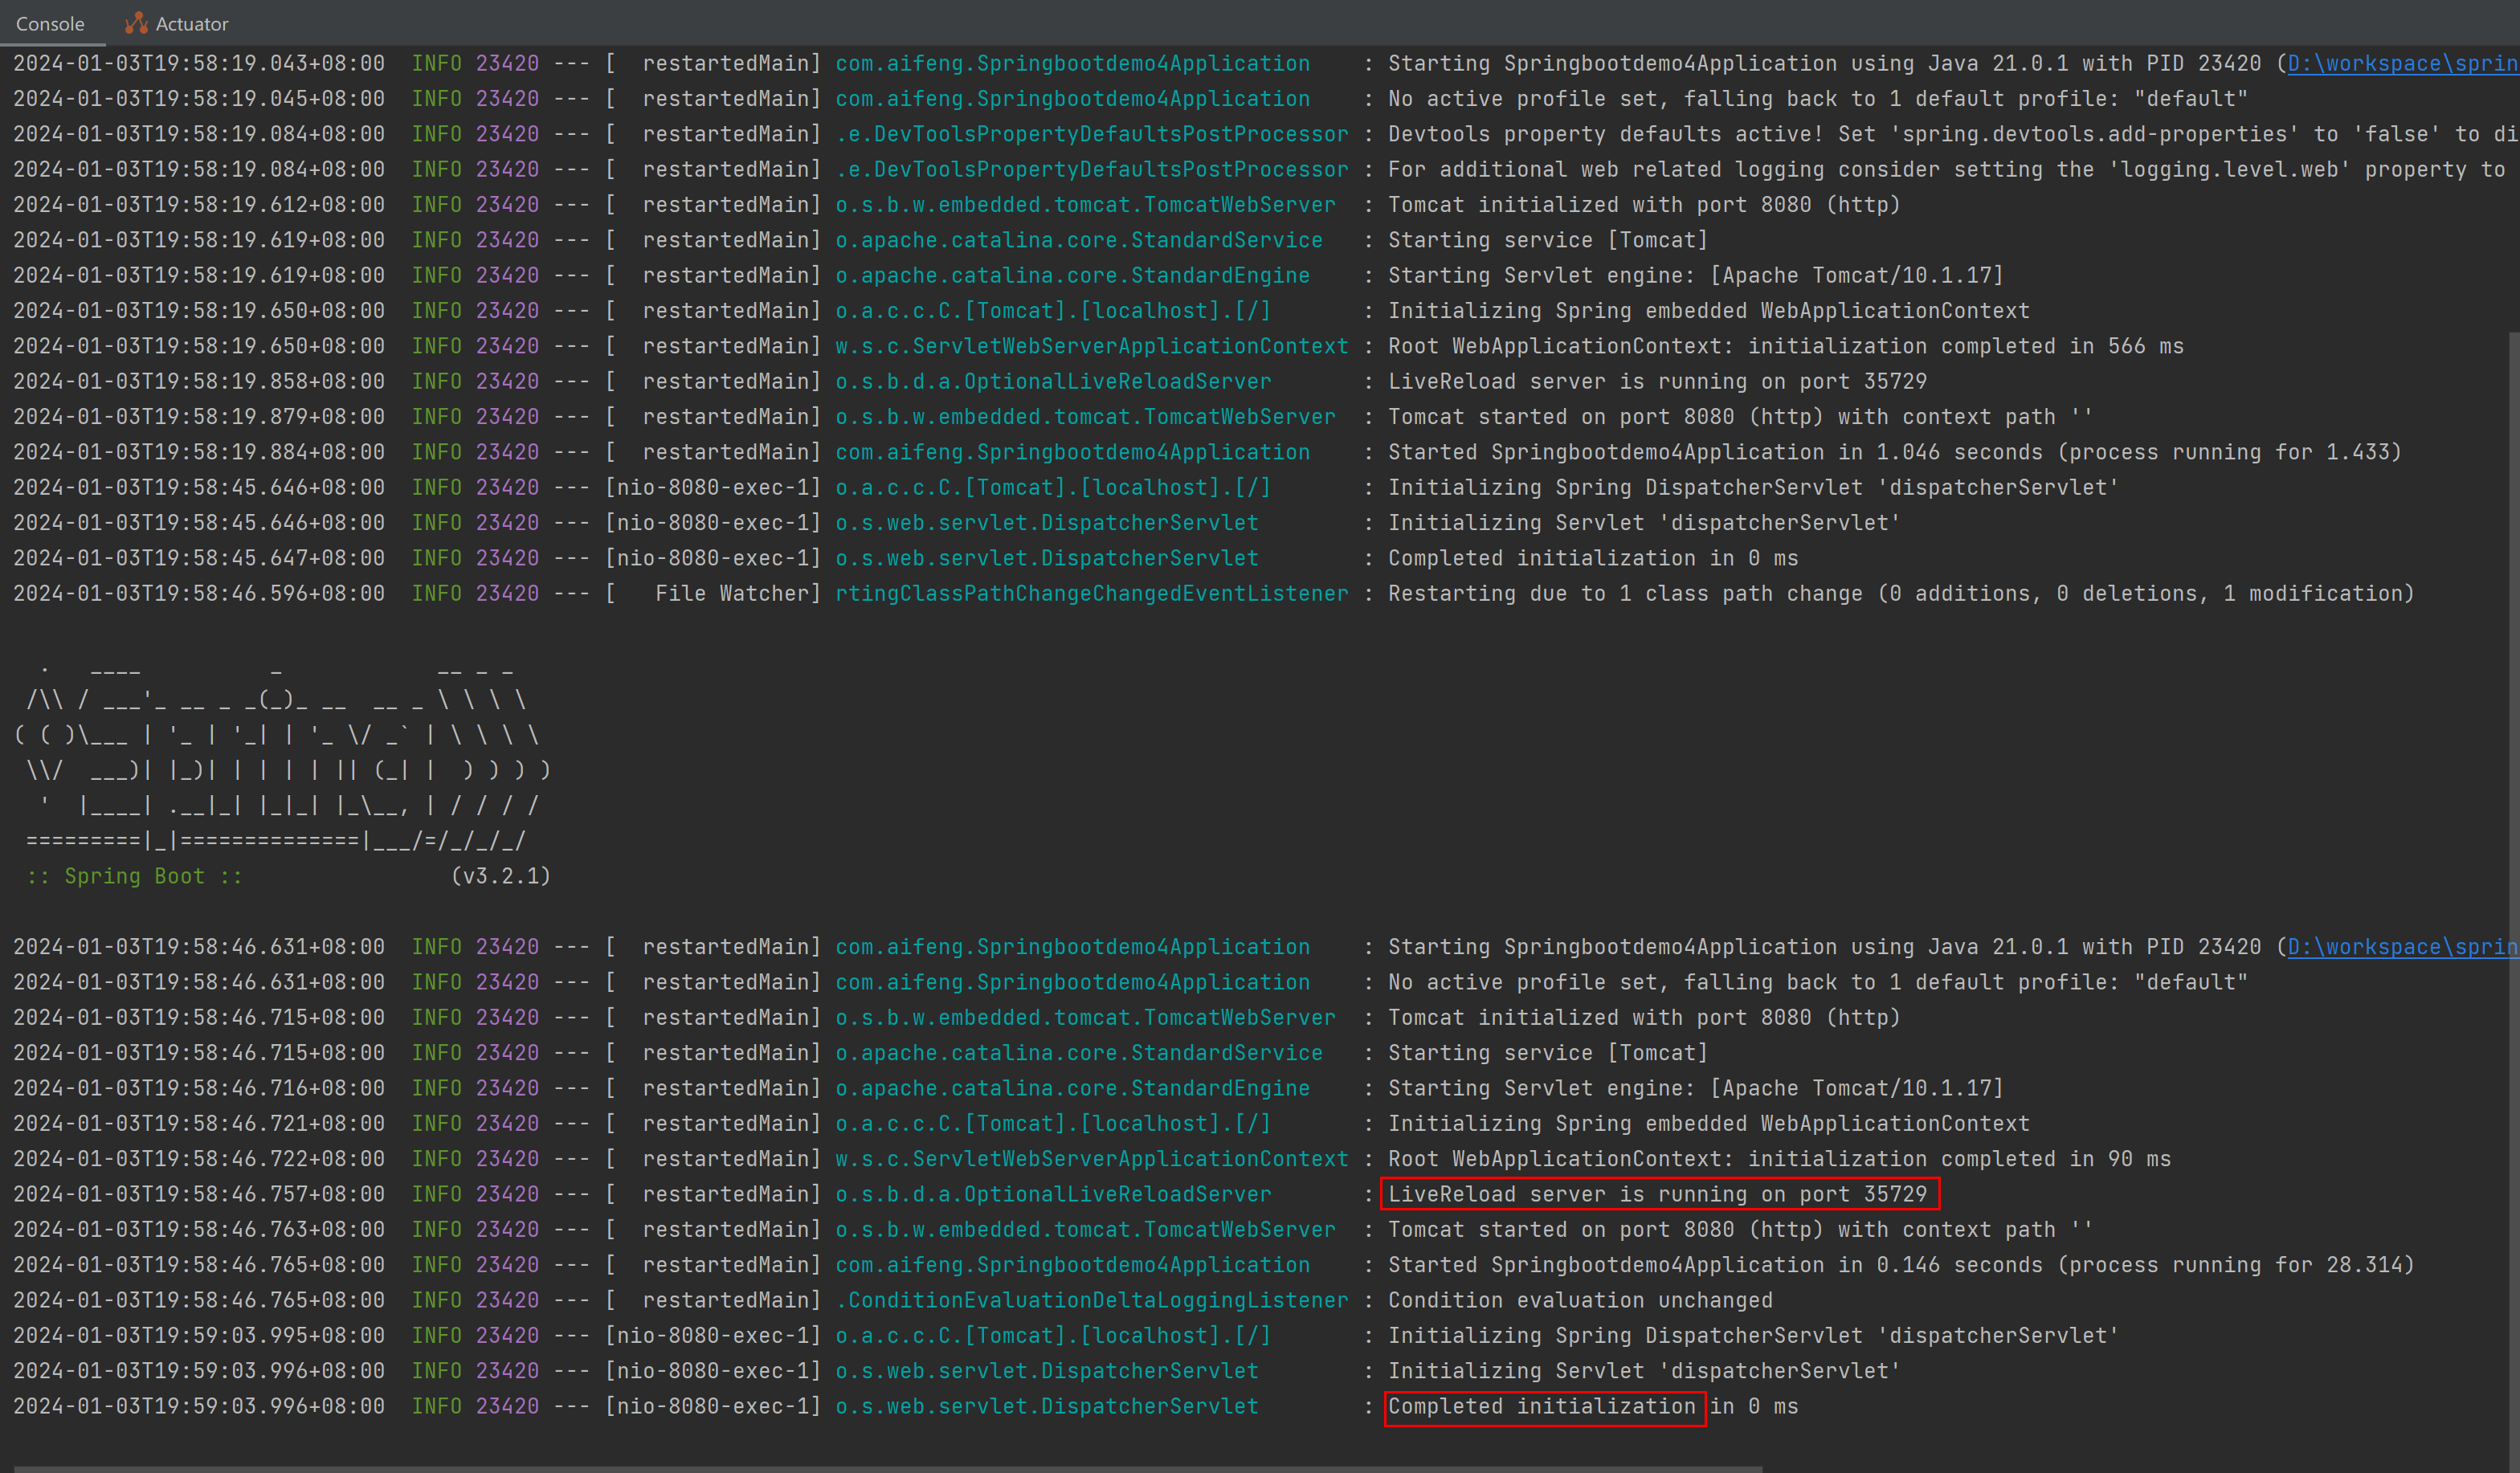
查看控制台打印信息,发现项目能够自动构建与编译,说明热部署生效(出现了多次 springboot 项目的启动与构建)
8.properties全局配置文件(上)
问题解决记录:mysql Communications link failure
mysql驱动依赖:
https://mvnrepository.com/artifact/com.mysql/mysql-connector-j
–8.0
Communications link failure
The last packet sent successfully to the server was 0 milliseconds ago. The driver has not received any packets from the server.
Connection timed out: no further information
Connection timed out: no further information
–5.1.32
Can’t create driver instance
Error creating driver ‘MySQL’ instance.
Most likely required jar files are missing.
You should configure jars in driver settings.
Reason: can’t load driver class ‘com.mysql.cj.jdbc.Driver’
Error creating driver ‘MySQL’ instance.
Most likely required jar files are missing.
You should configure jars in driver settings.
Reason: can’t load driver class ‘com.mysql.cj.jdbc.Driver’
com.mysql.cj.jdbc.Driver
com.mysql.cj.jdbc.Driver
–5.1.34
Communications link failure
The last packet sent successfully to the server was 0 milliseconds ago. The driver has not received any packets from the server.
Connect timed out
Connect timed out
–
Communications link failure
The last packet sent successfully to the server was 0 milliseconds ago. The driver has not received any packets from the server.
Connection timed out: no further information
Connection timed out: no further information
查看 MySQL服务
[root@master ~]# systemctl status mysqld
● mysqld.service - MySQL Community Server
   Loaded: loaded (/usr/lib/systemd/system/mysqld.service; enabled; vendor preset: disabled)
   Active: active (running) since 三 2024-01-03 20:20:07 CST; 1h 31min ago
  Process: 1103 ExecStartPost=/usr/bin/mysql-systemd-start post (code=exited, status=0/SUCCESS)
  Process: 1063 ExecStartPre=/usr/bin/mysql-systemd-start pre (code=exited, status=0/SUCCESS)
 Main PID: 1102 (mysqld_safe)
   CGroup: /system.slice/mysqld.service
           ├─1102 /bin/sh /usr/bin/mysqld_safe --basedir=/usr
           └─1382 /usr/sbin/mysqld --basedir=/usr --datadir=/var/lib/mysql --plugin-dir=/usr/lib64/my...

1月 03 20:20:04 master systemd[1]: Starting MySQL Community Server...
1月 03 20:20:04 master mysqld_safe[1102]: 240103 20:20:04 mysqld_safe Logging to '/var/log/mysqld.log'.
1月 03 20:20:05 master mysqld_safe[1102]: 240103 20:20:05 mysqld_safe Starting mysqld daemon wit...ysql
1月 03 20:20:07 master systemd[1]: Started MySQL Community Server.
Hint: Some lines were ellipsized, use -l to show in full.
[root@master ~]#
mysql登录
mysql -uroot -p123456
查看mysql配置文件目录:
sql: SHOW VARIABLES LIKE ‘config_file’;
[root@master etc]# ls
adjtime                  gnupg                     motd               rwtab
aliases                  GREP_COLORS               mtab               rwtab.d
aliases.db               groff                     my.cnf             sasl2
alternatives             group                     my.cnf.d           securetty
anacrontab               group-                    NetworkManager     security
mysql配置文件修改超时参数
[root@master etc]# vi my.cnf
# For advice on how to change settings please see
# http://dev.mysql.com/doc/refman/5.6/en/server-configuration-defaults.html

[mysqld]
#
# Remove leading # and set to the amount of RAM for the most important data
# cache in MySQL. Start at 70% of total RAM for dedicated server, else 10%.
# innodb_buffer_pool_size = 128M
#
# Remove leading # to turn on a very important data integrity option: logging
# changes to the binary log between backups.
# log_bin
#
# Remove leading # to set options mainly useful for reporting servers.
# The server defaults are faster for transactions and fast SELECTs.
# Adjust sizes as needed, experiment to find the optimal values.
# join_buffer_size = 128M
# sort_buffer_size = 2M
# read_rnd_buffer_size = 2M
datadir=/var/lib/mysql
socket=/var/lib/mysql/mysql.sock
wait_timeout=2147483
interactive=2147483
# Disabling symbolic-links is recommended to prevent assorted security risks
symbolic-links=0

# Recommended in standard MySQL setup
sql_mode=NO_ENGINE_SUBSTITUTION,STRICT_TRANS_TABLES

[mysqld_safe]
log-error=/var/log/mysqld.log
pid-file=/var/run/mysqld/mysqld.pid
查看设置的超时时间
[root@master ~]# mysql -uroot -p123456
Warning: Using a password on the command line interface can be insecure.
Welcome to the MySQL monitor.  Commands end with ; or \g.
Your MySQL connection id is 2
Server version: 5.6.51 MySQL Community Server (GPL)

Copyright (c) 2000, 2021, Oracle and/or its affiliates. All rights reserved.

Oracle is a registered trademark of Oracle Corporation and/or its
affiliates. Other names may be trademarks of their respective
owners.

Type 'help;' or '\h' for help. Type '\c' to clear the current input statement.

mysql> show global variables like 'interactive_timeout';
+---------------------+---------+
| Variable_name       | Value   |
+---------------------+---------+
| interactive_timeout | 2147483 |
+---------------------+---------+
1 row in set (0.00 sec)

mysql> show global variables like 'wait_timeout';
+---------------+---------+
| Variable_name | Value   |
+---------------+---------+
| wait_timeout  | 2147483 |
+---------------+---------+
1 row in set (0.00 sec)

mysql>
mysq服务端IP地址
192.168.11.128

Server version: 5.6.51 MySQL Community Server (GPL)
mysql 数据库查看权限
mysql> SELECT host,user,db FROM mysql.db;
+------+------+---------+
| host | user | db      |
+------+------+---------+
| %    |      | test    |
| %    |      | test\_% |
+------+------+---------+
2 rows in set (0.02 sec)

mysql> SHOW GRANTS FOR current_user;
+------------------------------------------------------------------------------------------------                      ----------------------------------------+
| Grants for root@localhost                                                                                                                                    |
+------------------------------------------------------------------------------------------------                      ----------------------------------------+
| GRANT ALL PRIVILEGES ON *.* TO 'root'@'localhost' IDENTIFIED BY PASSWORD '*6BB4837EB74329105EE4                      568DDA7DC67ED2CA2AD9' WITH GRANT OPTION |
| GRANT PROXY ON ''@'' TO 'root'@'localhost' WITH GRANT OPTION                                                                                                 |
+------------------------------------------------------------------------------------------------                      ----------------------------------------+
2 rows in set (0.00 sec)

mysql>
mysql 查看所有用户
mysql> select user,host,password from mysql.user;
+------+-----------------------+-------------------------------------------+
| user | host                  | password                                  |
+------+-----------------------+-------------------------------------------+
| root | localhost             | *6BB4837EB74329105EE4568DDA7DC67ED2CA2AD9 |
| root | localhost.localdomain |                                           |
| root | 127.0.0.1             |                                           |
| root | ::1                   |                                           |
|      | localhost             |                                           |
|      | localhost.localdomain |                                           |
| root | %                     | *6BB4837EB74329105EE4568DDA7DC67ED2CA2AD9 |
+------+-----------------------+-------------------------------------------+
7 rows in set (0.00 sec)
mysql用户授权
授权给root 权限为所有ip 都可以访问,赋予所有特殊权限给root用户,可以从任何IP地址远程登录,密码为****,且拥有 grant 赋予权限的权限
grant all privileges on *.* to 'root'@'%' identified by '123456' with grant option;
mysql 驱动程序检查
mysql 8.x 或更高版本: 使用 com.mysql.cj.jdbc.Driver 驱动程序
mysql 5.x 或更低版本: 使用 com.mysql.jdbc.Driver 驱动程序
centos7 关闭防火墙
[root@master etc]# systemctl status firewalld
● firewalld.service - firewalld - dynamic firewall daemon
   Loaded: loaded (/usr/lib/systemd/system/firewalld.service; enabled; vendor preset: enabled)
   Active: active (running) since 四 2024-01-04 09:40:33 CST; 10h ago
     Docs: man:firewalld(1)
 Main PID: 748 (firewalld)
   CGroup: /system.slice/firewalld.service
           └─748 /usr/bin/python2 -Es /usr/sbin/firewalld --nofork --nopid

1月 04 09:40:32 master systemd[1]: Starting firewalld - dynamic firewall daemon...
1月 04 09:40:33 master systemd[1]: Started firewalld - dynamic firewall daemon.
1月 04 09:40:34 master firewalld[748]: WARNING: AllowZoneDrifting is enabled. This is considered an insecure c... now.
Hint: Some lines were ellipsized, use -l to show in full.
[root@master etc]# systemctl stop firewalld
[root@master etc]# systemctl status firewalld
● firewalld.service - firewalld - dynamic firewall daemon
   Loaded: loaded (/usr/lib/systemd/system/firewalld.service; enabled; vendor preset: enabled)
   Active: inactive (dead) since 四 2024-01-04 20:08:04 CST; 2s ago
     Docs: man:firewalld(1)
  Process: 748 ExecStart=/usr/sbin/firewalld --nofork --nopid $FIREWALLD_ARGS (code=exited, status=0/SUCCESS)
 Main PID: 748 (code=exited, status=0/SUCCESS)

1月 04 09:40:32 master systemd[1]: Starting firewalld - dynamic firewall daemon...
1月 04 09:40:33 master systemd[1]: Started firewalld - dynamic firewall daemon.
1月 04 09:40:34 master firewalld[748]: WARNING: AllowZoneDrifting is enabled. This is considered an insecure c... now.
1月 04 20:08:02 master systemd[1]: Stopping firewalld - dynamic firewall daemon...
1月 04 20:08:04 master systemd[1]: Stopped firewalld - dynamic firewall daemon.
Hint: Some lines were ellipsized, use -l to show in full.
[root@master etc]# iptales -nL
-bash: iptales: 未找到命令
[root@master etc]# iptables -nL
Chain INPUT (policy ACCEPT)
target     prot opt source               destination

Chain FORWARD (policy ACCEPT)
target     prot opt source               destination

Chain OUTPUT (policy ACCEPT)
target     prot opt source               destination
[root@master etc]#
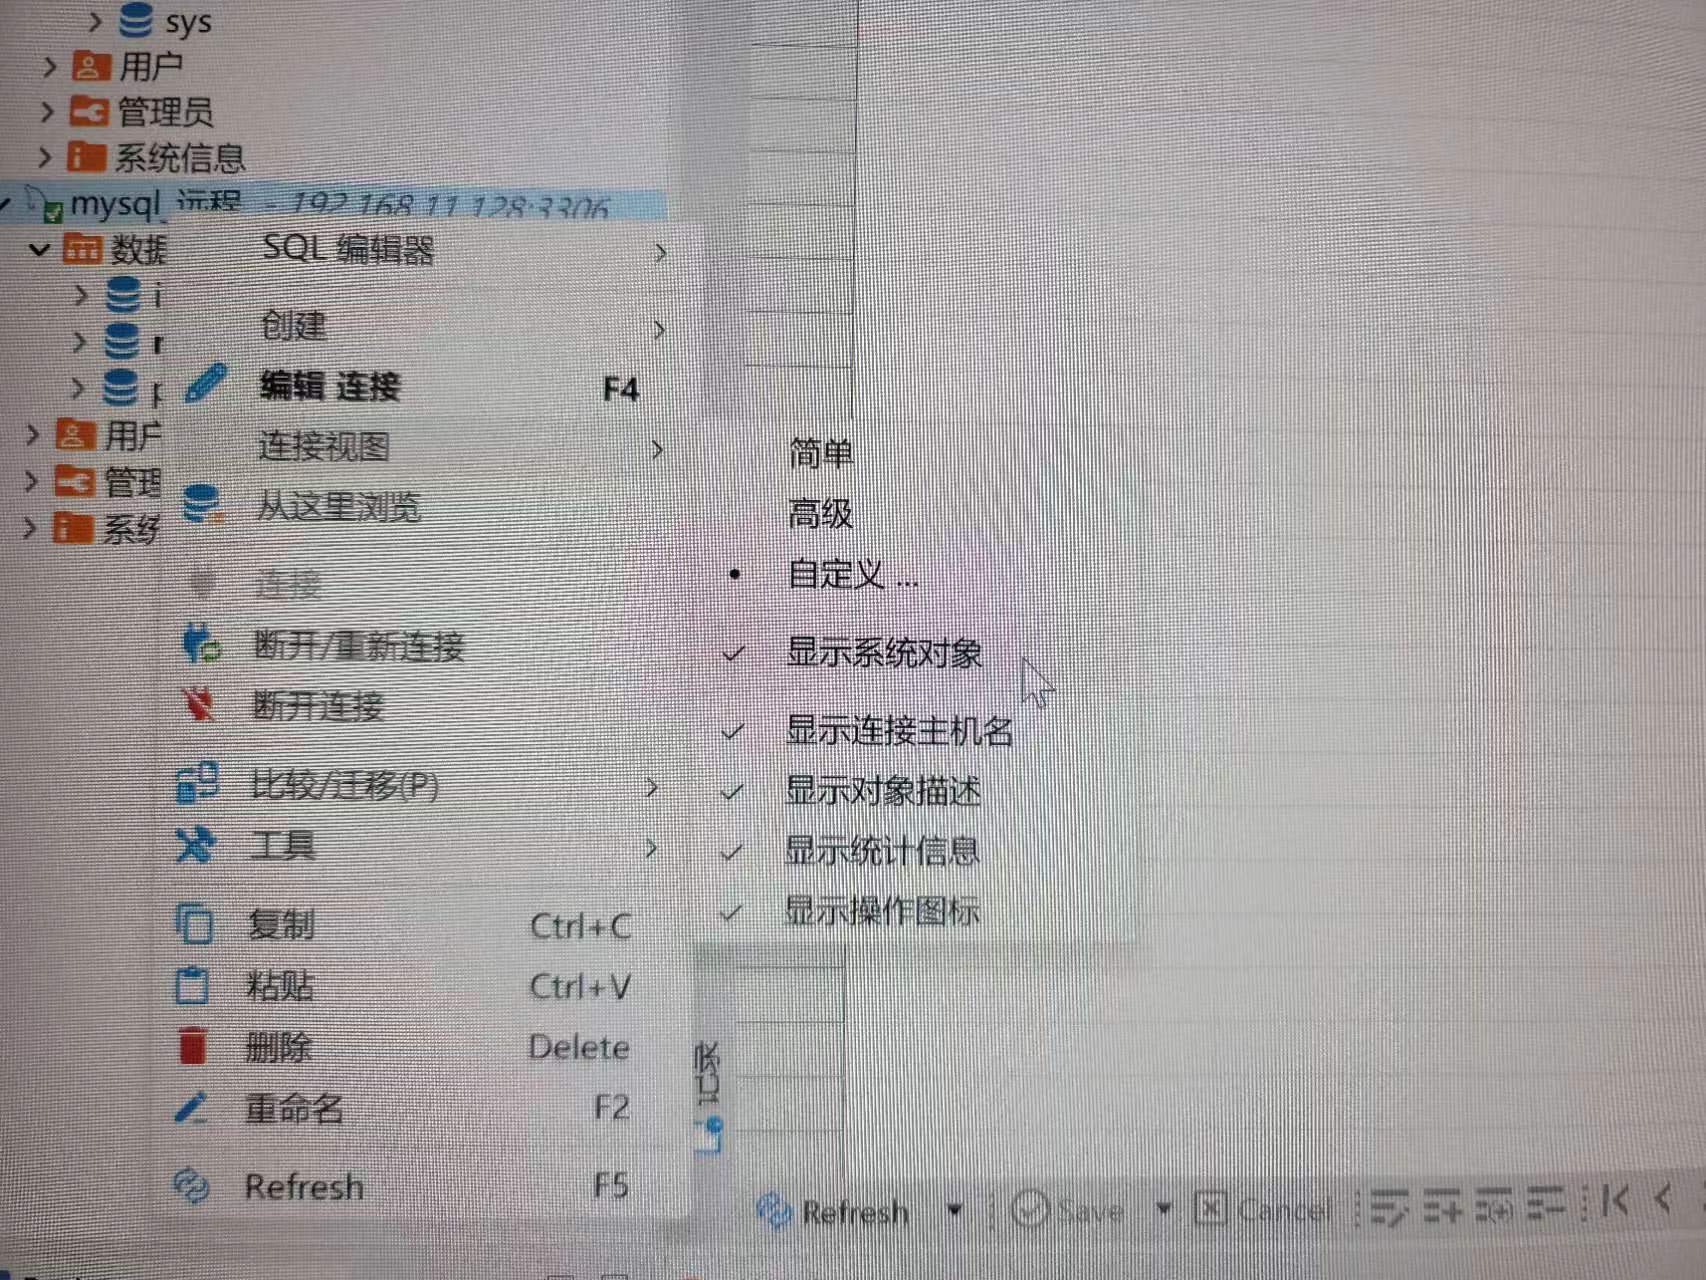
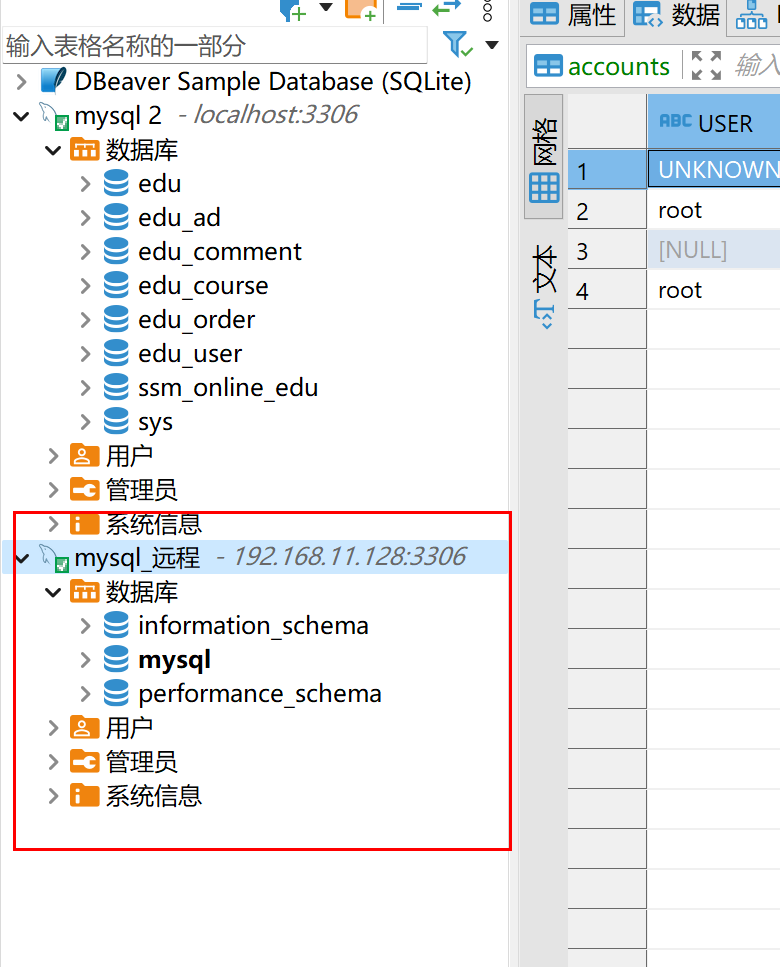
配置显示数据库-显示系统对象(显示远程连接上数据库,但是看不到 mysql 数据库 QAQ !!!)
右击数据库连接,勾选显示系统对象之后,展示了mysql数据库
永久关闭防火墙
cetos7:
临时关闭防火墙:systemctl stop firewalld
禁止开机启动防火墙:systemctl disable firewalld
查看防火墙规则:iptables -nL
[root@master ~]# systemctl stop firewalld
[root@master ~]# systemctl disable firewalld
[root@master ~]# iptable -nL
[root@master ~]# iptables -nL
Chain INPUT (policy ACCEPT)
target     prot opt source               destination

Chain FORWARD (policy ACCEPT)
target     prot opt source               destination

Chain OUTPUT (policy ACCEPT)
target     prot opt source               destination
[root@master ~]#
全局配置文件:application.properties
引入 jdbcTemplate 坐标
<!--引入 jdbcTemplate 坐标-->
<dependency>
    <groupId>org.springframework.boot</groupId>
    <artifactId>spring-boot-starter-jdbc</artifactId>
</dependency>
application.properties 全局配置文件配置 数据库连接信息及 jdbcTemplate 对象
#修改tomcat的版本号
server.port=8888
#定义数据库的连接信息  jdbcTemplate
spring.datasource.driver-class-name=com.mysql.cj.jdbc.Driver
spring.datasource.url=jdbc:mysql://192.168.11.128:3306/mysql
spring.datasource.name=root
spring.datasource.password=123456
HelloController 以及 单元测试类里 都可以直接注入 jdbcTemplate 对象
package com.aifeng.controller;


import org.springframework.beans.factory.annotation.Autowired;
import org.springframework.jdbc.core.JdbcTemplate;
import org.springframework.web.bind.annotation.RequestMapping;
import org.springframework.web.bind.annotation.RestController;

@RestController
@RequestMapping("/hello")
public class HelloController {

    @RequestMapping("/springboot")
    public String demo(){
        return "hello spring boot !!! 你好啊, i am  update !!!";
    }

    /*
    * 直接注入JdbcTemplate 对象
    * 依赖坐标已配置
    * */
    @Autowired
    private JdbcTemplate jdbcTemplate;

    @RequestMapping("/jdbc")
    public String jdbc(){
        return jdbcTemplate.toString();
    }
}
浏览器访问测试

9.properties全局配置文件(下)
使用 @ConfigurationProperties注解,提示注解没有配置
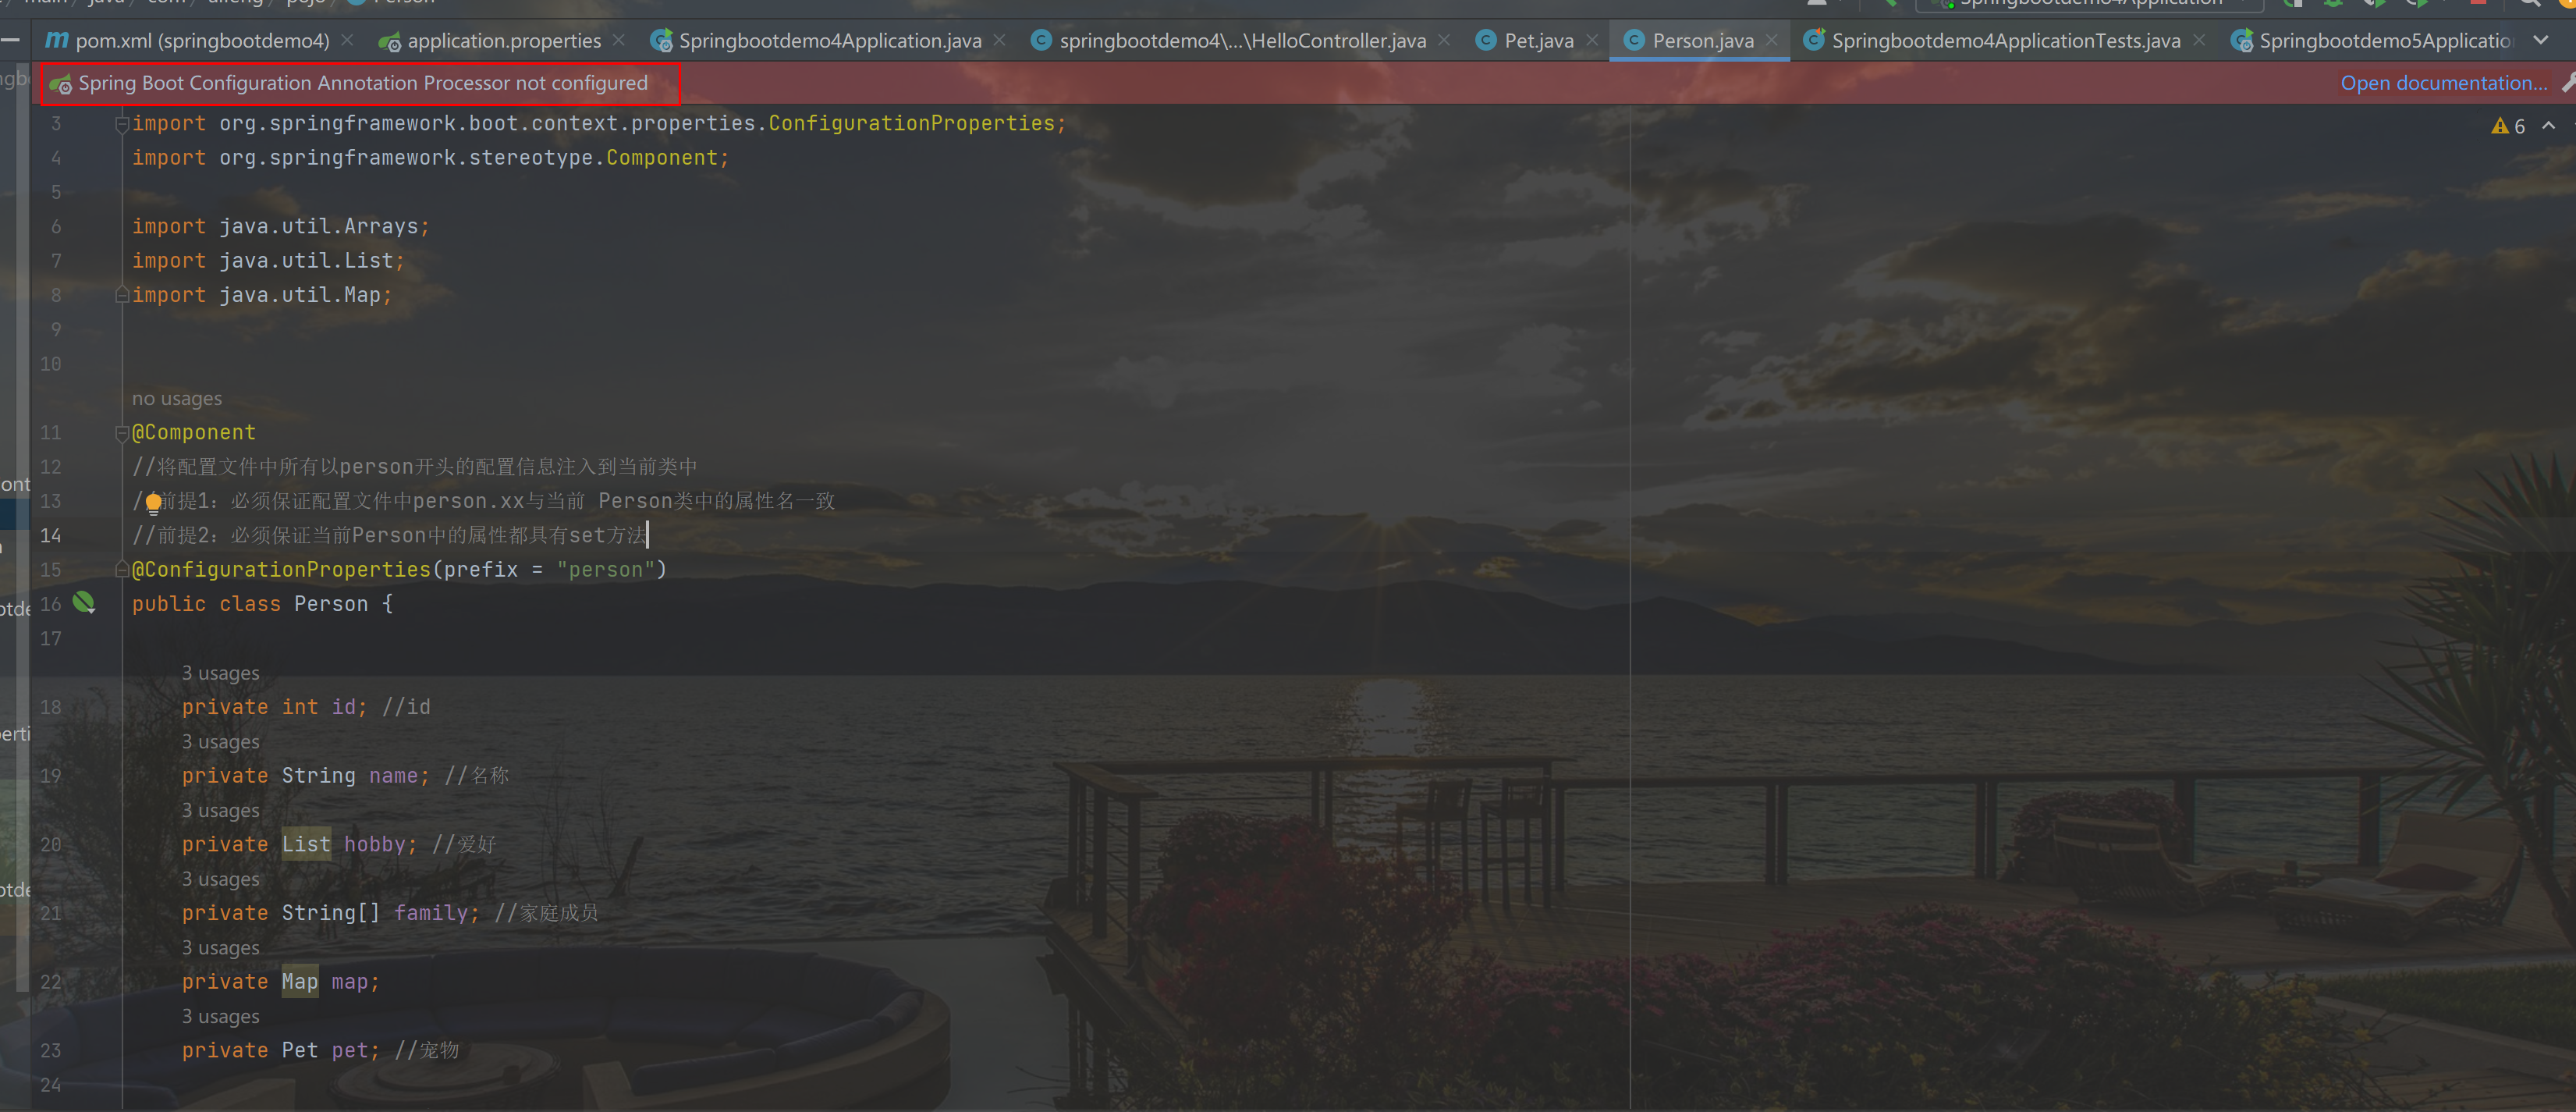
配置使用 @ConfigurationProperties注解,所需的依赖坐标
<dependency>
    <groupId>org.springframework.boot</groupId>
    <artifactId>spring-boot-configuration-processor</artifactId>
    <optional>true</optional>
</dependency>
测试类
@RunWith(SpringRunner.class) //@RunWith:运行器 |JUnit4.class: junit 测试运行环境| SpringJUnit4ClassRunner.class:spring 测试运行环境  | SpringRunner.class: springboot的测试运行环境
@SpringBootTest// 标记为
class Springbootdemo4ApplicationTests {


    /**
     * 需求:调用 HelloController的方法
     *
     */

    /*
    * 1.注入需要调用的类
    * 2.直接调用类中的方法
    *
    * */
    @Autowired
    HelloController helloController;

    @Autowired
    Person person;

    @Test
    void contextLoads() {
        String result = helloController.demo();
        System.out.println(result);
    }

    @Test
    void showPersonInfo(){
        System.out.println(person);
    }


}
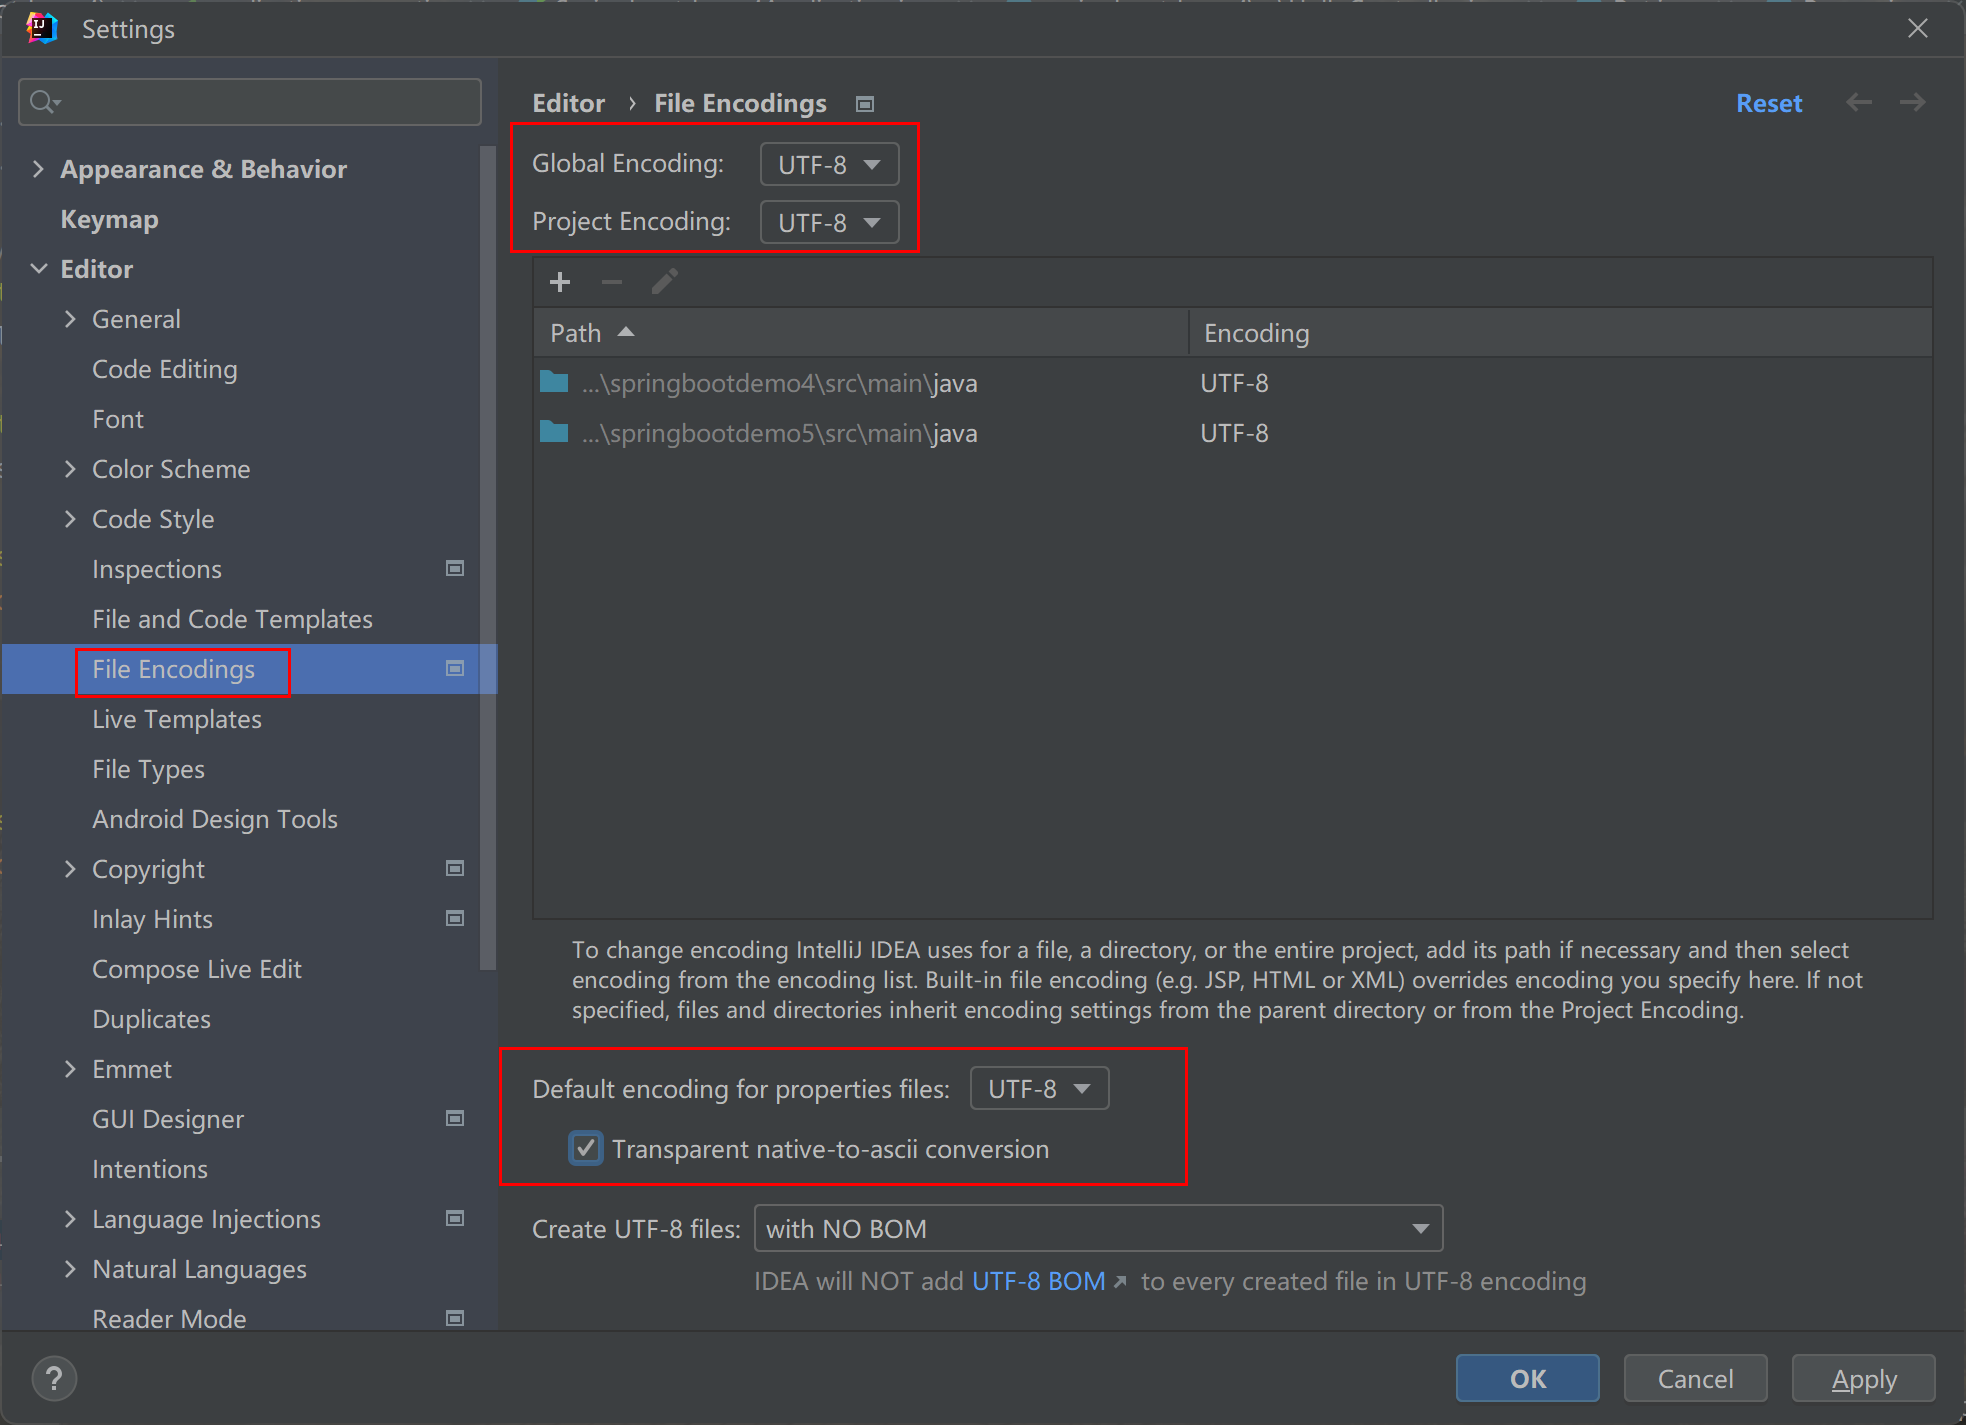
测试出现中文乱码问题

问题解决方法:
项目编码也设置成 UTF-8,配置文件 UTF-8,勾选本地与ASCII的转换
配置未生效,IDEA编译器报红
#解决中文乱码
server.tomcat.uri-encoding=UTF-8
spring.http.encoding.force=true
spring.http.encoding.charset=UTF-8
spring.http.encoding.enabled=true
配置生效:
#解决中文乱码
#server.tomcat.uri-encoding=UTF-8
server.servlet.encoding.force=true
#server.servlet.encoding.charset=UTF-8
server.servlet.encoding.enabled=true


#配置tomcat端口
server.port=8888
#数据库连接信息  jdbcTemplate
spring.datasource.driver-class-name=com.mysql.cj.jdbc.Driver
spring.datasource.url=jdbc:mysql://192.168.11.128:3306/mysql
spring.datasource.name=root
spring.datasource.password=123456

#自定义配置信息
person.id=100
person.name=爱枫
#list
person.hobby=书法,音乐,看书
#String[]
person.family=妻,妾
#map映射
person.map.k1=v1
person.map.k2=v2
#pet属性
person.pet.type=dog
person.pet.name=旺财
浏览器测试

测试类测试

10.yaml全局配置文件
properties 文件 与 yml问价可以共存
springboot的三种配置文件是可以共存的
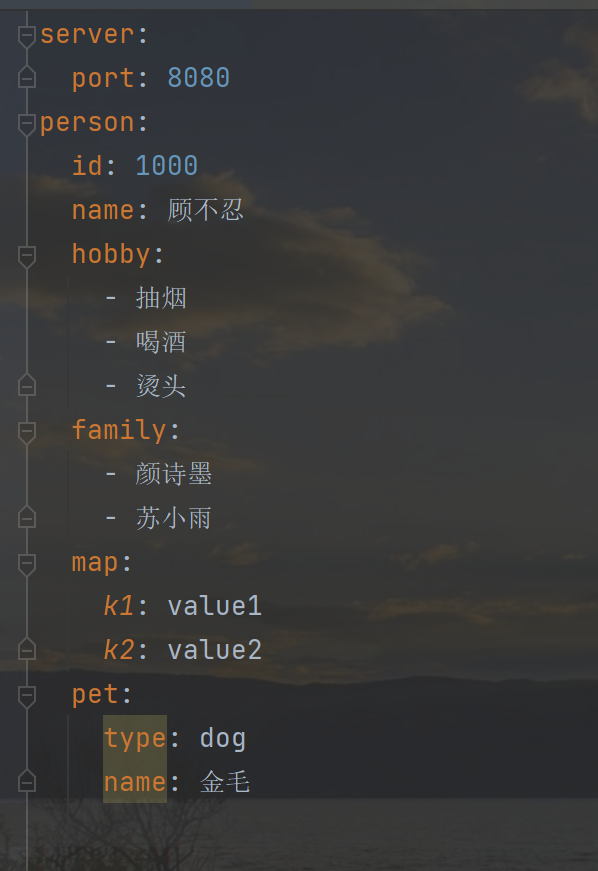
yml 文件中配置 person 属性
server:
  port: 8080
person:
  id: 1000
  name: 顾不忍
  hobby:
    - 抽烟
    - 喝酒
    - 烫头
  family:
    - 颜诗墨
    - 苏小雨
  map:
    k1: value1
    k2: value2
  pet:
    type: dog
    name: 金毛
重启springboot 项目,浏览器访问: http://localhost:8080/hello/person

11.配置文件属性值的注入
使用@Value 注解 ,注入student类中属性的值
@Component
public class Student {

    @Value("${person.id}")
    private int number;


    @Value("${person.name}")
    private String name;

    public int getNumber() {
        return number;
    }

    public void setNumber(int number) {
        this.number = number;
    }

    public String getName() {
        return name;
    }

    public void setName(String name) {
        this.name = name;
    }

    @Override
    public String toString() {
        return "Student{" +
                "number=" + number +
                ", name='" + name + '\'' +
                '}';
    }
}
单元测试 ,打印student属性的值

注意: @Value 注解,不支持 集合,对象类型的属性注入 ,如果非要注入,可以使用 @ConfigurationProperties 注解(一般很少使用,因为数据是从数据库中取的,或者是内存中的数据)
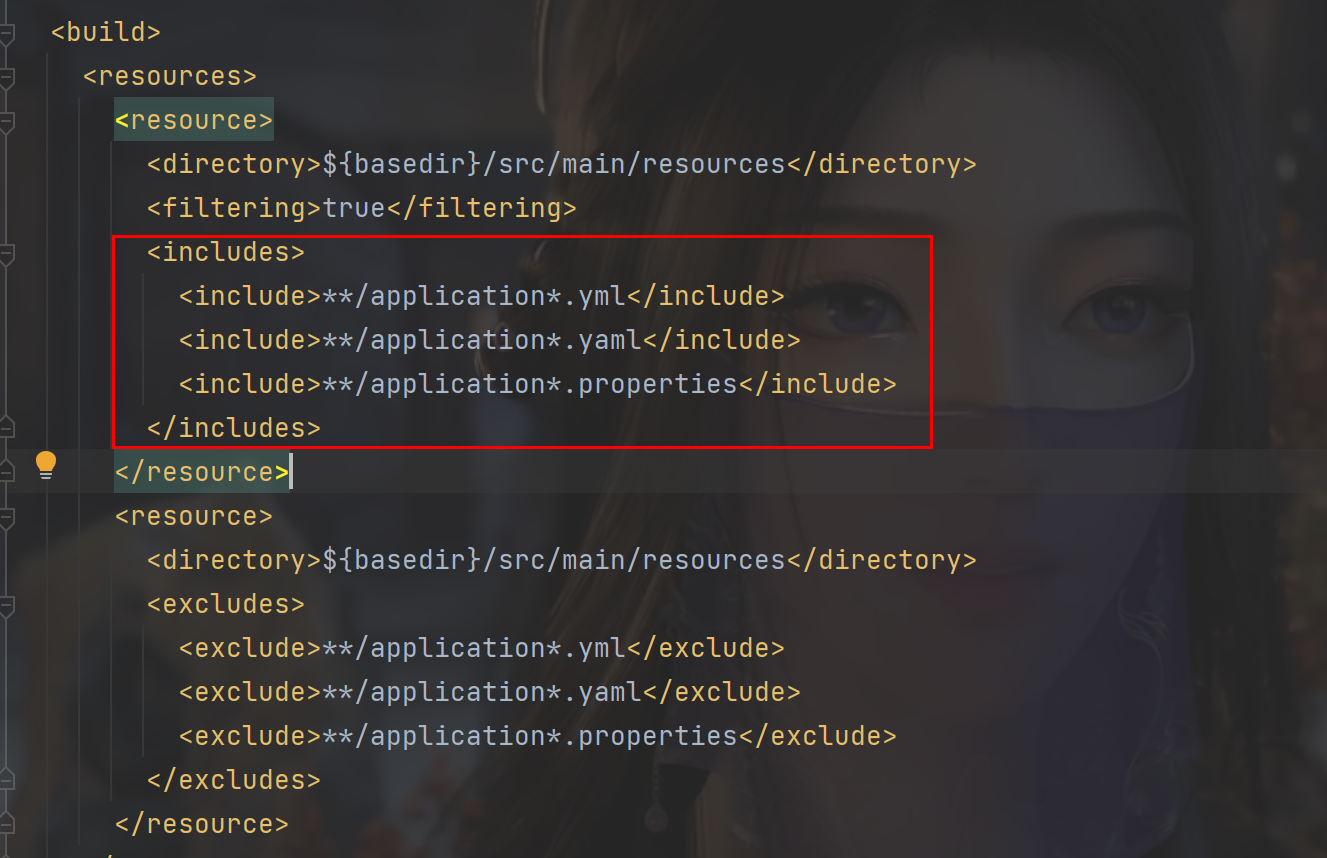
12.配置文件优先级问题
配置文件的优先级从低到高的顺序
<resource>
    <directory>${basedir}/src/main/resources</directory>
    <filtering>true</filtering>
    <includes>
        <include>**/application*.yml</include>
        <include>**/application*.yaml</include>
        <include>**/application*.properties</include>
    </includes>
</resource>
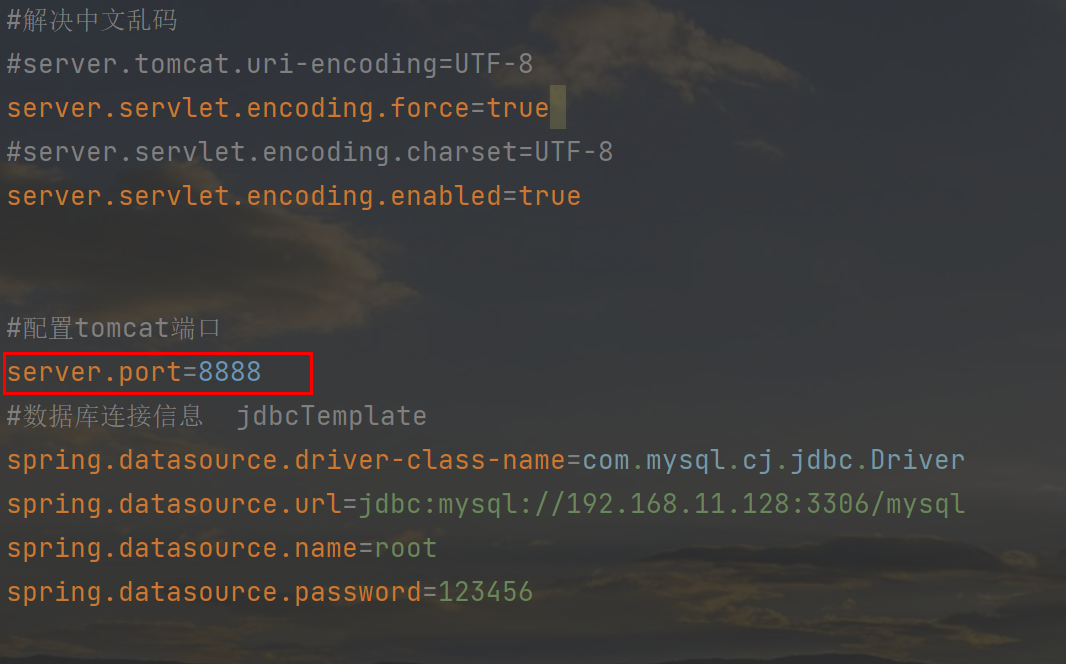
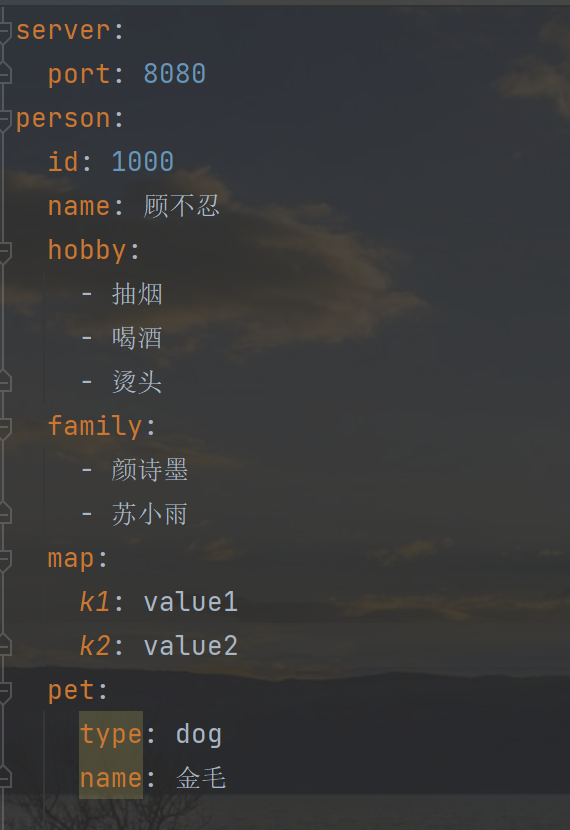
第一个属性测试
- properties
- yml
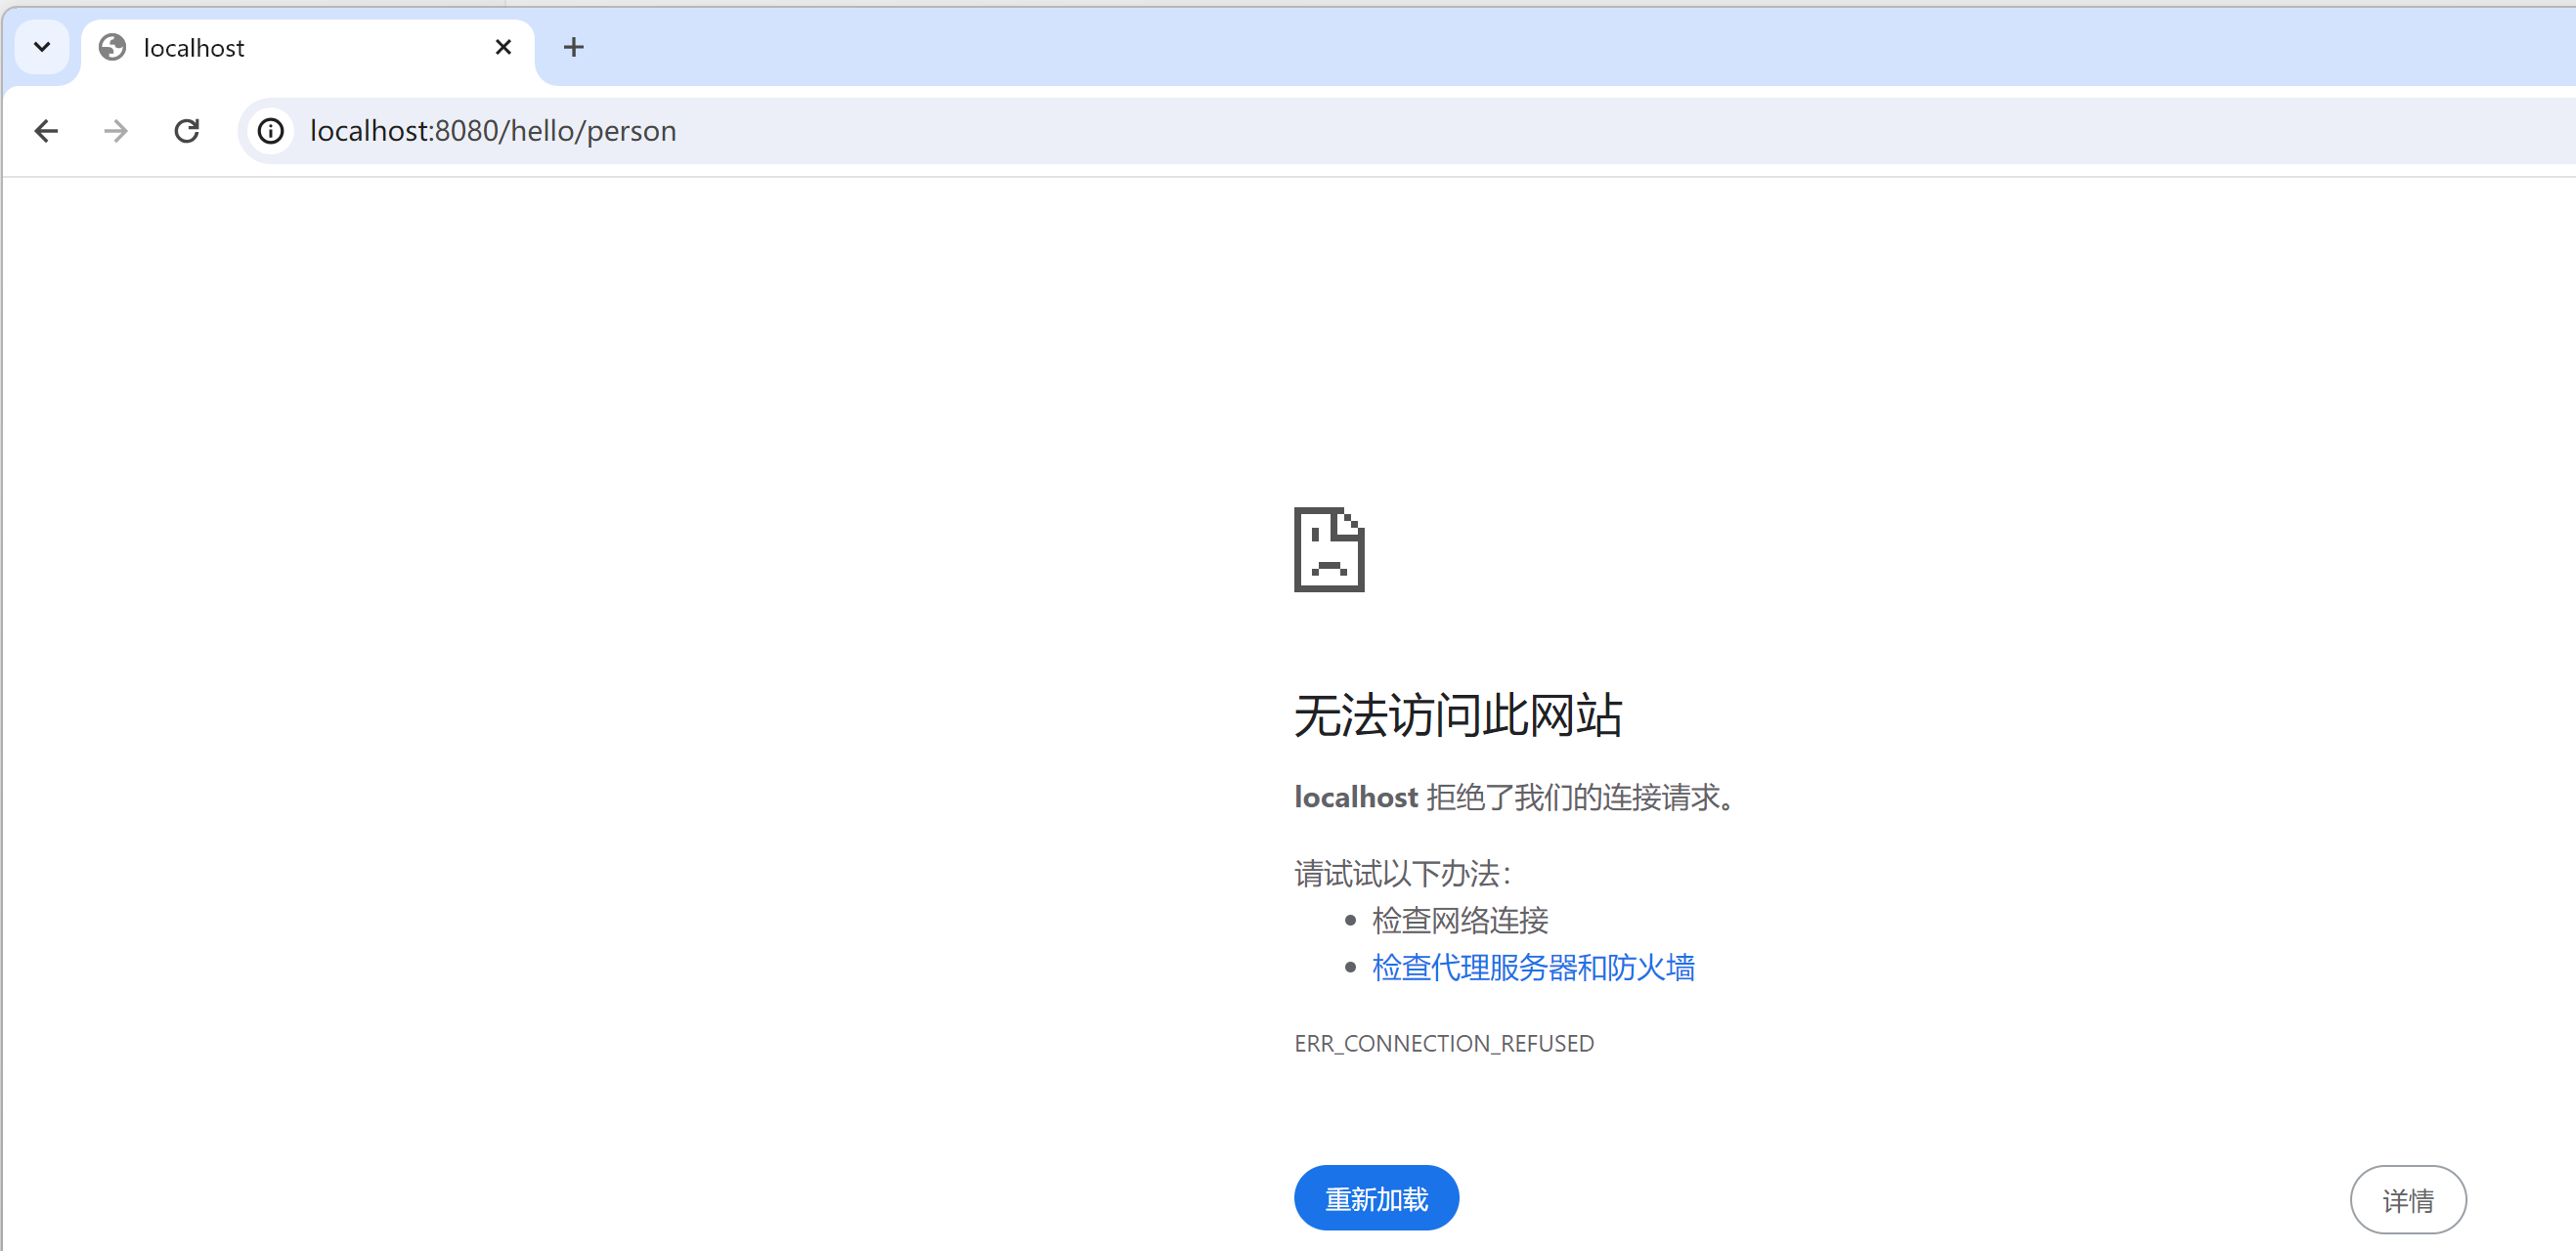
- 浏览器访问
可以看到 properties 的配置文件中的8888 端口可以访问,优先级高

yml 配置的 8080 无法访问
第二个属性测试
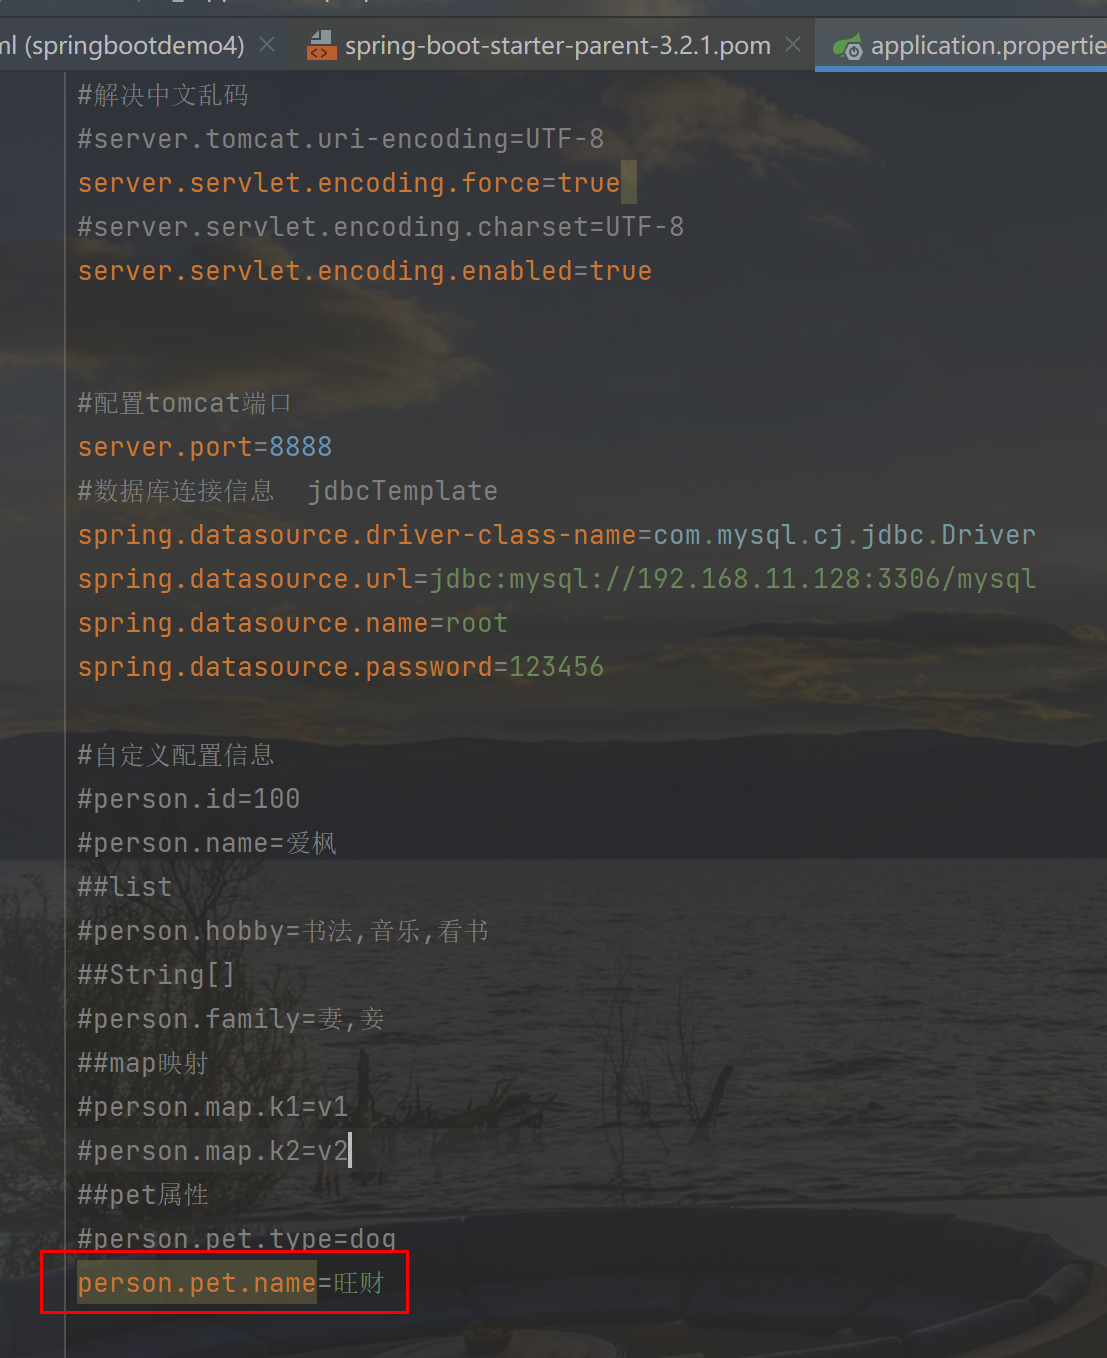
浏览器访问测试:
- ? 可以看到 properties 的优先级高

13.加载读取自定义配置
自定义配置文件:my.properties
?
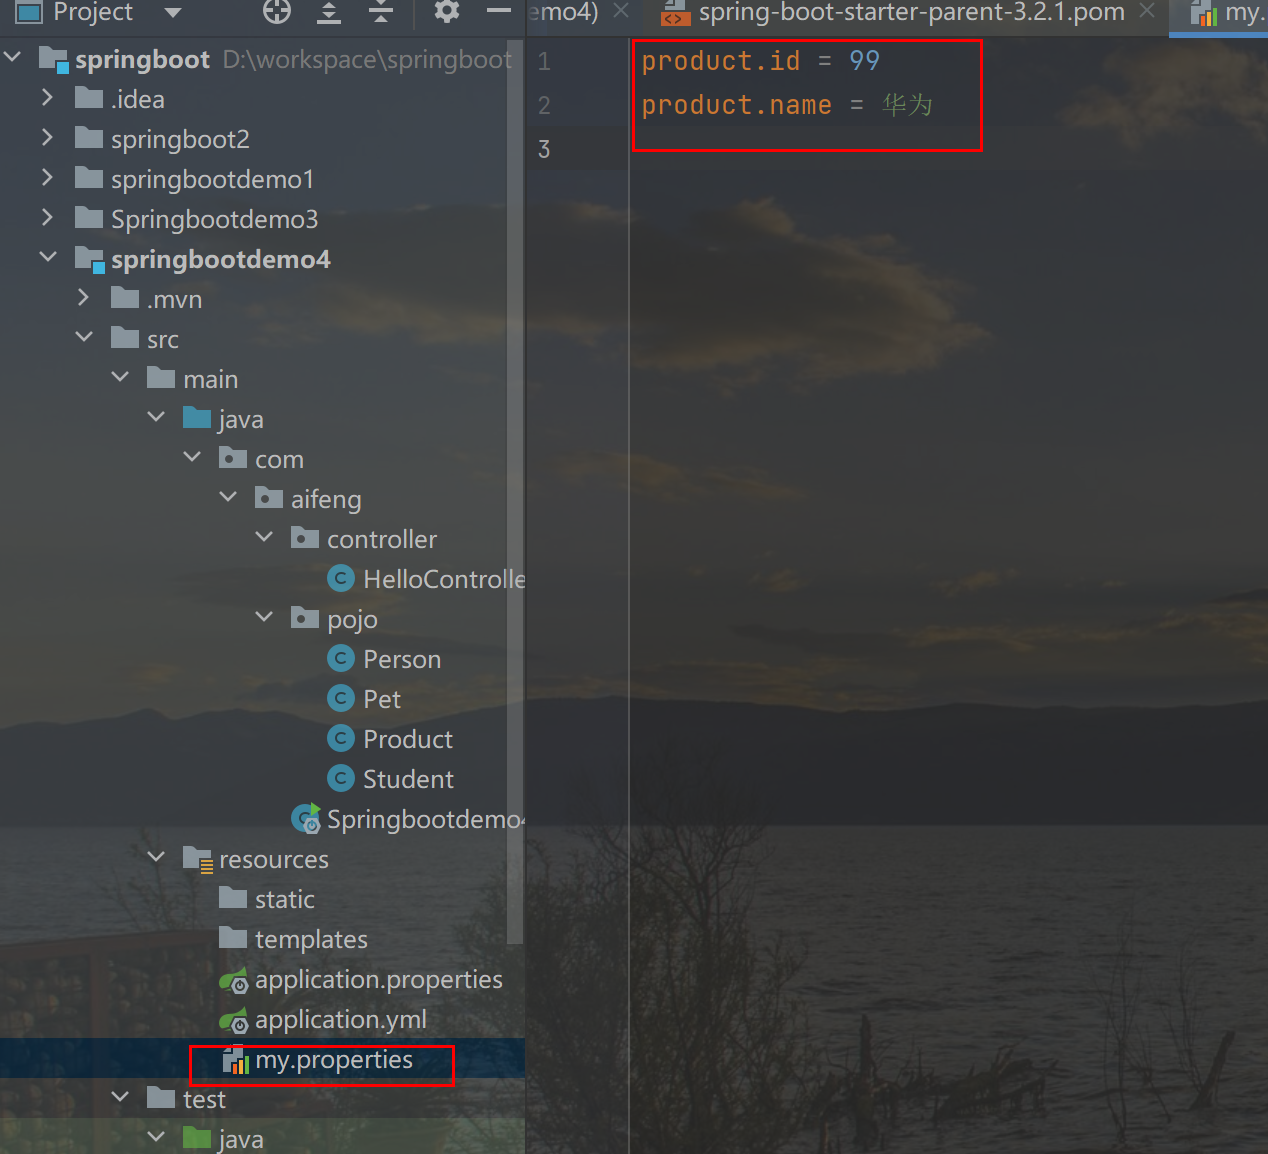
使用@PropertySource 注解加载 自定义的配置文件,参数为配置文件的路径

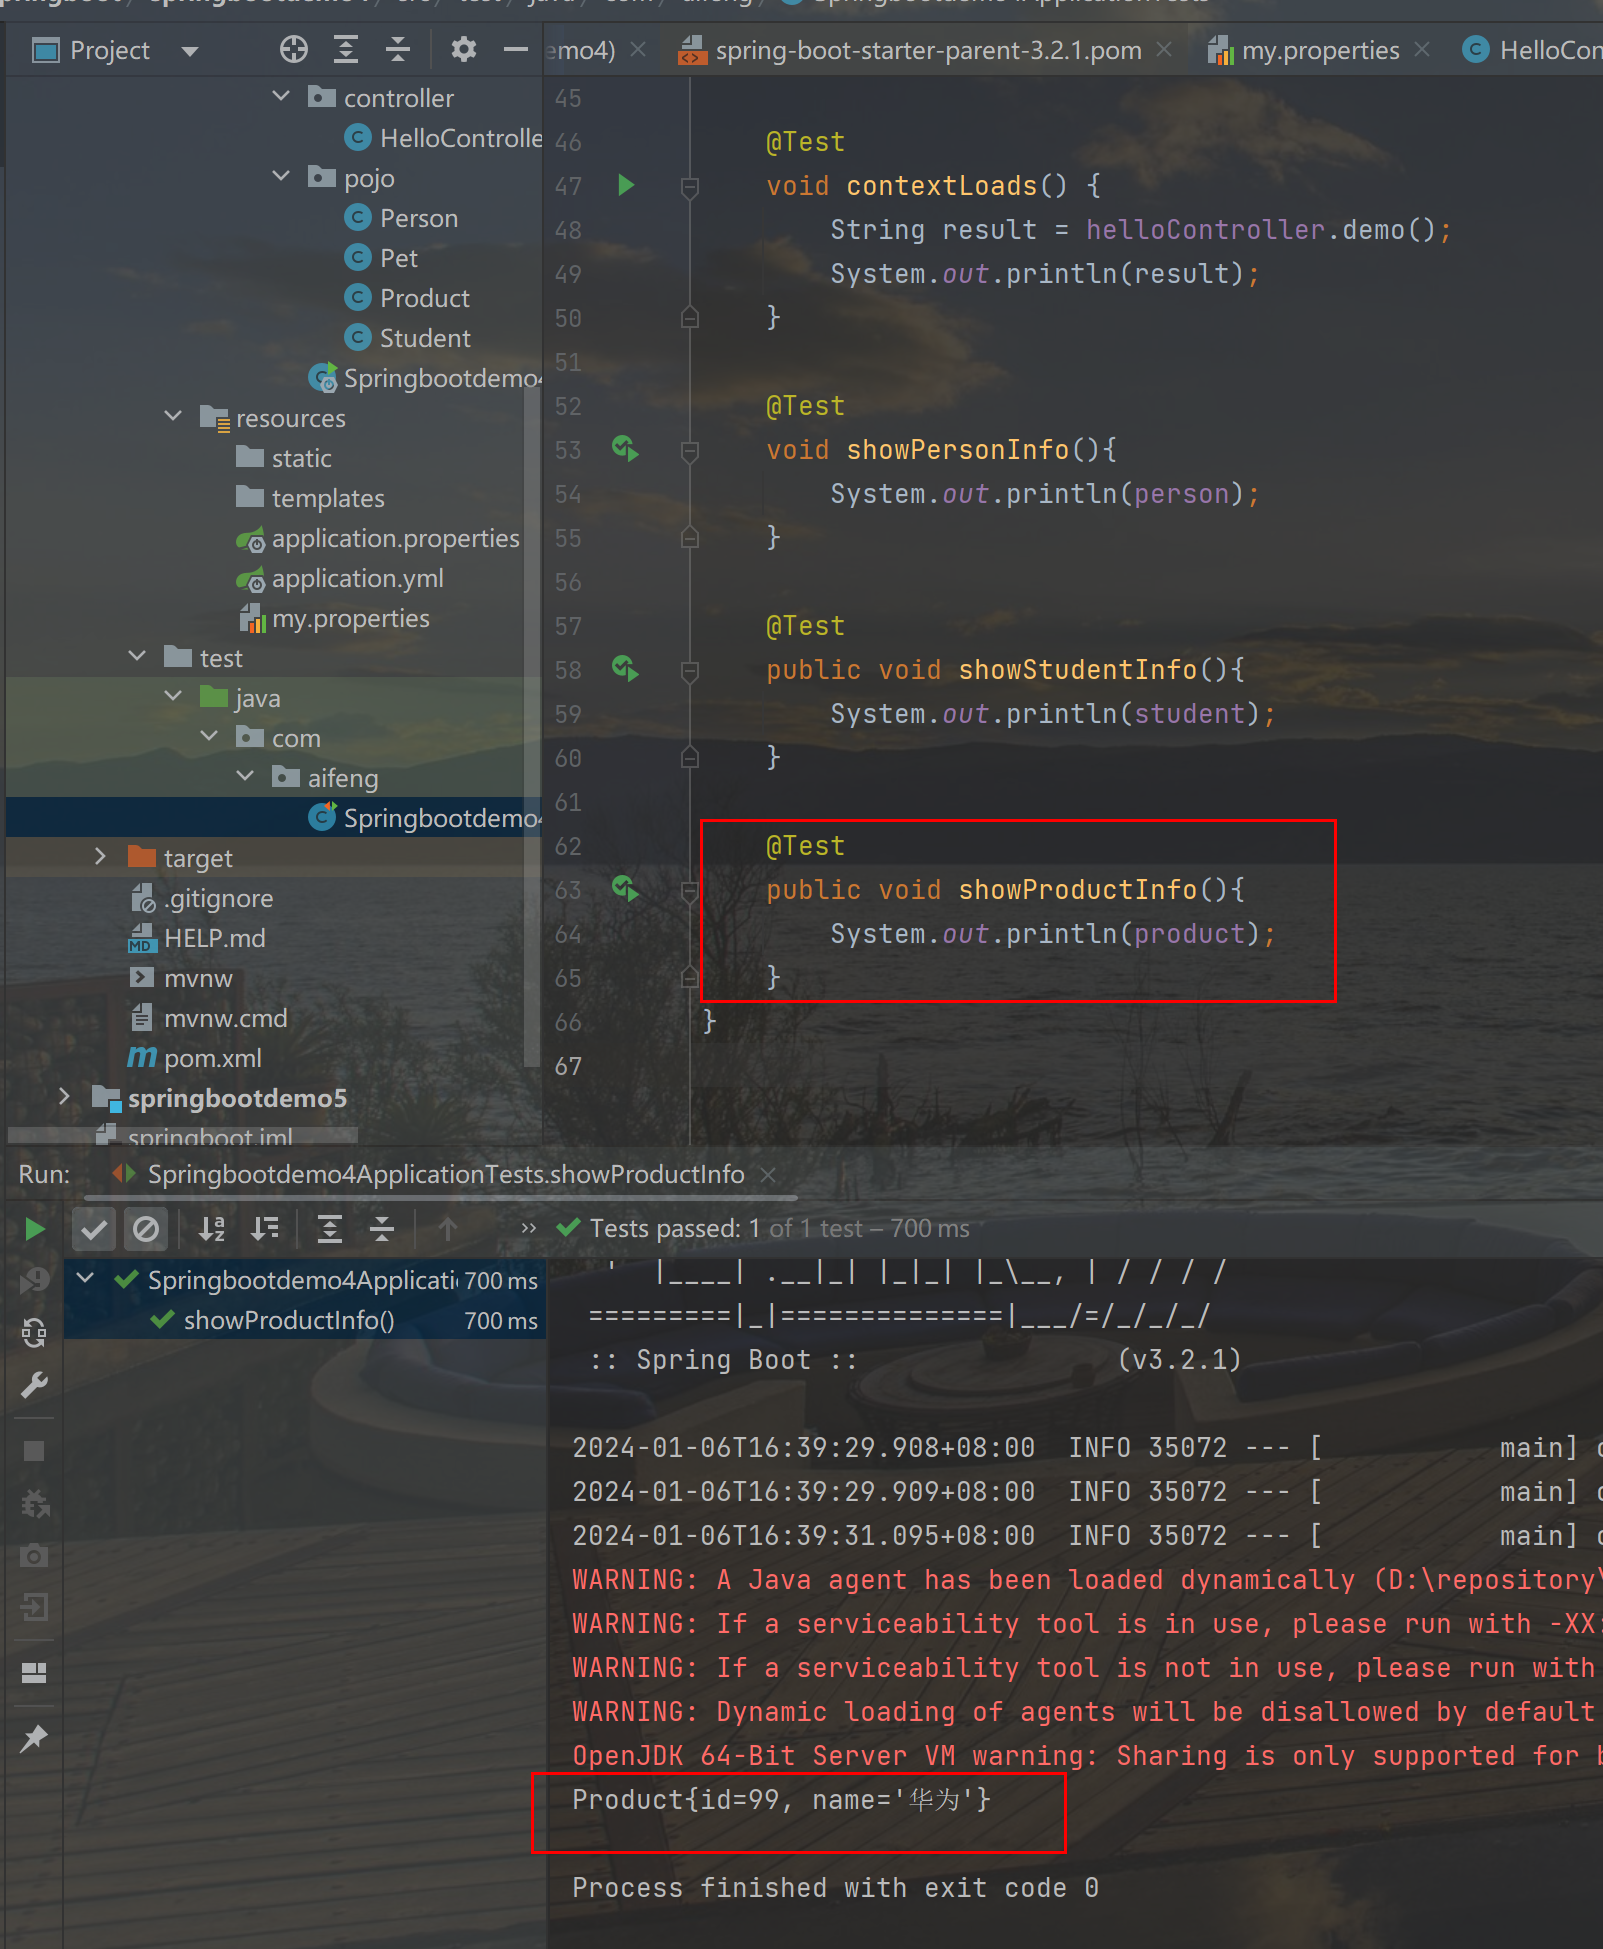
单元测试
打印出了product类中属性的值
14.自定义配置类
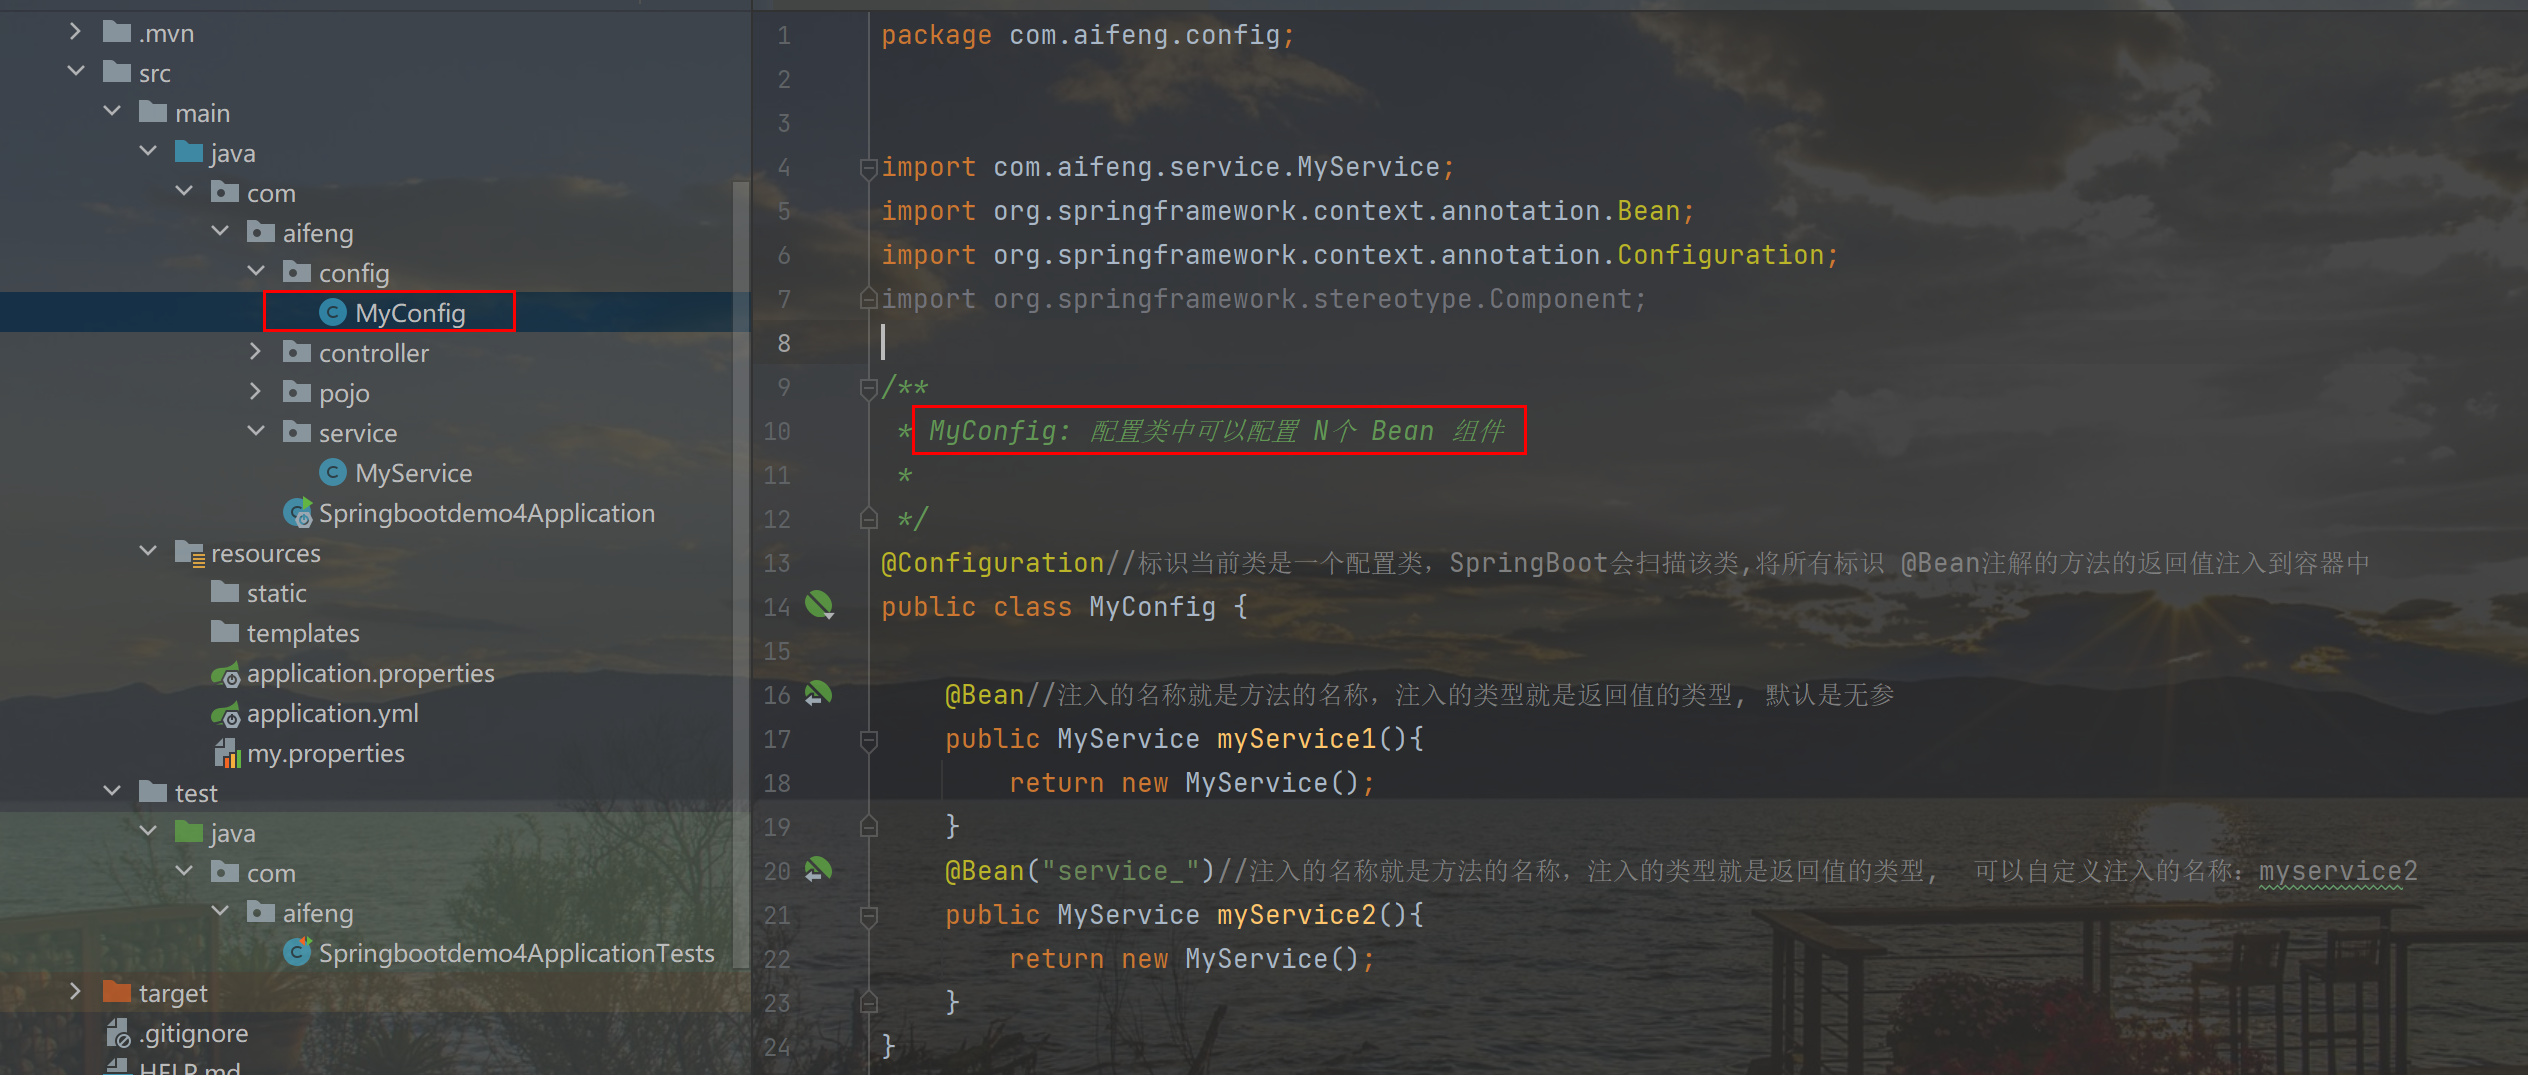
@Configuration 注解标识当前类是一个配置类,SpringBoot会扫描该类,将所有标识 @Bean注解的方法的返回值注入到容器中
MyConfig: 配置类中可以配置 N**个 Bean 组件
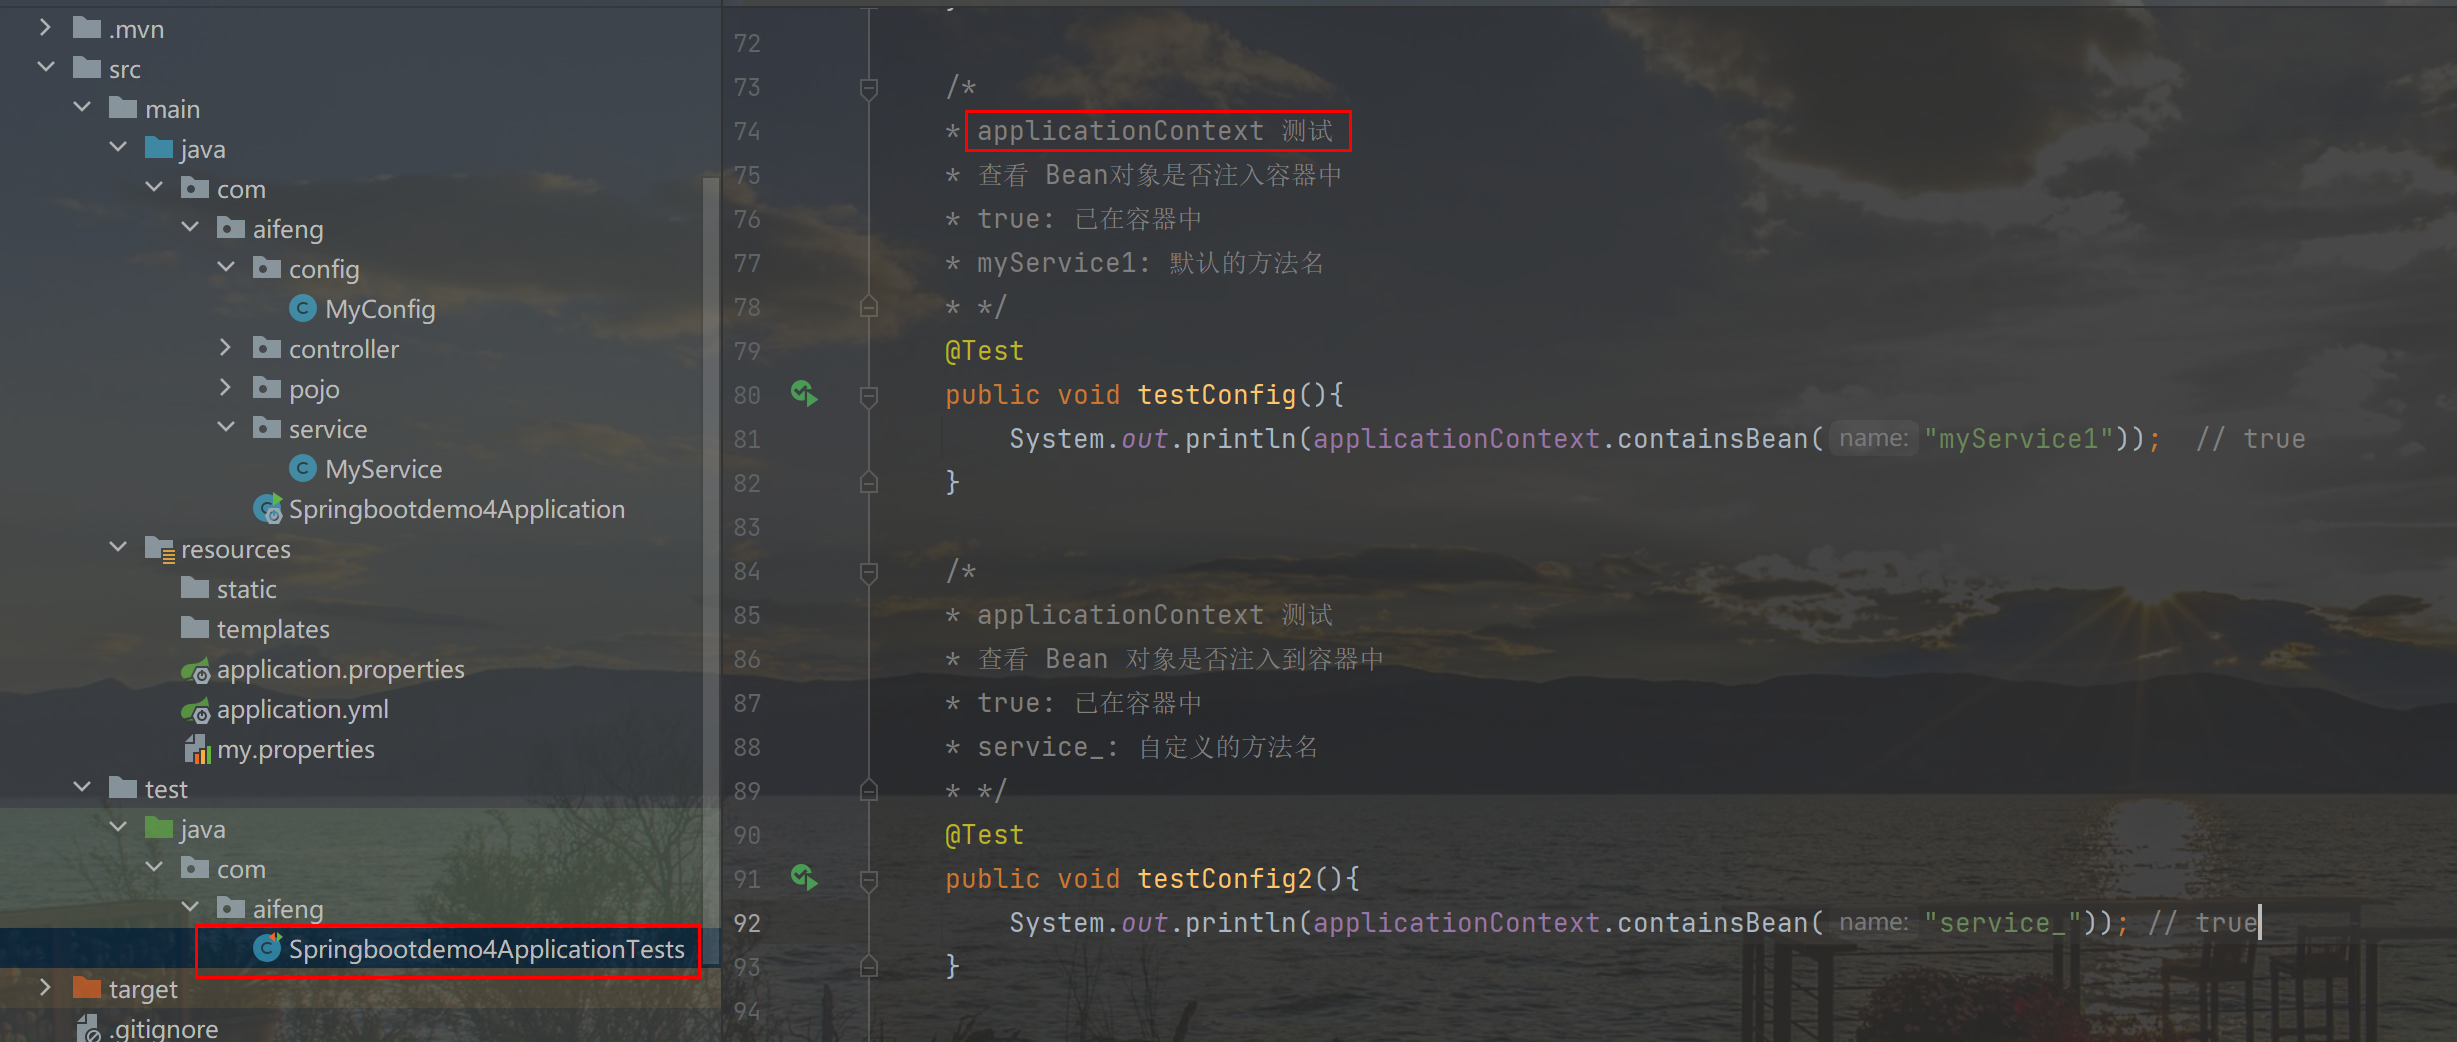
注入 ApplicationContext 上下文环境进行测试
    /*
    * 注入 ApplicationContext 上下文环境
    * */
    @Autowired
    private ApplicationContext applicationContext;

    /*
    * applicationContext 测试
    * 查看 Bean对象是否注入容器中
    * true: 已在容器中
    * myService1: 默认的方法名
    * */
    @Test
    public void testConfig(){
        System.out.println(applicationContext.containsBean("myService1"));  // true
    }

    /*
    * applicationContext 测试
    * 查看 Bean 对象是否注入到容器中
    * true: 已在容器中
    * service_: 自定义的方法名
    * */
    @Test
    public void testConfig2(){
        System.out.println(applicationContext.containsBean("service_")); // true
    }
查看结果返回为 true
15.任务一自测
阶段九模块一任务一: SpringBoot基本应用
共4道 总分100分
- 1. 单选题以下哪个选项不可以作为 Spring Boot默认支持的配置文件[单选题] *(25分)
- Aapplication.properites
- Bapplication.yaml
- Capplication.yml
- Dapplication.xml
- 2. 单选题在项目启动类中标识当前类为Spring Boot项目启动类的注解是[单选题] *(25分)
- A.@SpringBootApplication
- B.@SpringBootConfiguration
- C.@EnableAutoConfiguration
- D.@SpringApplication
- 3. 单选题SpringBoot的测试类中,除了要加@SpringBootTest注解之外,还需要添加的注解是[单选题] *(25分)
- A.@RunWith(JUnit4.class)
- B.@RunWith(Suite.class)
- C.@RunWith(SpringRunner.class)
- D.@RunWith(SpringBootRunner.class)
- 4. 单选题SpringBoot依赖内嵌Tomcat,默认的端口是[单选题] *(25分)
- A8080
- B80
- C9000
- D9001
-
1. 单选题以下哪个选项不可以作为 Spring Boot默认支持的配置文件[单选题] *(25分)
- Aapplication.properites
- Bapplication.yaml
- Capplication.yml
- Dapplication.xml
 回答正确 +25分
答案解析
解析:Spring Boot默认加载的配置文件列表是:application.properites、application.yaml、application.yml,不支持XML格式的配置文件。
-
2. 单选题在项目启动类中标识当前类为Spring Boot项目启动类的注解是[单选题] *(25分)
- AA.@SpringBootApplication
- BB.@SpringBootConfiguration
- CC.@EnableAutoConfiguration
- DD.@SpringApplication
 回答正确 +25分
答案解析
解析:@SpringBootApplication 是标识启动类的注解,作用是:开启自动配置,@SpringBootConfiguration 注解和@EnableAutoConfiguration 注解是@SpringBootApplication 注解定义类中使用的。其中@SpringBootConfiguration继承自@Configuration,二者功能也一致,标注当前类是配置类;@EnableAutoConfiguration 注解是借助@Import的支持,收集和注册特定场景相关的bean定义。
-
3. 单选题SpringBoot的测试类中,除了要加@SpringBootTest注解之外,还需要添加的注解是[单选题] *(25分)
- AA.@RunWith(JUnit4.class)
- BB.@RunWith(Suite.class)
- CC.@RunWith(SpringRunner.class)
- DD.@RunWith(SpringBootRunner.class)
 回答正确 +25分
答案解析
解析:@RunWith就是一个运行器,括号中的参数执行运行的环境,SpringRunner.Class表示是测试开始的时候自动创建Spring的应用上下文
-
4. 单选题SpringBoot依赖内嵌Tomcat,默认的端口是[单选题] *(25分)
-
A8080 -
B80
-
C9000
-
D9001
正确答案为 A
答案解析
解析:内嵌Tomcat的端口号是
8080,可以在配置文件中通过server.port属性进行修改。 -
任务二: SpringBoot原理剖析及高级
1.源码剖析-依赖管理-spring-boot-starter-parent
1.1 依赖管理
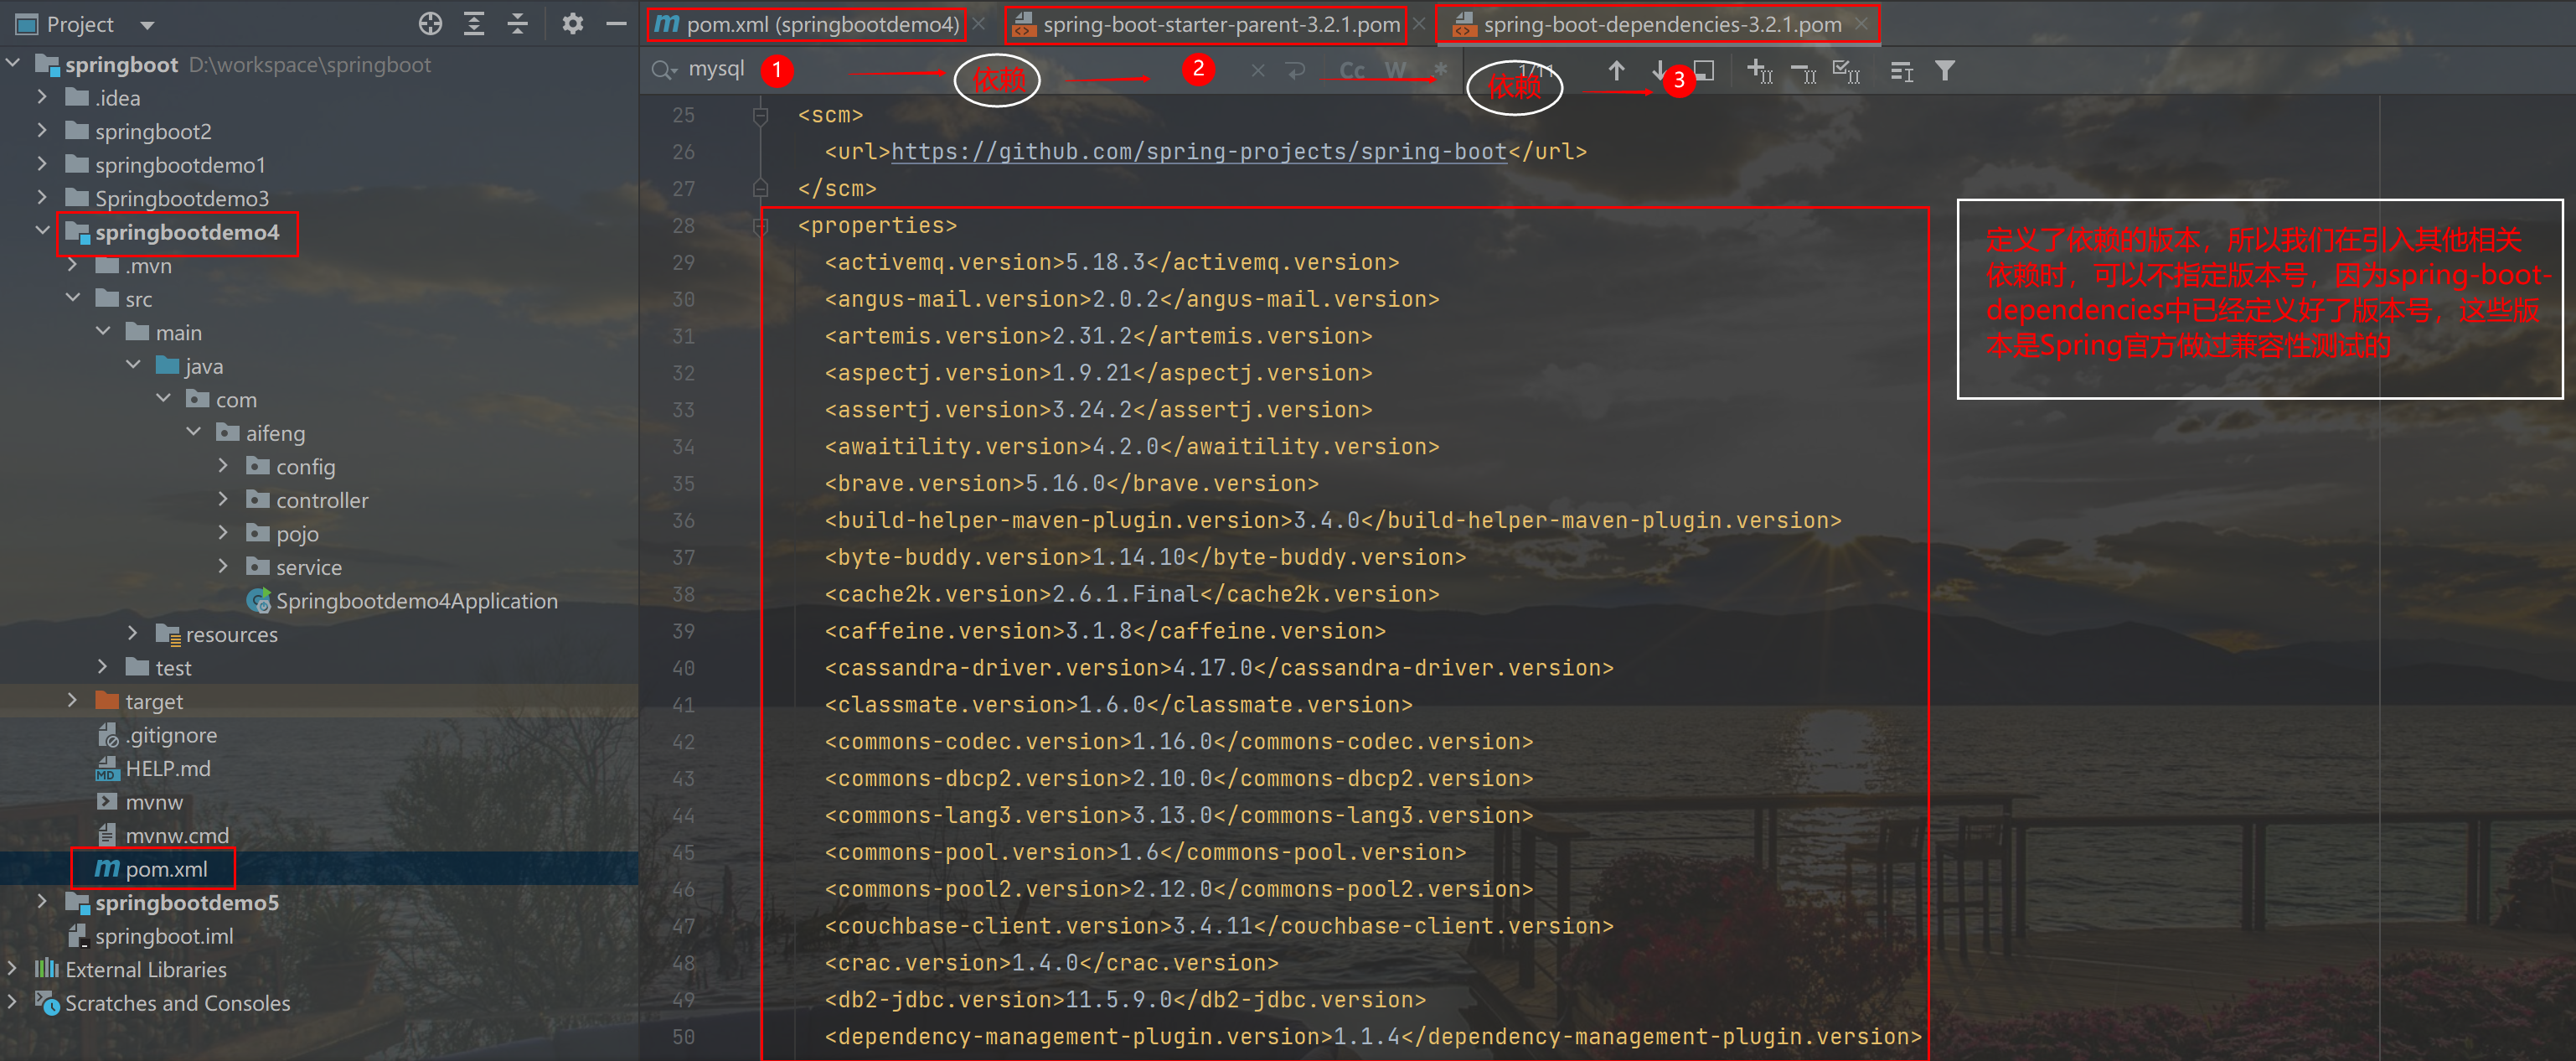
层级依赖关系以及 spring-boot-dependencies 的依赖管理
问题1 :pom 文件引入的依赖不需要版本号的原因
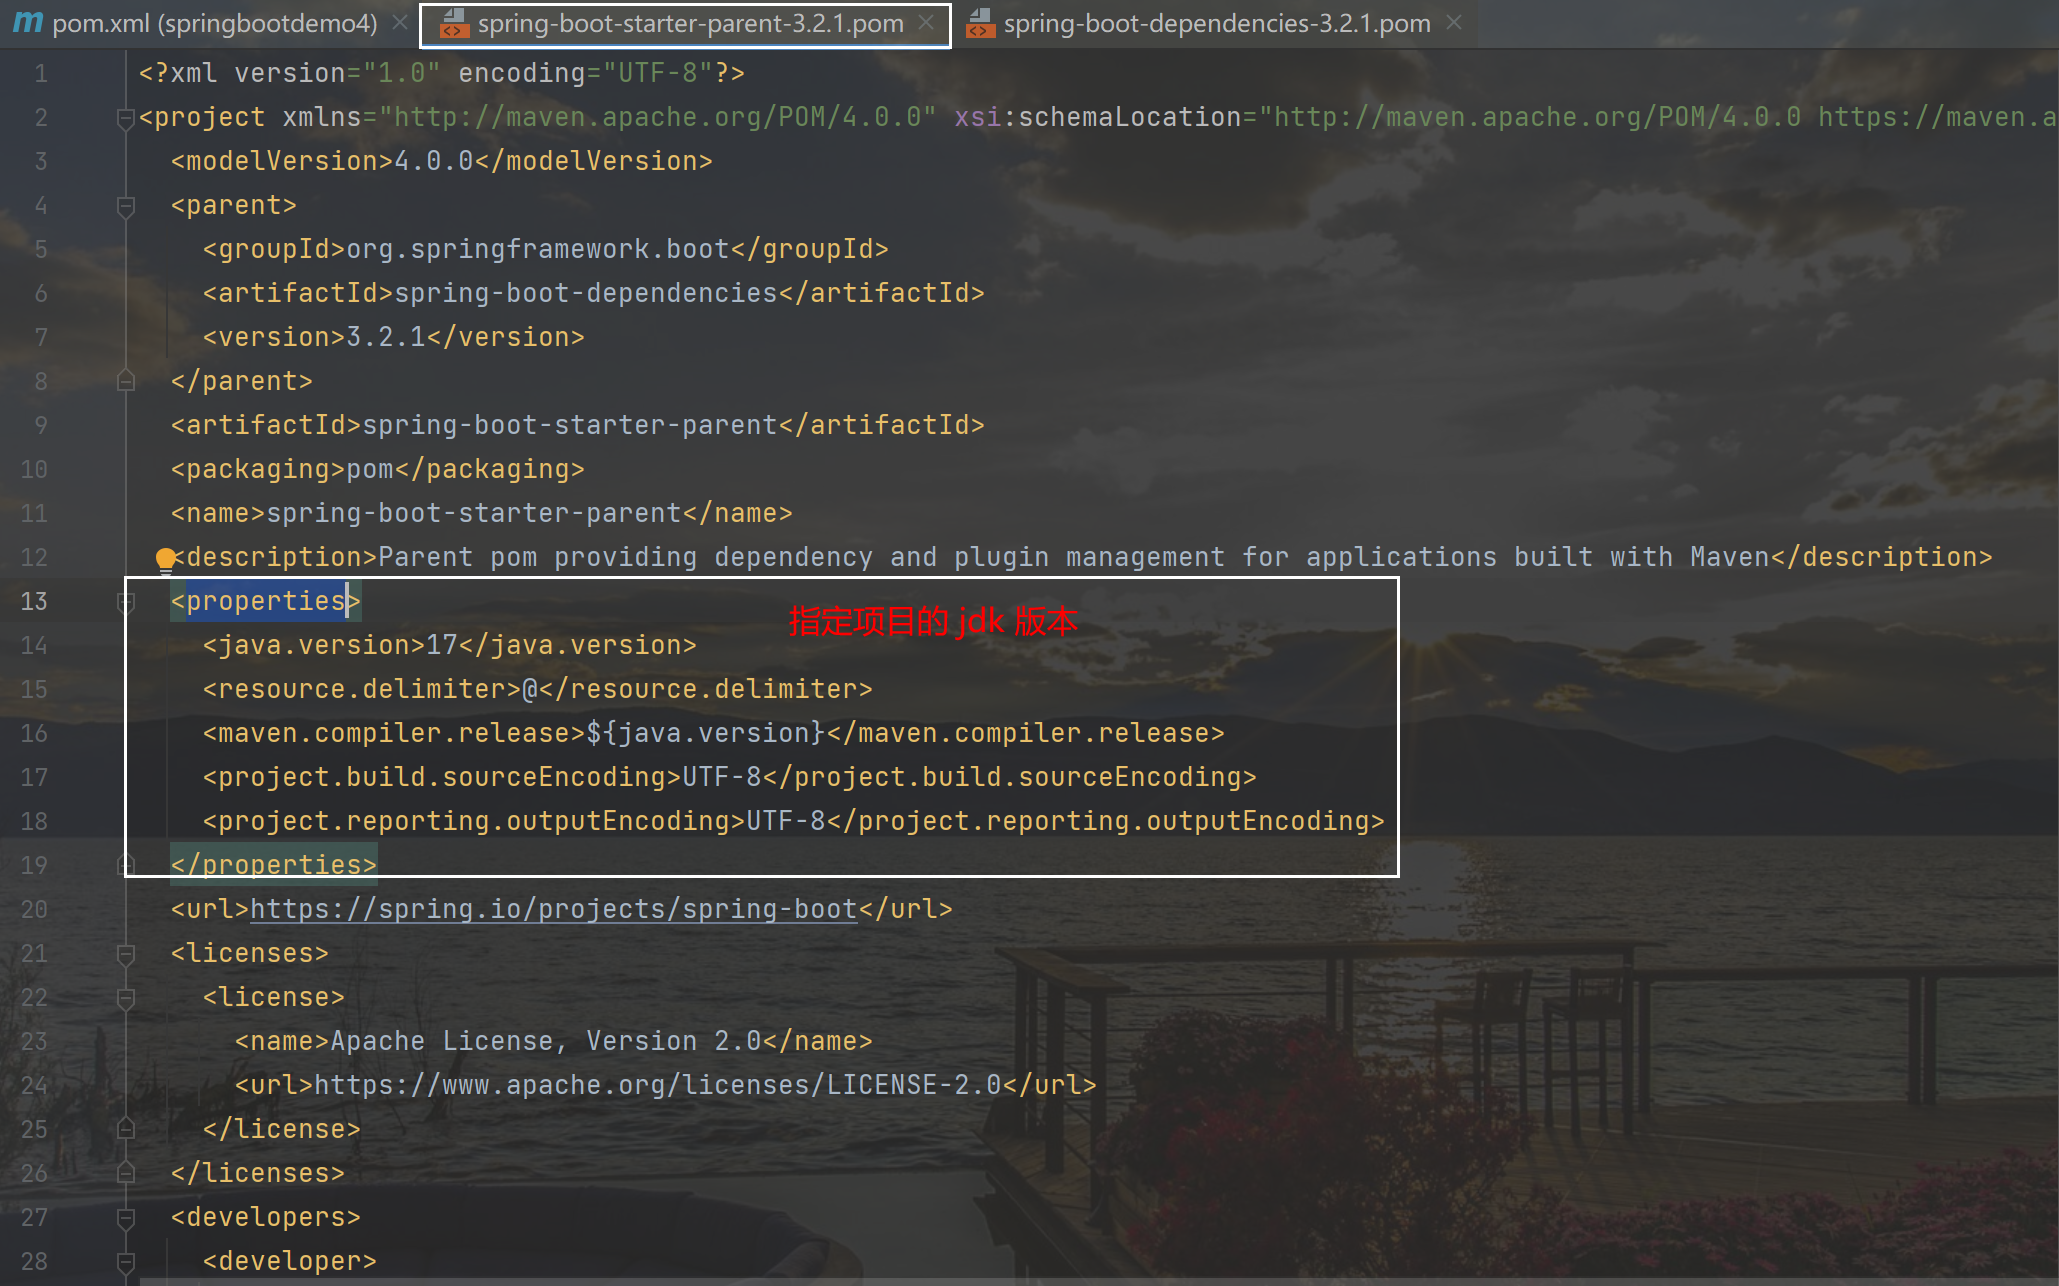
父级依赖的 properties 属性
  <properties>
    <java.version>17</java.version> // jdk 的版本
    <resource.delimiter>@</resource.delimiter>
     //跟随jdk 的版本
    <maven.compiler.release>${java.version}</maven.compiler.release>
    <project.build.sourceEncoding>UTF-8</project.build.sourceEncoding>
    <project.reporting.outputEncoding>UTF-8</project.reporting.outputEncoding>
  </properties>
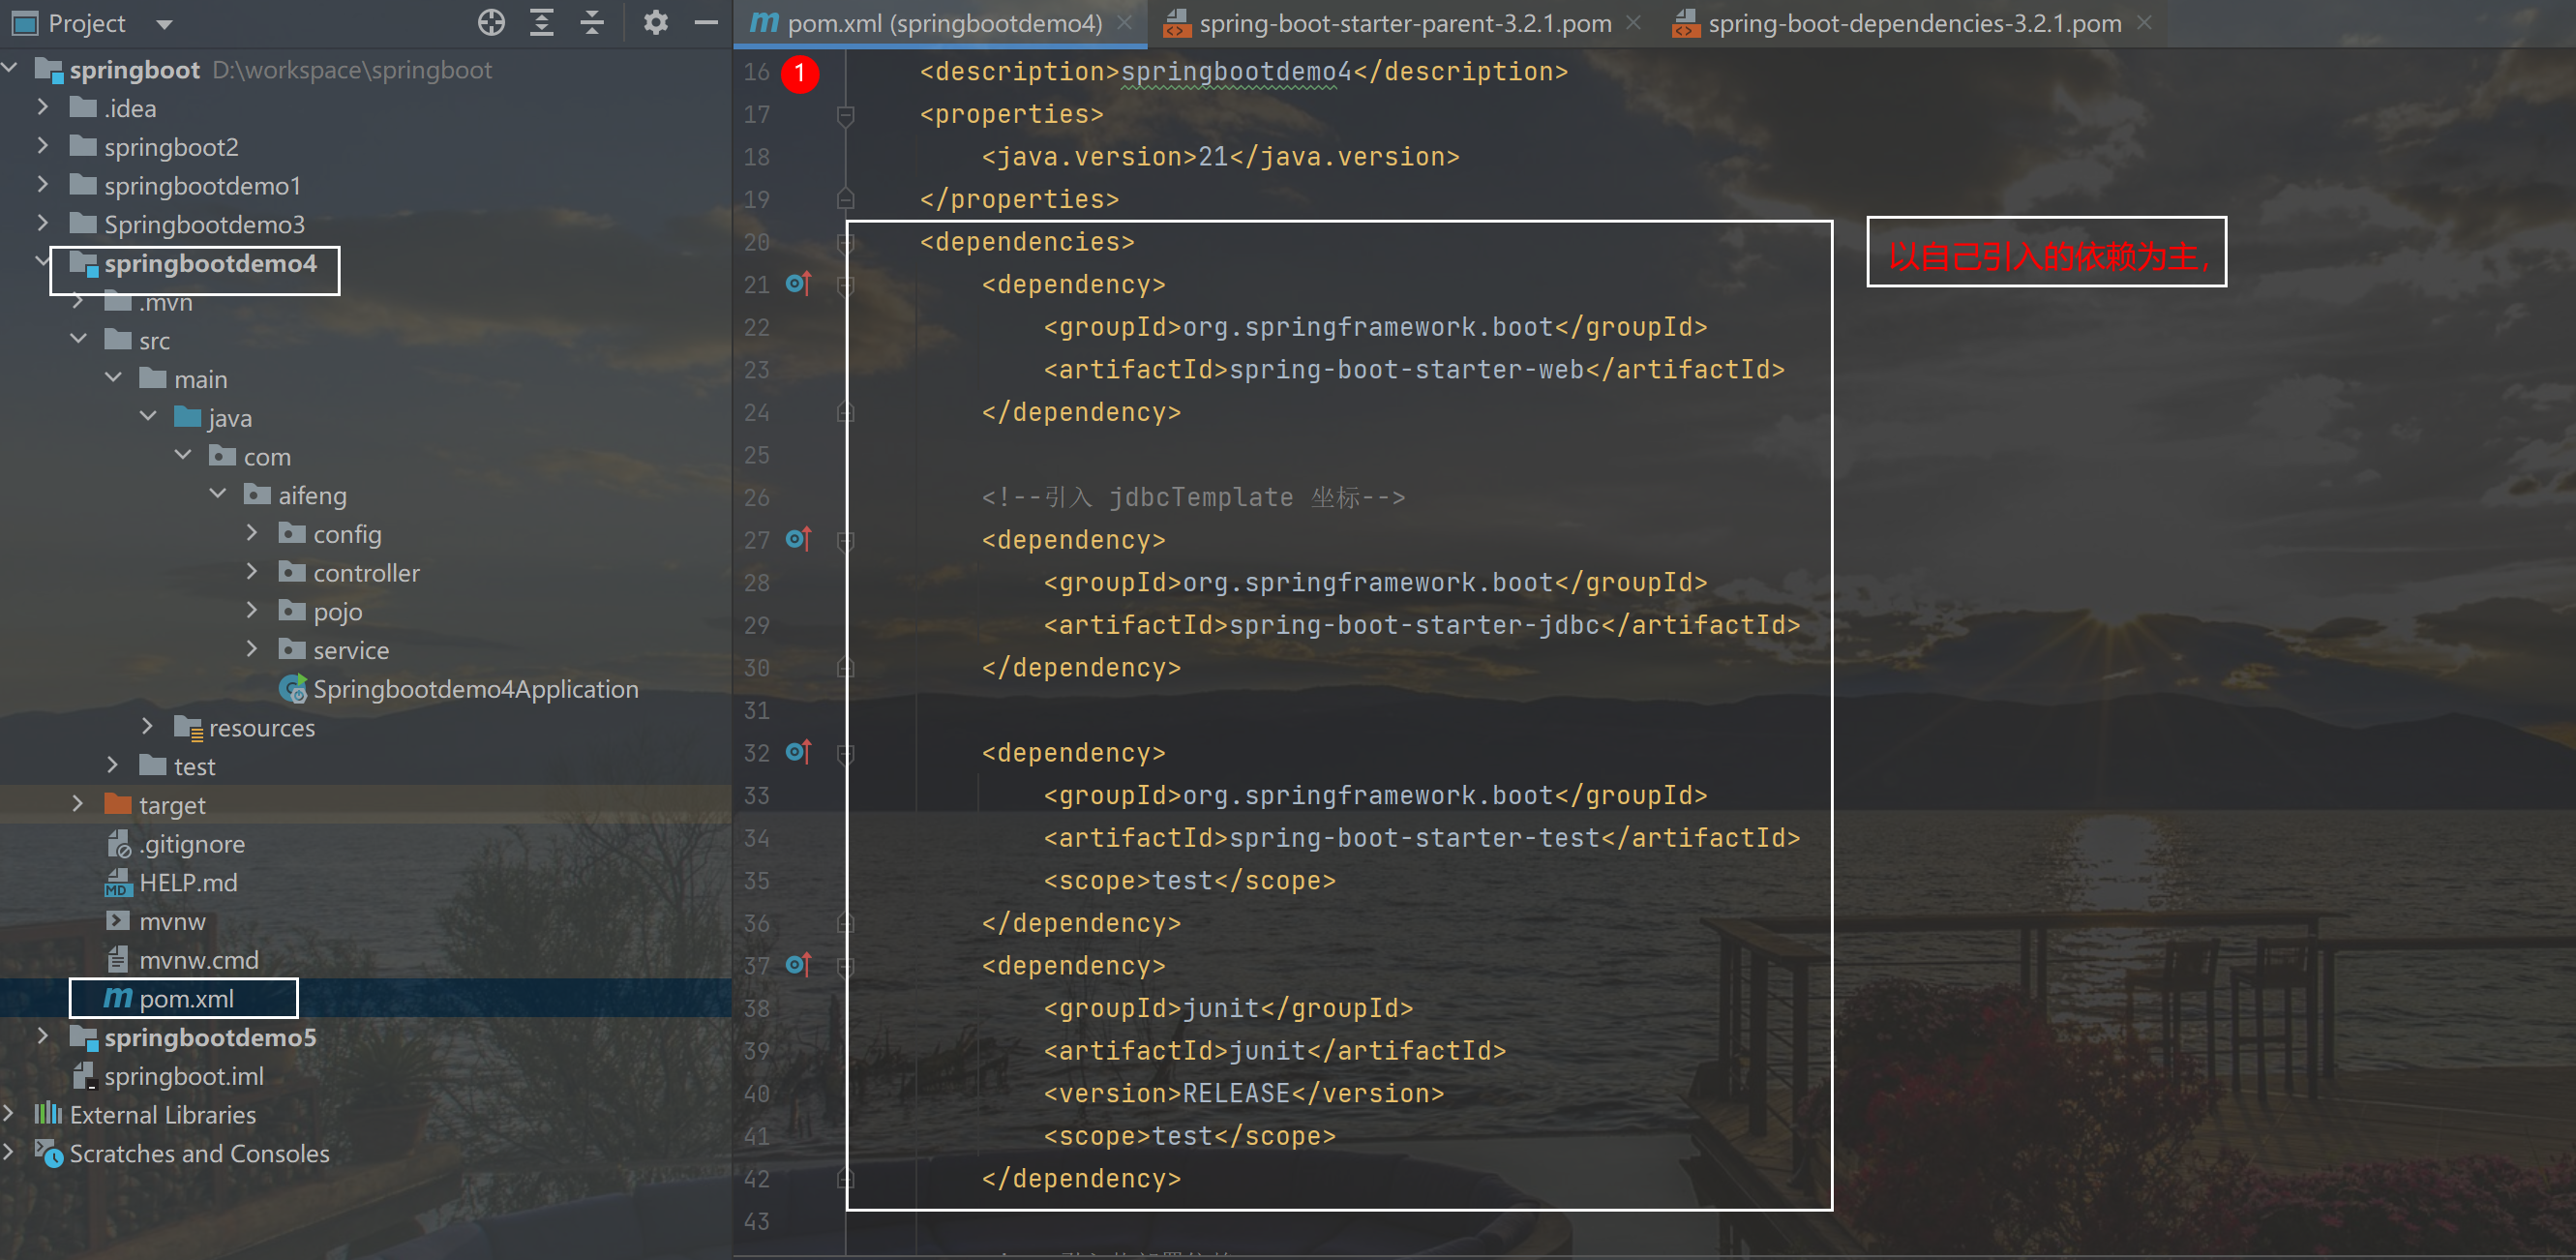
以自己引入的依赖为主
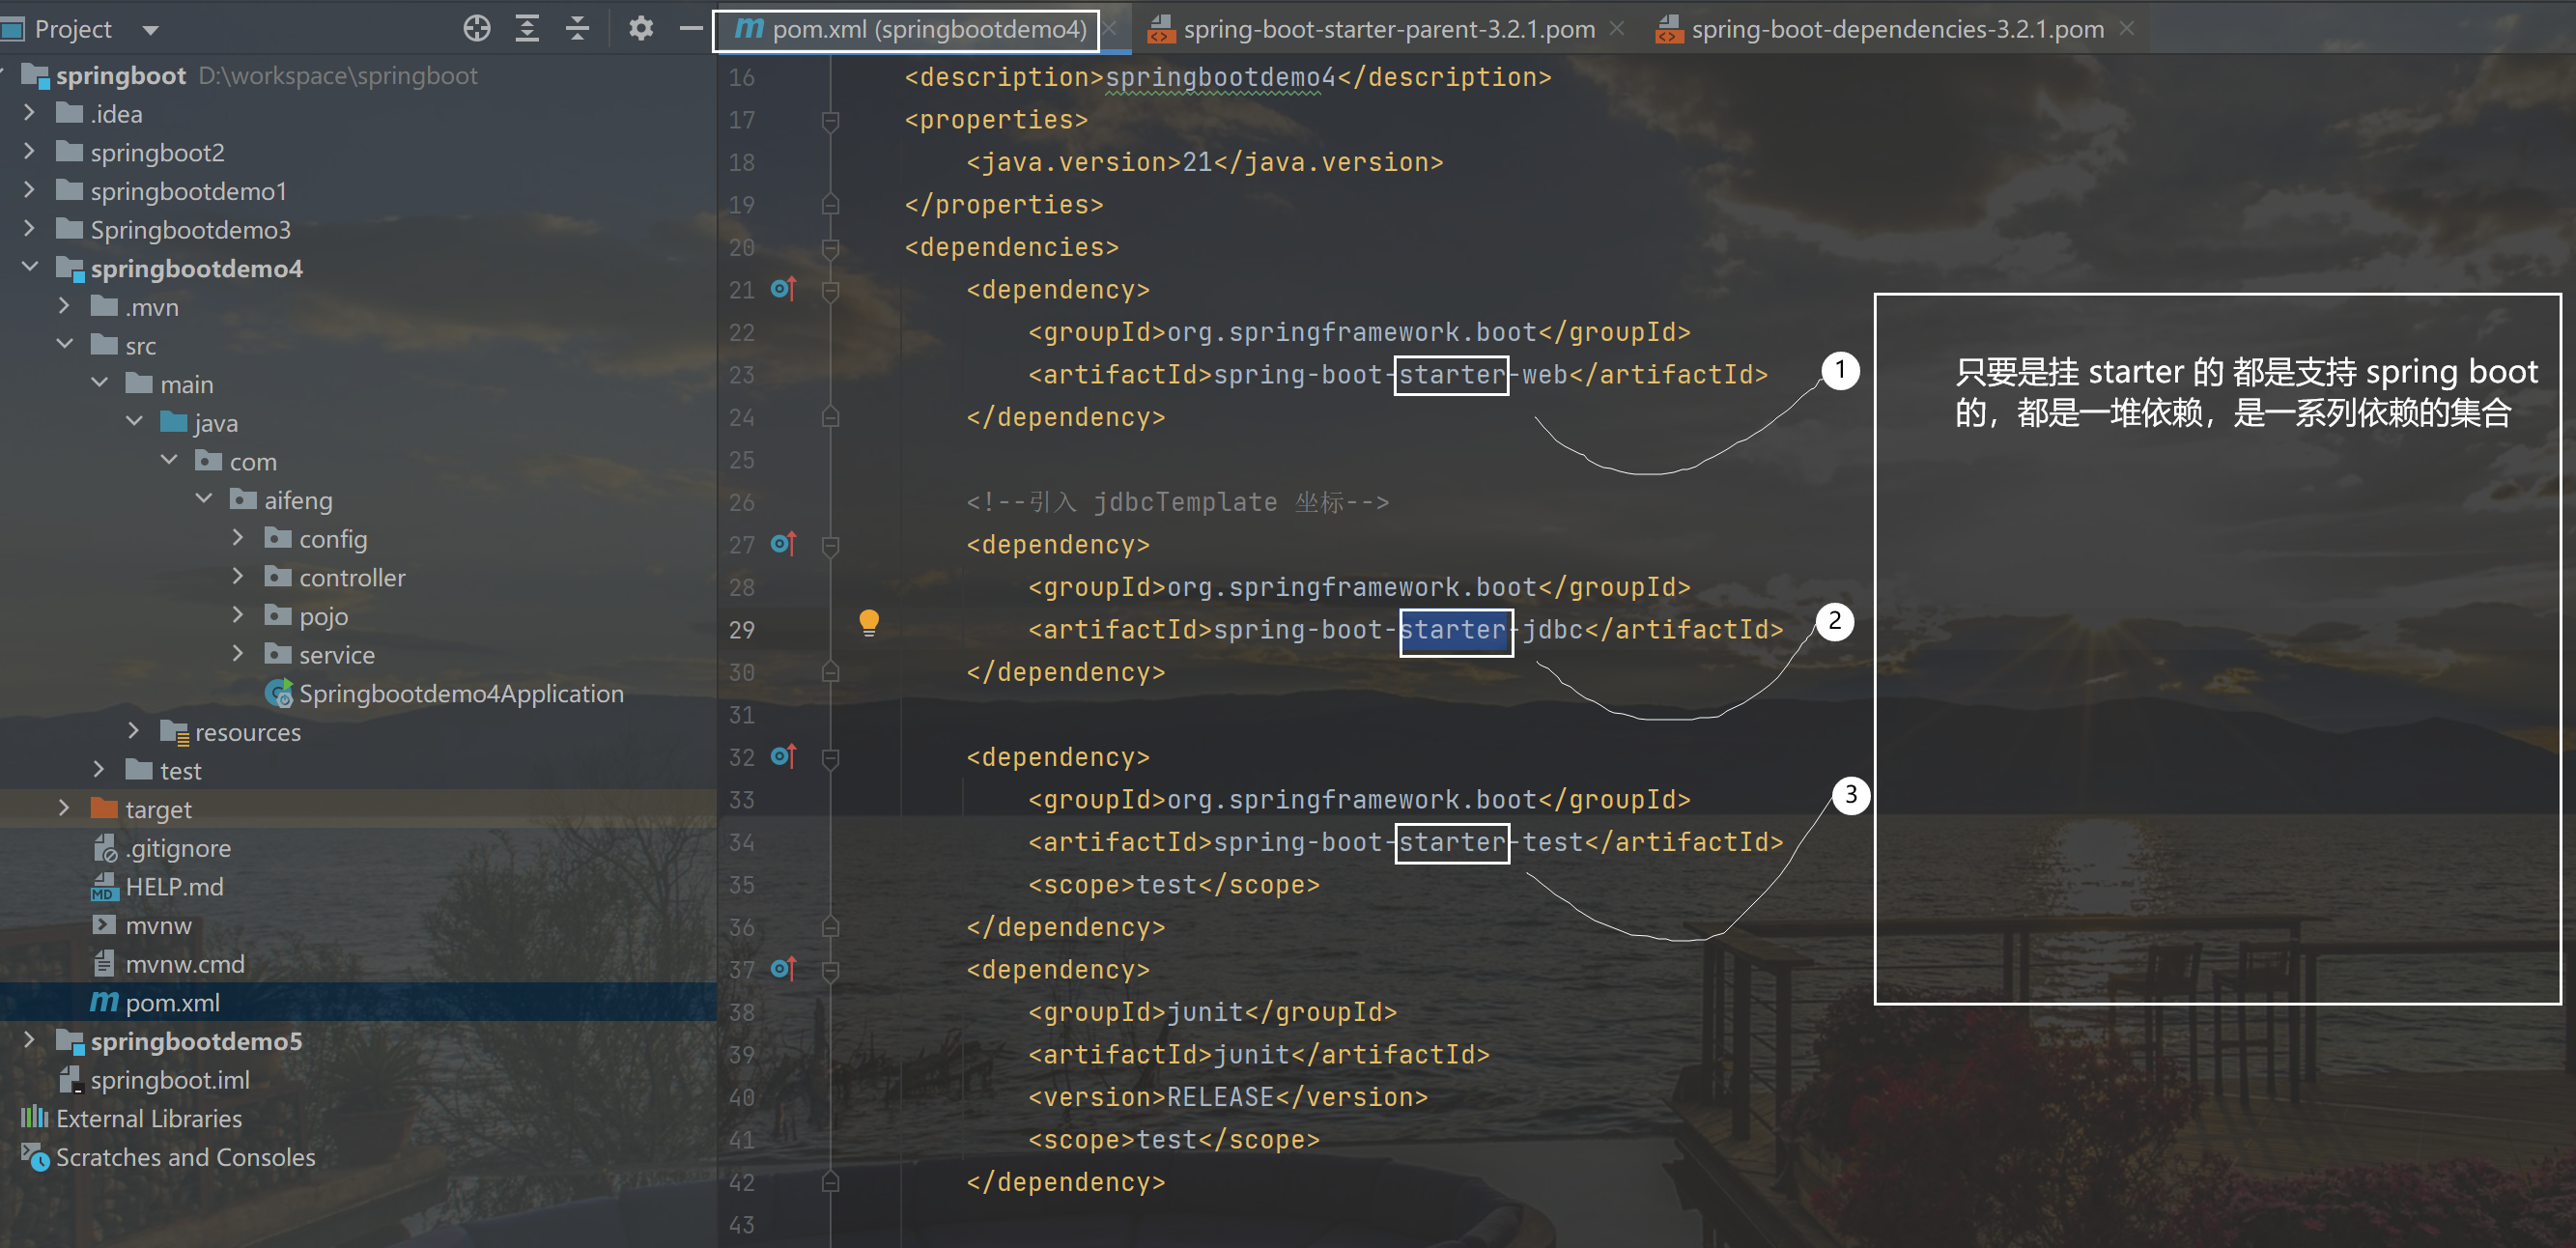
问题2: spring-boot-starter-parent父依赖启动器的主要作用是进行版本统一管理,那么项目运行依赖的JAR包是从何而来的?
以 spring-boot-starter-web 进行分析

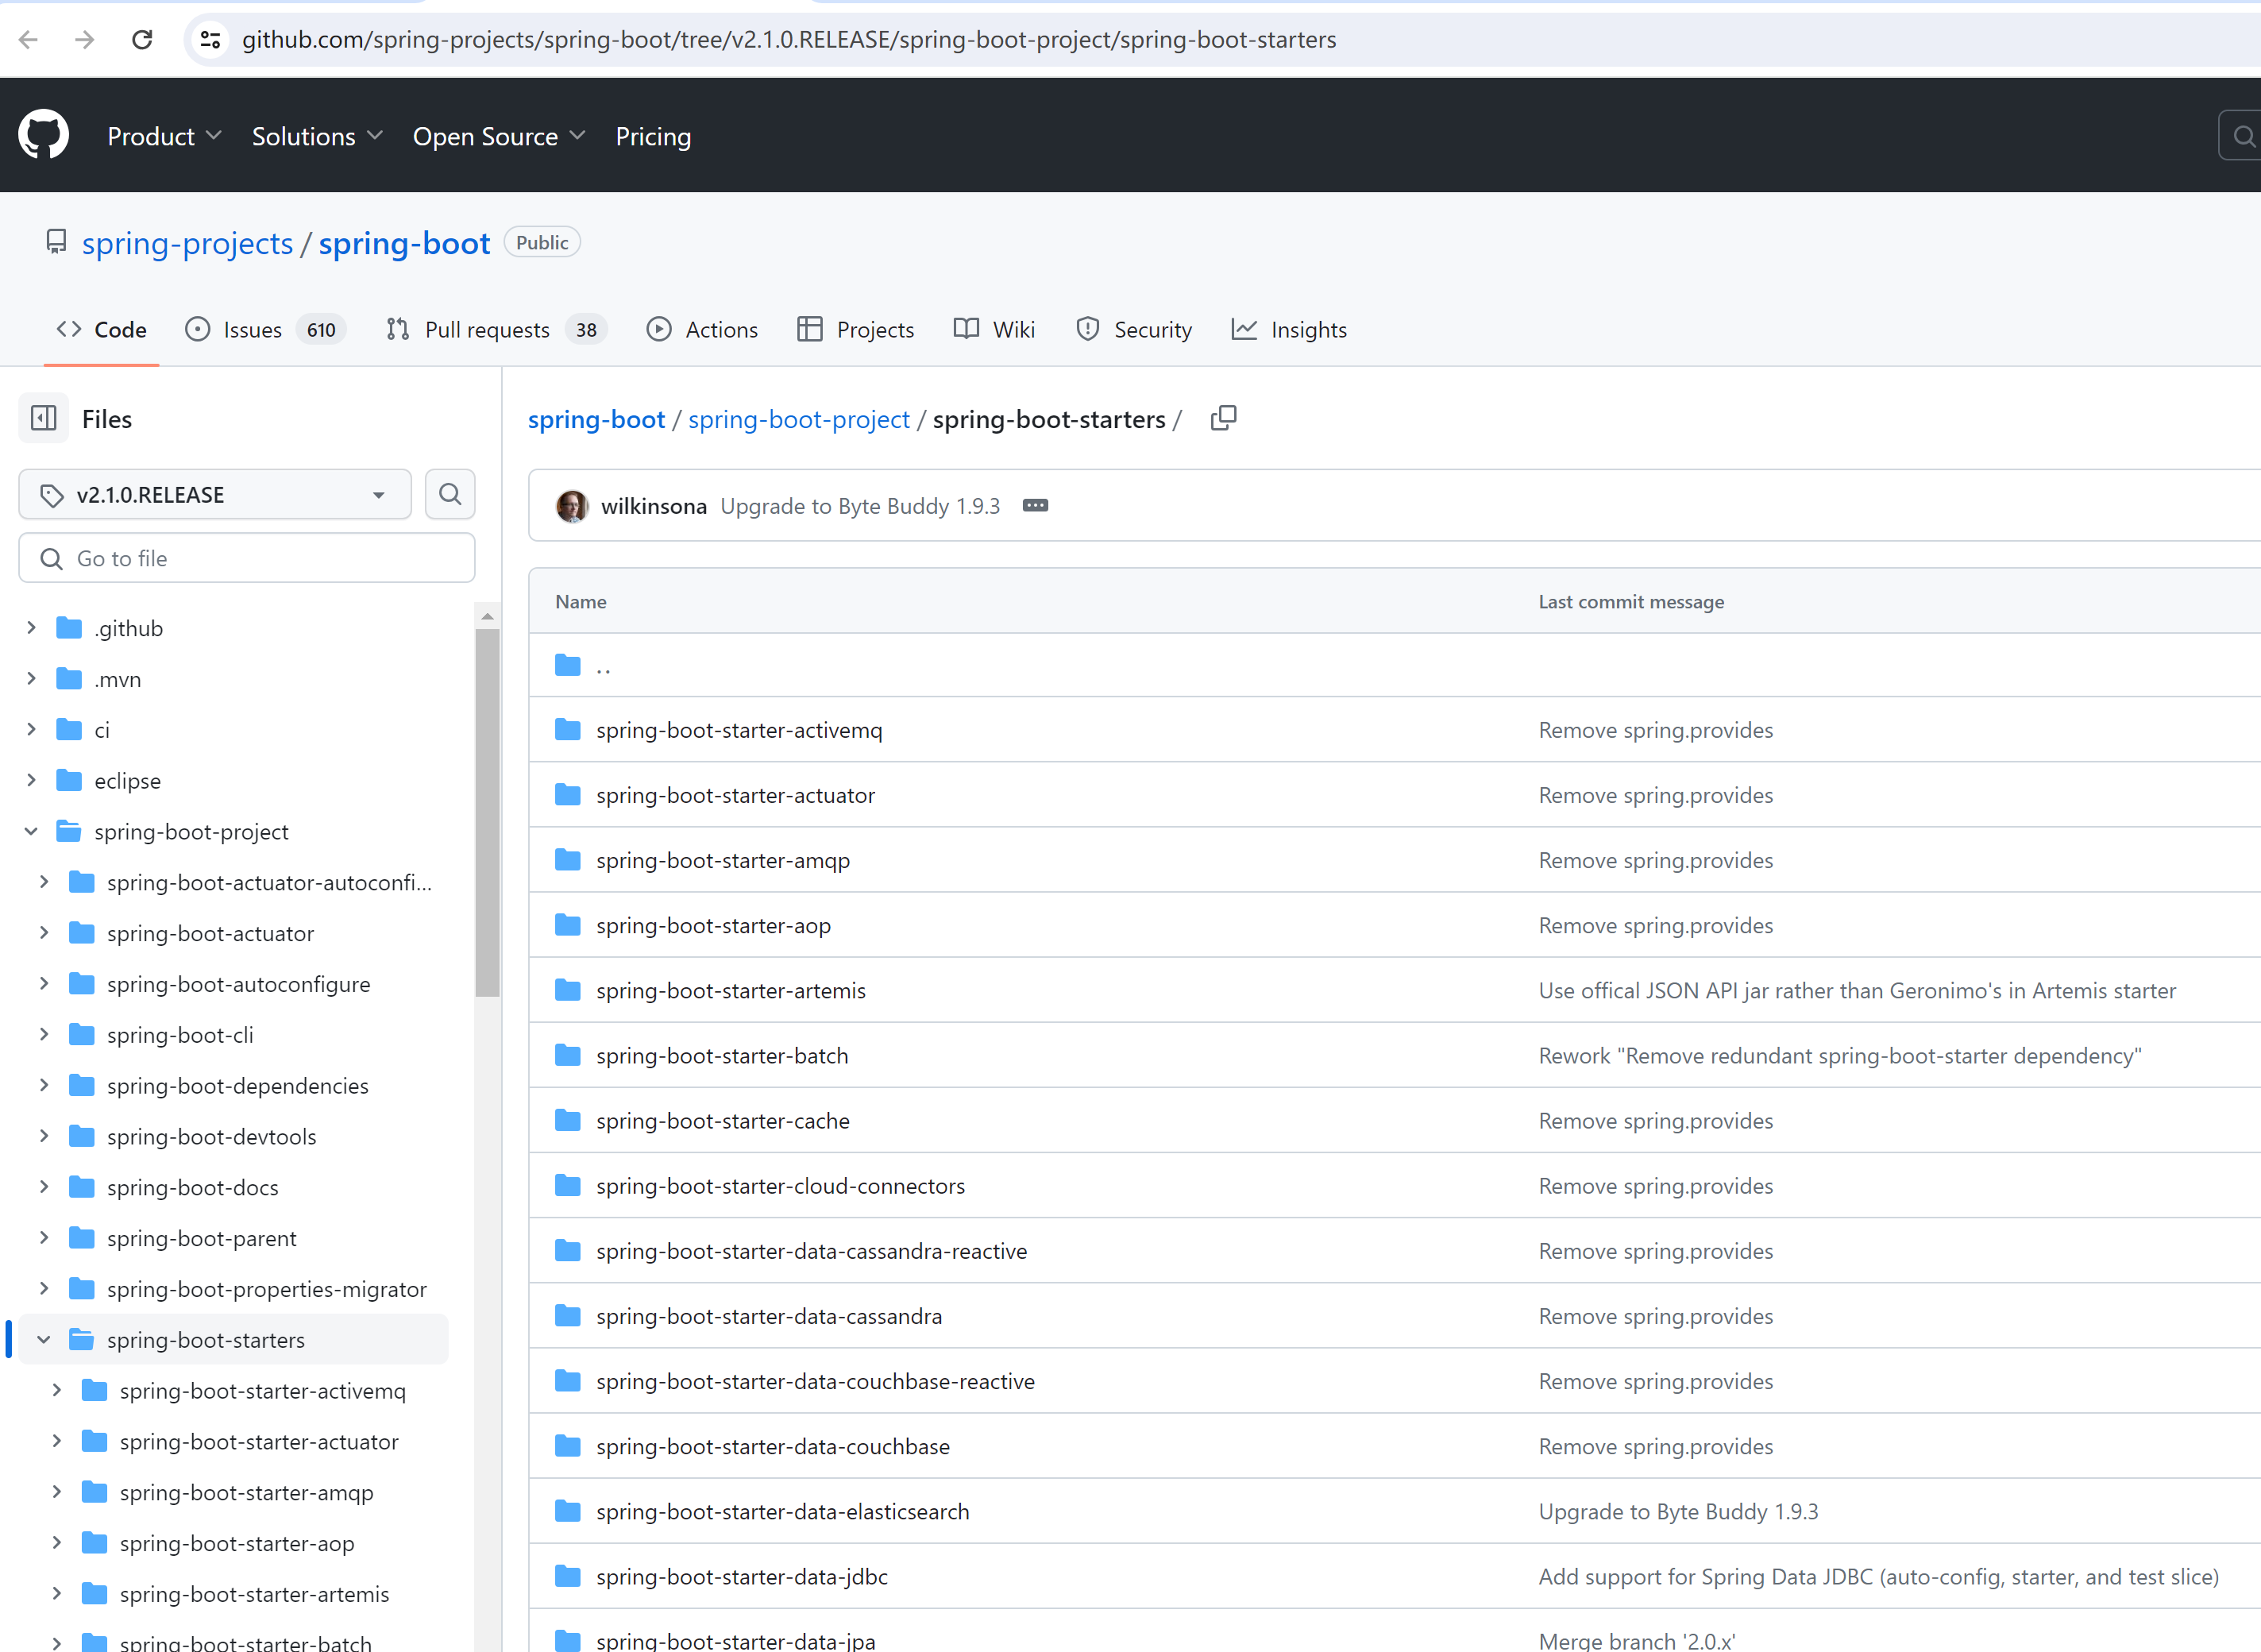
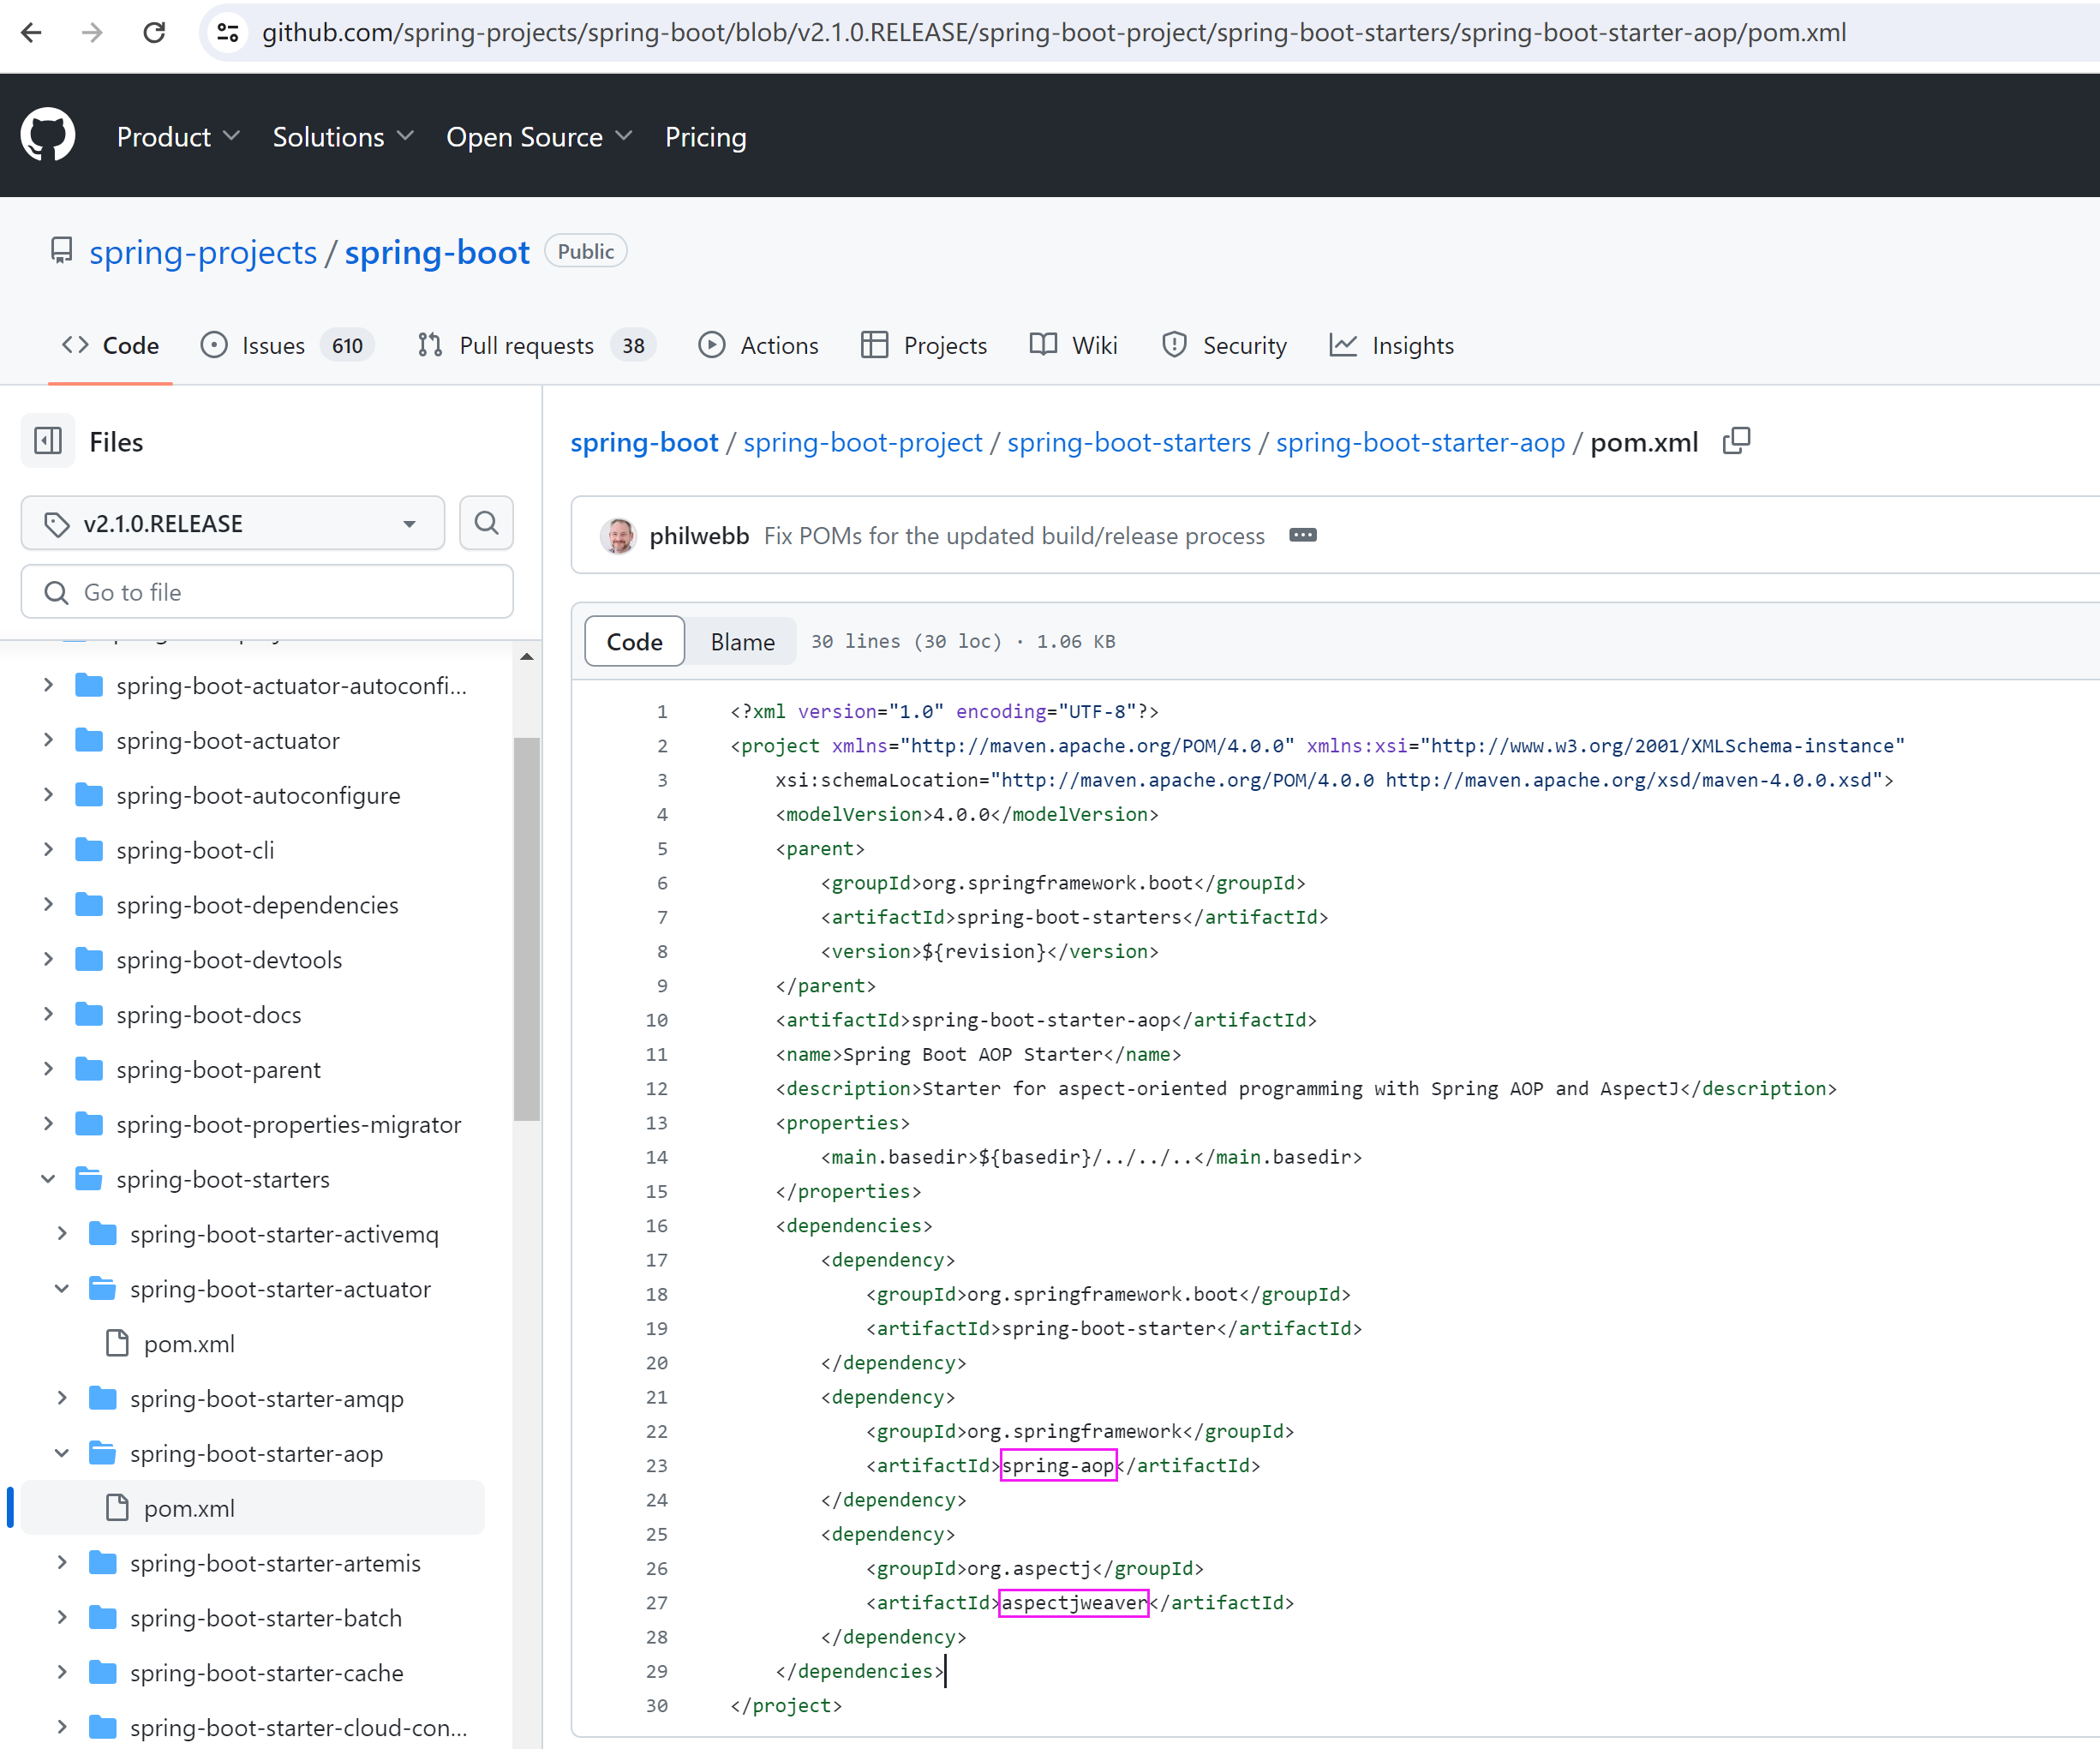
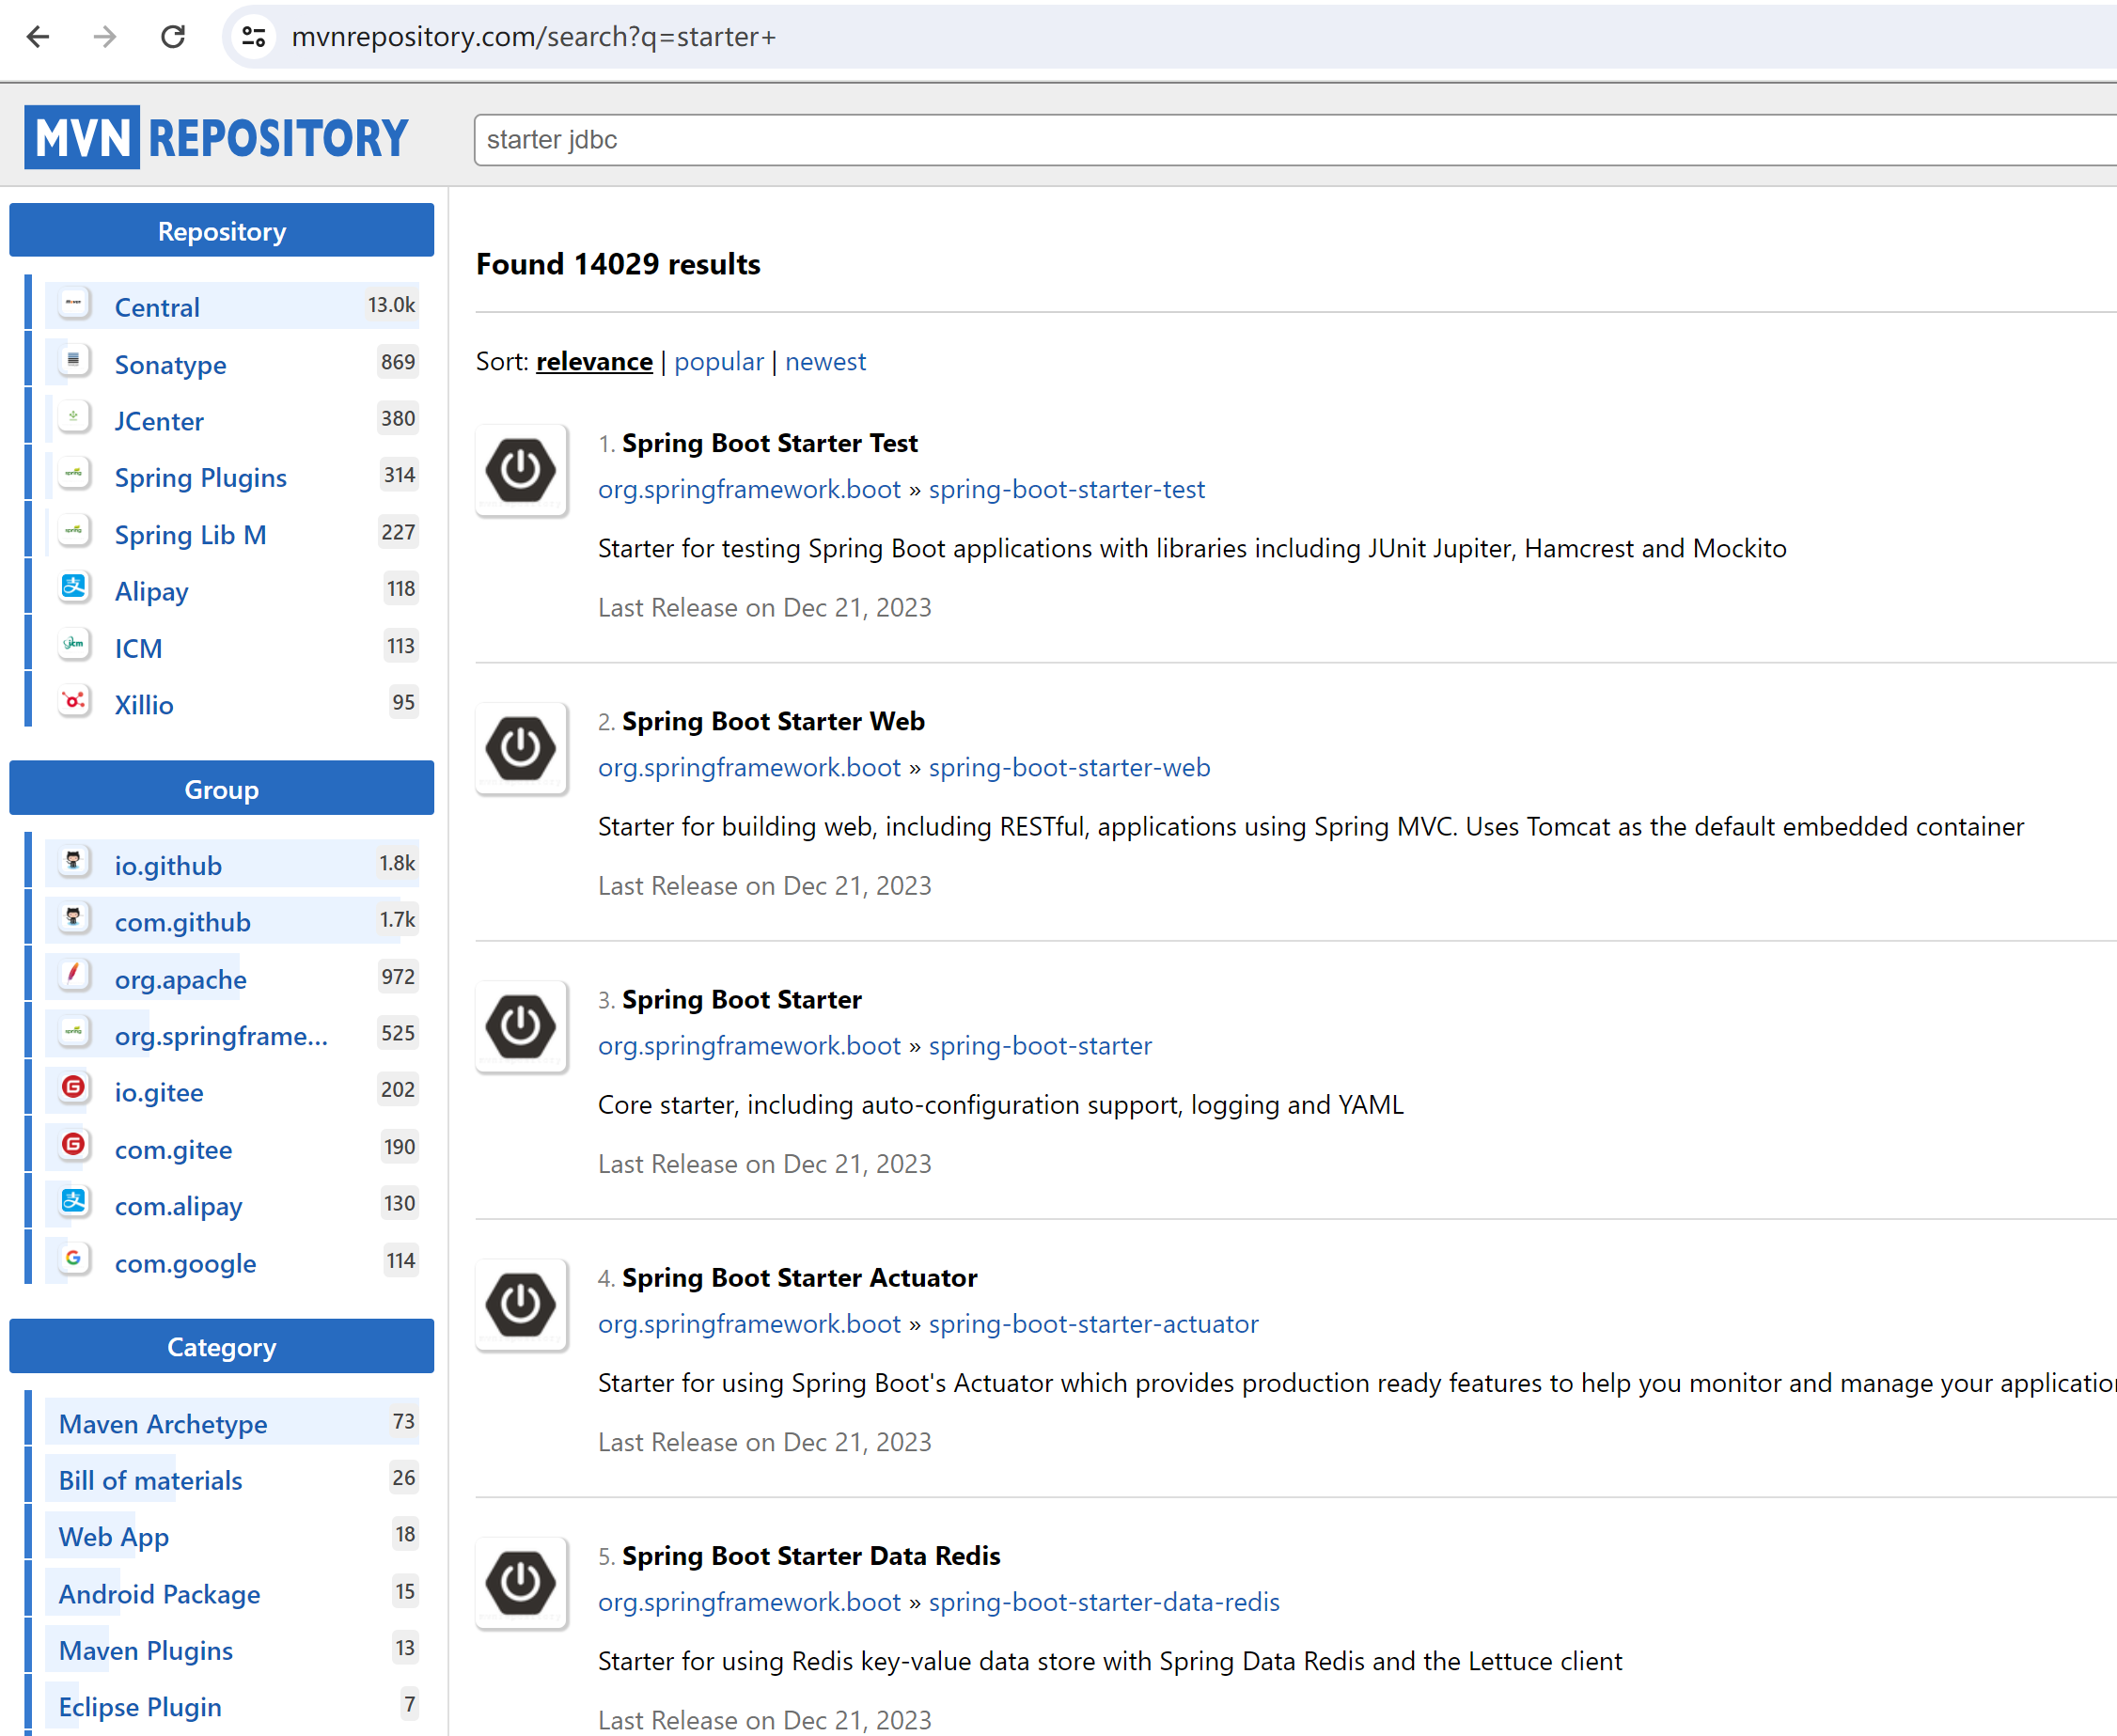
starter 依赖
github中 SpringBoot 的 starters列表
https://github.com/spring-projects/spring-boot/tree/v2.1.0.RELEASE/spring-boot-project/spring-boot-starters
mvn: https://mvnrepository.com/search?q=starter+
2.源码剖析-自动配置-SpringBootConfiguration
问题:Spring Boot 到底是如何进行自动配置的,都把哪些组件进行了自动配置?

核心注解1:@SpringBootConfiguration
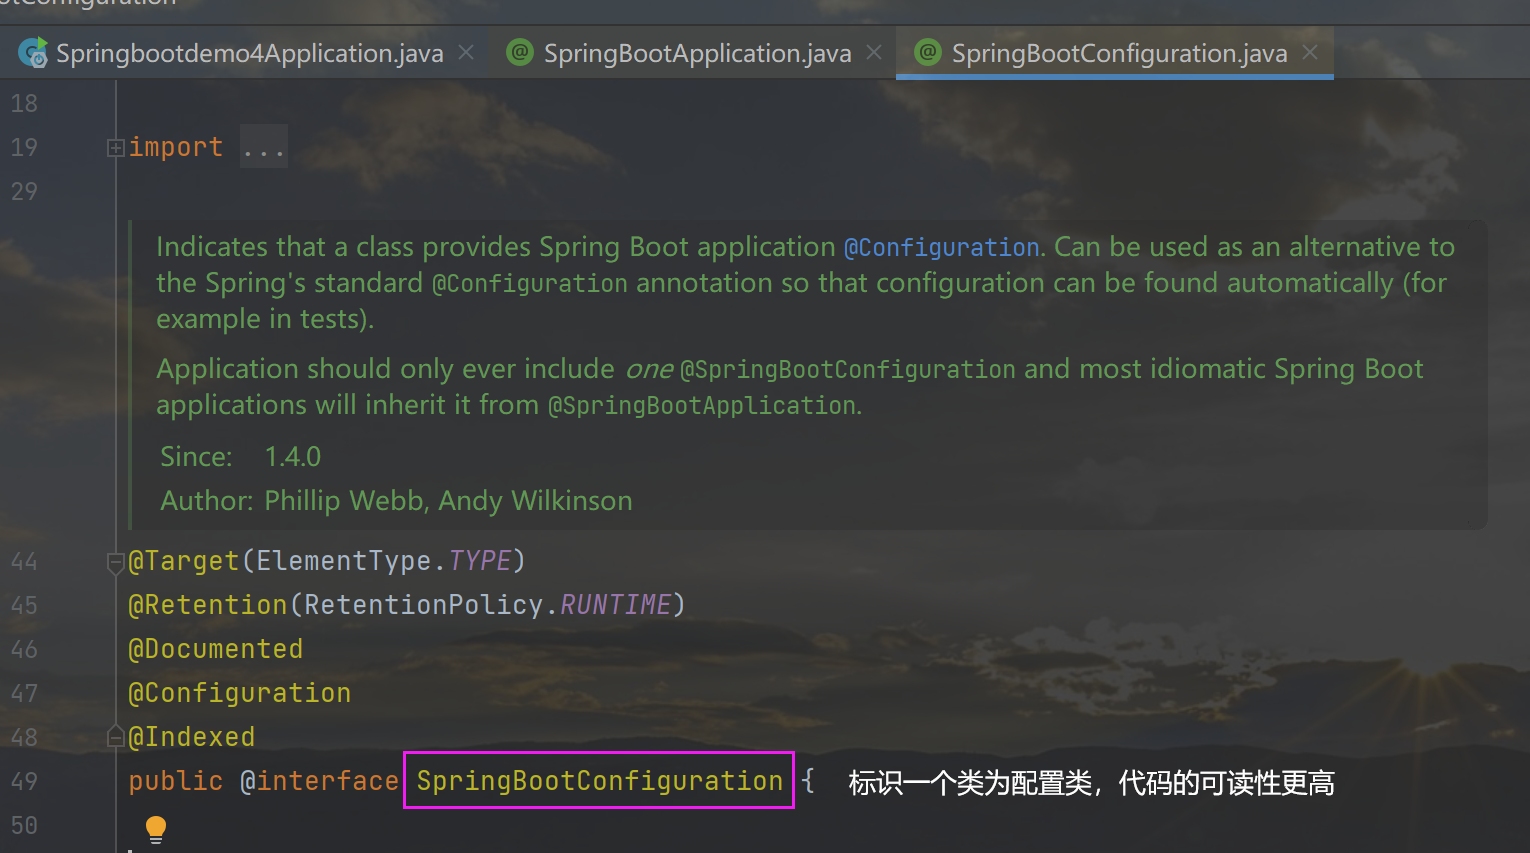
@Target(ElementType.TYPE)
@Retention(RetentionPolicy.RUNTIME)
@Documented
@Configuration  //一个配置类
@Indexed
public @interface SpringBootConfiguration {

	/**
	 * Specify whether {@link Bean @Bean} methods should get proxied in order to enforce
	 * bean lifecycle behavior, e.g. to return shared singleton bean instances even in
	 * case of direct {@code @Bean} method calls in user code. This feature requires
	 * method interception, implemented through a runtime-generated CGLIB subclass which
	 * comes with limitations such as the configuration class and its methods not being
	 * allowed to declare {@code final}.
	 * <p>
	 * The default is {@code true}, allowing for 'inter-bean references' within the
	 * configuration class as well as for external calls to this configuration's
	 * {@code @Bean} methods, e.g. from another configuration class. If this is not needed
	 * since each of this particular configuration's {@code @Bean} methods is
	 * self-contained and designed as a plain factory method for container use, switch
	 * this flag to {@code false} in order to avoid CGLIB subclass processing.
	 * <p>
	 * Turning off bean method interception effectively processes {@code @Bean} methods
	 * individually like when declared on non-{@code @Configuration} classes, a.k.a.
	 * "@Bean Lite Mode" (see {@link Bean @Bean's javadoc}). It is therefore behaviorally
	 * equivalent to removing the {@code @Configuration} stereotype.
	 * @return whether to proxy {@code @Bean} methods
	 * @since 2.2
	 */
	@AliasFor(annotation = Configuration.class)
	boolean proxyBeanMethods() default true;

}
3.源码剖析-自动配置-AutoConfigurationPackage
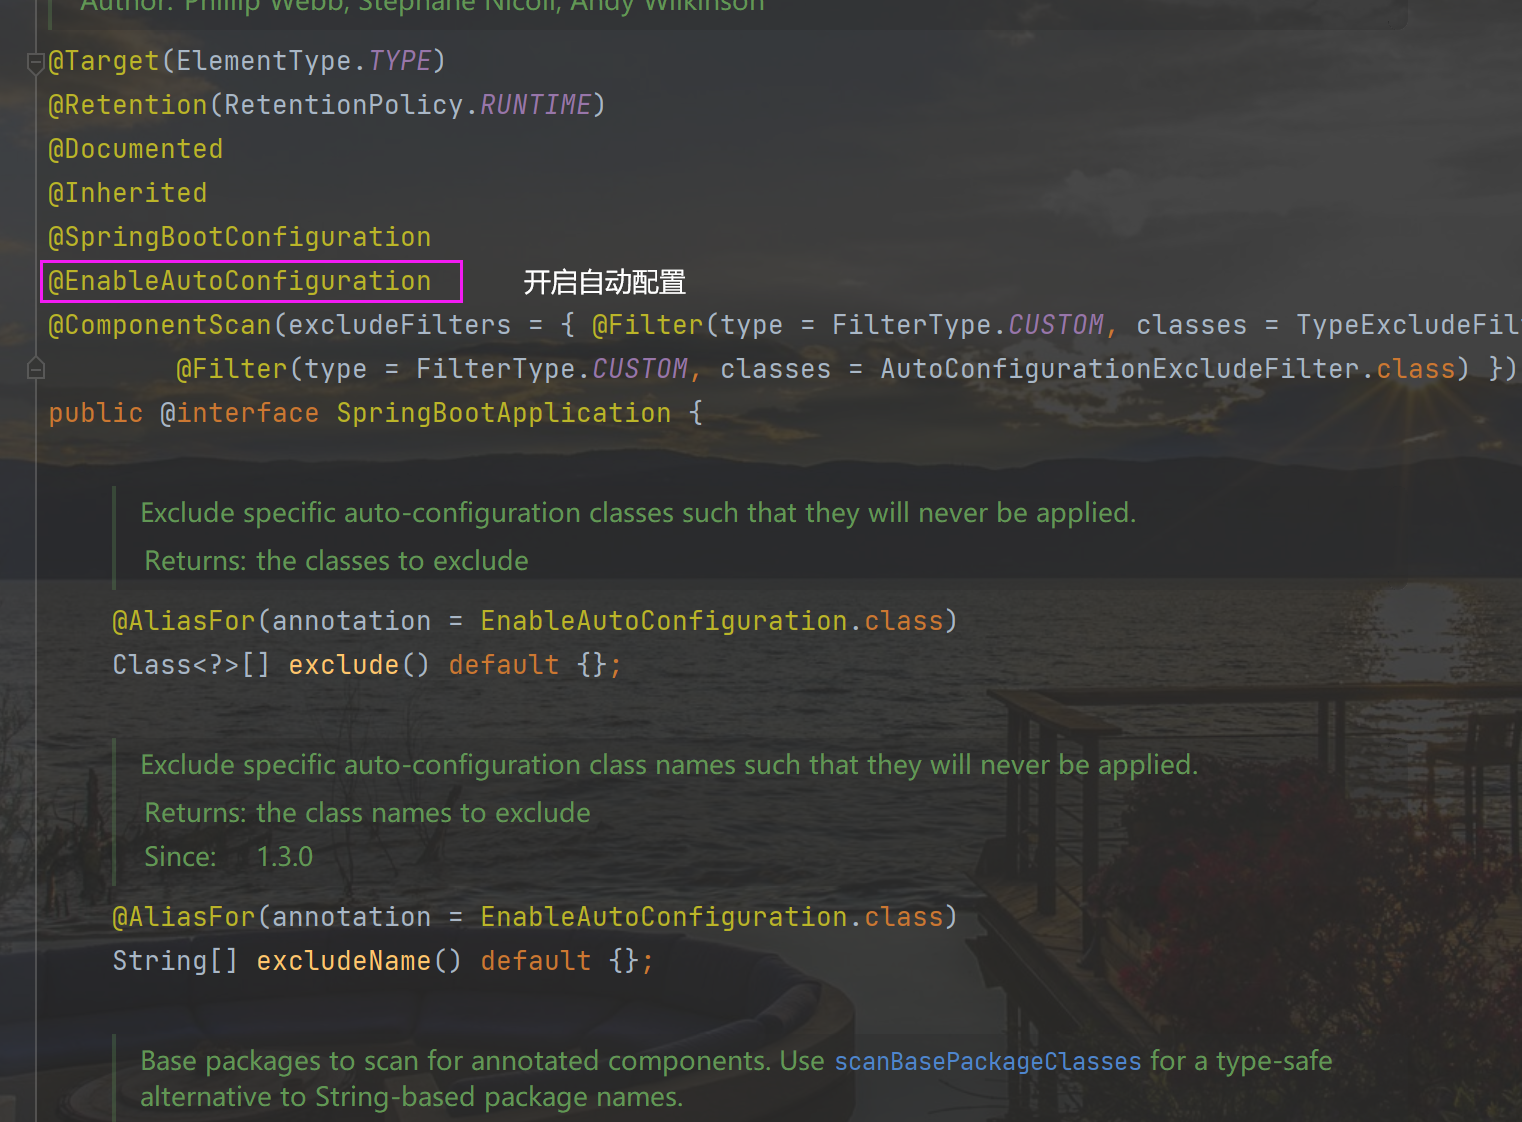
核心注解2: @EnableAutoConfiguration
@Target(ElementType.TYPE)
@Retention(RetentionPolicy.RUNTIME)
@Documented
@Inherited
@AutoConfigurationPackage //核心注解
@Import(AutoConfigurationImportSelector.class)
public @interface EnableAutoConfiguration {

	/**
	 * Environment property that can be used to override when auto-configuration is
	 * enabled.
	 */
	String ENABLED_OVERRIDE_PROPERTY = "spring.boot.enableautoconfiguration";

	/**
	 * Exclude specific auto-configuration classes such that they will never be applied.
	 * @return the classes to exclude
	 */
	Class<?>[] exclude() default {};

	/**
	 * Exclude specific auto-configuration class names such that they will never be
	 * applied.
	 * @return the class names to exclude
	 * @since 1.3.0
	 */
	String[] excludeName() default {};

}
@AutoConfigurationPackage
@Target(ElementType.TYPE)
@Retention(RetentionPolicy.RUNTIME)
@Documented
@Inherited
@Import(AutoConfigurationPackages.Registrar.class)
public @interface AutoConfigurationPackage {

	/**
	 * Base packages that should be registered with {@link AutoConfigurationPackages}.
	 * <p>
	 * Use {@link #basePackageClasses} for a type-safe alternative to String-based package
	 * names.
	 * @return the back package names
	 * @since 2.3.0
	 */
	String[] basePackages() default {};

	/**
	 * Type-safe alternative to {@link #basePackages} for specifying the packages to be
	 * registered with {@link AutoConfigurationPackages}.
	 * <p>
	 * Consider creating a special no-op marker class or interface in each package that
	 * serves no purpose other than being referenced by this attribute.
	 * @return the base package classes
	 * @since 2.3.0
	 */
	Class<?>[] basePackageClasses() default {};

}
Registrar
	/**
	 * {@link ImportBeanDefinitionRegistrar} to store the base package from the importing
	 * configuration.
	 */
	static class Registrar implements ImportBeanDefinitionRegistrar, DeterminableImports {

		@Override
		public void registerBeanDefinitions(AnnotationMetadata metadata, BeanDefinitionRegistry registry) {
			register(registry, new PackageImports(metadata).getPackageNames().toArray(new String[0]));
		}

		@Override
		public Set<Object> determineImports(AnnotationMetadata metadata) {
			return Collections.singleton(new PackageImports(metadata));
		}

	}
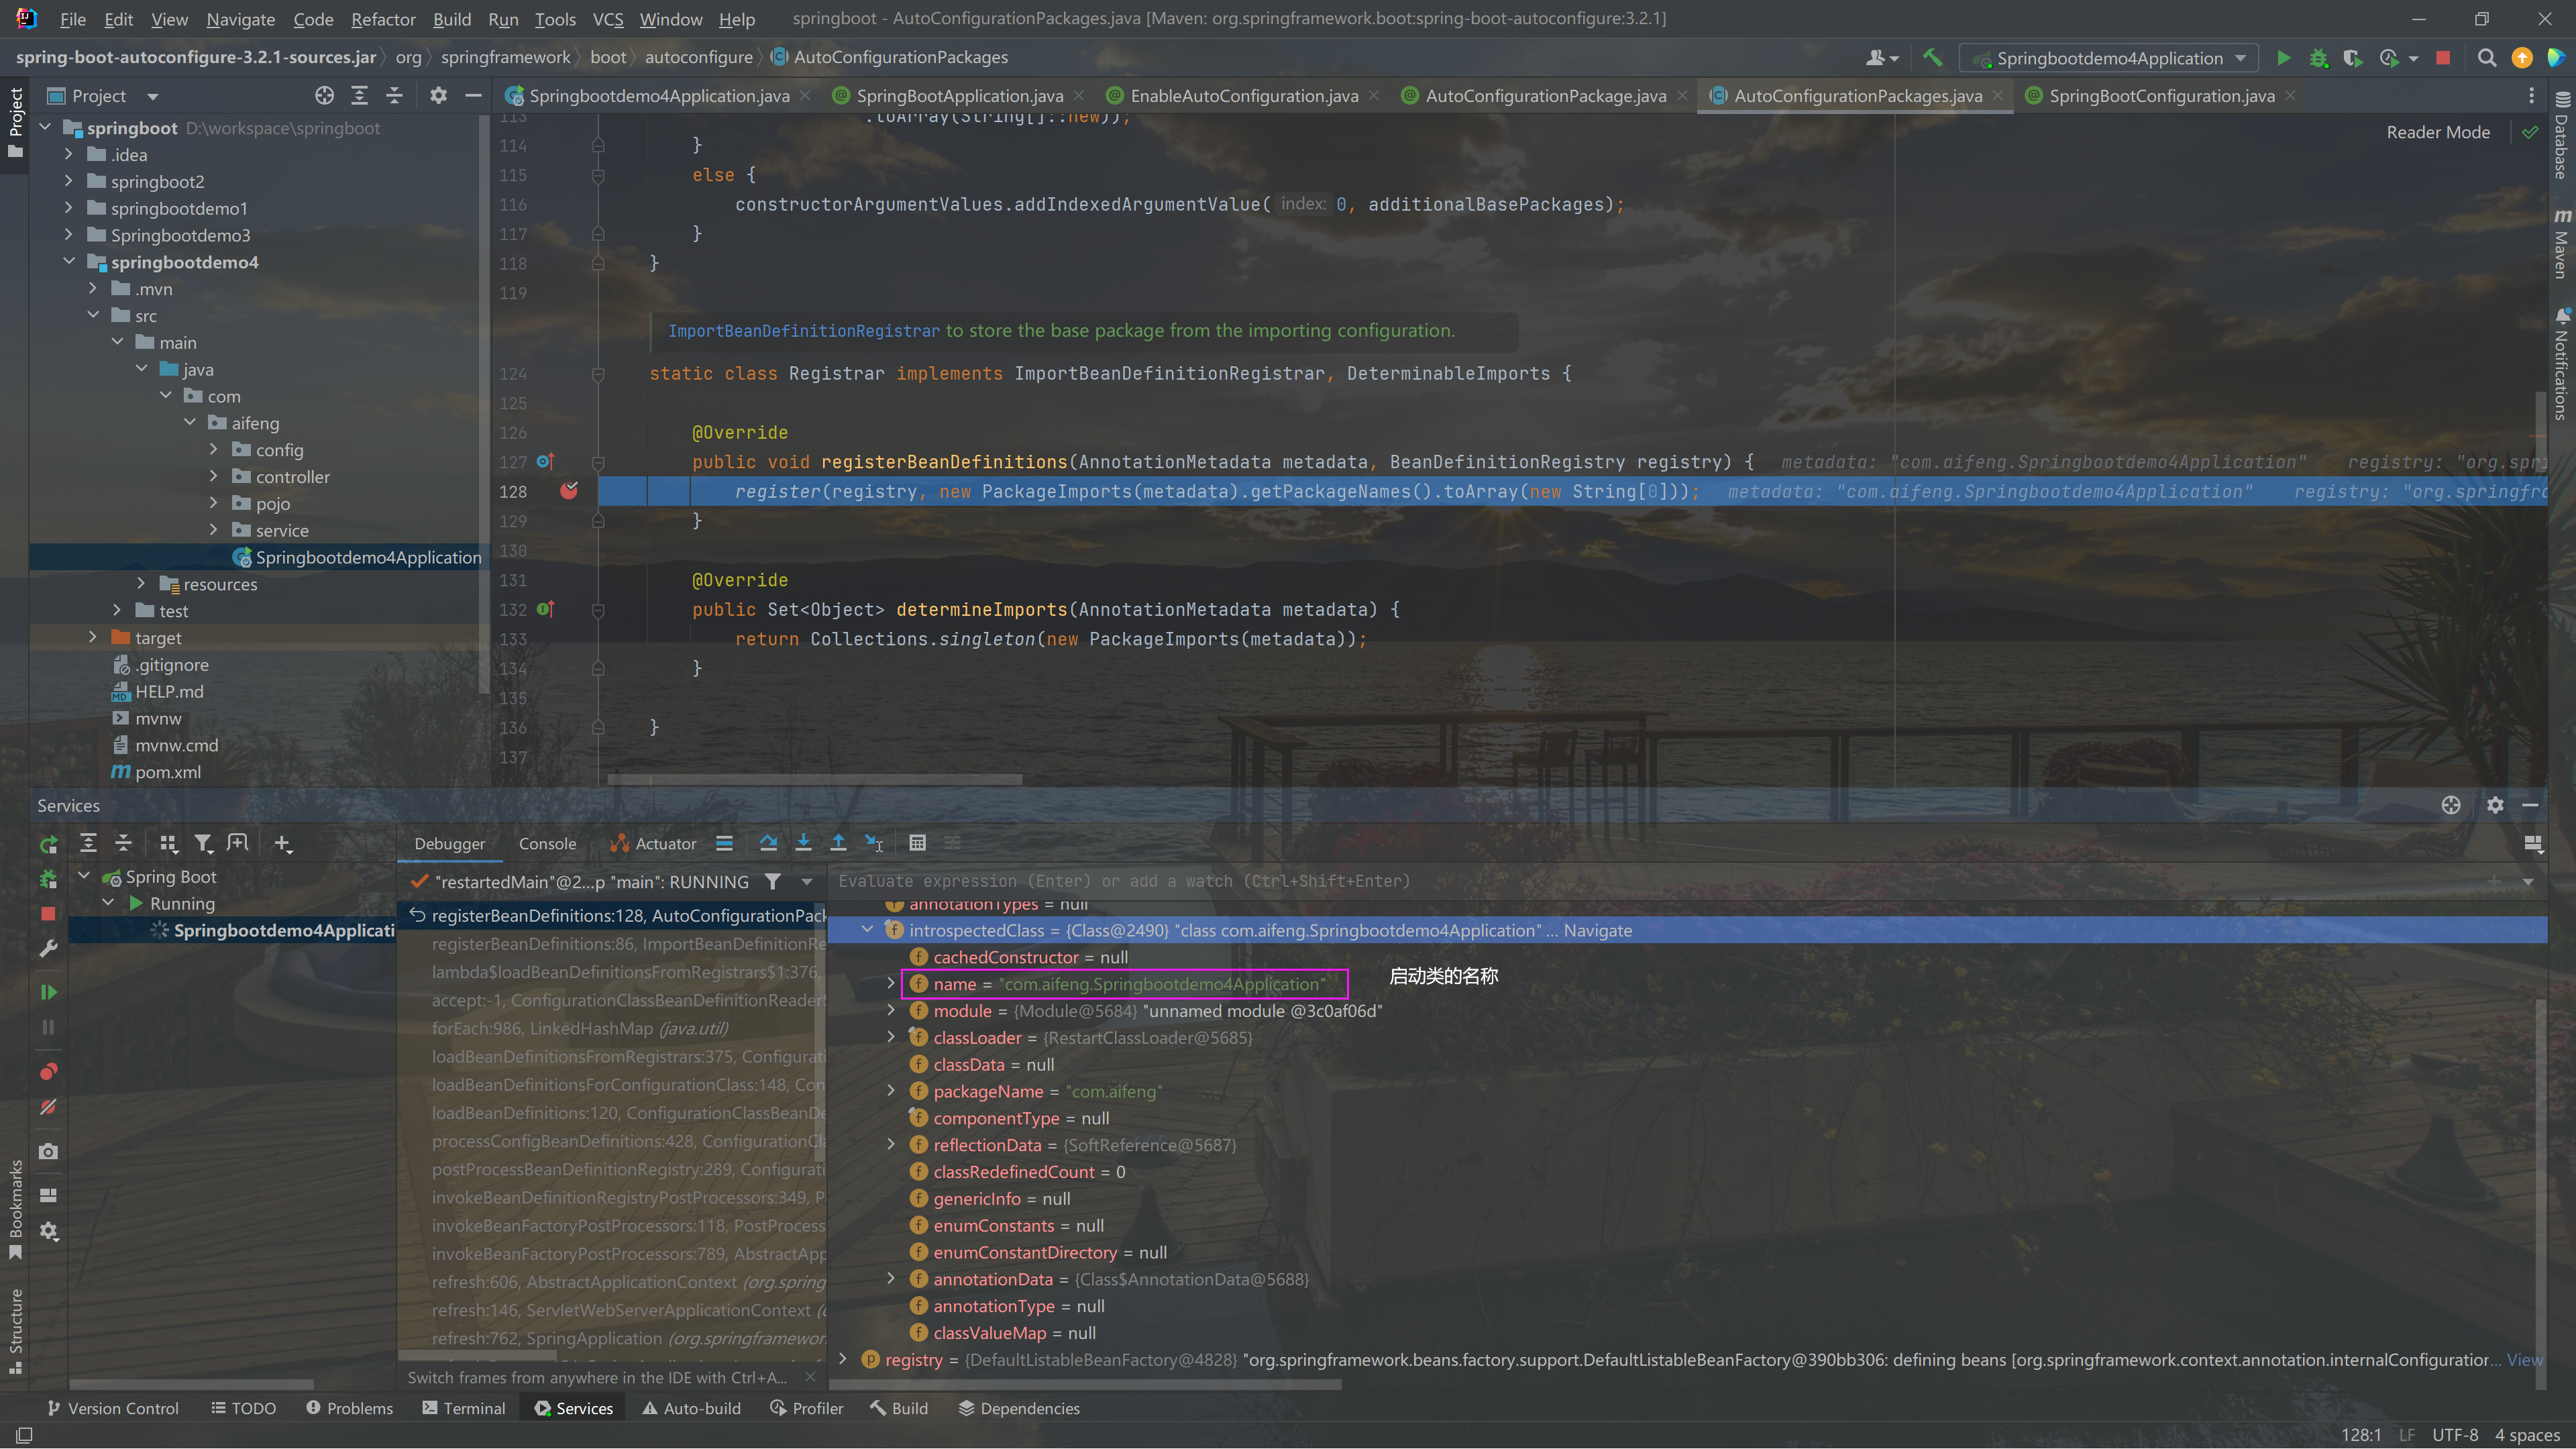
打断点查看加载的数据
把当前启动类所在的包及其子包下的所有内容都扫描到了容器中(F9 结束断点 | alt + f9)
4.源码剖析-自动配置-AutoConfigurationImportSelector
@Import : 是 spring 框架底层所使用的注解,通过该注解,可以导入一些组件,存入到我们的IOC 容器中
分析时,光看注解是没用的,得看导入的组件是干什么的,做了哪些东西

selectImports(): 这个方法是自动配置真正干活的方法,这个方法有什么作用呢?
他会查找所有符合条件的配置类,然后进行自动配置 ,所以说它是我们的核心方法 ,针对这个方法,我们可以看一下,它主要做了哪些事情
	@Override
	public String[] selectImports(AnnotationMetadata annotationMetadata) {
		if (!isEnabled(annotationMetadata)) { // 首先做了下判断是否开启了自动配置
			return NO_IMPORTS;  // 如果没有开启,就返回自定义的 String 数组  |  private static final String[] NO_IMPORTS = {};
		}
		AutoConfigurationEntry autoConfigurationEntry = getAutoConfigurationEntry(annotationMetadata); // 得到元数据信息
		return StringUtils.toStringArray(autoConfigurationEntry.getConfigurations());
	}
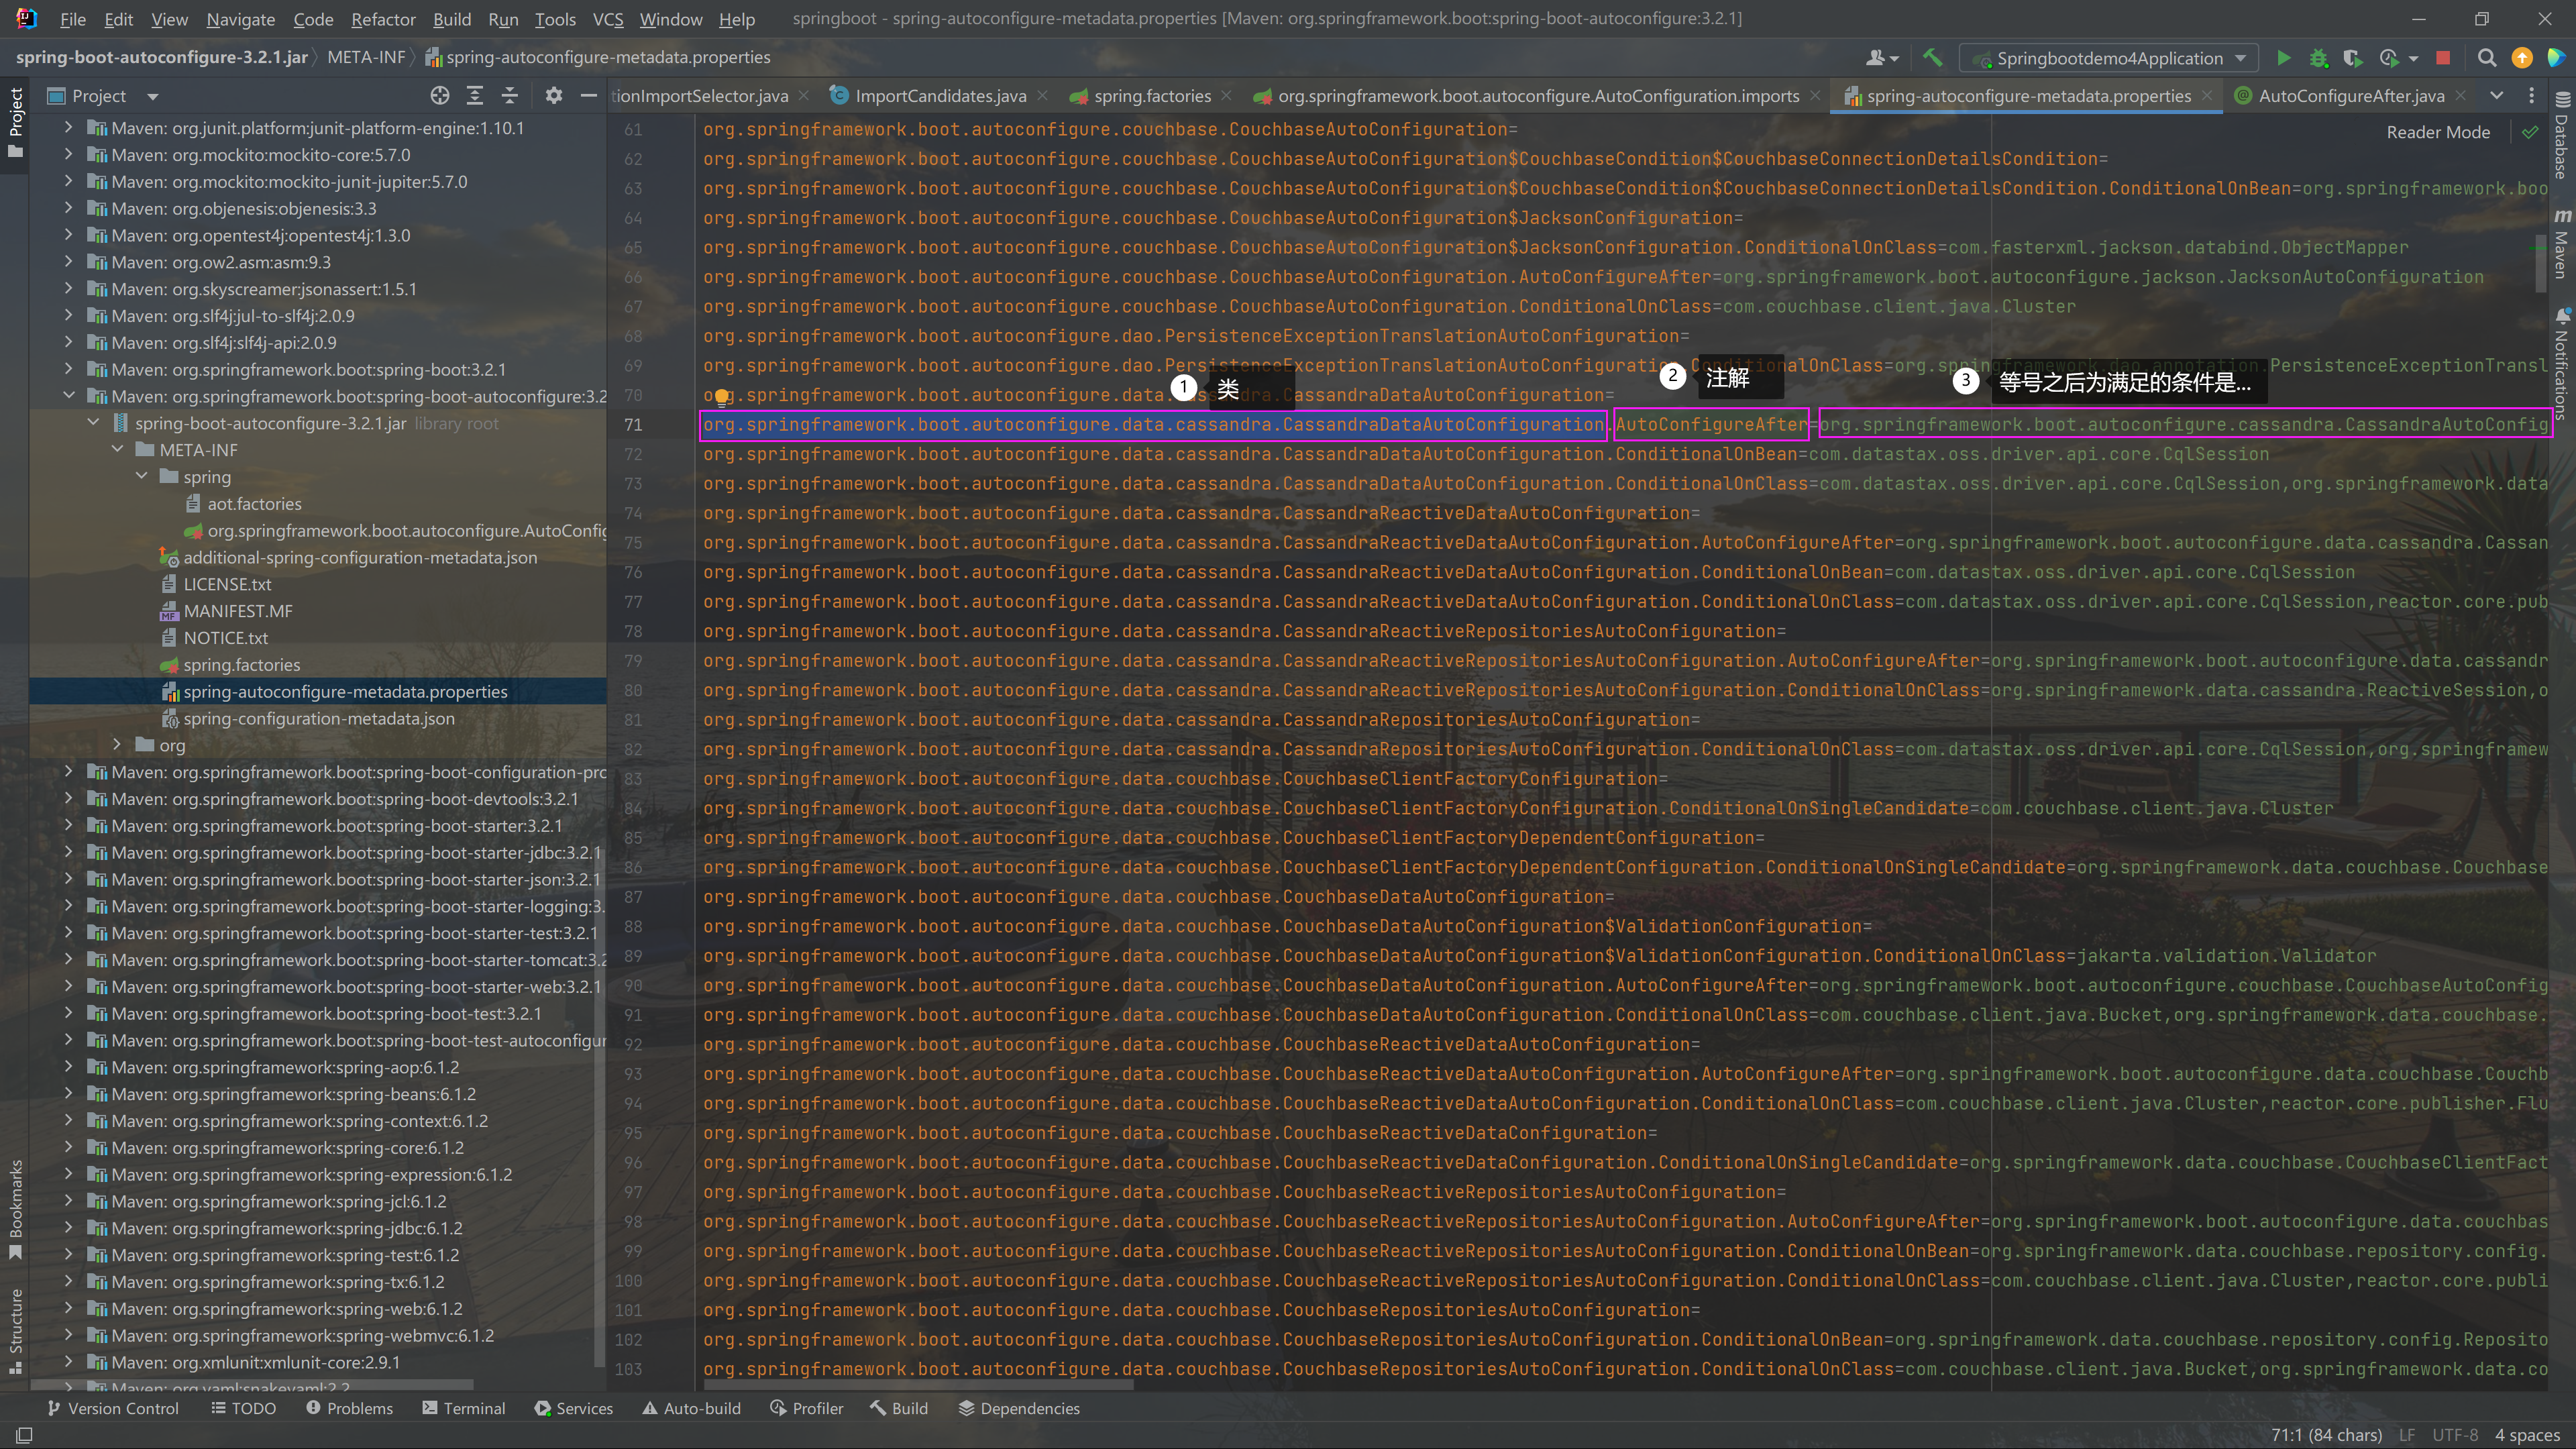
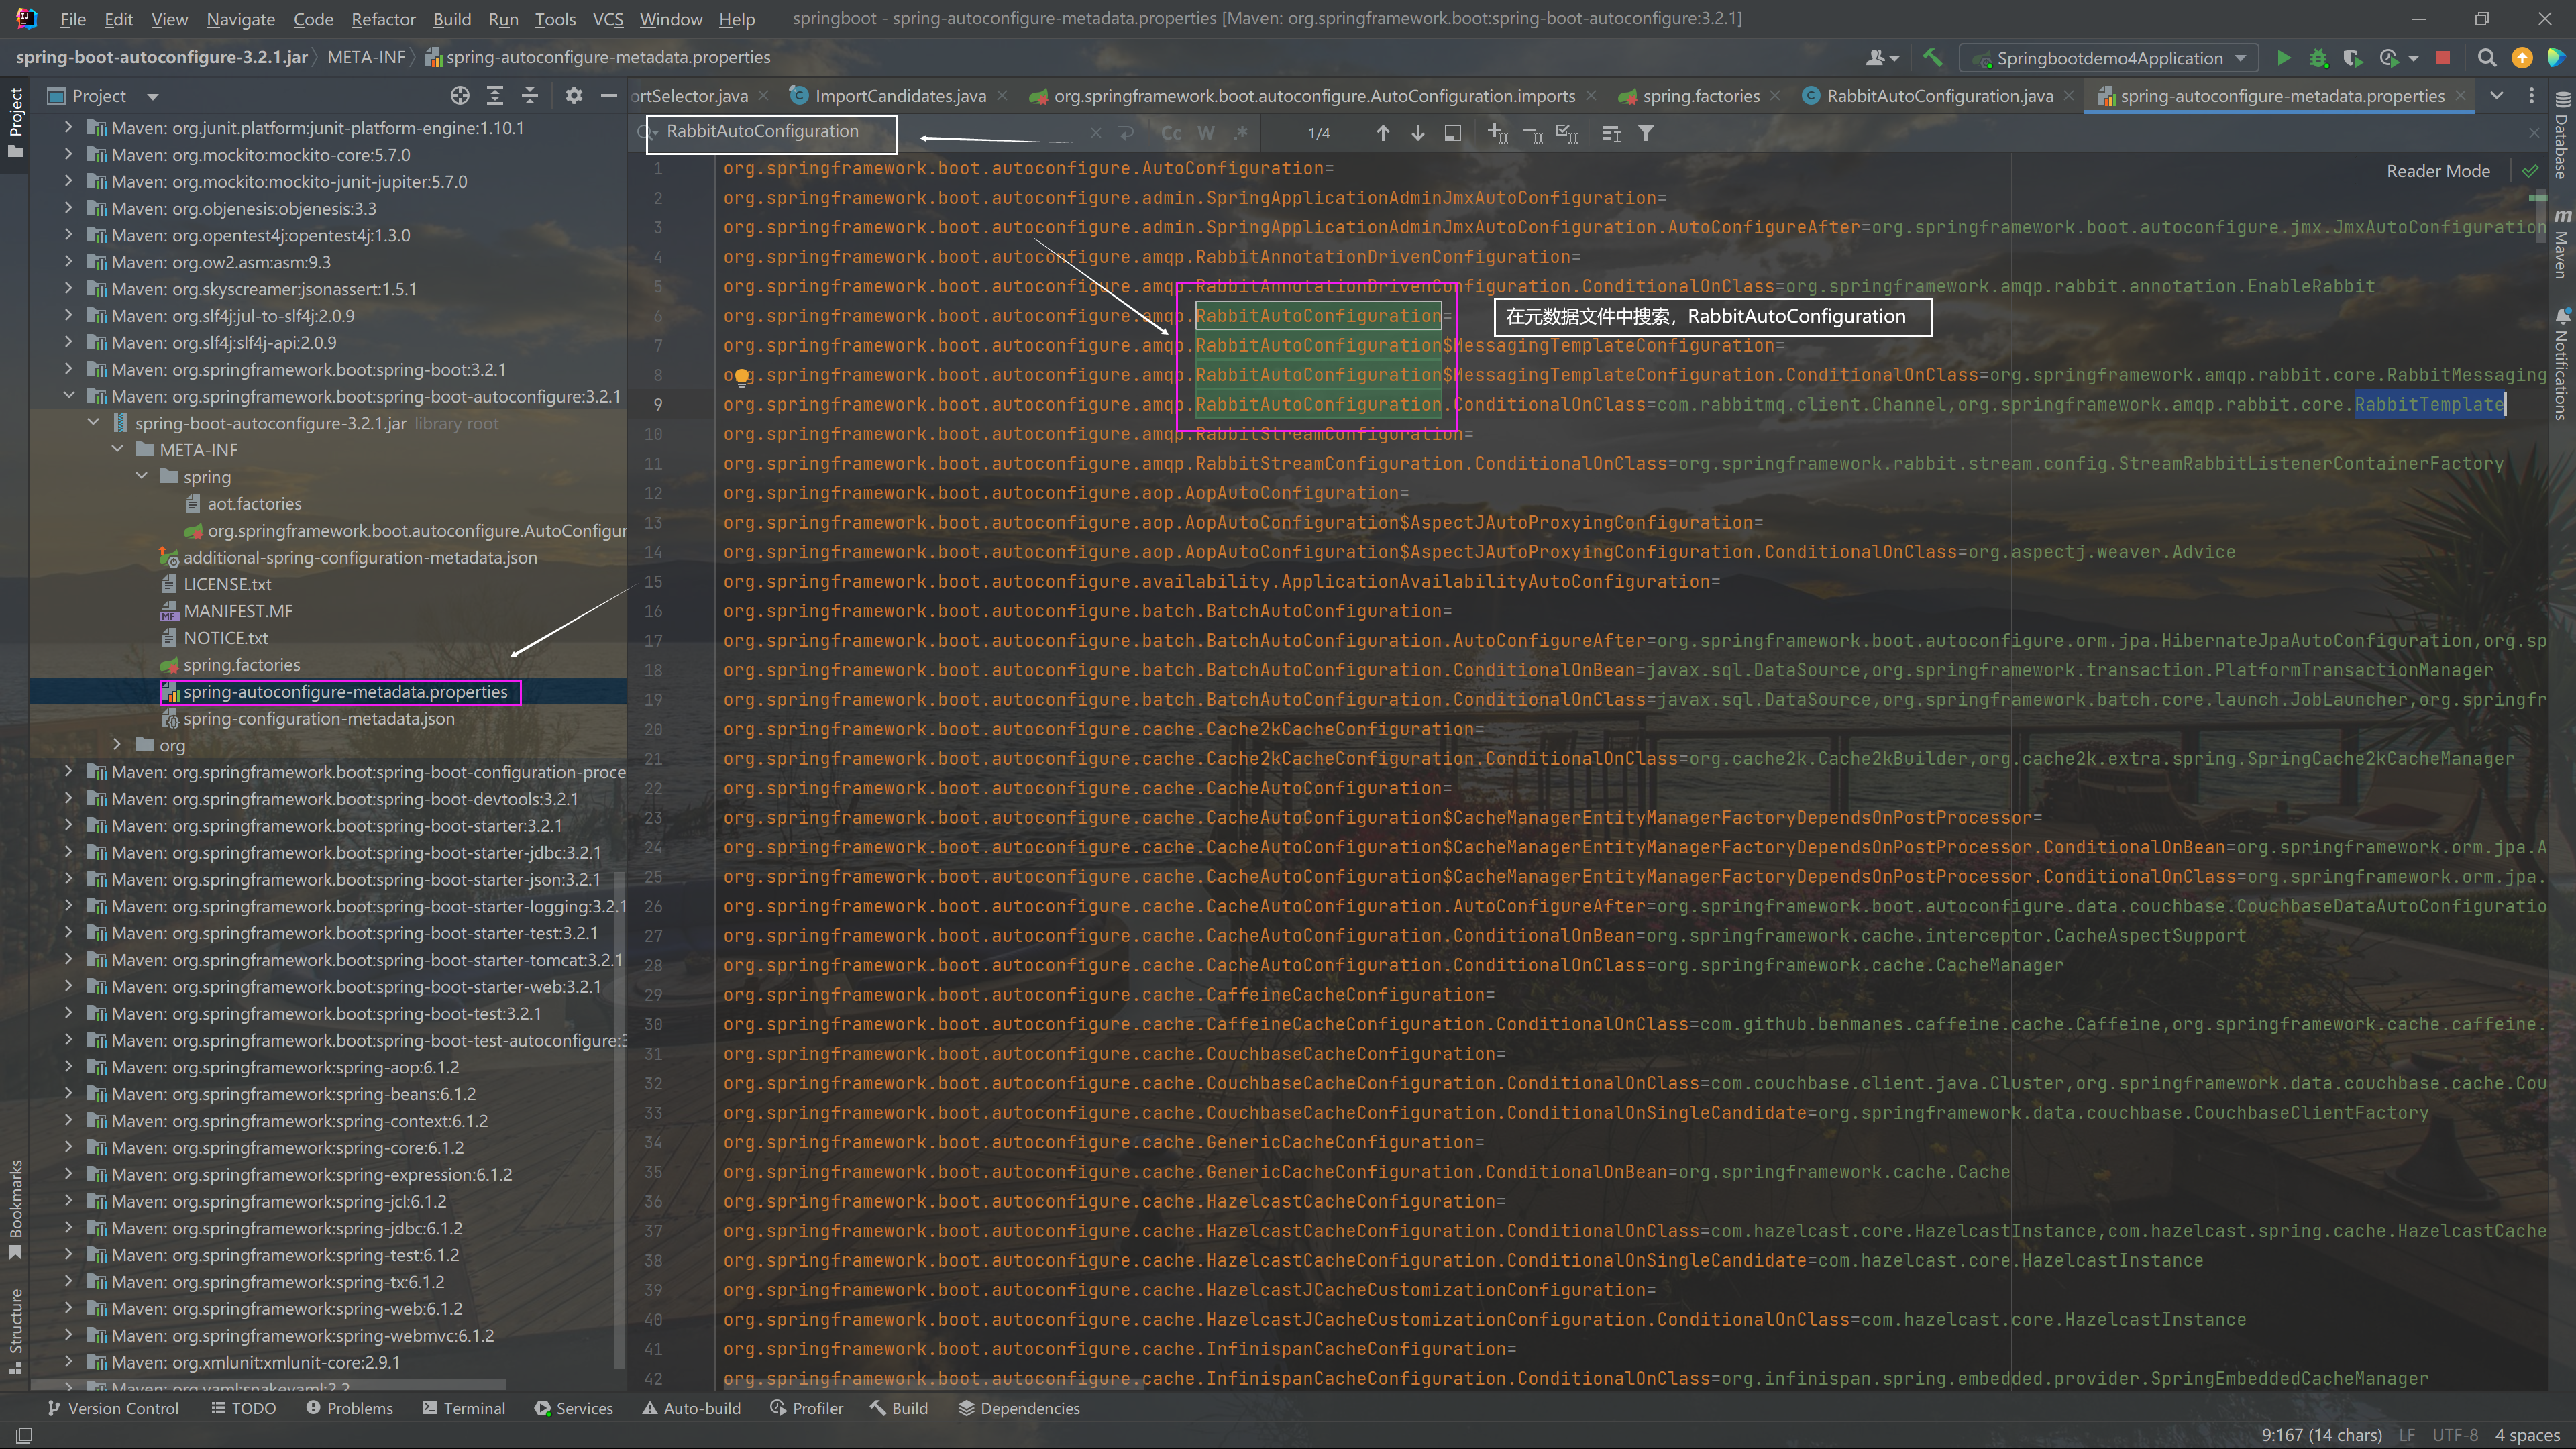
目前本地使用的SpringBoot 版本是 3.2.1版本,不同的版本,配置不同,本次单单只是查看 spring-autoconfigure-metadata.properties 这个文件,即元数据配置文件的信息
springboot 3.2.1 版本没有
loadMetadata()方法 (spring boot 2.2.2)后续详细分析得到元数据的方法:
getAutoConfigurationEntry()
信息内容举例:
-
org.springframework.boot.autoconfigure.data.cassandra.CassandraDataAutoConfiguration: 为类 -
AutoConfigureAfter: 为注解 -
=org.springframework.boot.autoconfigure.cassandra.CassandraAutoConfiguration: 等号之后为满足的条件,条件为多个可以用逗号分隔
即为满足等号右边的条件之后,才会自动注入这个类或者说自动配置(@注解:标记这个类是干什么的,然后加载一些配置项–上下文环境)
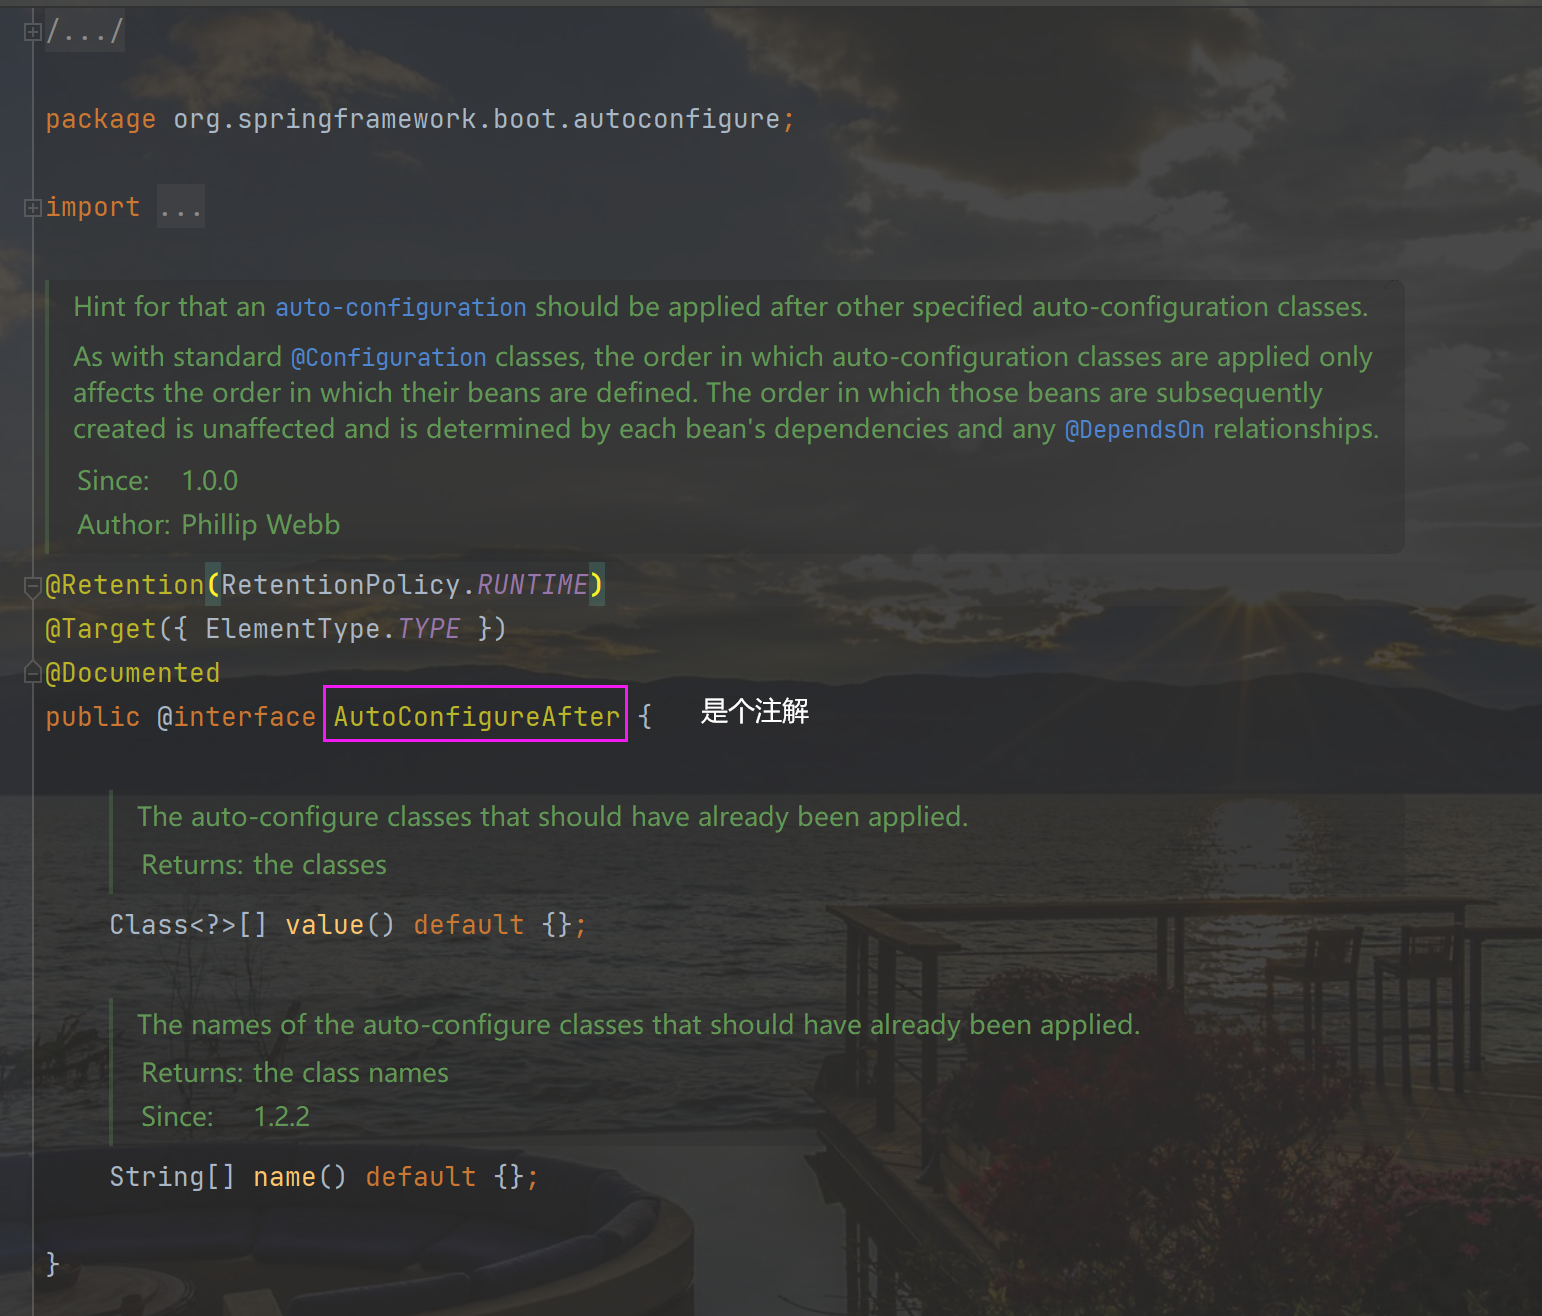
getAutoConfigurationEntry():
	/**
	 * Return the {@link AutoConfigurationEntry} based on the {@link AnnotationMetadata}
	 * of the importing {@link Configuration @Configuration} class.
	 * @param annotationMetadata the annotation metadata of the configuration class
	 * @return the auto-configurations that should be imported
	 */
	protected AutoConfigurationEntry getAutoConfigurationEntry(AnnotationMetadata annotationMetadata) {
		if (!isEnabled(annotationMetadata)) { // 1.判断 @EnableAutoConfiguration 注解有没有开启,默认开启
			return EMPTY_ENTRY;
		}
		AnnotationAttributes attributes = getAttributes(annotationMetadata); //2.获得注解的属性信息
		List<String> configurations = getCandidateConfigurations(annotationMetadata, attributes); //3.获取默认支持的自动配置列表
		configurations = removeDuplicates(configurations); //4.去重操作
		Set<String> exclusions = getExclusions(annotationMetadata, attributes); // 5.去除一些多余的配置类,根据 EnableAutoConfiguration 的 exclusions 属性 去排除
		checkExcludedClasses(configurations, exclusions);
		configurations.removeAll(exclusions);// 调用 removeAll 方法进行排除出去
		configurations = getConfigurationClassFilter().filter(configurations); //6.根据pom文件中加入的依赖文件筛选出最终符合当前项目运行环境对应的自动配置类
		fireAutoConfigurationImportEvents(configurations, exclusions); //7.触发自动配置导入的监听事件
		return new AutoConfigurationEntry(configurations, exclusions);
	}
getCandidateConfigurations():
开始与 Spring boot 2.2.2 中的代码不一致
	protected List<String> getCandidateConfigurations(AnnotationMetadata metadata, AnnotationAttributes attributes) {
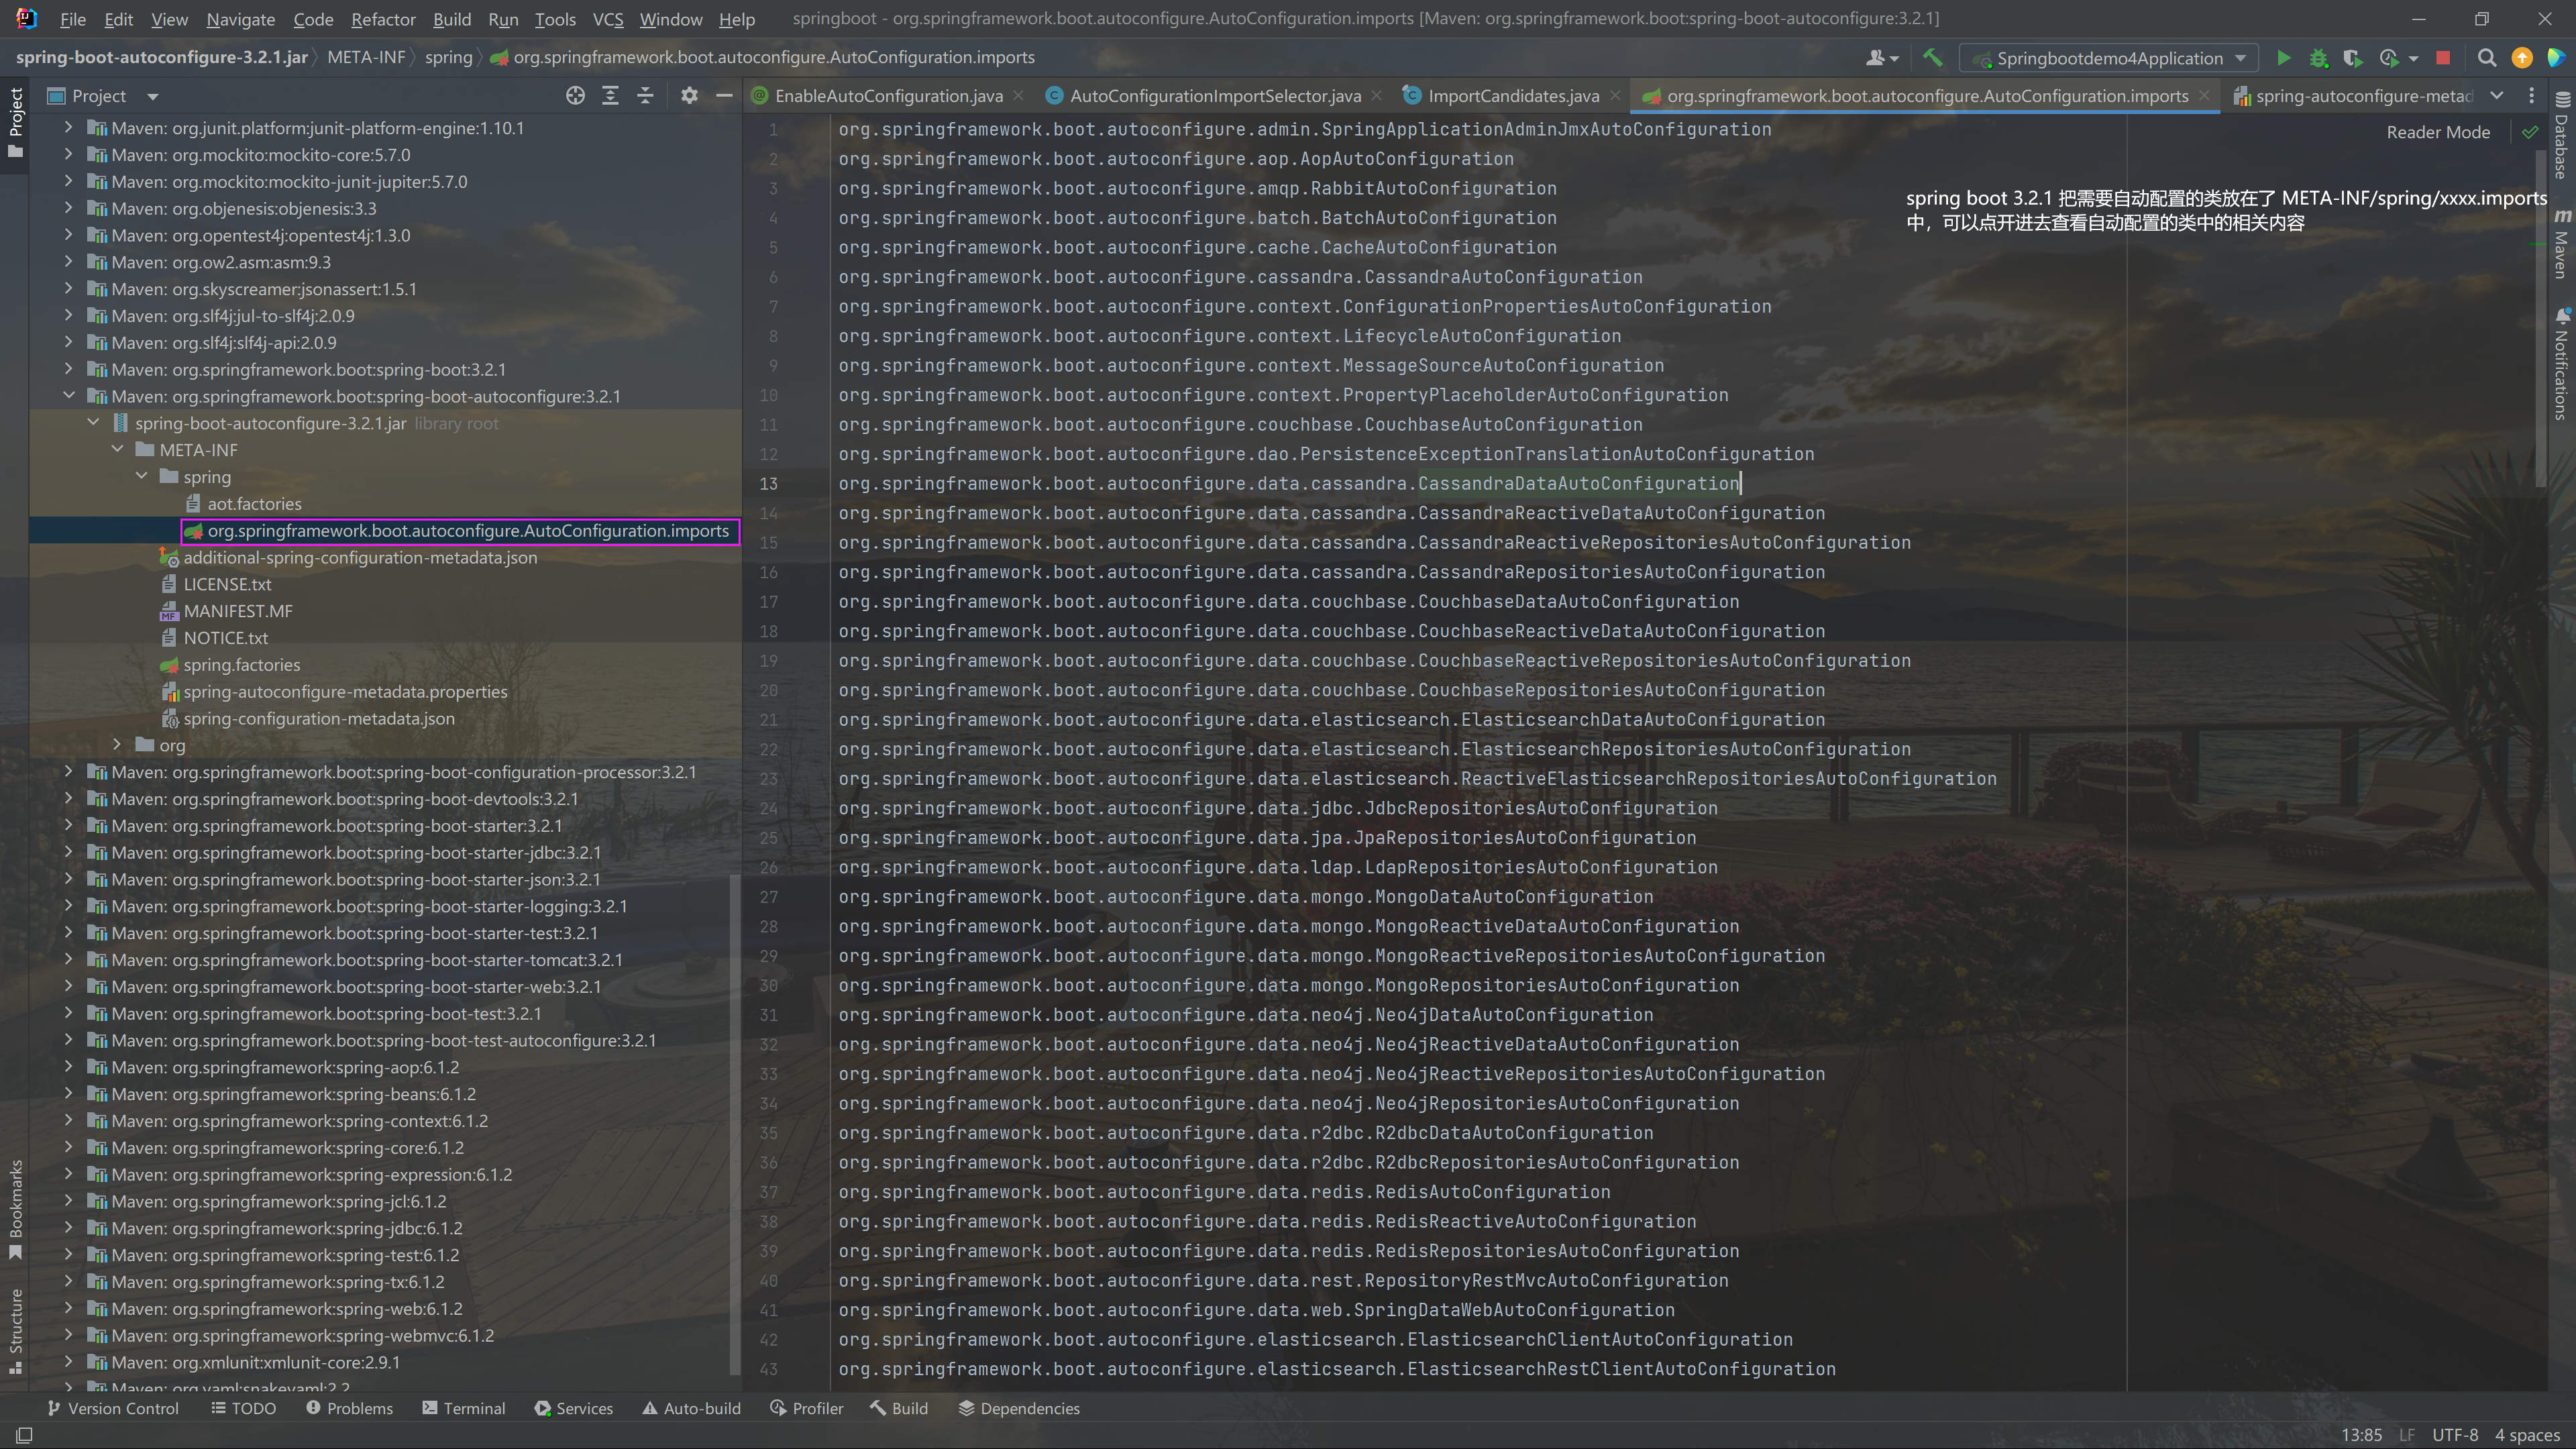
		List<String> configurations = ImportCandidates.load(AutoConfiguration.class, getBeanClassLoader())
			.getCandidates();
		Assert.notEmpty(configurations,
				"No auto configuration classes found in "
						+ "META-INF/spring/org.springframework.boot.autoconfigure.AutoConfiguration.imports. If you "
						+ "are using a custom packaging, make sure that file is correct.");
		return configurations;
	}
ImportCandidates.load()
	/**
	 * Loads the names of import candidates from the classpath.
	 *
	 * The names of the import candidates are stored in files named
	 * {@code META-INF/spring/full-qualified-annotation-name.imports} on the classpath.
	 * Every line contains the full qualified name of the candidate class. Comments are
	 * supported using the # character.
	 * @param annotation annotation to load
	 * @param classLoader class loader to use for loading
	 * @return list of names of annotated classes
	 */
	public static ImportCandidates load(Class<?> annotation, ClassLoader classLoader) {
		Assert.notNull(annotation, "'annotation' must not be null");
		ClassLoader classLoaderToUse = decideClassloader(classLoader);
		String location = String.format(LOCATION, annotation.getName());
		Enumeration<URL> urls = findUrlsInClasspath(classLoaderToUse, location);
		List<String> importCandidates = new ArrayList<>();
		while (urls.hasMoreElements()) {
			URL url = urls.nextElement();
			importCandidates.addAll(readCandidateConfigurations(url));
		}
		return new ImportCandidates(importCandidates);
	}
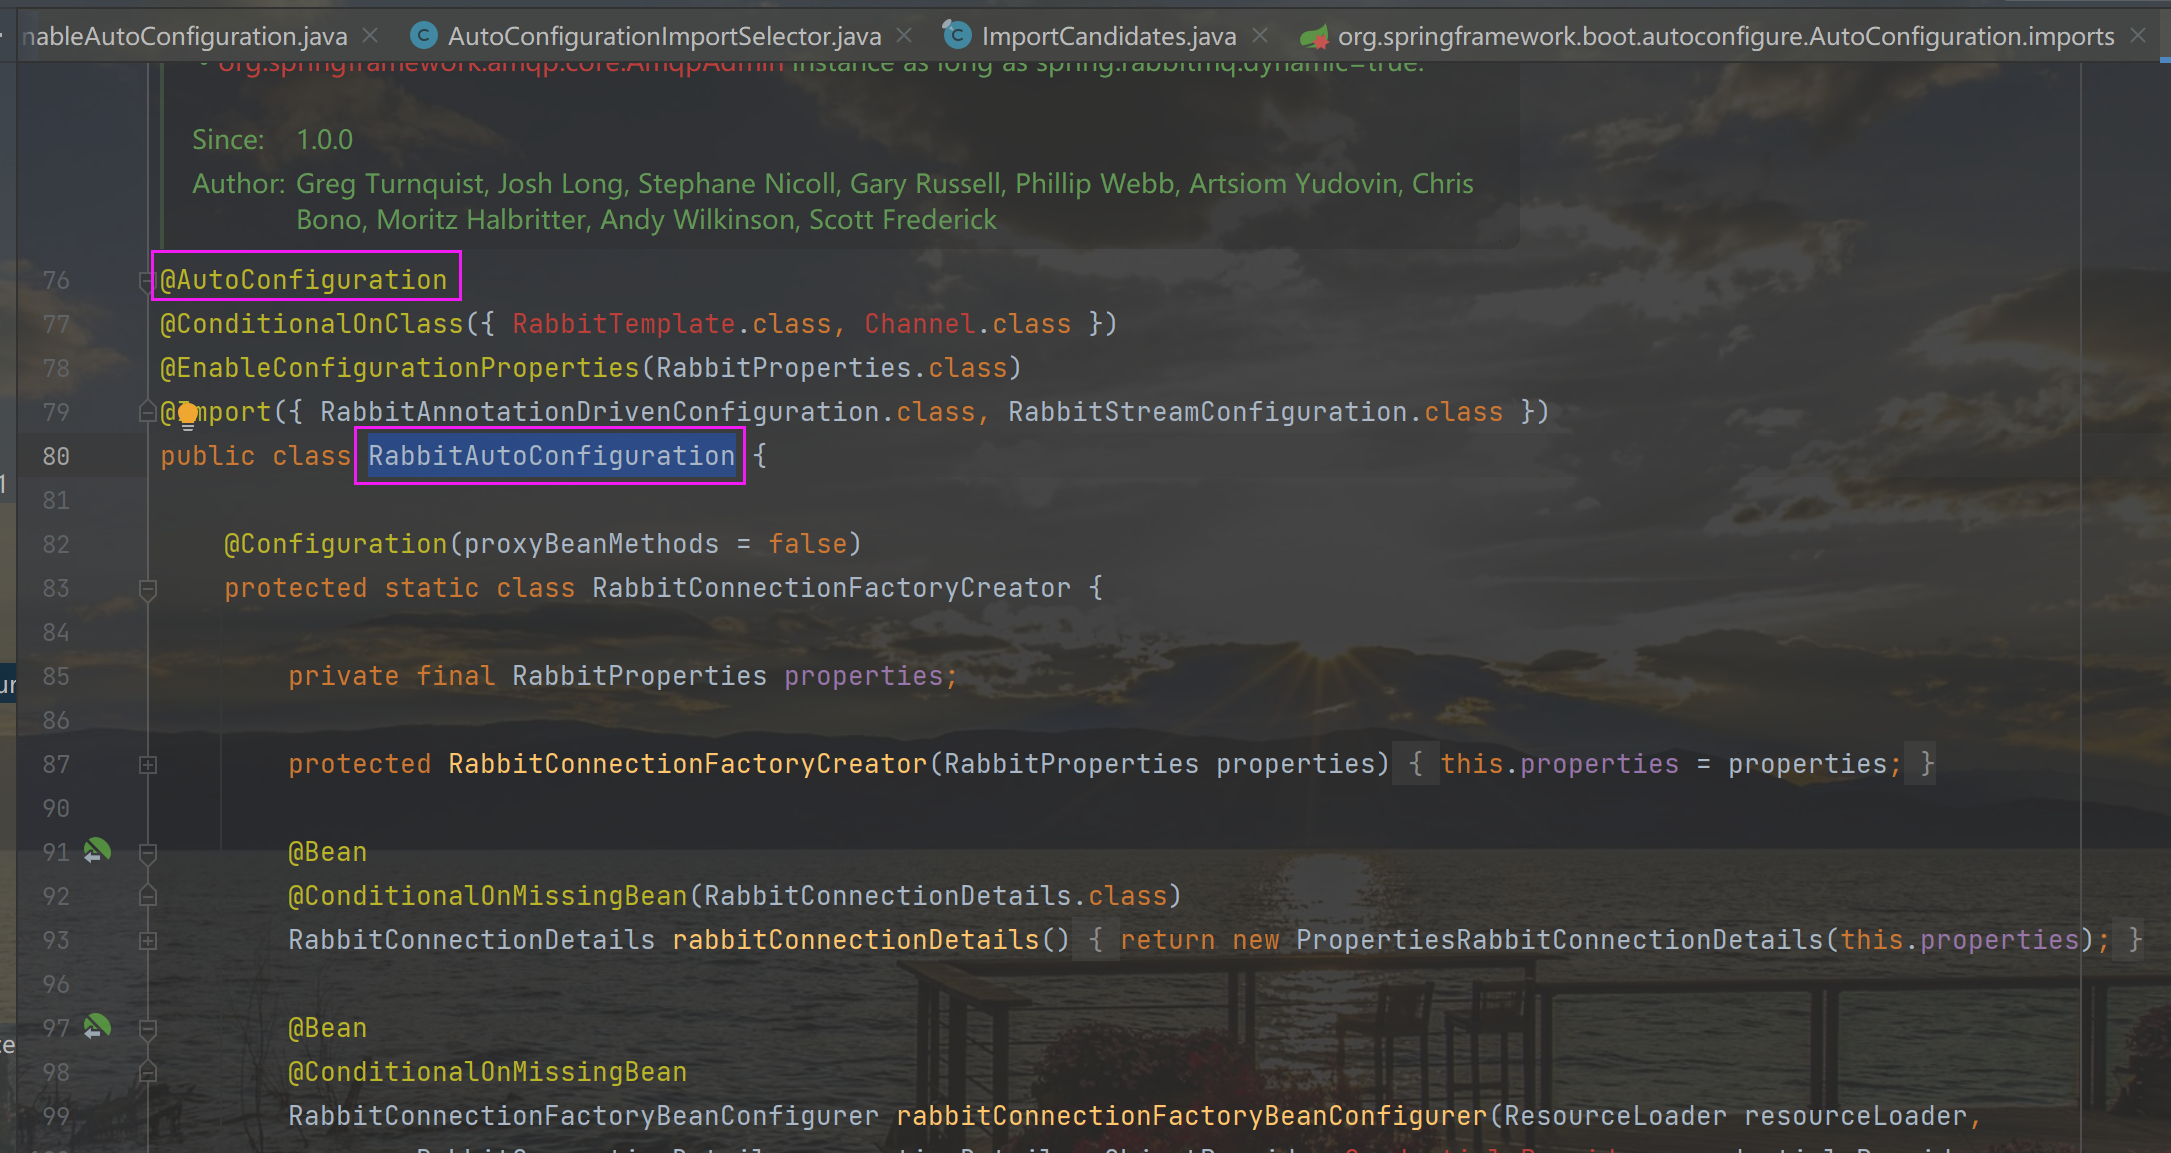
在元数据中搜索 RabbitAutoConfiguration 信息
5.源码剖析-自动配置-ComponentScan
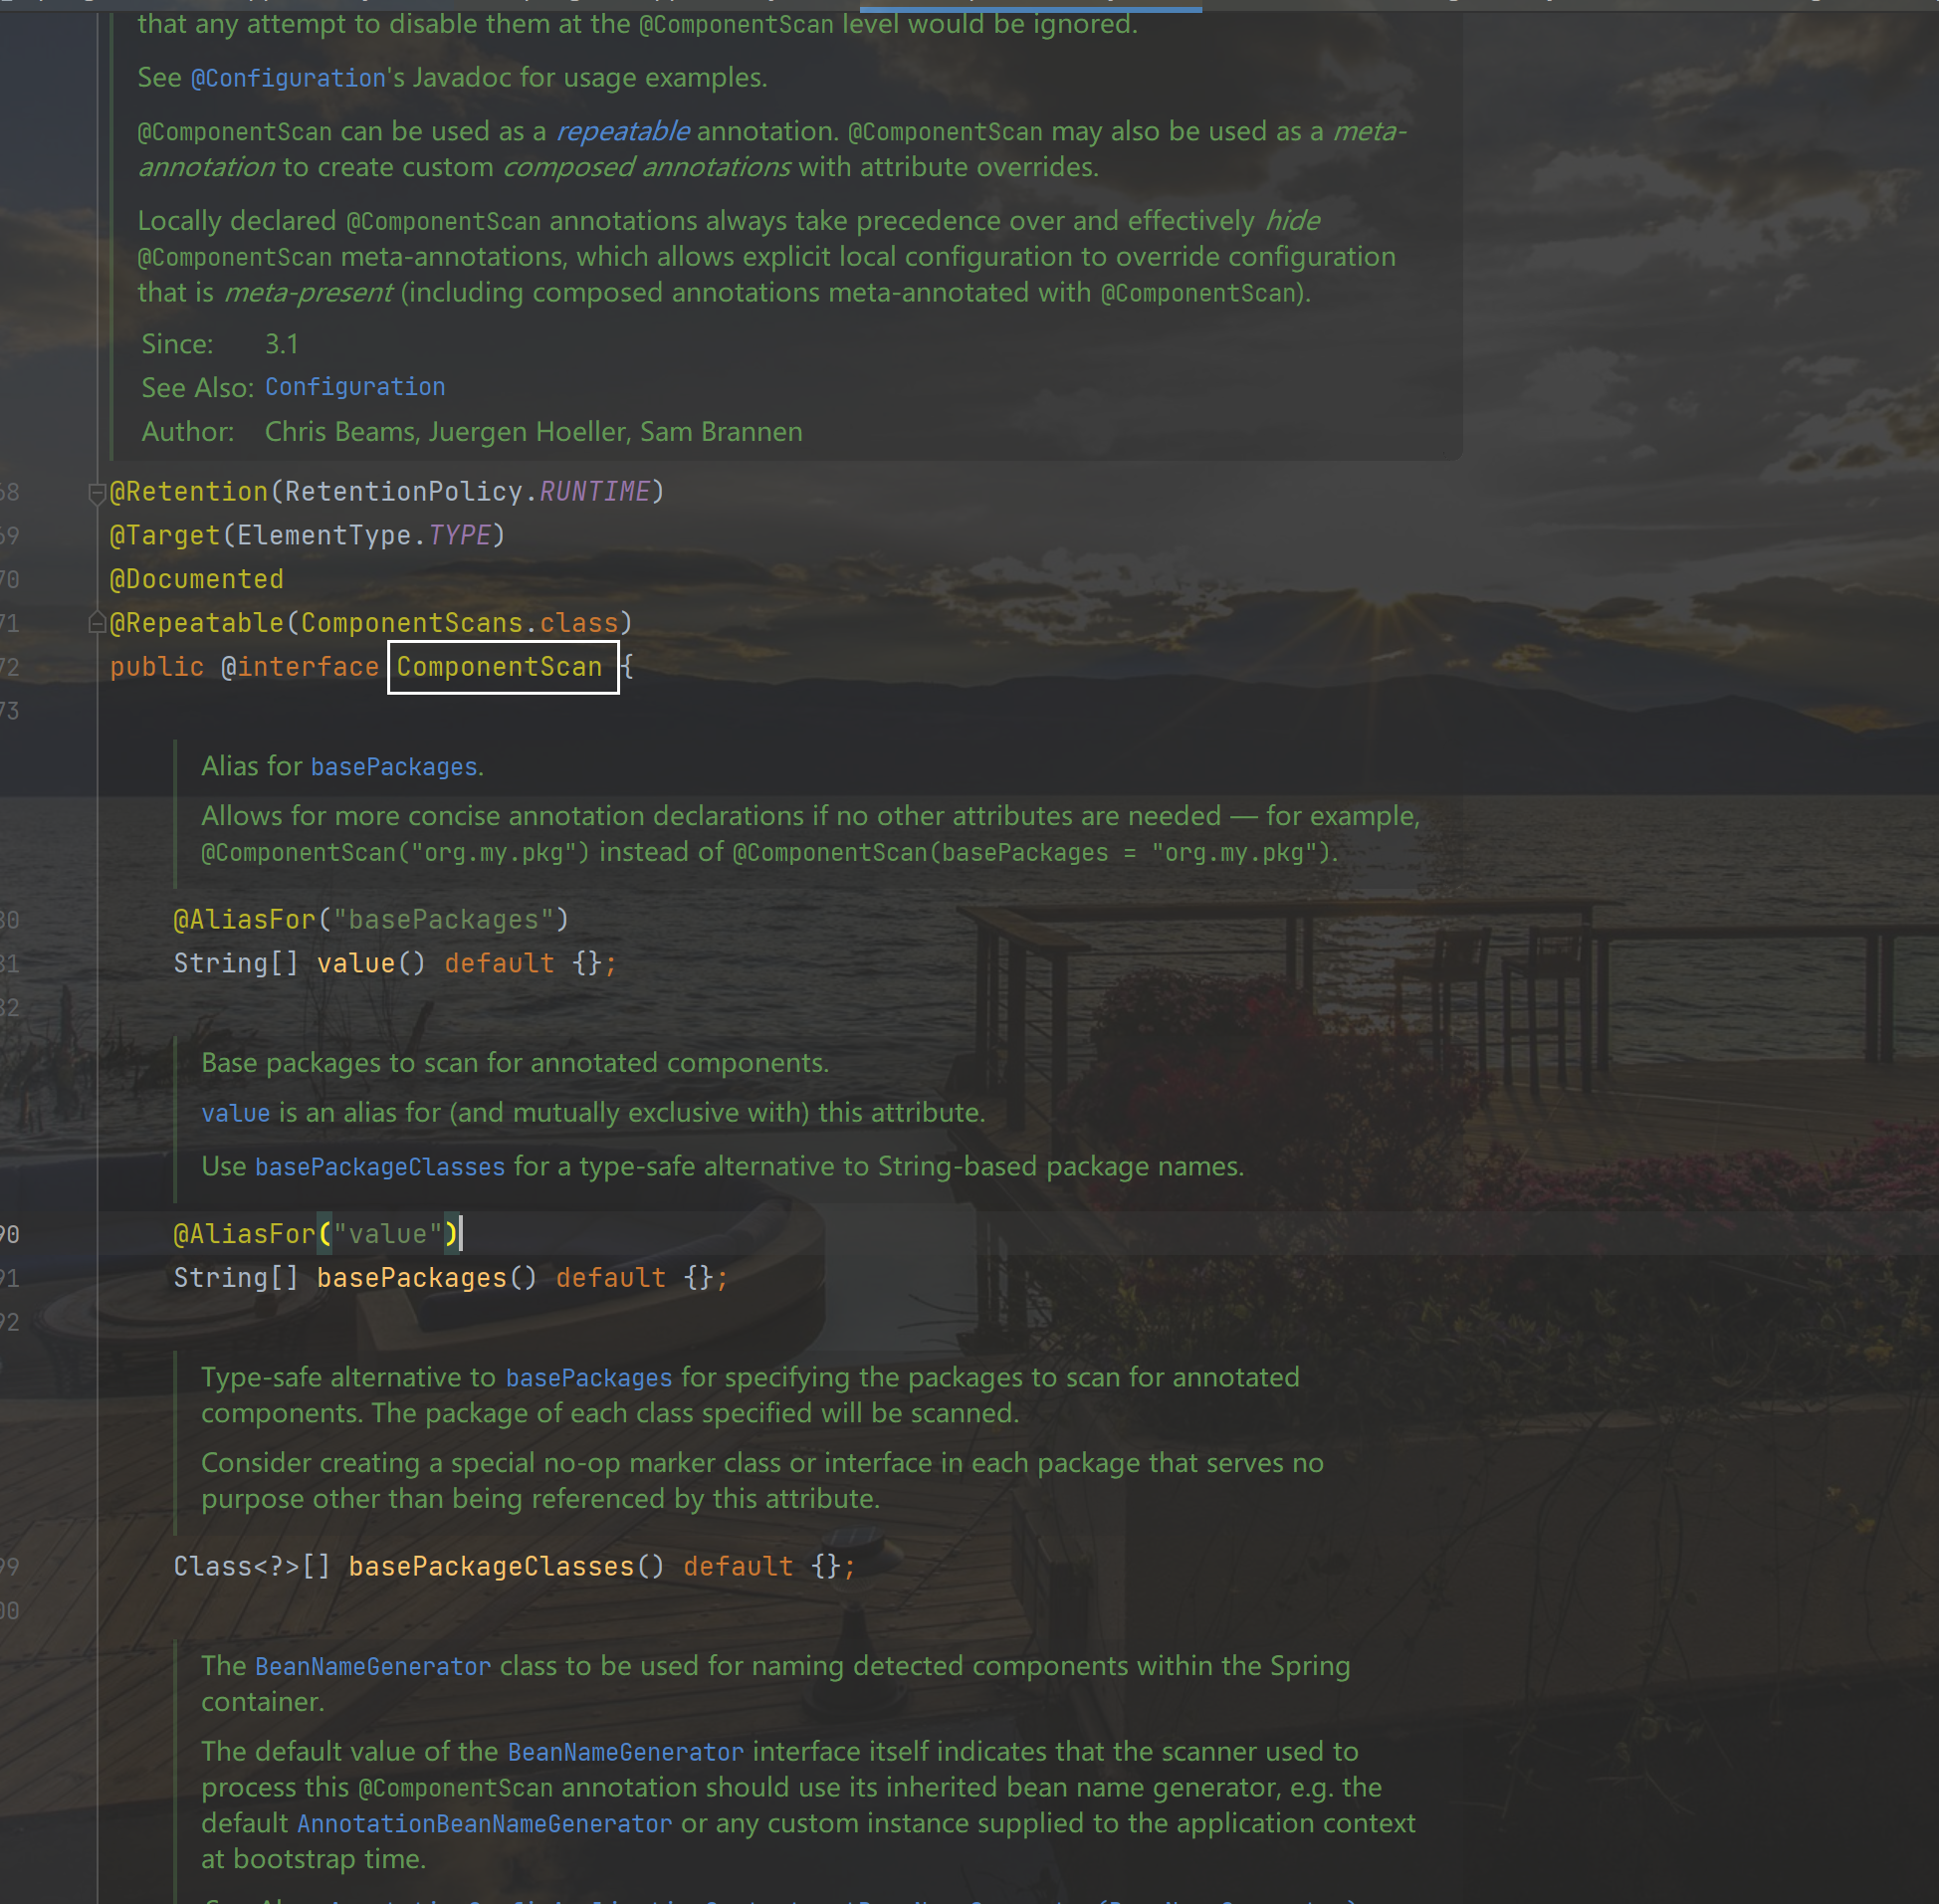
@ComponentScan: 开启组件扫描
@ComponentScan 注解具体扫描包的路径由springboot项目主程序启动类所在包的位置决定,在扫描过程中由 @AutoConfigurationPackage 注解进行解析,从而得到Springboot项目主程序启动类所在包的具体位置
总结:
源码剖析技巧,看注解 ,看引用的注解做了哪些东西,然后一步步分析该类所具有的功能
6.SpringBoot整合MyBatis-环境准备
- 基础环境搭建
- 数据准备:
- 在MySQL中,先创建了一个数据库springbootdata,然后创建了两个表t_article和t_comment并向表中插入数据。其中评论表t_comment的a_id与文章表t_article的主键id相关联
- 数据准备:
# 创建数据库
CREATE DATABASE springbootdata;
# 选择使用数据库
USE springbootdata;
# 创建表t_article并插入相关数据
DROP TABLE IF EXISTS t_article;
CREATE TABLE t_article (
    id int(20) NOT NULL AUTO_INCREMENT COMMENT '文章id',
    title varchar(200) DEFAULT NULL COMMENT '文章标题',
    content longtext COMMENT '文章内容', PRIMARY KEY (id)
) ENGINE=InnoDB AUTO_INCREMENT=2 DEFAULT CHARSET=utf8;
INSERT INTO t_article VALUES ('1', 'Spring Boot基础入门', '从入门到精通讲解...');
INSERT INTO t_article VALUES ('2', 'Spring Cloud基础入门', '从入门到精通讲 解...');

# 创建表t_comment并插入相关数据
DROP TABLE IF EXISTS t_comment;
CREATE TABLE t_comment (
    id int(20) NOT NULL AUTO_INCREMENT COMMENT '评论id',
    content longtext COMMENT '评论内容', author varchar(200) DEFAULT NULL COMMENT '评论作者',
    a_id int(20) DEFAULT NULL COMMENT '关联的文章id',
    PRIMARY KEY (id)
) ENGINE=InnoDB AUTO_INCREMENT=3 DEFAULT CHARSET=utf8;
INSERT INTO t_comment VALUES ('1', '很全、很详细', 'lucy', '1');
INSERT INTO t_comment VALUES ('2', '赞一个', 'tom', '1');
INSERT INTO t_comment VALUES ('3', '很详细', 'eric', '1');
INSERT INTO t_comment VALUES ('4', '很好,非常详细', '张三', '1');
INSERT INTO t_comment VALUES ('5', '很不错', '李四', '2');
7.SpringBoot整合MyBatis-注解方式
需求:实现通过ID查询Comment信息
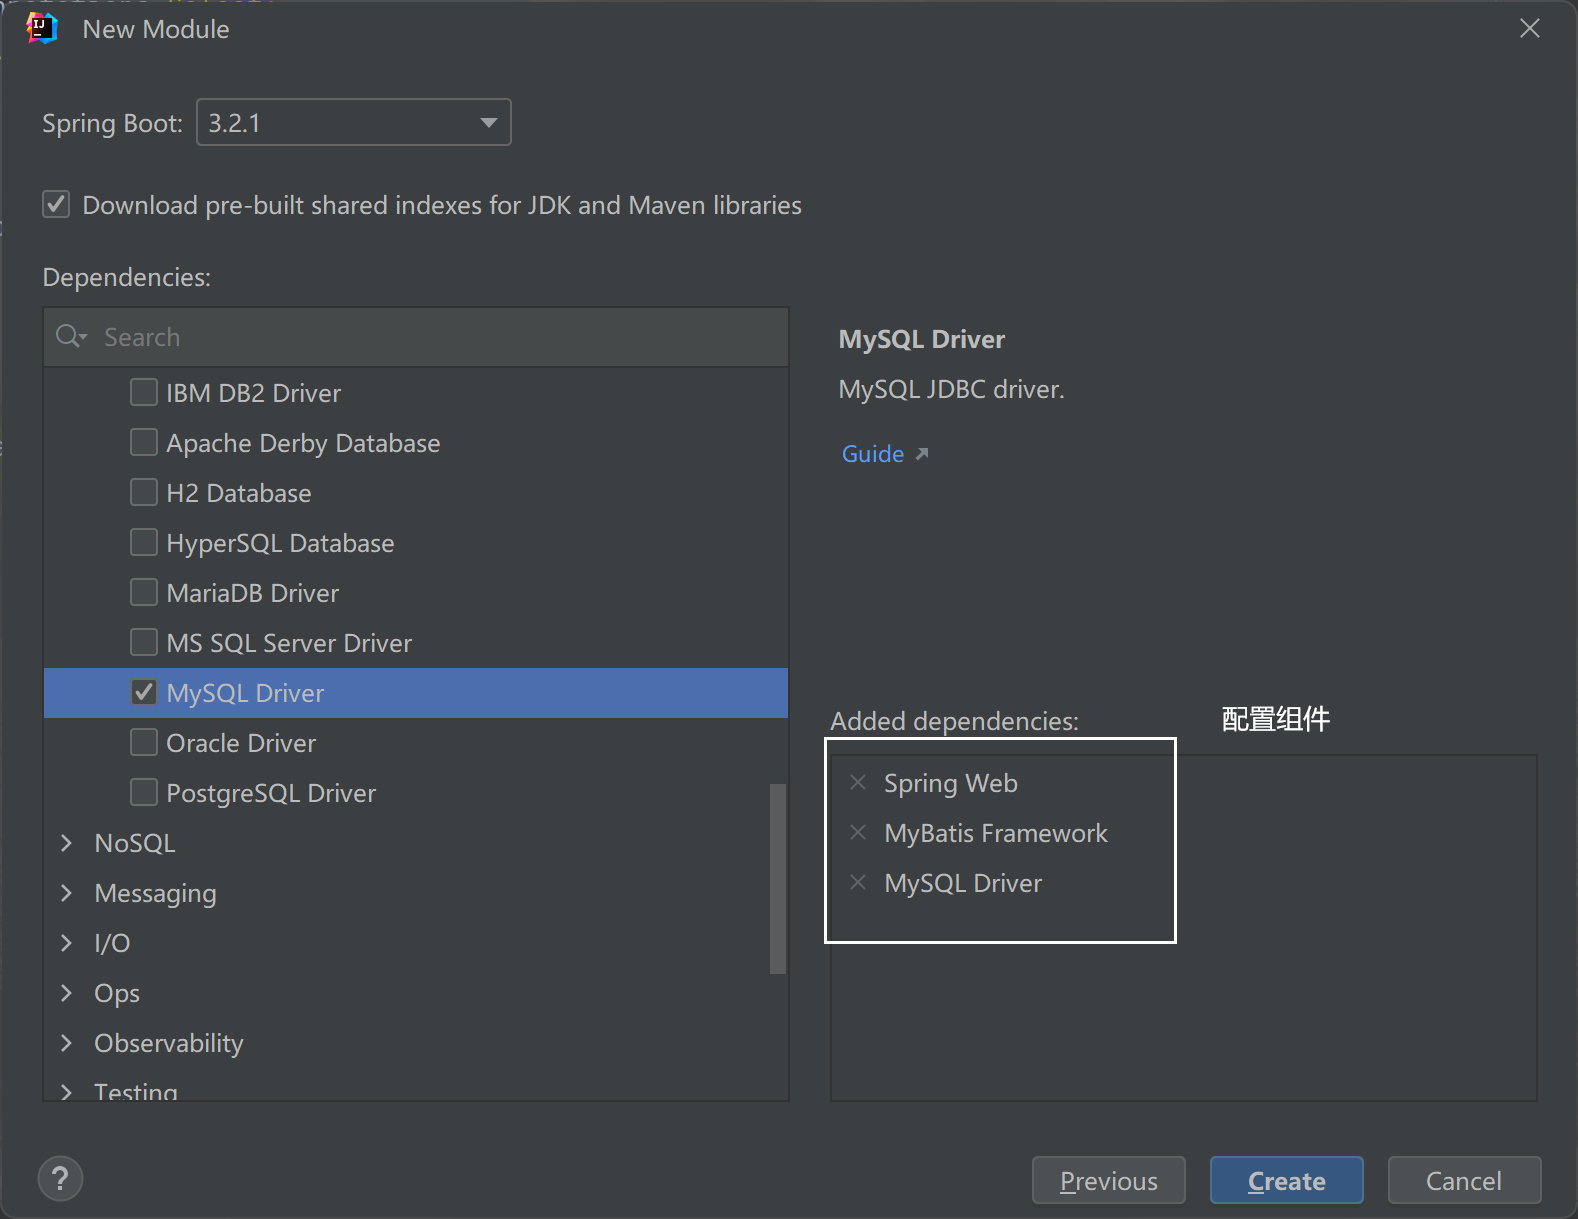
创建module配置组件
创建CommentMapper接口
@Component//使用 @Component 注解 防止报红
public interface CommentMapper {


    @Select("select * from t_comment where id = #{id}")
    Comment findById(Integer id);
}
启动类了使用 @MapperScan 开启mapper扫描
@SpringBootApplication
@MapperScan("com.aifeng.bootmybatis.mapper")// 指定扫描mapper的包名
public class BootmybatisApplication {

    public static void main(String[] args) {
        SpringApplication.run(BootmybatisApplication.class, args);
    }

}
编写单元测试方法
@RunWith(SpringRunner.class)
@SpringBootTest
class BootmybatisApplicationTests {

    /*
    * 注入 CommentMapper 对象,如果报红,说明是idea 没有识别到
    * 为什么呢?
    *   - 原因是 @MapperScan注解是mybatis提供的(查看包路径:package org.mybatis.spring.annotation)
    *   - 而 @Autowired是Spring提供的,使用@Autowired注解IDEA可以理解spring的上下文环境,但是理解不了
    *   - mybatis的上下文,所以此处可以在CommentMapper接口上,加上@Component注解,主要作用就是为了欺骗
    *   - IDEA,让IDEA以为CommentMapper接口也是Spring管理的Bean,这样就不会报红了
    *
    * */
    @Autowired
    private CommentMapper commentMapper;

    @Test
    void findCommentByid() {
        Comment comment = commentMapper.findById(1);
        System.out.println(comment);
    }

}
打印结果测试
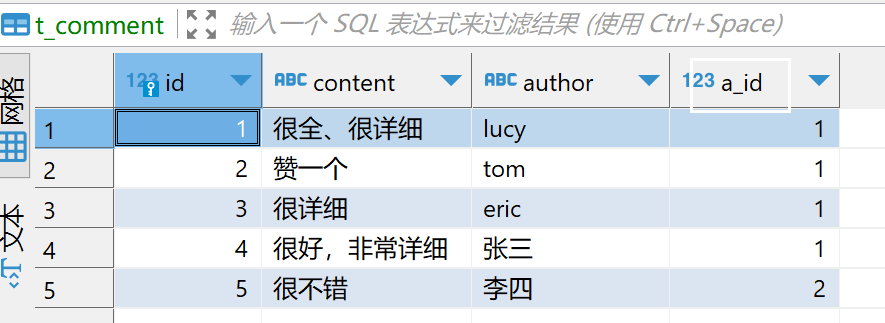
 aid = null
打印的 aid = null ,查看数据库可知,该字段不为null
**解决方法:**application.yml 配置文件,配置驼峰命名规则
spring:
  datasource:
    url: jdbc:mysql://192.168.11.128:3306/springbootdata? serverTimezone=UTC&characterEncoding=UTF-8
    username: root
    password: 123456
mybatis:
  configuration:
    map-underscore-to-camel-case: true #开启驼峰命名配置映射
打印结果测试,已有值

8.SpringBoot整合MyBatis-配置文件方式
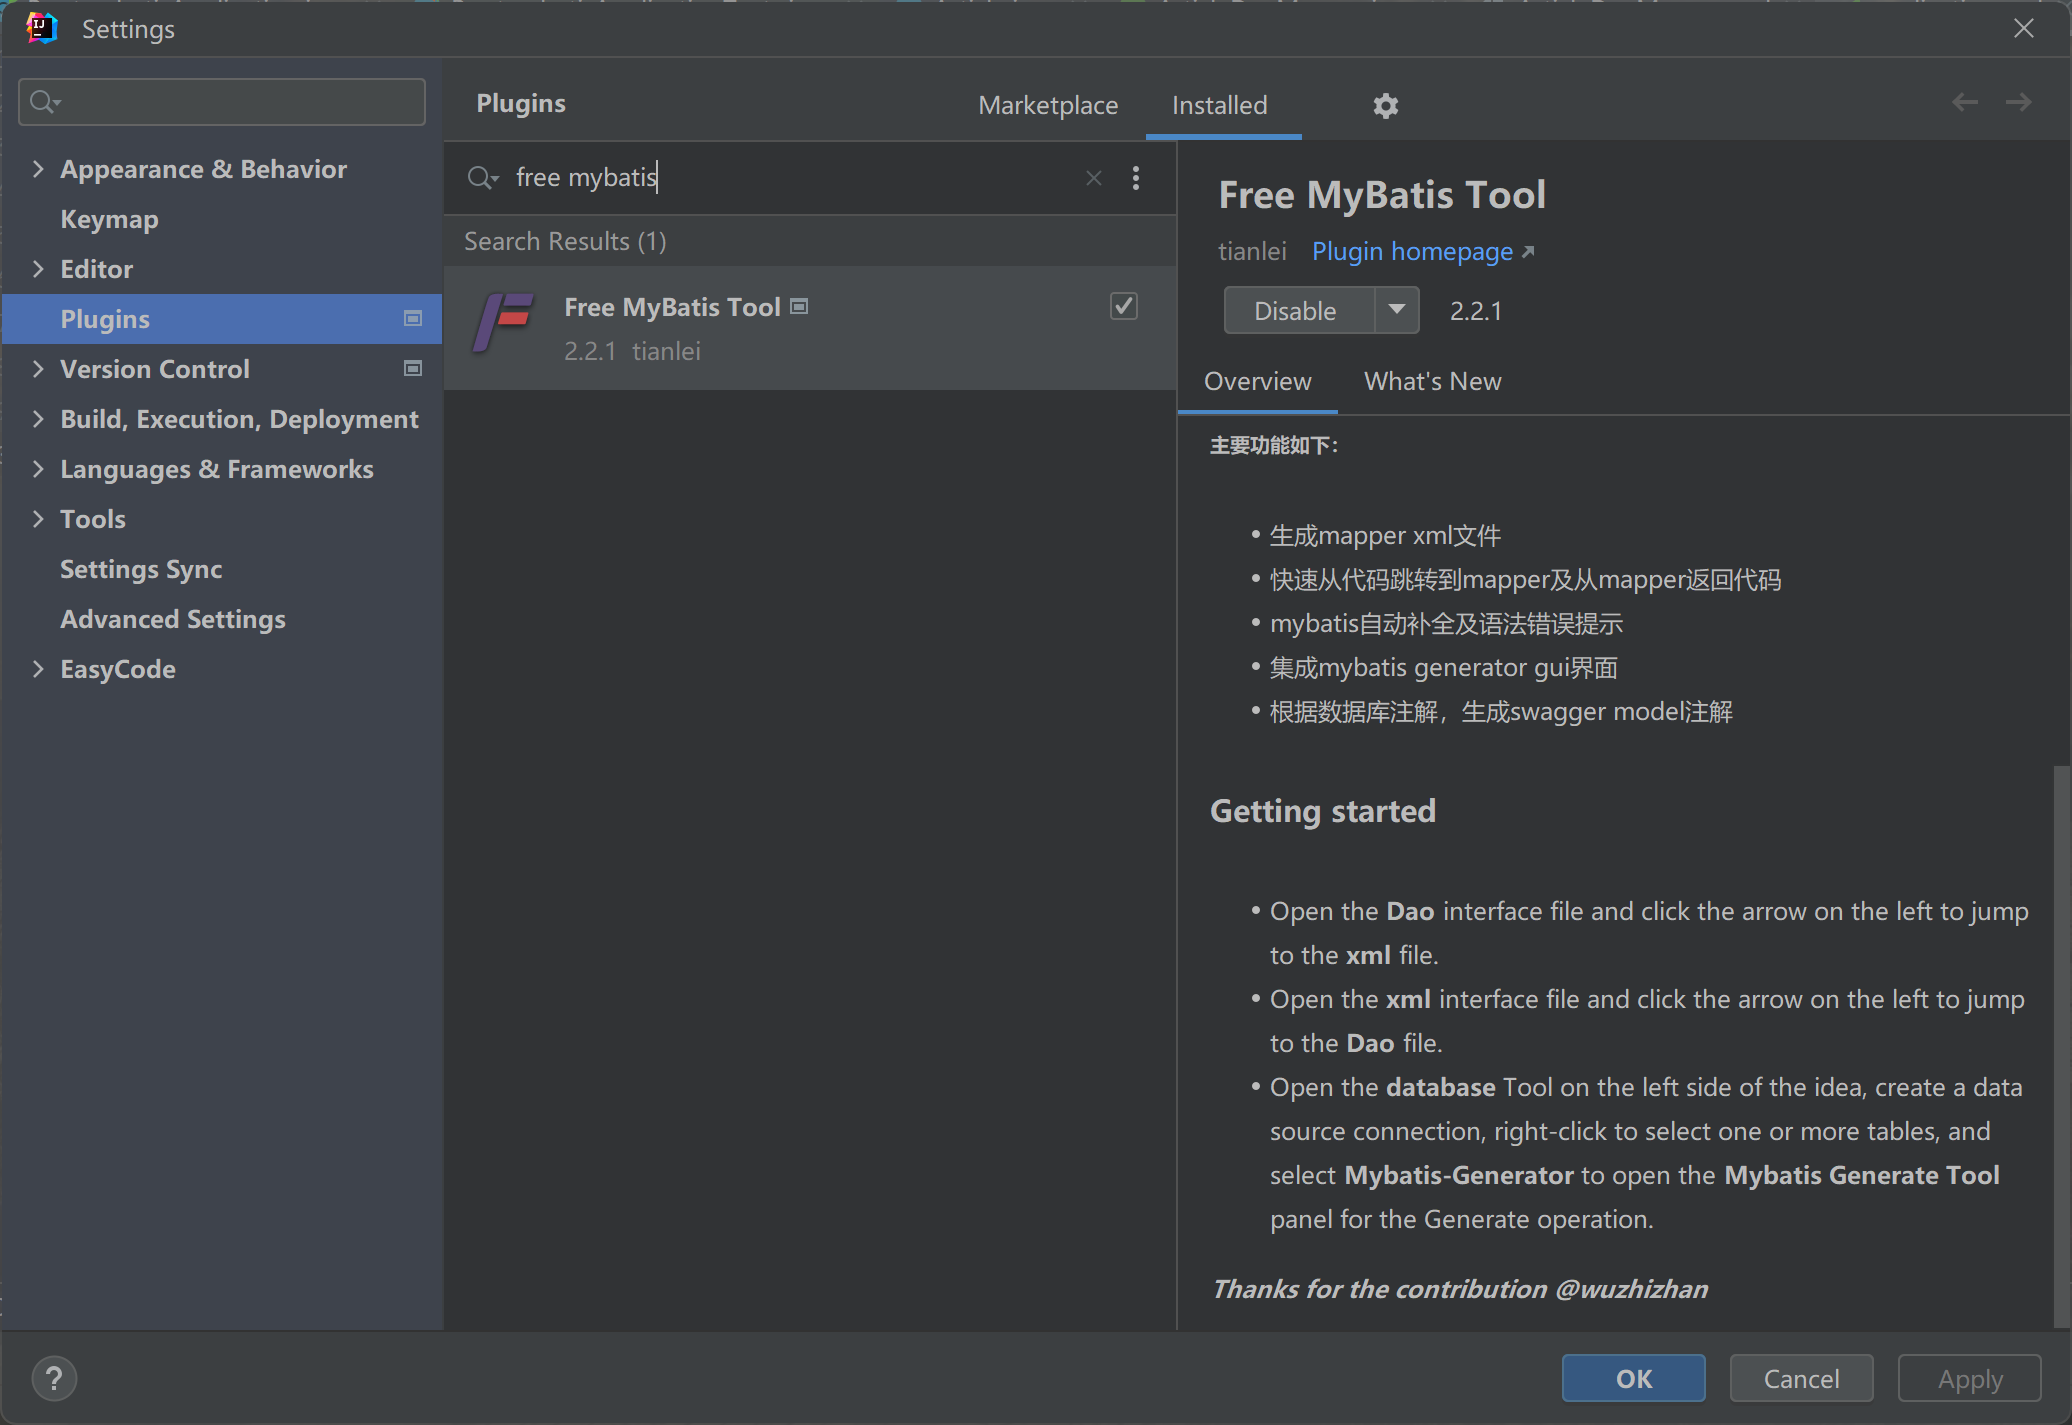
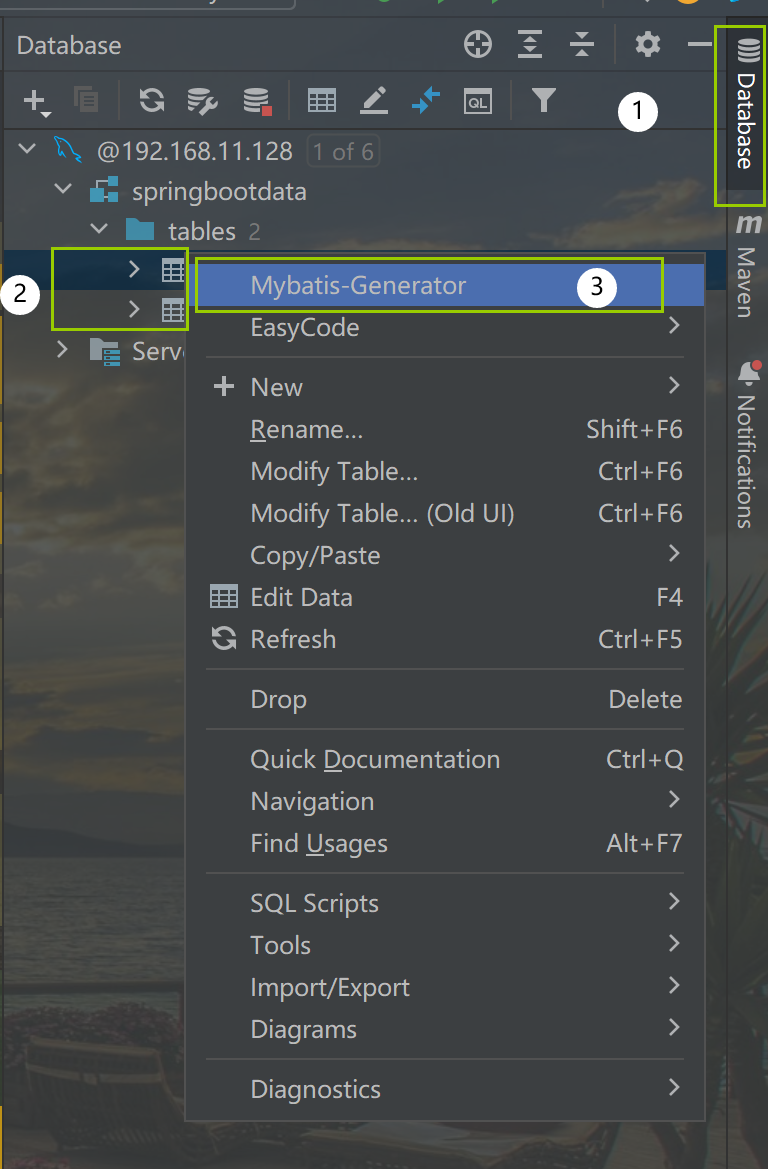
配置插件
配置数据库
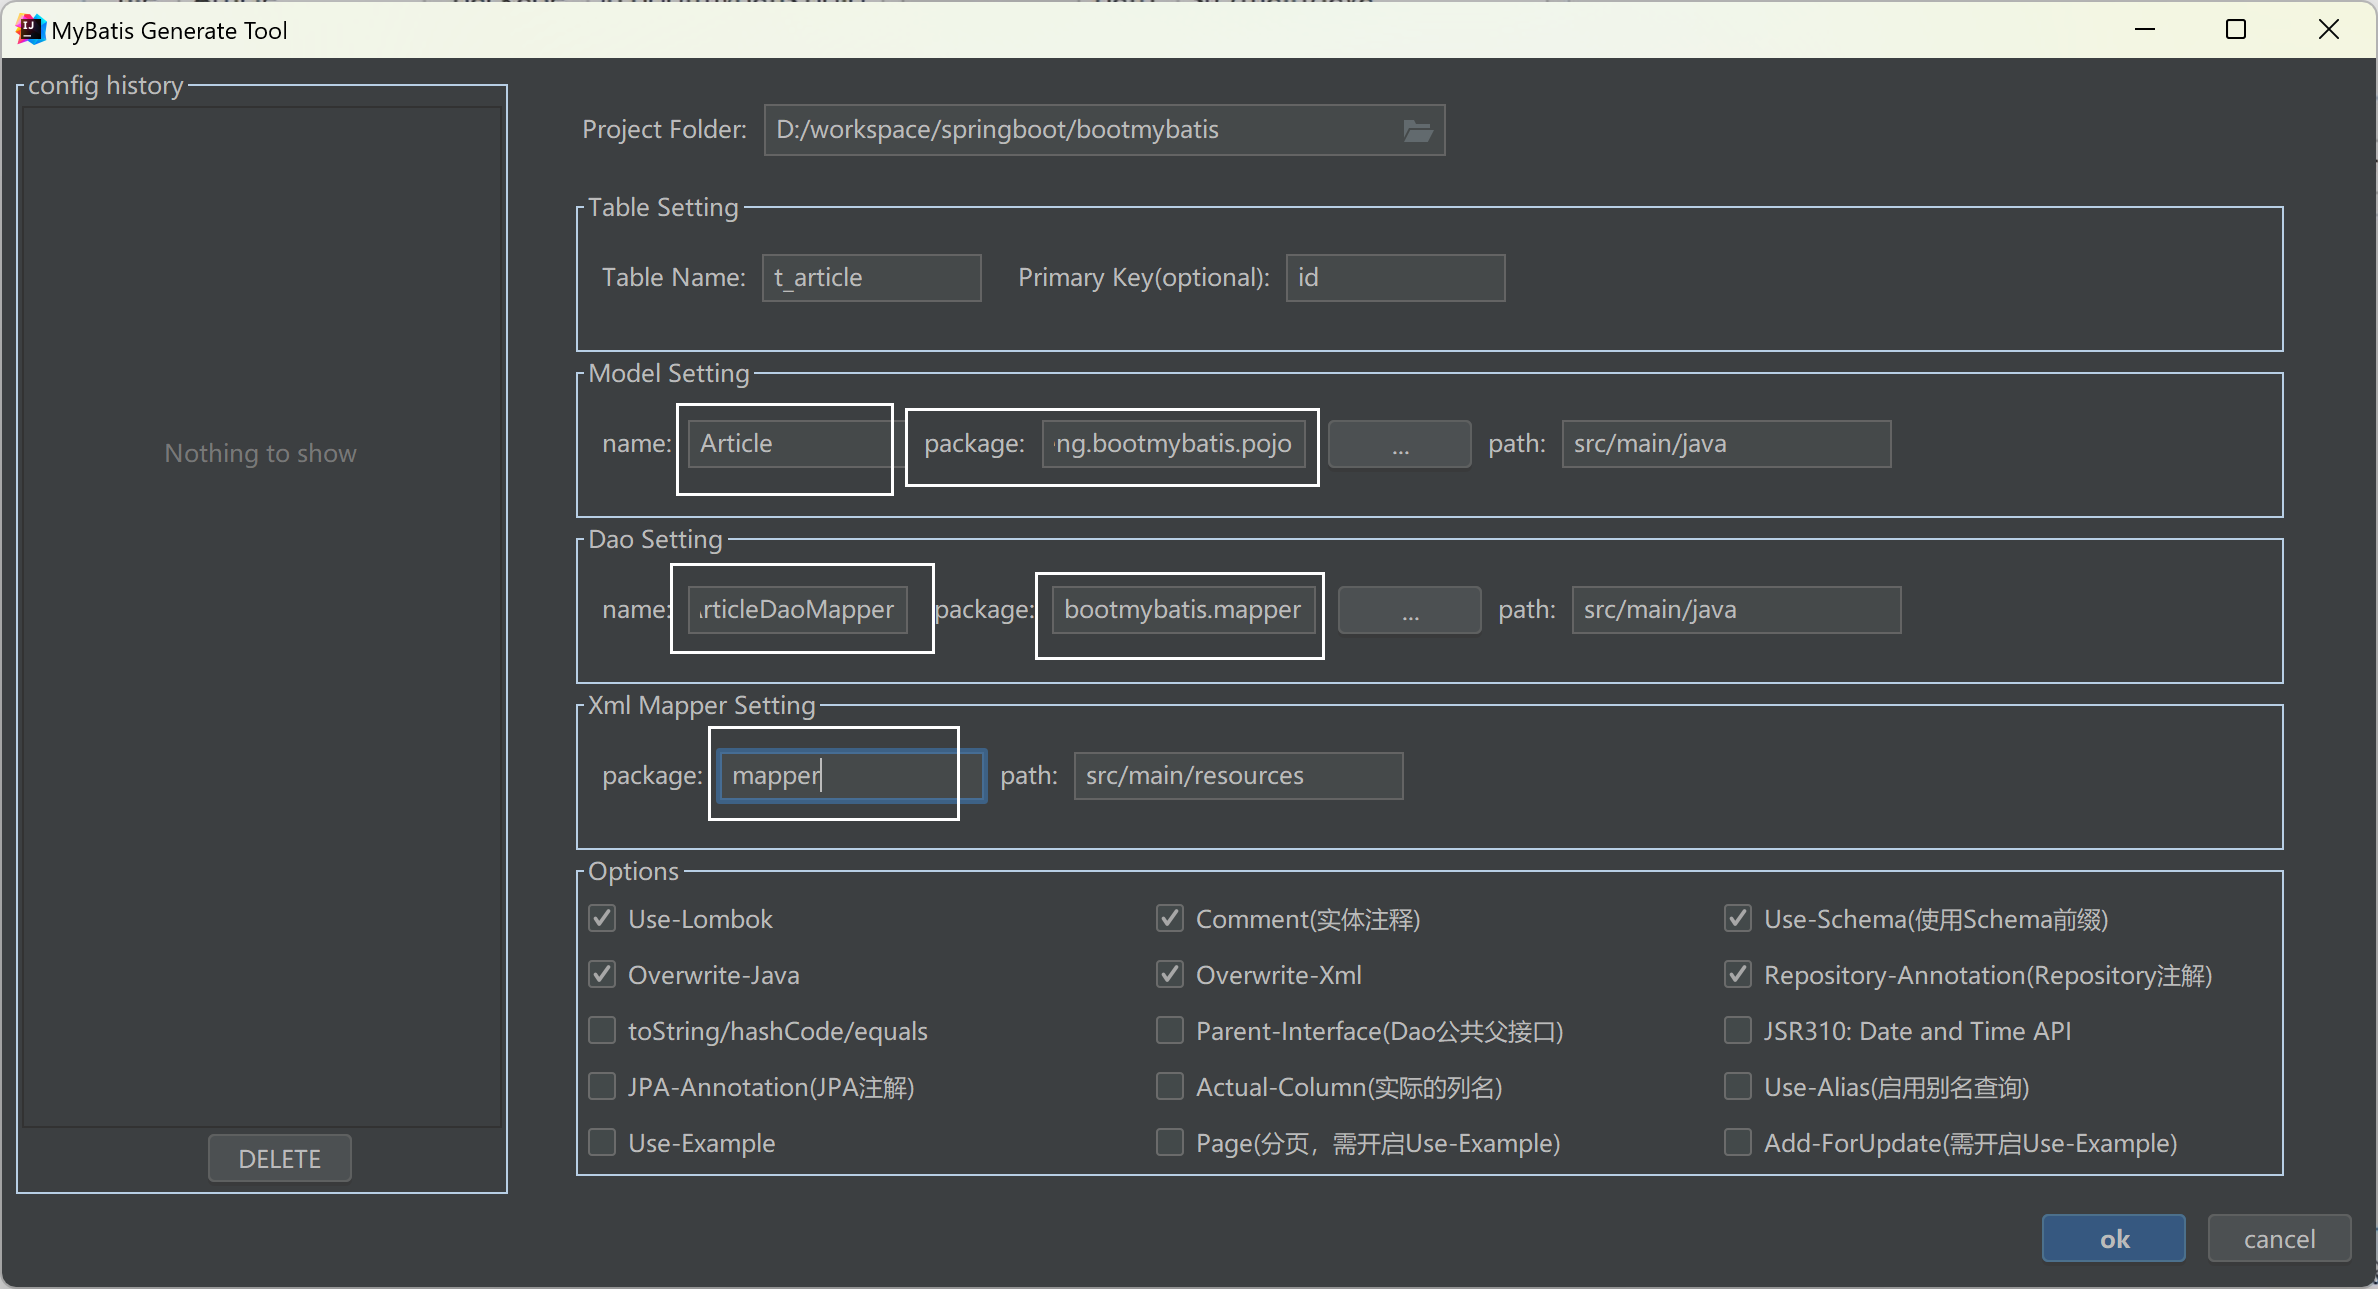
配置文件存放的路径:
生成的文件在目录结构的位置: 实体 ——> 接口 ———> xml映射配置文件
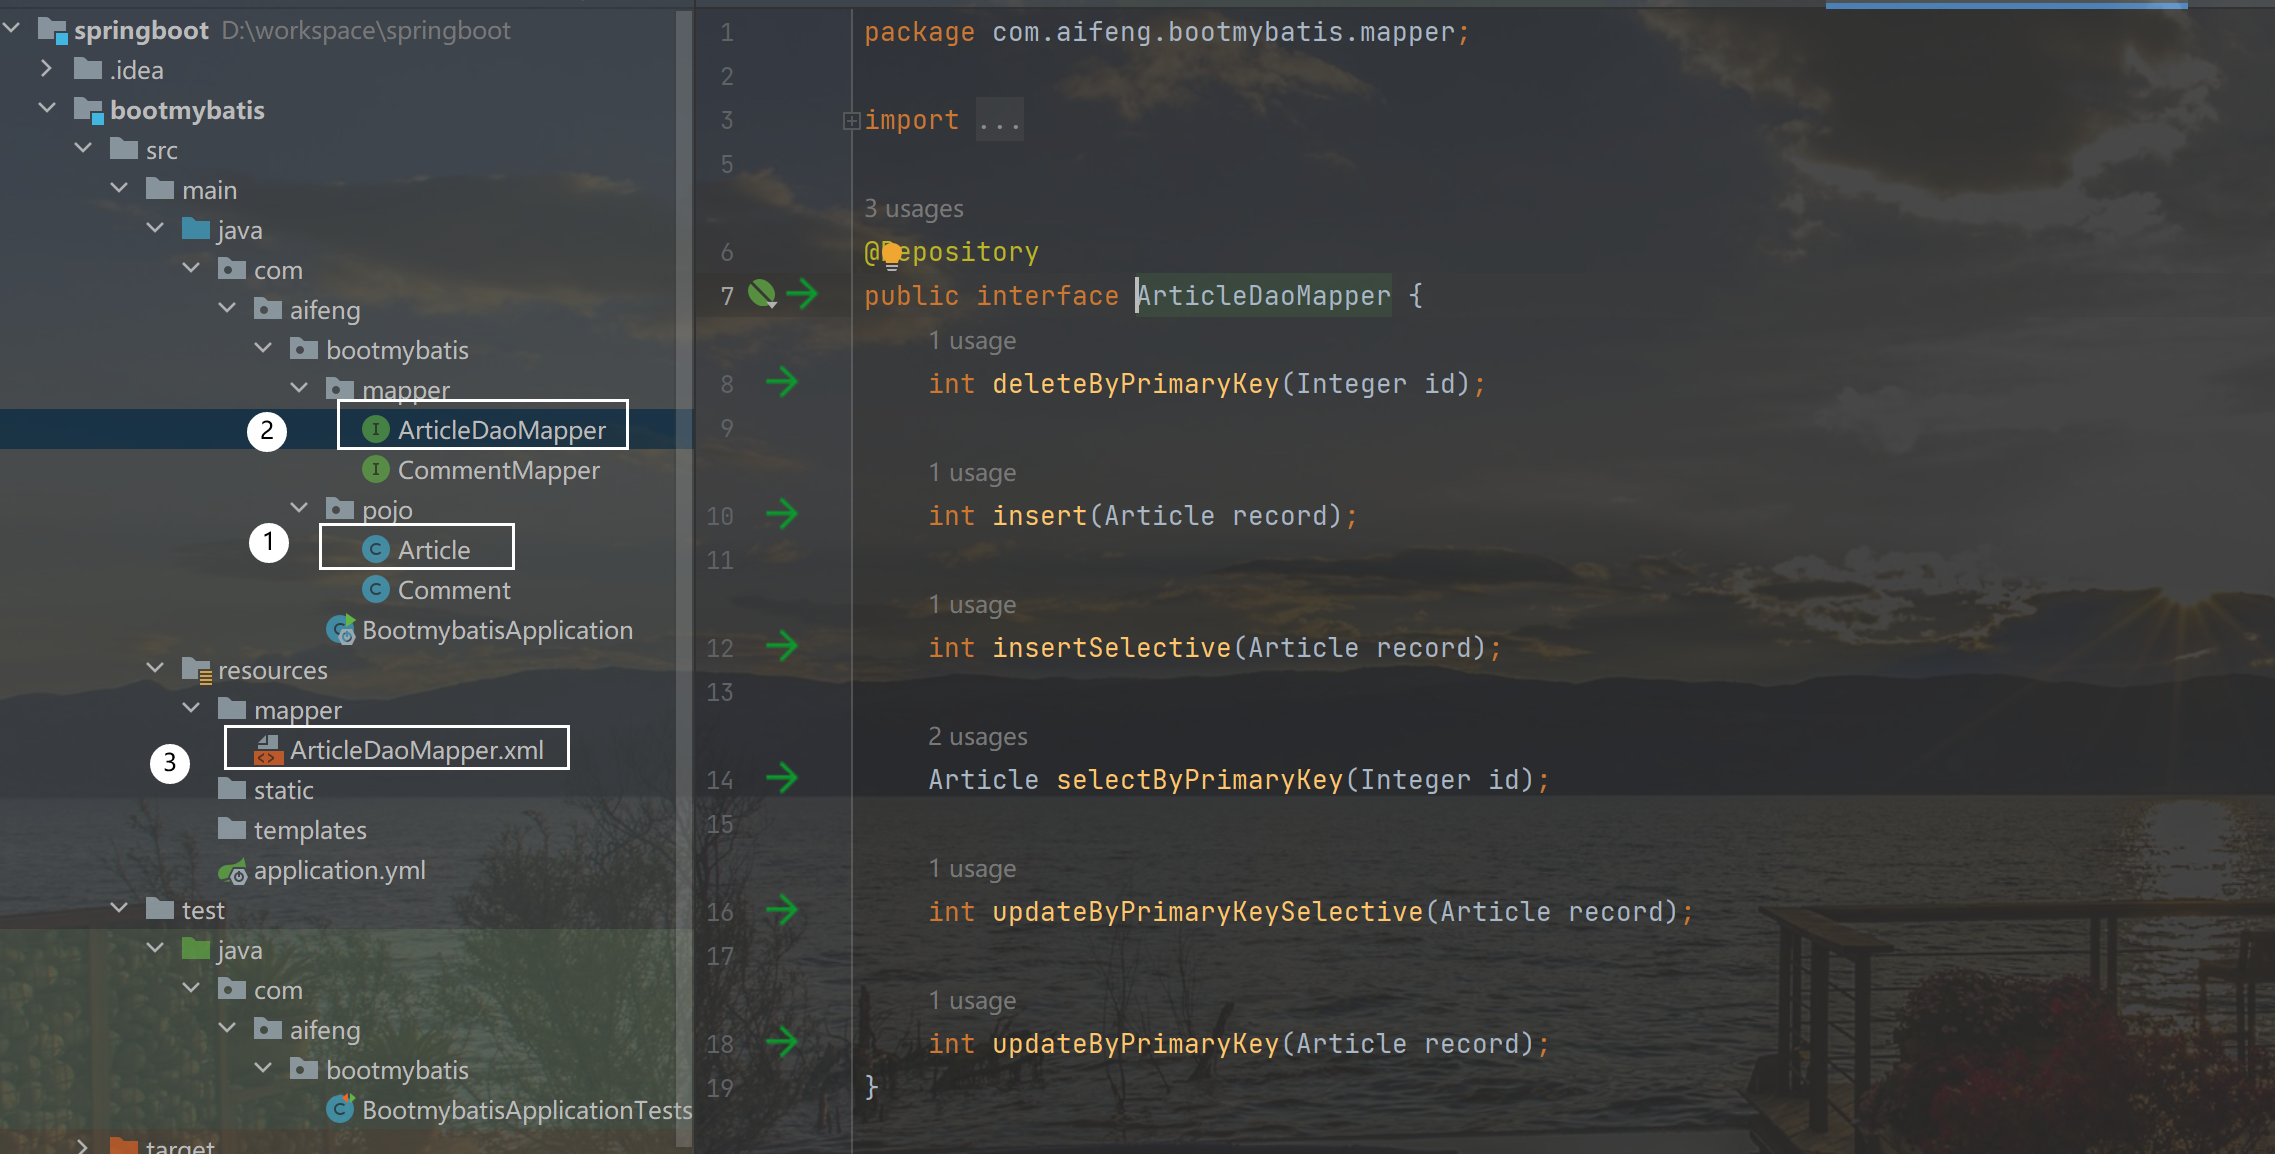
Article 实体去掉 lombok 插件生成 getter and setter 方法 以及 toString 方法
单元测试类
    @Autowired
    private ArticleDaoMapper articleDaoMapper;

    @Test
    void findArticleById(){
        Article article = articleDaoMapper.selectByPrimaryKey(1);
        System.out.println(article);
    }
打印测试结果

9.SpringBoot整合Redis
添加redis 依赖包
<!-- redis依赖包 -->
<dependency>
    <groupId>org.springframework.boot</groupId>
    <artifactId>spring-boot-starter-data-redis</artifactId>
</dependency>
查看redis 所用的依赖
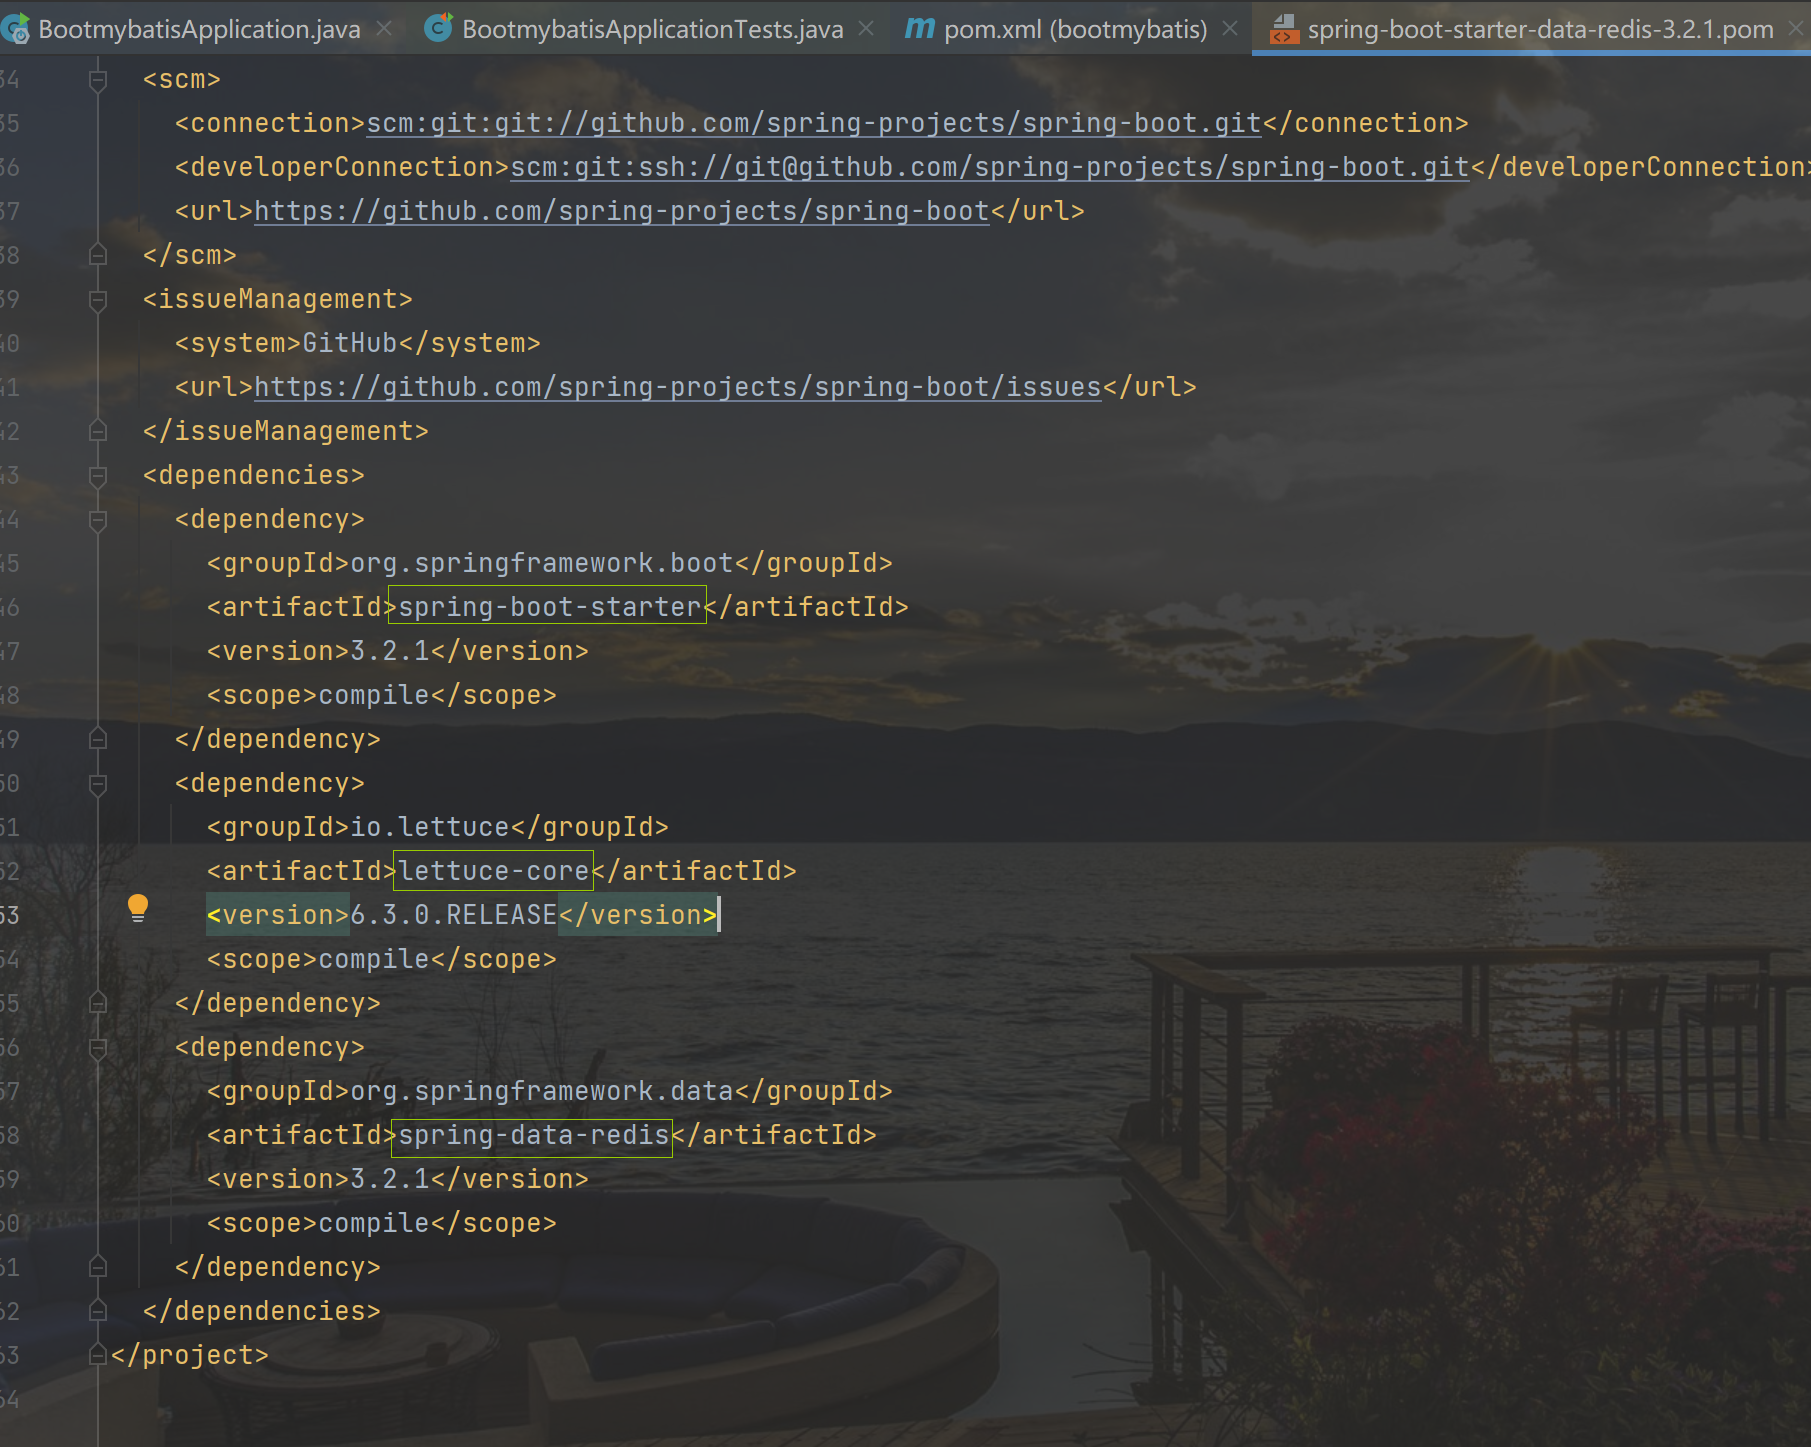
安装redis
[root@master src]# wget http://download.redis.io/releases/redis-5.0.4.tar.gz
make 编译报错,提示gcc 命令未找到
[root@master src]# ls
redis-5.0.4.tar.gz
[root@master src]# tar xzf redis-5.0.4.tar.gz
[root@master src]# ls
redis-5.0.4  redis-5.0.4.tar.gz
[root@master src]# cd redis-5.0.4
[root@master redis-5.0.4]# ls
00-RELEASENOTES  CONTRIBUTING  deps     Makefile   README.md   runtest          runtest-sentinel  src    utils
BUGS             COPYING       INSTALL  MANIFESTO  redis.conf  runtest-cluster  sentinel.conf     tests
[root@master redis-5.0.4]# make
cd src && make all
make[1]: 进入目录“/usr/local/src/redis-5.0.4/src”
    CC Makefile.dep
make[1]: 离开目录“/usr/local/src/redis-5.0.4/src”
make[1]: 进入目录“/usr/local/src/redis-5.0.4/src”
rm -rf redis-server redis-sentinel redis-cli redis-benchmark redis-check-rdb redis-check-aof *.o *.gcda *.gcno *.gcov redis.info lcov-html Makefile.dep dict-benchmark
(cd ../deps && make distclean)
make[2]: 进入目录“/usr/local/src/redis-5.0.4/deps”
(cd hiredis && make clean) > /dev/null || true
(cd linenoise && make clean) > /dev/null || true
(cd lua && make clean) > /dev/null || true
(cd jemalloc && [ -f Makefile ] && make distclean) > /dev/null || true
(rm -f .make-*)
make[2]: 离开目录“/usr/local/src/redis-5.0.4/deps”
(rm -f .make-*)
echo STD=-std=c99 -pedantic -DREDIS_STATIC='' >> .make-settings
echo WARN=-Wall -W -Wno-missing-field-initializers >> .make-settings
echo OPT=-O2 >> .make-settings
echo MALLOC=jemalloc >> .make-settings
echo CFLAGS= >> .make-settings
echo LDFLAGS= >> .make-settings
echo REDIS_CFLAGS= >> .make-settings
echo REDIS_LDFLAGS= >> .make-settings
echo PREV_FINAL_CFLAGS=-std=c99 -pedantic -DREDIS_STATIC='' -Wall -W -Wno-missing-field-initializers -O2 -g -ggdb   -I../deps/hiredis -I../deps/linenoise -I../deps/lua/src -DUSE_JEMALLOC -I../deps/jemalloc/include >> .make-settings
echo PREV_FINAL_LDFLAGS=  -g -ggdb -rdynamic >> .make-settings
(cd ../deps && make hiredis linenoise lua jemalloc)
make[2]: 进入目录“/usr/local/src/redis-5.0.4/deps”
(cd hiredis && make clean) > /dev/null || true
(cd linenoise && make clean) > /dev/null || true
(cd lua && make clean) > /dev/null || true
(cd jemalloc && [ -f Makefile ] && make distclean) > /dev/null || true
(rm -f .make-*)
(echo "" > .make-cflags)
(echo "" > .make-ldflags)
MAKE hiredis
cd hiredis && make static
make[3]: 进入目录“/usr/local/src/redis-5.0.4/deps/hiredis”
gcc -std=c99 -pedantic -c -O3 -fPIC  -Wall -W -Wstrict-prototypes -Wwrite-strings -g -ggdb  net.c
make[3]: gcc:命令未找到
make[3]: *** [net.o] 错误 127
make[3]: 离开目录“/usr/local/src/redis-5.0.4/deps/hiredis”
make[2]: *** [hiredis] 错误 2
make[2]: 离开目录“/usr/local/src/redis-5.0.4/deps”
make[1]: [persist-settings] 错误 2 (忽略)
    CC adlist.o
/bin/sh: cc: 未找到命令
make[1]: *** [adlist.o] 错误 127
make[1]: 离开目录“/usr/local/src/redis-5.0.4/src”
make: *** [all] 错误 2
安装gcc
yum -y install gcc
make install 安装
[root@master redis-5.0.4]# make install
cd src && make install
make[1]: 进入目录“/usr/local/src/redis-5.0.4/src”
    CC Makefile.dep
make[1]: 离开目录“/usr/local/src/redis-5.0.4/src”
make[1]: 进入目录“/usr/local/src/redis-5.0.4/src”

Hint: It's a good idea to run 'make test' ;)

    INSTALL install
    INSTALL install
    INSTALL install
    INSTALL install
    INSTALL install
make[1]: 离开目录“/usr/local/src/redis-5.0.4/src”
redis 配置后台运行
修改配置文件,把 daemonize 配置成 yes
vi redis.conf
# By default Redis does not run as a daemon. Use 'yes' if you need it.
# Note that Redis will write a pid file in /var/run/redis.pid when daemonized.
daemonize yes

# If you run Redis from upstart or systemd, Redis can interact with your
# supervision tree. Options:
#   supervised no      - no supervision interaction
#   supervised upstart - signal upstart by putting Redis into SIGSTOP mode
#   supervised systemd - signal systemd by writing READY=1 to $NOTIFY_SOCKET
#   supervised auto    - detect upstart or systemd method based on
#                        UPSTART_JOB or NOTIFY_SOCKET environment variables
# Note: these supervision methods only signal "process is ready."
#       They do not enable continuous liveness pings back to your supervisor.
supervised no
以配置文件的方式启动
[root@master bin]# redis-server /usr/local/src/redis-5.0.4/redis.conf
检测 6379 端口是否被监听
[root@master bin]# netstat -antpl | grep 6379
tcp        0      0 127.0.0.1:6379          0.0.0.0:*               LISTEN      7698/redis-server 1
检测redis 后台进程是否存在
[root@master bin]# ps -ef | grep redis
root       7698      1  0 18:42 ?        00:00:00 redis-server 127.0.0.1:6379
root       7705   3019  0 18:44 pts/1    00:00:00 grep --color=auto redis
执行测试类: 报错
    /*
    * 写入,key:1, value: mysql数据库中ID为1的article记录
    * 1.注入RedisUtilsh对象
    * */

    @Test
    void writeRedis(){
        redisUtils.set("1",articleDaoMapper.selectByPrimaryKey(1));
        System.out.println("success");
    }
java.lang.RuntimeException: org.springframework.data.redis.RedisConnectionFailureException: Unable to connect to Redis

	at com.aifeng.bootmybatis.utils.RedisUtils.set(RedisUtils.java:37)
	at com.aifeng.bootmybatis.BootmybatisApplicationTests.writeRedis(BootmybatisApplicationTests.java:65)
	at java.base/java.lang.reflect.Method.invoke(Method.java:580)
	at java.base/java.util.ArrayList.forEach(ArrayList.java:1596)
	at java.base/java.util.ArrayList.forEach(ArrayList.java:1596)
Caused by: org.springframework.data.redis.RedisConnectionFailureException: Unable to connect to Redis
	at org.springframework.data.redis.connection.lettuce.LettuceConnectionFactory$ExceptionTranslatingConnectionProvider.translateException(LettuceConnectionFactory.java:1805)
	at org.springframework.data.redis.connection.lettuce.LettuceConnectionFactory$ExceptionTranslatingConnectionProvider.getConnection(LettuceConnectionFactory.java:1736)
	at org.springframework.data.redis.connection.lettuce.LettuceConnectionFactory$SharedConnection.getNativeConnection(LettuceConnectionFactory.java:1538)
	at org.springframework.data.redis.connection.lettuce.LettuceConnectionFactory$SharedConnection.lambda$getConnection$0(LettuceConnectionFactory.java:1518)
	at org.springframework.data.redis.connection.lettuce.LettuceConnectionFactory.doInLock(LettuceConnectionFactory.java:1478)
	at org.springframework.data.redis.connection.lettuce.LettuceConnectionFactory$SharedConnection.getConnection(LettuceConnectionFactory.java:1515)
	at org.springframework.data.redis.connection.lettuce.LettuceConnectionFactory.getSharedConnection(LettuceConnectionFactory.java:1199)
	at org.springframework.data.redis.connection.lettuce.LettuceConnectionFactory.getConnection(LettuceConnectionFactory.java:1006)
	at org.springframework.data.redis.core.RedisConnectionUtils.fetchConnection(RedisConnectionUtils.java:194)
	at org.springframework.data.redis.core.RedisConnectionUtils.doGetConnection(RedisConnectionUtils.java:143)
	at org.springframework.data.redis.core.RedisConnectionUtils.getConnection(RedisConnectionUtils.java:104)
	at org.springframework.data.redis.core.RedisTemplate.execute(RedisTemplate.java:393)
	at org.springframework.data.redis.core.RedisTemplate.execute(RedisTemplate.java:373)
	at org.springframework.data.redis.core.AbstractOperations.execute(AbstractOperations.java:97)
	at org.springframework.data.redis.core.DefaultValueOperations.set(DefaultValueOperations.java:253)
	at com.aifeng.bootmybatis.utils.RedisUtils.set(RedisUtils.java:34)
	... 4 more
Caused by: io.lettuce.core.RedisConnectionException: Unable to connect to 192.168.11.128/<unresolved>:6379
	at io.lettuce.core.RedisConnectionException.create(RedisConnectionException.java:78)
	at io.lettuce.core.RedisConnectionException.create(RedisConnectionException.java:56)
	at io.lettuce.core.AbstractRedisClient.getConnection(AbstractRedisClient.java:350)
	at io.lettuce.core.RedisClient.connect(RedisClient.java:215)
	at org.springframework.data.redis.connection.lettuce.StandaloneConnectionProvider.lambda$getConnection$1(StandaloneConnectionProvider.java:112)
	at java.base/java.util.Optional.orElseGet(Optional.java:364)
	at org.springframework.data.redis.connection.lettuce.StandaloneConnectionProvider.getConnection(StandaloneConnectionProvider.java:112)
	at org.springframework.data.redis.connection.lettuce.LettuceConnectionFactory$ExceptionTranslatingConnectionProvider.getConnection(LettuceConnectionFactory.java:1734)
	... 18 more
Caused by: io.netty.channel.AbstractChannel$AnnotatedConnectException: Connection refused: no further information: /192.168.11.128:6379
Caused by: java.net.ConnectException: Connection refused: no further information
	at java.base/sun.nio.ch.Net.pollConnect(Native Method)
	at java.base/sun.nio.ch.Net.pollConnectNow(Net.java:682)
	at java.base/sun.nio.ch.SocketChannelImpl.finishConnect(SocketChannelImpl.java:973)
	at io.netty.channel.socket.nio.NioSocketChannel.doFinishConnect(NioSocketChannel.java:337)
	at io.netty.channel.nio.AbstractNioChannel$AbstractNioUnsafe.finishConnect(AbstractNioChannel.java:335)
	at io.netty.channel.nio.NioEventLoop.processSelectedKey(NioEventLoop.java:776)
	at io.netty.channel.nio.NioEventLoop.processSelectedKeysOptimized(NioEventLoop.java:724)
	at io.netty.channel.nio.NioEventLoop.processSelectedKeys(NioEventLoop.java:650)
	at io.netty.channel.nio.NioEventLoop.run(NioEventLoop.java:562)
	at io.netty.util.concurrent.SingleThreadEventExecutor$4.run(SingleThreadEventExecutor.java:997)
	at io.netty.util.internal.ThreadExecutorMap$2.run(ThreadExecutorMap.java:74)
	at io.netty.util.concurrent.FastThreadLocalRunnable.run(FastThreadLocalRunnable.java:30)
	at java.base/java.lang.Thread.run(Thread.java:1583)

2024-01-10T20:29:14.015+08:00  INFO 21568 --- [ionShutdownHook] com.zaxxer.hikari.HikariDataSource       : HikariPool-1 - Shutdown initiated...
2024-01-10T20:29:14.025+08:00  INFO 21568 --- [ionShutdownHook] com.zaxxer.hikari.HikariDataSource       : HikariPool-1 - Shutdown completed.

Process finished with exit code -1
解决问题方法:
- redis.conf 配置文件注释掉 bind 127.0.0.1
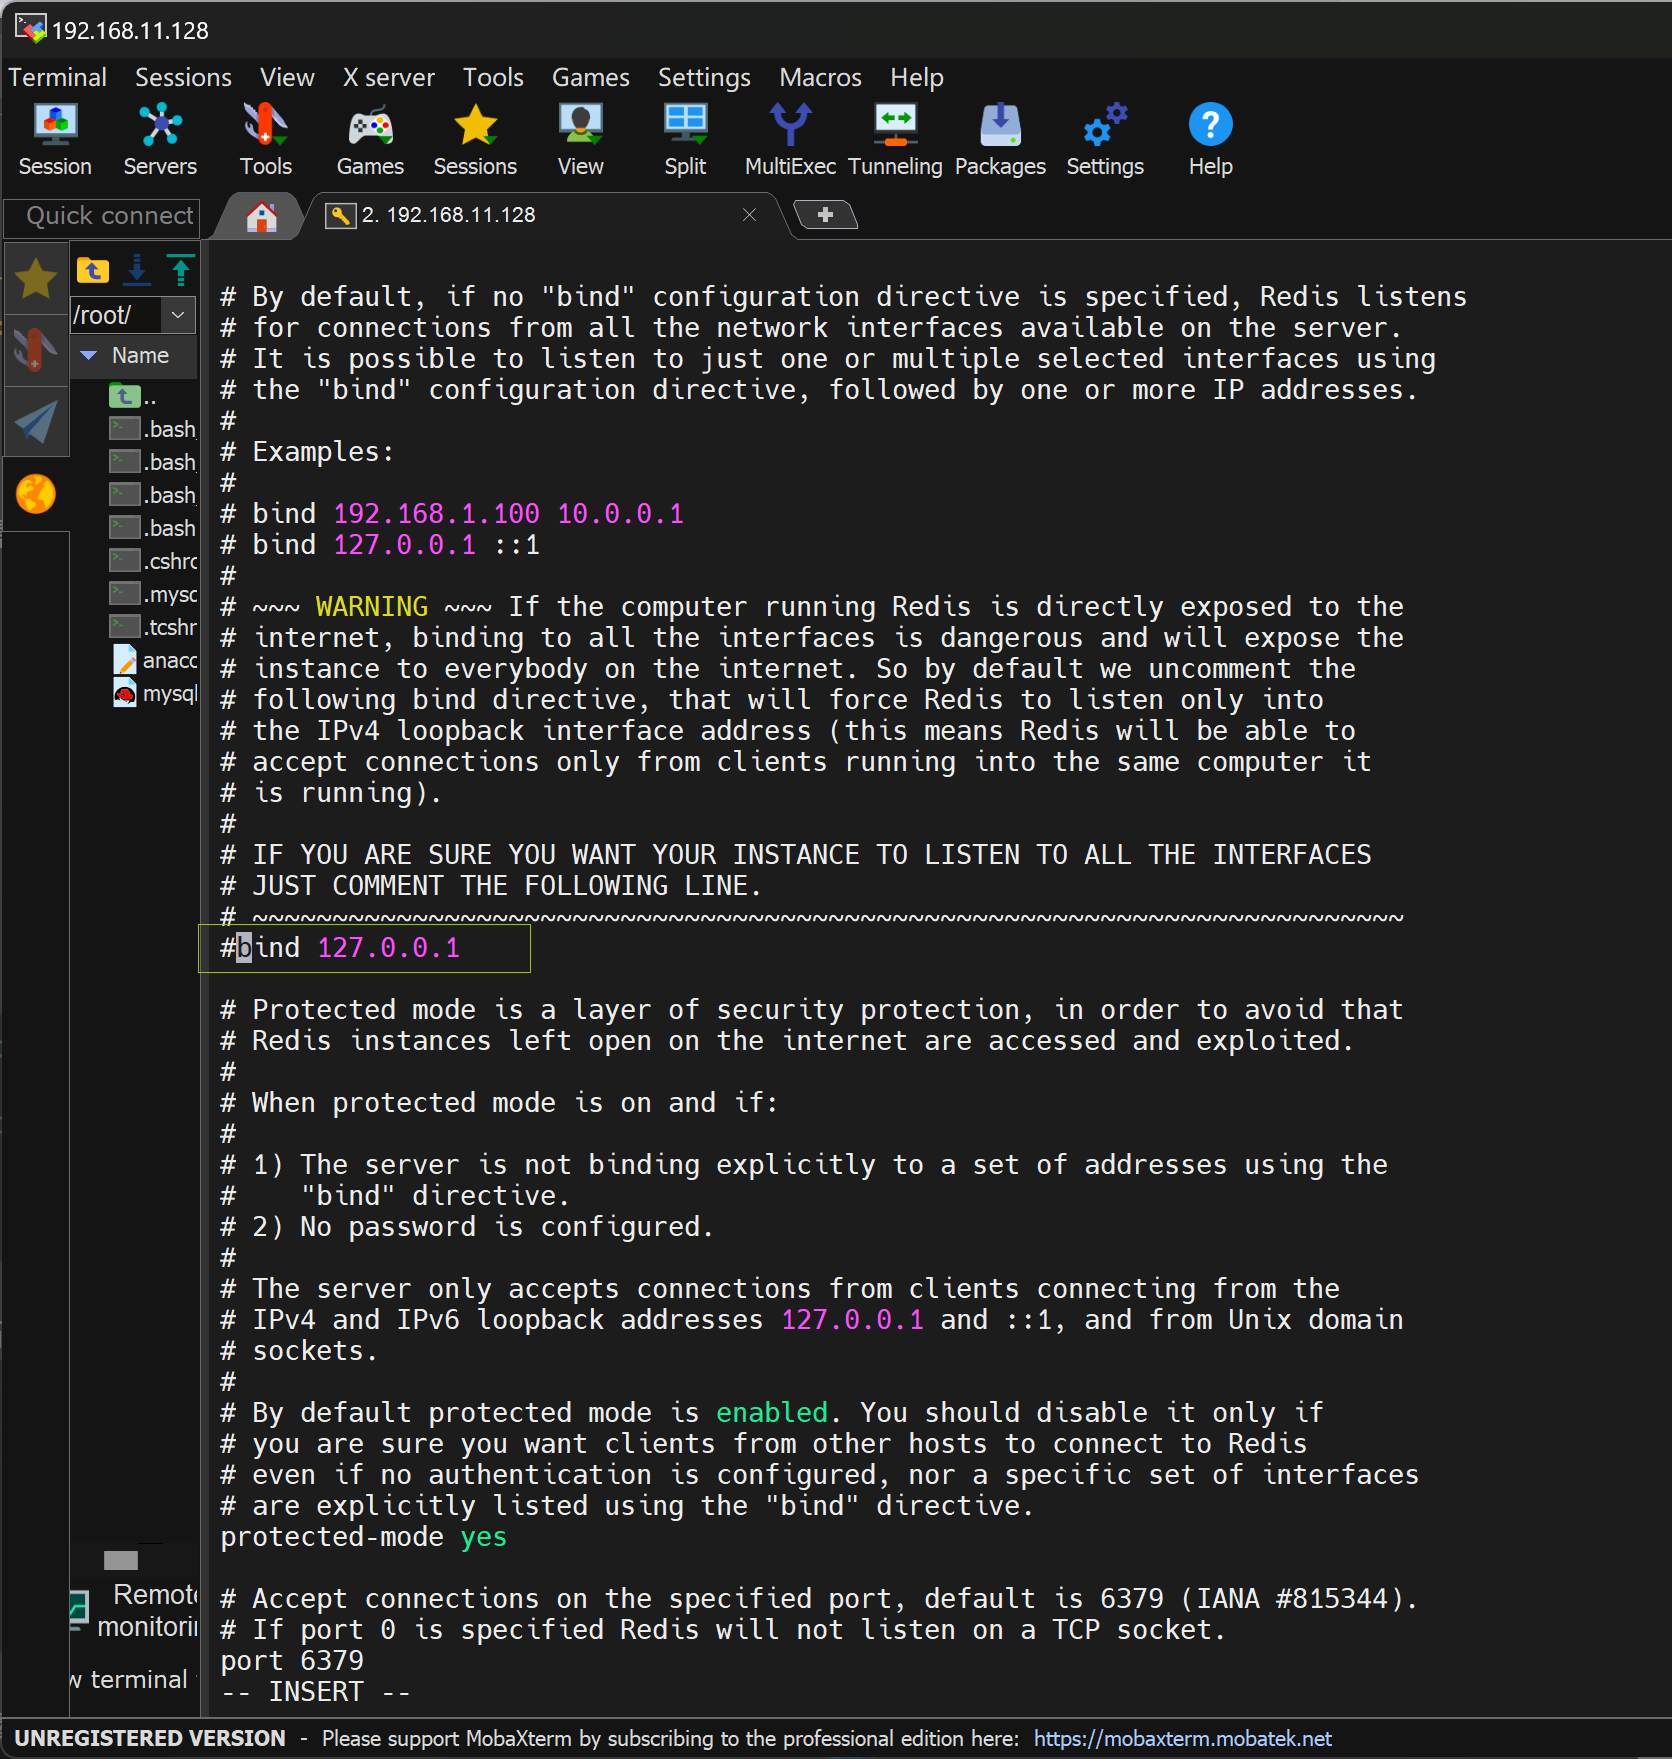
-
在redis.conf 文件中配置保护模式为 no
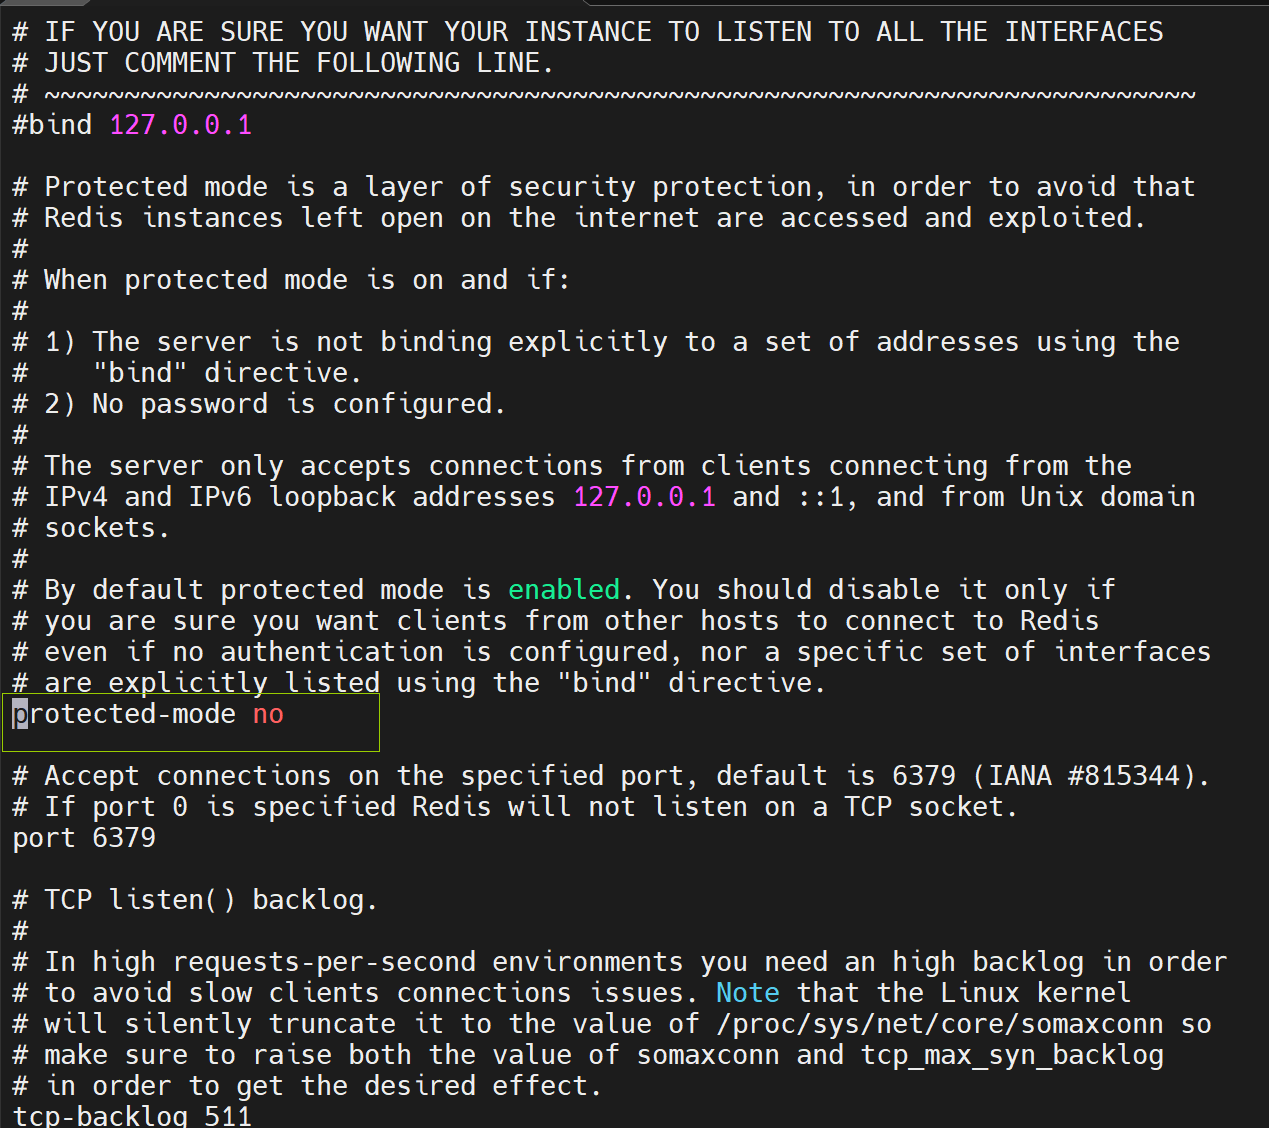
3.重启redis
1.杀死redis进程
[root@master redis-5.0.4]# netstat -ntpl
Active Internet connections (only servers)
Proto Recv-Q Send-Q Local Address           Foreign Address         State       PID/Program name
tcp        0      0 0.0.0.0:22              0.0.0.0:*               LISTEN      976/sshd
tcp        0      0 127.0.0.1:25            0.0.0.0:*               LISTEN      1372/master
tcp        0      0 127.0.0.1:6379          0.0.0.0:*               LISTEN      1746/redis-server 1
tcp6       0      0 :::22                   :::*                    LISTEN      976/sshd
tcp6       0      0 ::1:25                  :::*                    LISTEN      1372/master
tcp6       0      0 :::3306                 :::*                    LISTEN      1302/mysqld
[root@master redis-5.0.4]# kill -9 1746
[root@master redis-5.0.4]# netstat -ntpl
Active Internet connections (only servers)
Proto Recv-Q Send-Q Local Address           Foreign Address         State       PID/Program name
tcp        0      0 0.0.0.0:22              0.0.0.0:*               LISTEN      976/sshd
tcp        0      0 127.0.0.1:25            0.0.0.0:*               LISTEN      1372/master
tcp6       0      0 :::22                   :::*                    LISTEN      976/sshd
tcp6       0      0 ::1:25                  :::*                    LISTEN      1372/master
tcp6       0      0 :::3306                 :::*                    LISTEN      1302/mysqld
2.配置文件方式开启redis
[root@master redis-5.0.4]# redis-server redis.conf
1792:C 10 Jan 2024 20:47:00.549 # oO0OoO0OoO0Oo Redis is starting oO0OoO0OoO0Oo
1792:C 10 Jan 2024 20:47:00.549 # Redis version=5.0.4, bits=64, commit=00000000, modified=0, pid=1792, just started
1792:C 10 Jan 2024 20:47:00.549 # Configuration loaded
[root@master redis-5.0.4]# netstat -ntpl
Active Internet connections (only servers)
Proto Recv-Q Send-Q Local Address           Foreign Address         State       PID/Program name
tcp        0      0 0.0.0.0:22              0.0.0.0:*               LISTEN      976/sshd
tcp        0      0 127.0.0.1:25            0.0.0.0:*               LISTEN      1372/master
tcp        0      0 0.0.0.0:6379            0.0.0.0:*               LISTEN      1793/redis-server *
tcp6       0      0 :::22                   :::*                    LISTEN      976/sshd
tcp6       0      0 ::1:25                  :::*                    LISTEN      1372/master
tcp6       0      0 :::3306                 :::*                    LISTEN      1302/mysqld
tcp6       0      0 :::6379                 :::*                    LISTEN      1793/redis-server *
执行单元测试,成功

测试存入的redis信息
    /*
    * 测试存入的redis信息
    * */
    @Test
    void readRedis(){
        Article article = (Article) redisUtils.get("1");
        System.out.println(article);
    }
打印测试结果,成功输出信息

10.SpringBoot支持的视图技术
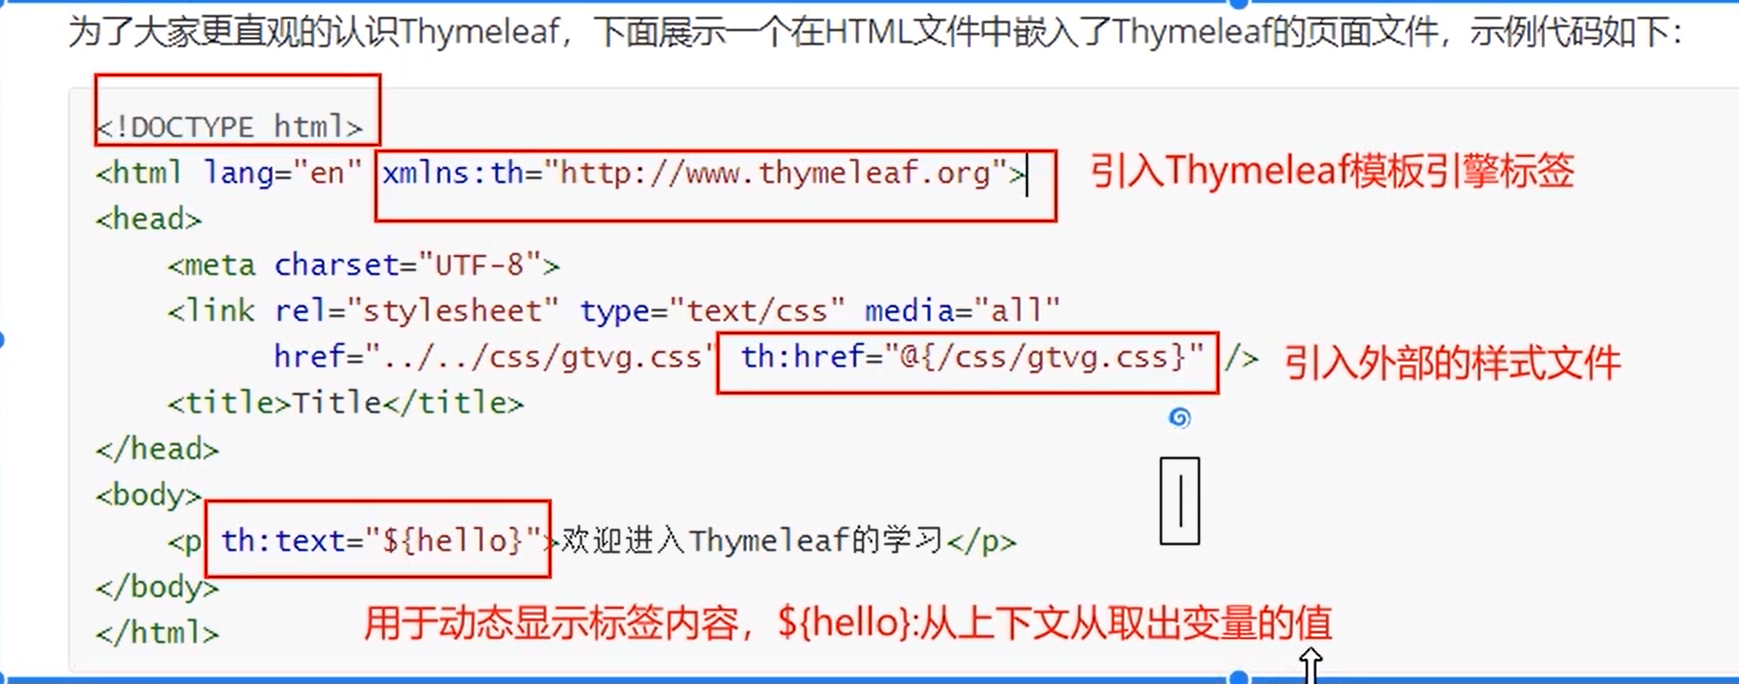
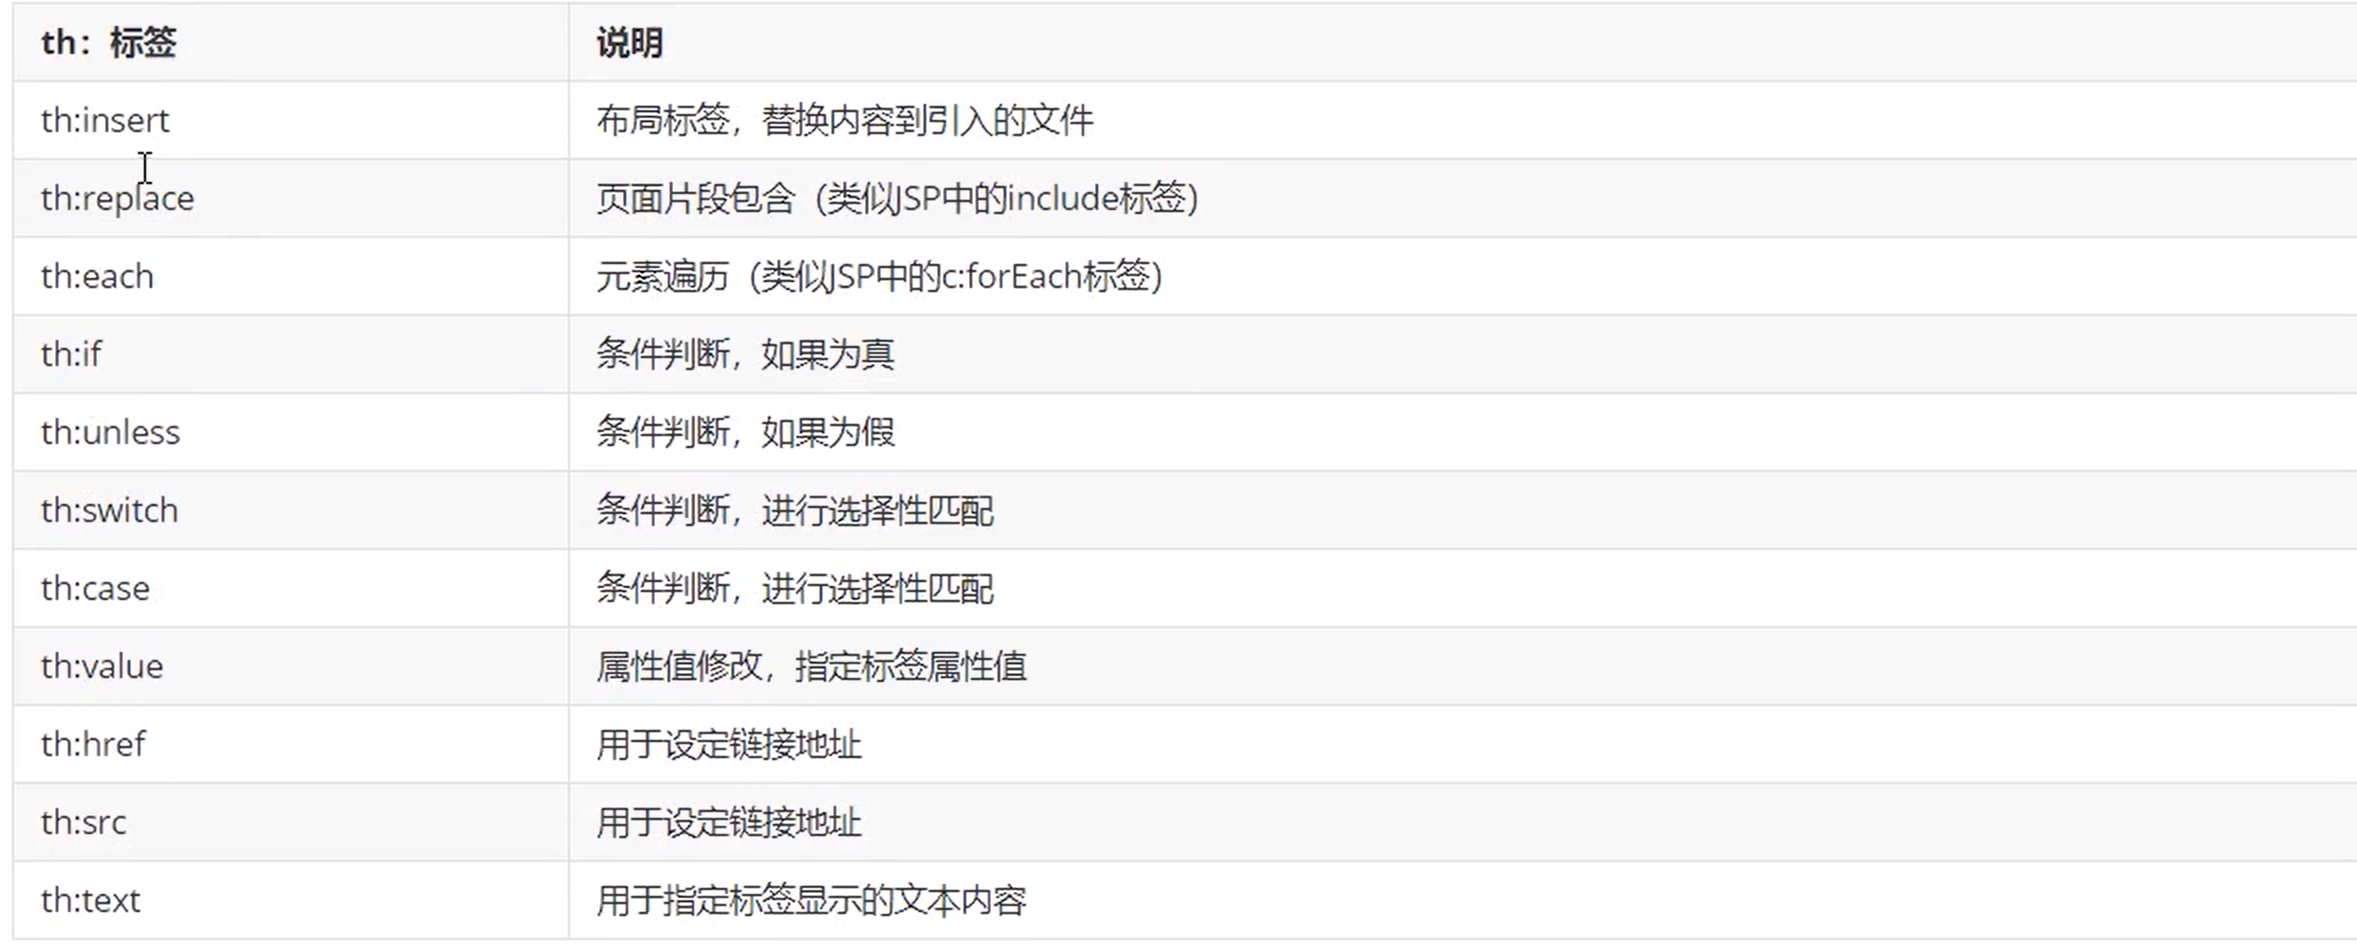
11.Thymeleaf常用标签
12.Thymeleaf标准表达式
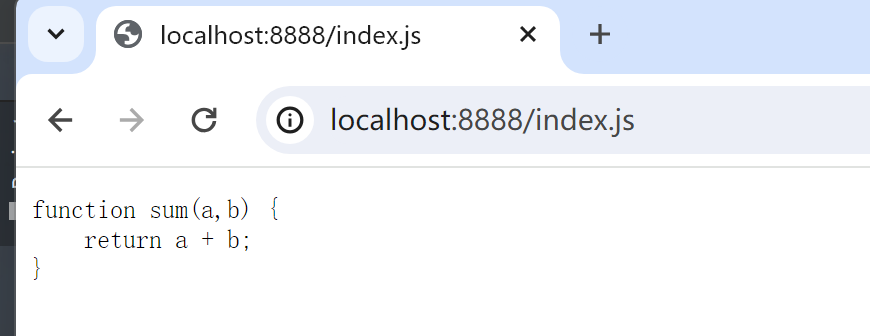
13.Thymeleaf基本使用
14.SpringBoot整合Thymeleaf
pom.xml
引入thymeleaf 依赖
        <dependency>
            <groupId>org.springframework.boot</groupId>
            <artifactId>spring-boot-starter-thymeleaf</artifactId>
        </dependency>
LoginController
package com.aifeng.bootthymeleaf.controller;


import org.springframework.stereotype.Controller;
import org.springframework.ui.Model;
import org.springframework.web.bind.annotation.RequestMapping;

import java.util.Calendar;

@Controller
public class LoginController {

    @RequestMapping("toLogin")
    public String toLoginView(Model model){
        model.addAttribute("currentYear",Calendar.getInstance().get(Calendar.YEAR));

        return "login";  //resources/templates/login.html
    }
}
login.html
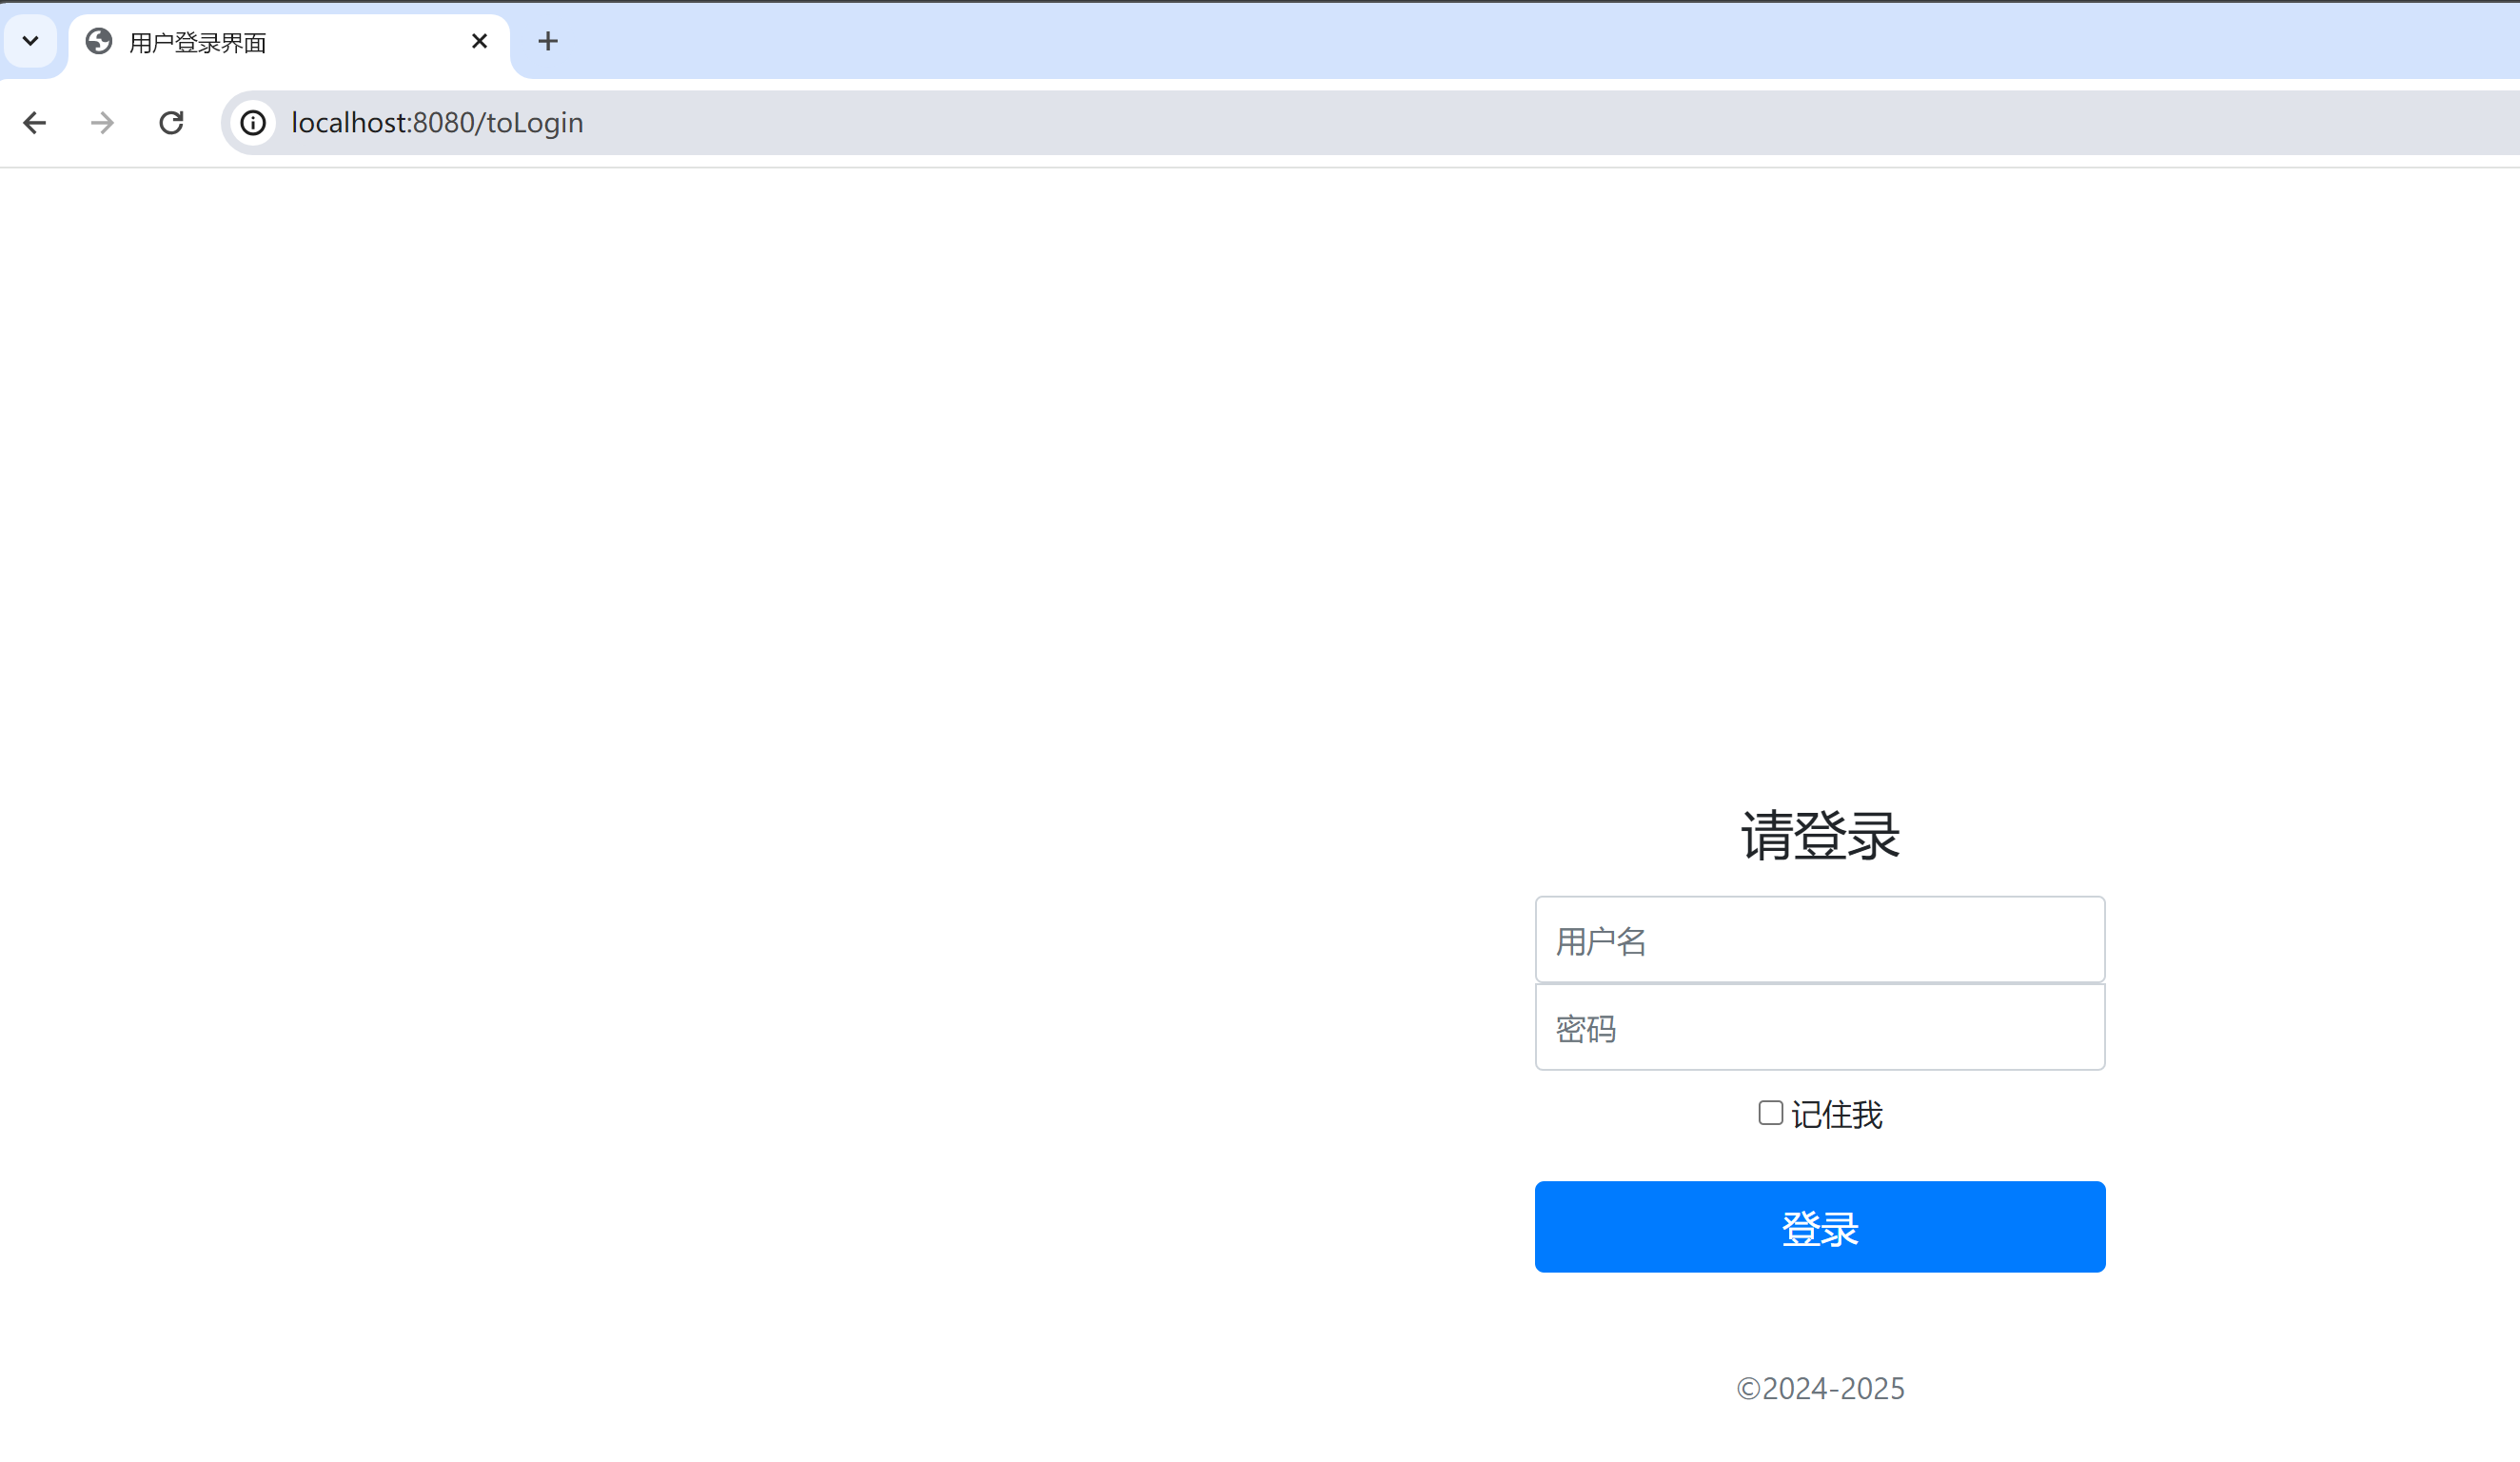
<!DOCTYPE html>
<html lang="en" xmlns:th="http://www.thymeleaf.org">
<head>
  <meta http-equiv="Content-Type" content="text/html; charset=UTF-8">
  <meta name="viewport" content="width=device-width, initial-scale=1,shrink- to-fit=no">
  <title>用户登录界面</title>
  <link th:href="@{/login/css/bootstrap.min.css}" rel="stylesheet">
  <link th:href="@{/login/css/signin.css}" rel="stylesheet">
</head>
<body class="text-center"> <!-- 用户登录form表单 -->
<form class="form-signin">
  <h1 class="h3 mb-3 font-weight-normal">请登录</h1>
  <input type="text" class="form-control" th:placeholder="用户名" required="" autofocus="">
  <input type="password" class="form-control" th:placeholder="密码" required="">
  <div class="checkbox mb-3">
    <label>
      <input type="checkbox" value="remember-me"> 记住我
    </label>
  </div>
  <button class="btn btn-lg btn-primary btn-block" type="submit" >登录</button>
  <p class="mt-5 mb-3 text-muted">?<span
          th:text="${currentYear}">2019</span>-<span
          th:text="${currentYear}+1">2020</span>
  </p>
</form>
</body>
</html>
浏览器访问测试
15.SpringBoot实战演练-Lombok
@SpringBootTest
class DemolombokApplicationTests {

    @Autowired
    private User user;

    @Test
    void testLombok() {
        User user = new User();
        user.setId(1);
        user.setName("爱枫");
        System.out.println(user); //如果有打印信息,显示toString() 方法生效  |  User(id=1, name=爱枫)
    }

    @Test
    void testLombok2(){
        user.setId(2);
        user.setName("我是Springboot lombok");
        System.out.println(user); //User(id=2, name=我是Springboot lombok)
    }


}
打印测试

16.SpringBoot实战演练-基础环境准备
建表:
# 创建表 user表,并插入相关数据
DROP TABLE IF EXISTS user;
CREATE TABLE user (
    id int(20) NOT NULL AUTO_INCREMENT COMMENT 'id',
    username varchar(200) DEFAULT NULL COMMENT '用户姓名',
    password varchar(200) DEFAULT NULL COMMENT '用户密码',
    birthday date DEFAULT NULL COMMENT '生日',
    PRIMARY KEY (id)
) ENGINE=InnoDB AUTO_INCREMENT=1 DEFAULT CHARSET=utf8;
INSERT INTO user VALUES (1,'张三', '123456', '1993-11-19');
INSERT INTO user VALUES (2,'顾不忍', '456789', '1993-11-20');
INSERT INTO user VALUES (3,'颜诗墨', '111222', '1993-11-21');
INSERT INTO user VALUES (4,'柳言庆', '333444', '2002-01-01');
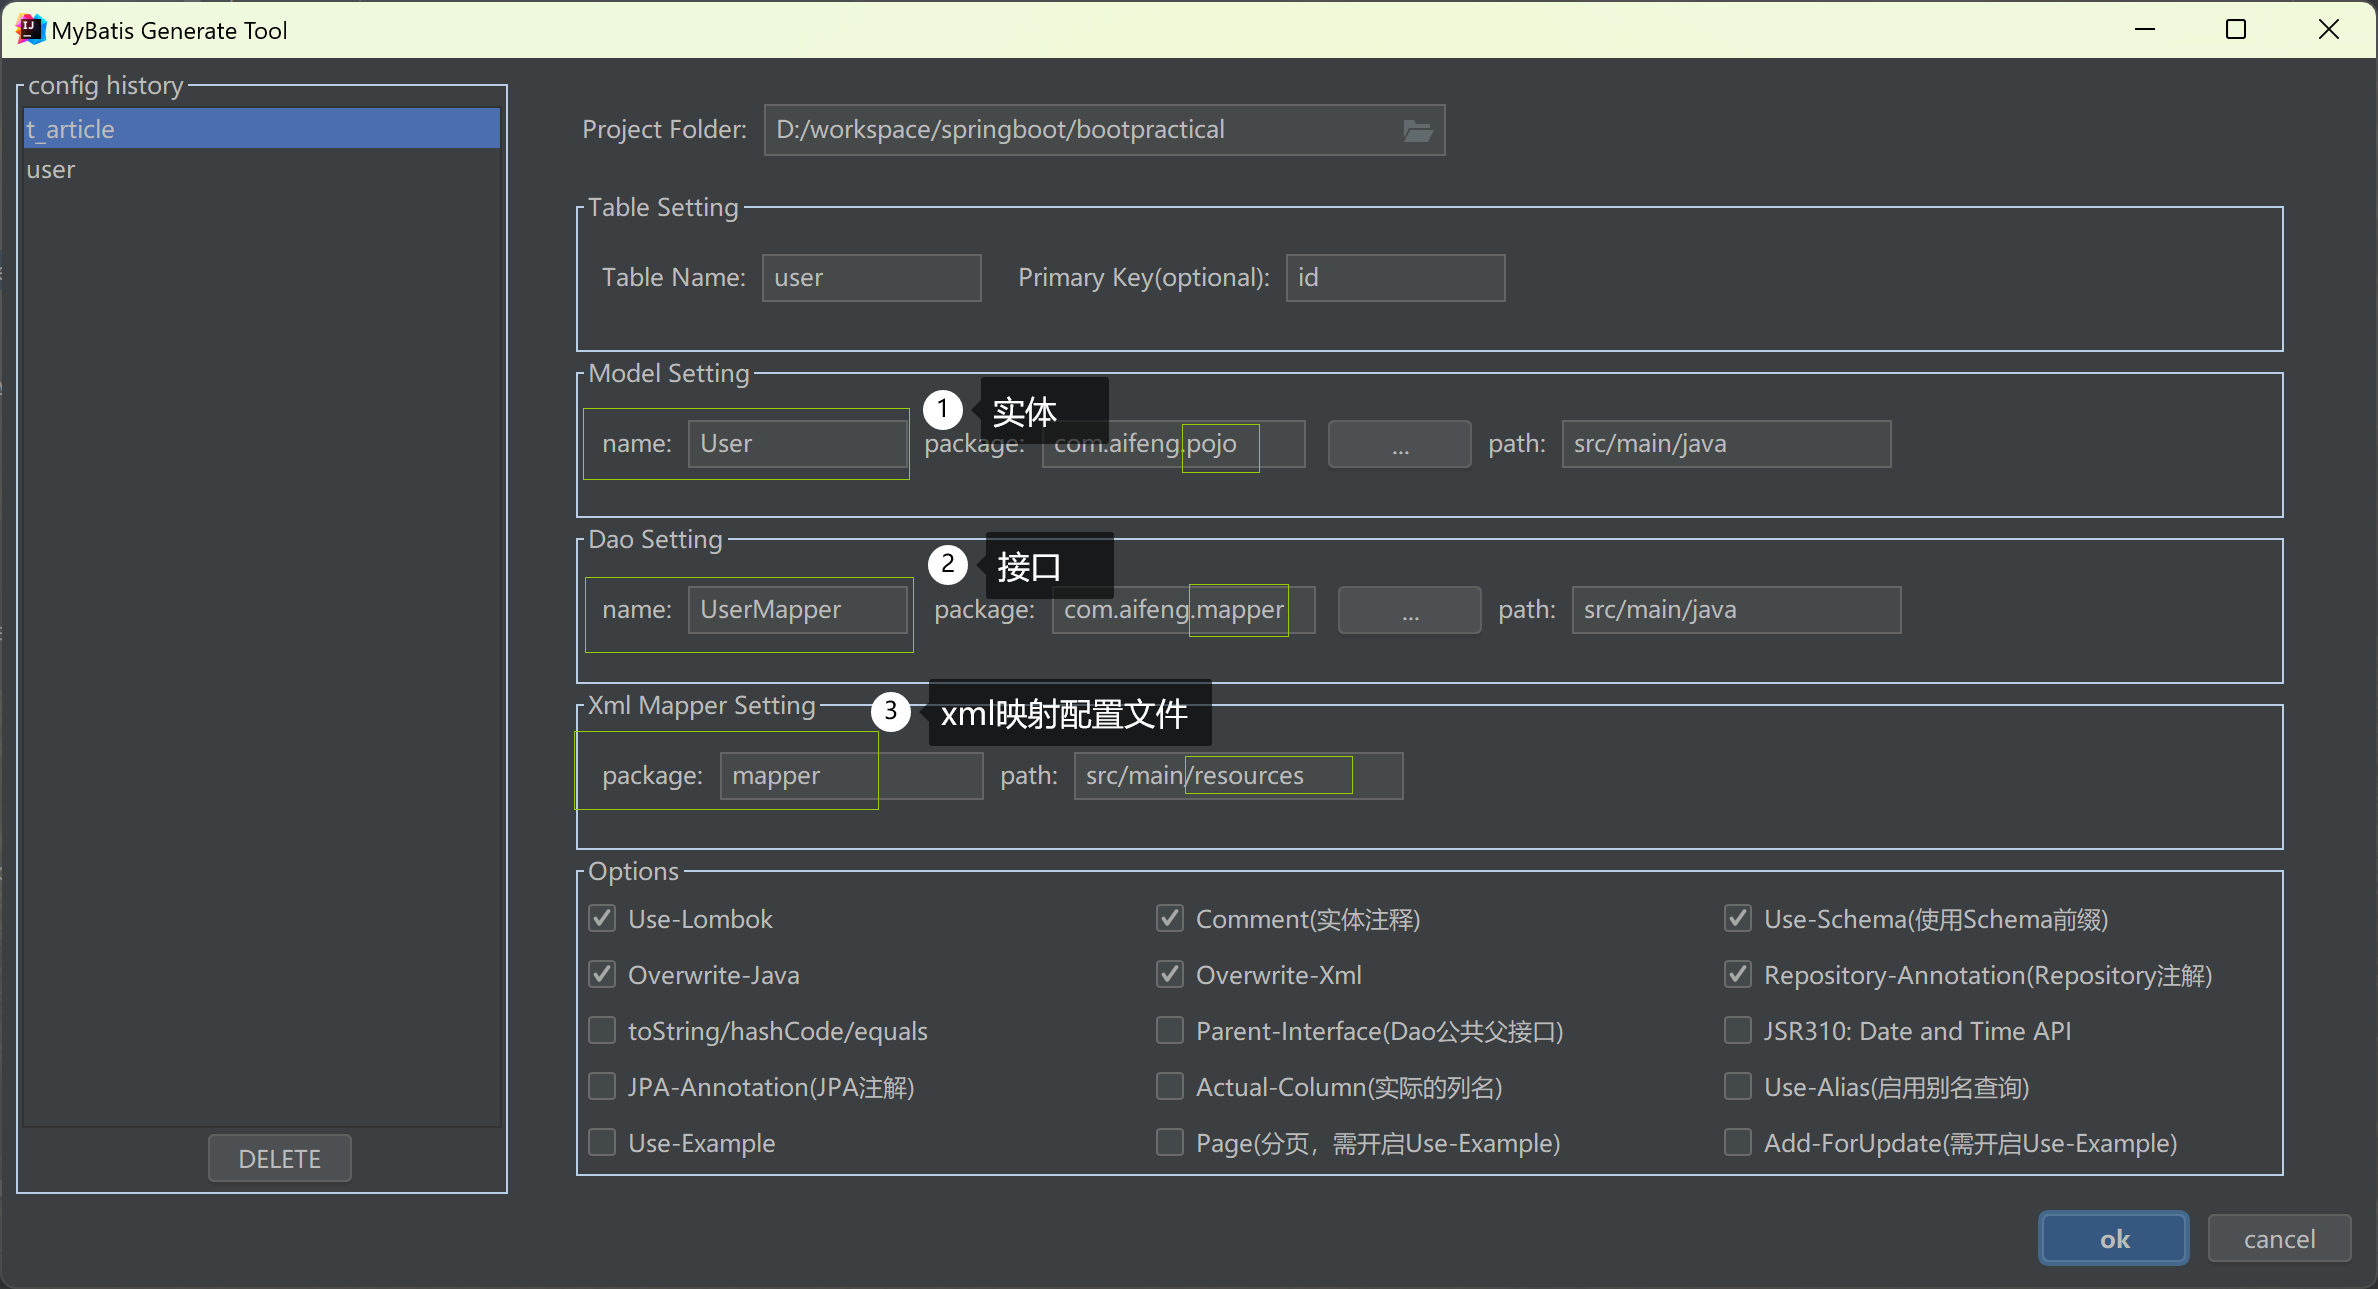
生成user实体对象,以及 UserMapper接口文件以及 xml 映射配置文件
使用@MapperScan 注解,开启mapper 包扫描
package com.aifeng;

import org.mybatis.spring.annotation.MapperScan;
import org.springframework.boot.SpringApplication;
import org.springframework.boot.autoconfigure.SpringBootApplication;

@SpringBootApplication
@MapperScan("com.aifeng.mapper")// 使用的Mybatis,使用@MapperScan注解,扫描com.aifeng.mapper
public class BootpracticalApplication {

    public static void main(String[] args) {
        SpringApplication.run(BootpracticalApplication.class, args);
    }

}
17.SpringBoot实战演练-业务逻辑实现
UserService
public interface UserService {

    /**
     * 查询所有
     * @return
     */
    List<User> queryAll();

    /**
     * 通过ID查询
     * @param id
     * @return
     */
    User findById(Integer id);

    /**
     * 新增
     * @param user
     */
    void insert(User user);

    /**
     * 通过ID删除
     * @param id
     */
    void deleteById(Integer id);

    /**
     * 修改
     * @param user
     */
    void update(User user);
}
UserServiceImpl 实现类
@Service
public class UserServiceImpl implements UserService {

    @Autowired
    private UserMapper userMapper;

    @Override
    public List<User> queryAll() {
        return userMapper.queryAll();
    }

    @Override
    public User findById(Integer id) {
        return userMapper.selectByPrimaryKey(id);
    }

    @Override
    public void insert(User user) {
        //userMapper.insert(user); //将除ID所有的列都拼sql
        userMapper.insertSelective(user); //只是将不为空的列才拼sql ,拼的sql短,高并发的时候快,有用嘛?有用,能快一点是一点(所以说使用这个)
    }

    @Override
    public void deleteById(Integer id) {
        userMapper.deleteByPrimaryKey(id);
    }

    @Override
    public void update(User user) {
        userMapper.updateByPrimaryKeySelective(user);

    }
}
动态sql
  <insert id="insertSelective" keyColumn="id" keyProperty="id" parameterType="com.aifeng.pojo.User" useGeneratedKeys="true">
    insert into user
    <trim prefix="(" suffix=")" suffixOverrides=",">
      <if test="username != null">
        username,
      </if>
      <if test="password != null">
        `password`,
      </if>
      <if test="birthday != null">
        birthday,
      </if>
    </trim>
    <trim prefix="values (" suffix=")" suffixOverrides=",">
      <if test="username != null">
        #{username,jdbcType=VARCHAR},
      </if>
      <if test="password != null">
        #{password,jdbcType=VARCHAR},
      </if>
      <if test="birthday != null">
        #{birthday,jdbcType=DATE},
      </if>
    </trim>
  </insert>
18.SpringBoot实战演练-查询功能实现
查询功能
@RestController
@RequestMapping("/user")
public class UserController {

    @Autowired
    private UserService userService;

    /**
     * restful格式进行访问
     * 查询:get
     * 新增:post
     * 更新:put
     * 删除:delete
     */


    /**
     * 查询所有
     * @return
     */
    @GetMapping("/query")
    public List<User> queryAll(){
        return userService.queryAll();
    }

    /**
     * 通过ID查询
     * @param id
     * @return
     */
    @GetMapping("/query/{id}")
    public User queryById(@PathVariable Integer id){//@PathVariable注解,获取地址中的参数
        return userService.findById(id);
    }

}
postman测试
接口的地址:请求方式 get
http://127.0.0.1:8090/user/query
接口返回json数据
[
    {
        "id": 1,
        "username": "张三",
        "password": "123456",
        "birthday": "1993-11-18T16:00:00.000+00:00"
    },
    {
        "id": 2,
        "username": "顾不忍",
        "password": "456789",
        "birthday": "1993-11-19T16:00:00.000+00:00"
    },
    {
        "id": 3,
        "username": "颜诗墨",
        "password": "111222",
        "birthday": "1993-11-20T16:00:00.000+00:00"
    },
    {
        "id": 4,
        "username": "柳言庆",
        "password": "333444",
        "birthday": "2001-12-31T16:00:00.000+00:00"
    }
]
19.SpringBoot实战演练-增删改功能实现
- 新增
    /**
     * 新增
     * @param user
     * @return
     */
    @PostMapping("/insert")
    public String insert(User user){
        userService.insert(user);
        return "新增成功";
    }
报错
Failed to convert from type [java.lang.String] to type [java.util.Date] for value [1990-11-20]
2024-01-13T15:48:47.119+08:00  WARN 16876 --- [nio-8090-exec-1] .w.s.m.s.DefaultHandlerExceptionResolver : Resolved [org.springframework.web.bind.MethodArgumentNotValidException: Validation failed for argument [0] in public java.lang.String com.aifeng.controller.UserController.insert(com.aifeng.pojo.User): [Field error in object 'user' on field 'birthday': rejected value [1990-11-20]; codes [typeMismatch.user.birthday,typeMismatch.birthday,typeMismatch.java.util.Date,typeMismatch]; arguments [org.springframework.context.support.DefaultMessageSourceResolvable: codes [user.birthday,birthday]; arguments []; default message [birthday]]; default message [Failed to convert property value of type 'java.lang.String' to required type 'java.util.Date' for property 'birthday'; Failed to convert from type [java.lang.String] to type [java.util.Date] for value [1990-11-20]]] ]
20242024-01-13T15:48:47.119+08:00  WARN 16876 --- [nio-8090-exec-1] .w.s.m.s.DefaultHandlerExceptionResolver : Resolved [org.springframework.web.bind.MethodArgumentNotValidException: Validation failed for argument [0] in public java.lang.String com.aifeng.controller.UserController.insert(com.aifeng.pojo.User): [Field error in object 'user' on field 'birthday': rejected value [1990-11-20]; codes [typeMismatch.user.birthday,typeMismatch.birthday,typeMismatch.java.util.Date,typeMismatch]; arguments [org.springframework.context.support.DefaultMessageSourceResolvable: codes [user.birthday,birthday]; arguments []; default message [birthday]]; default message [Failed to convert property value of type 'java.lang.String' to required type 'java.util.Date' for property 'birthday'; Failed to convert from type [java.lang.String] to type [java.util.Date] for value [1990-11-20]]] ]
原因:
在Java中如果没有对日期进行处理的话,默认格式类似于Fri Dec 20 00:00:00 CST 2013这样,而为我们现在要保存的日期格式为yyyy-MM-dd所以会转换错误
解决方法:
使用@DateTimeFormat注解进行日期格式的转换
    /**
     * 生日
     */
    @DateTimeFormat(pattern = "yyyy-MM-dd")//使用@DateTimeFormat注解进行日期格式的转换
    private Date birthday;
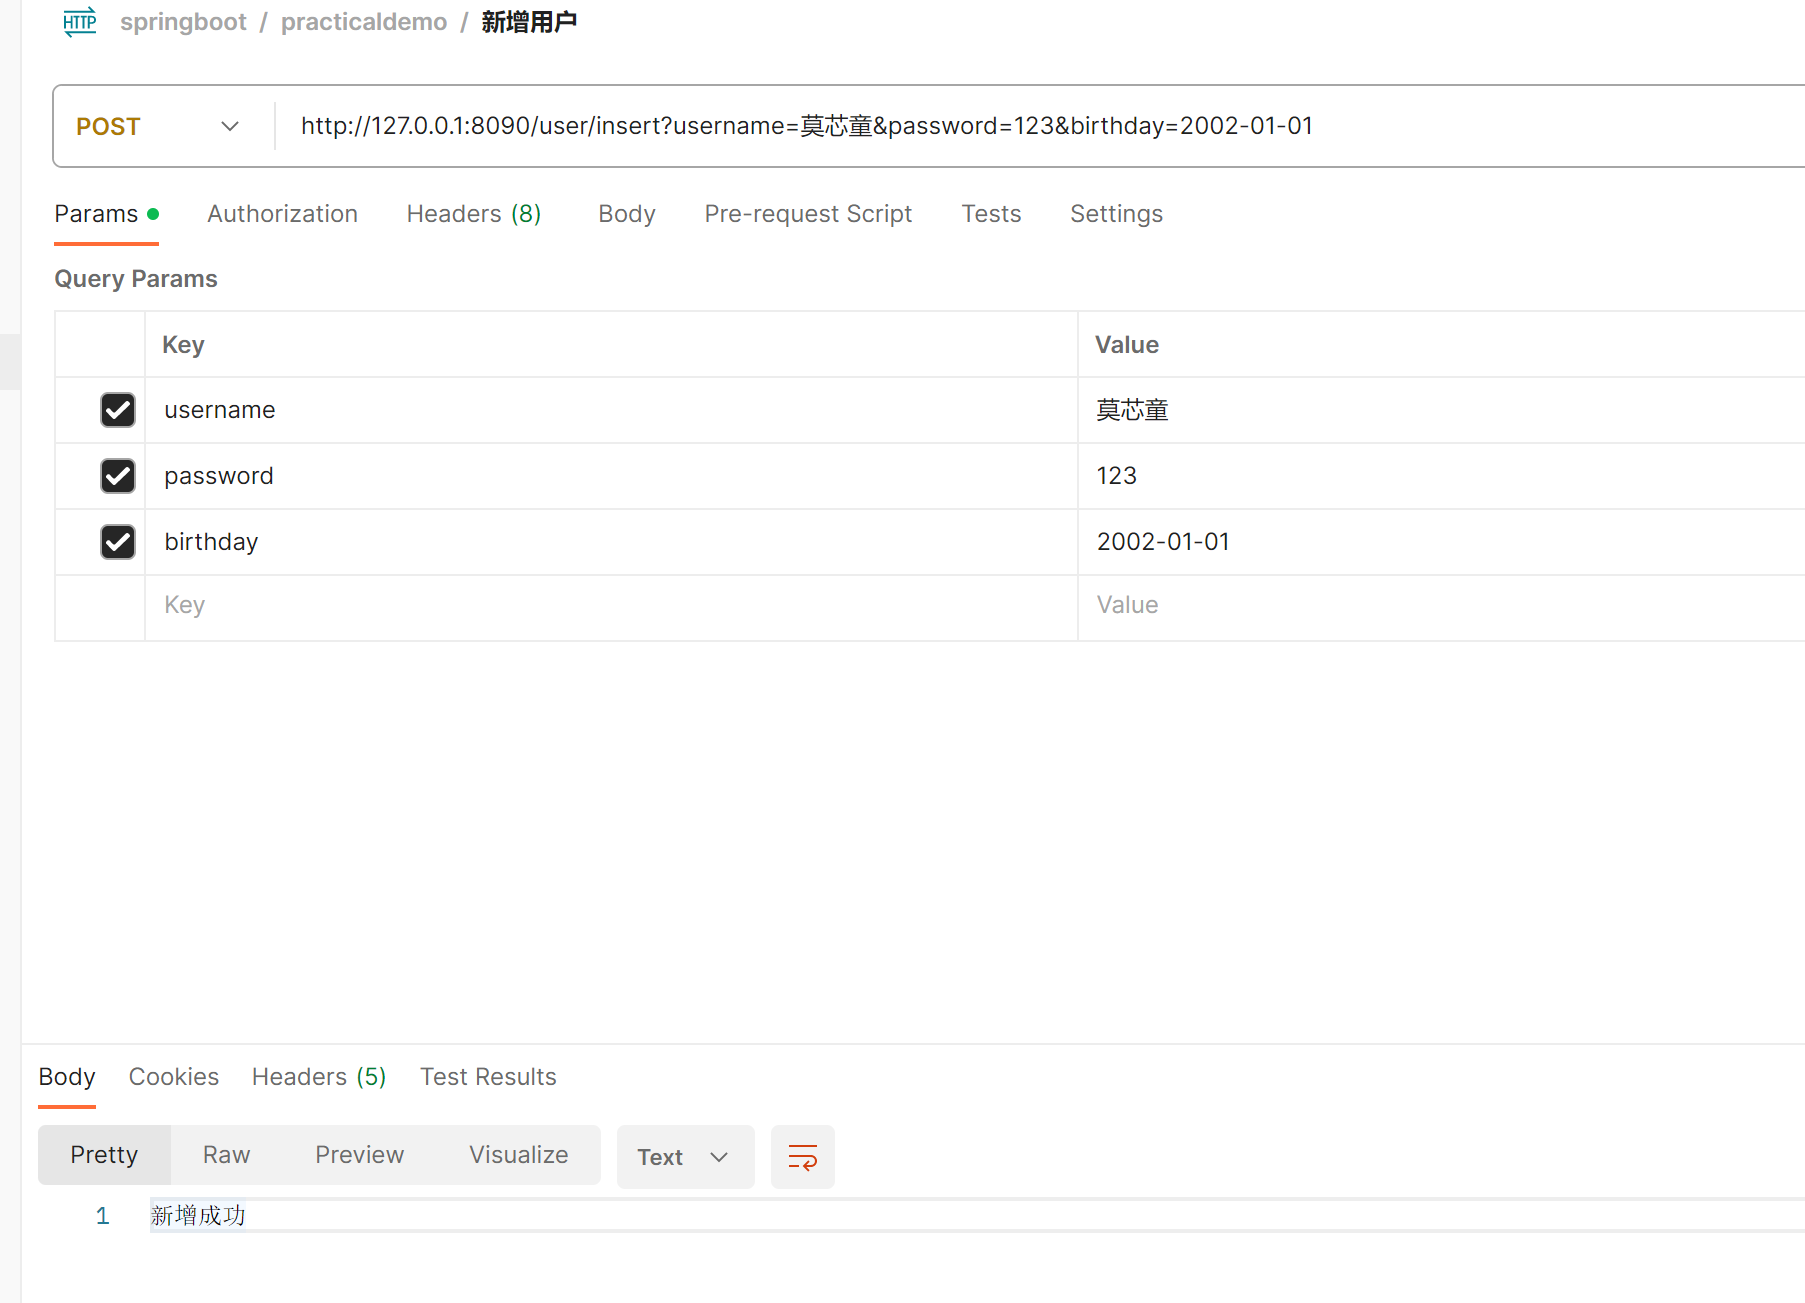
postman测试
post 地址:http://127.0.0.1:8090/user/insert?username=moxintong&password=123&birthday=2002-01-01

-
删除
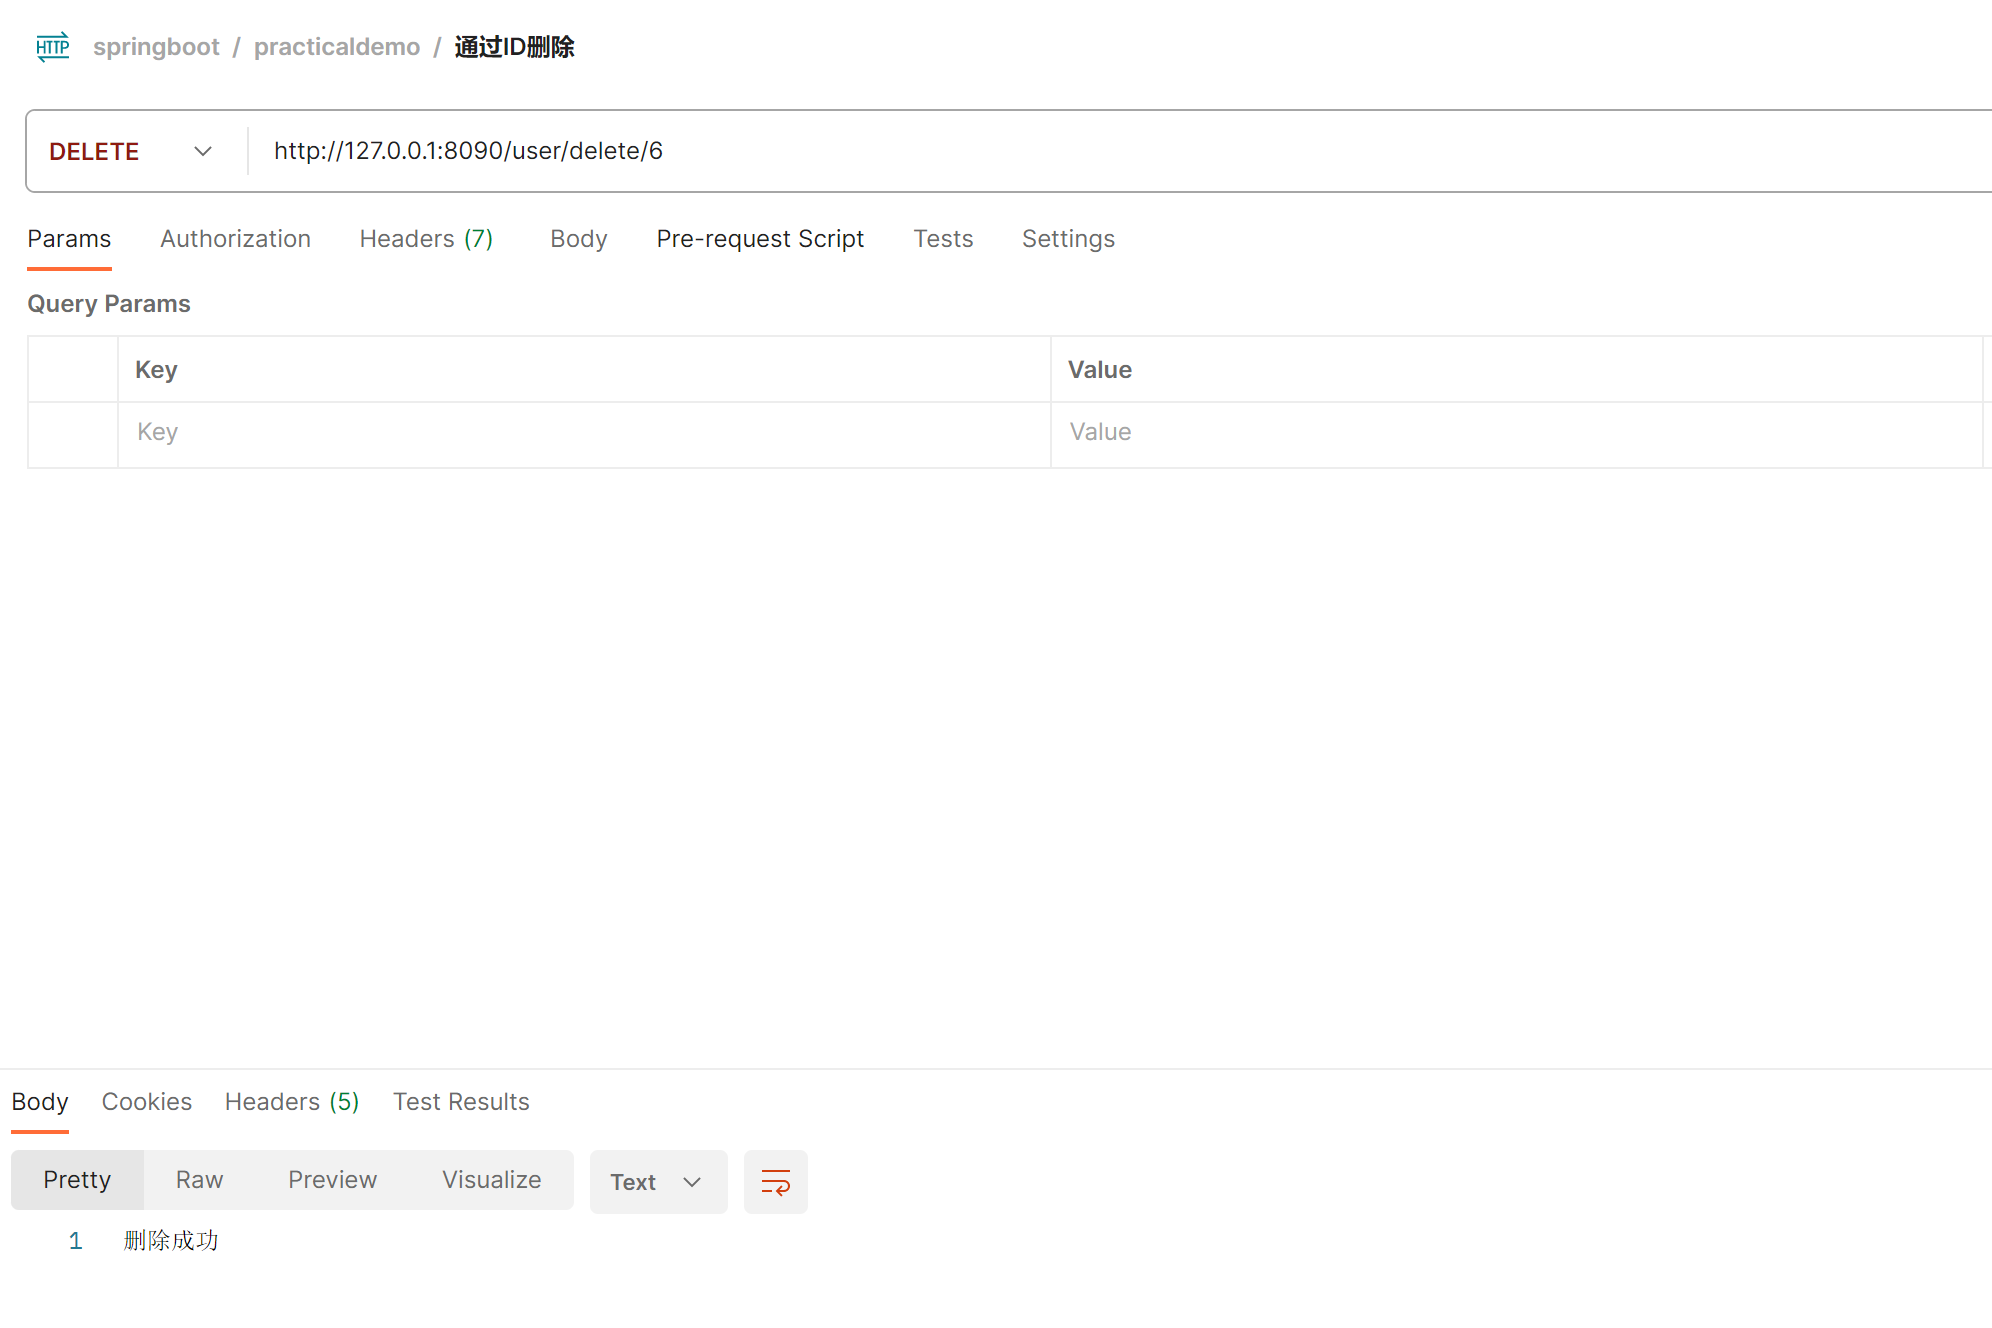
delete地址:http://127.0.0.1:8090/user/delete/6
    /**
     * 删除
     * @param id
     * @return
     */
    @DeleteMapping("/delete/{id}")
    public String delete(@PathVariable Integer id){
        userService.deleteById(id);
        return "删除成功";
    }
- 更新
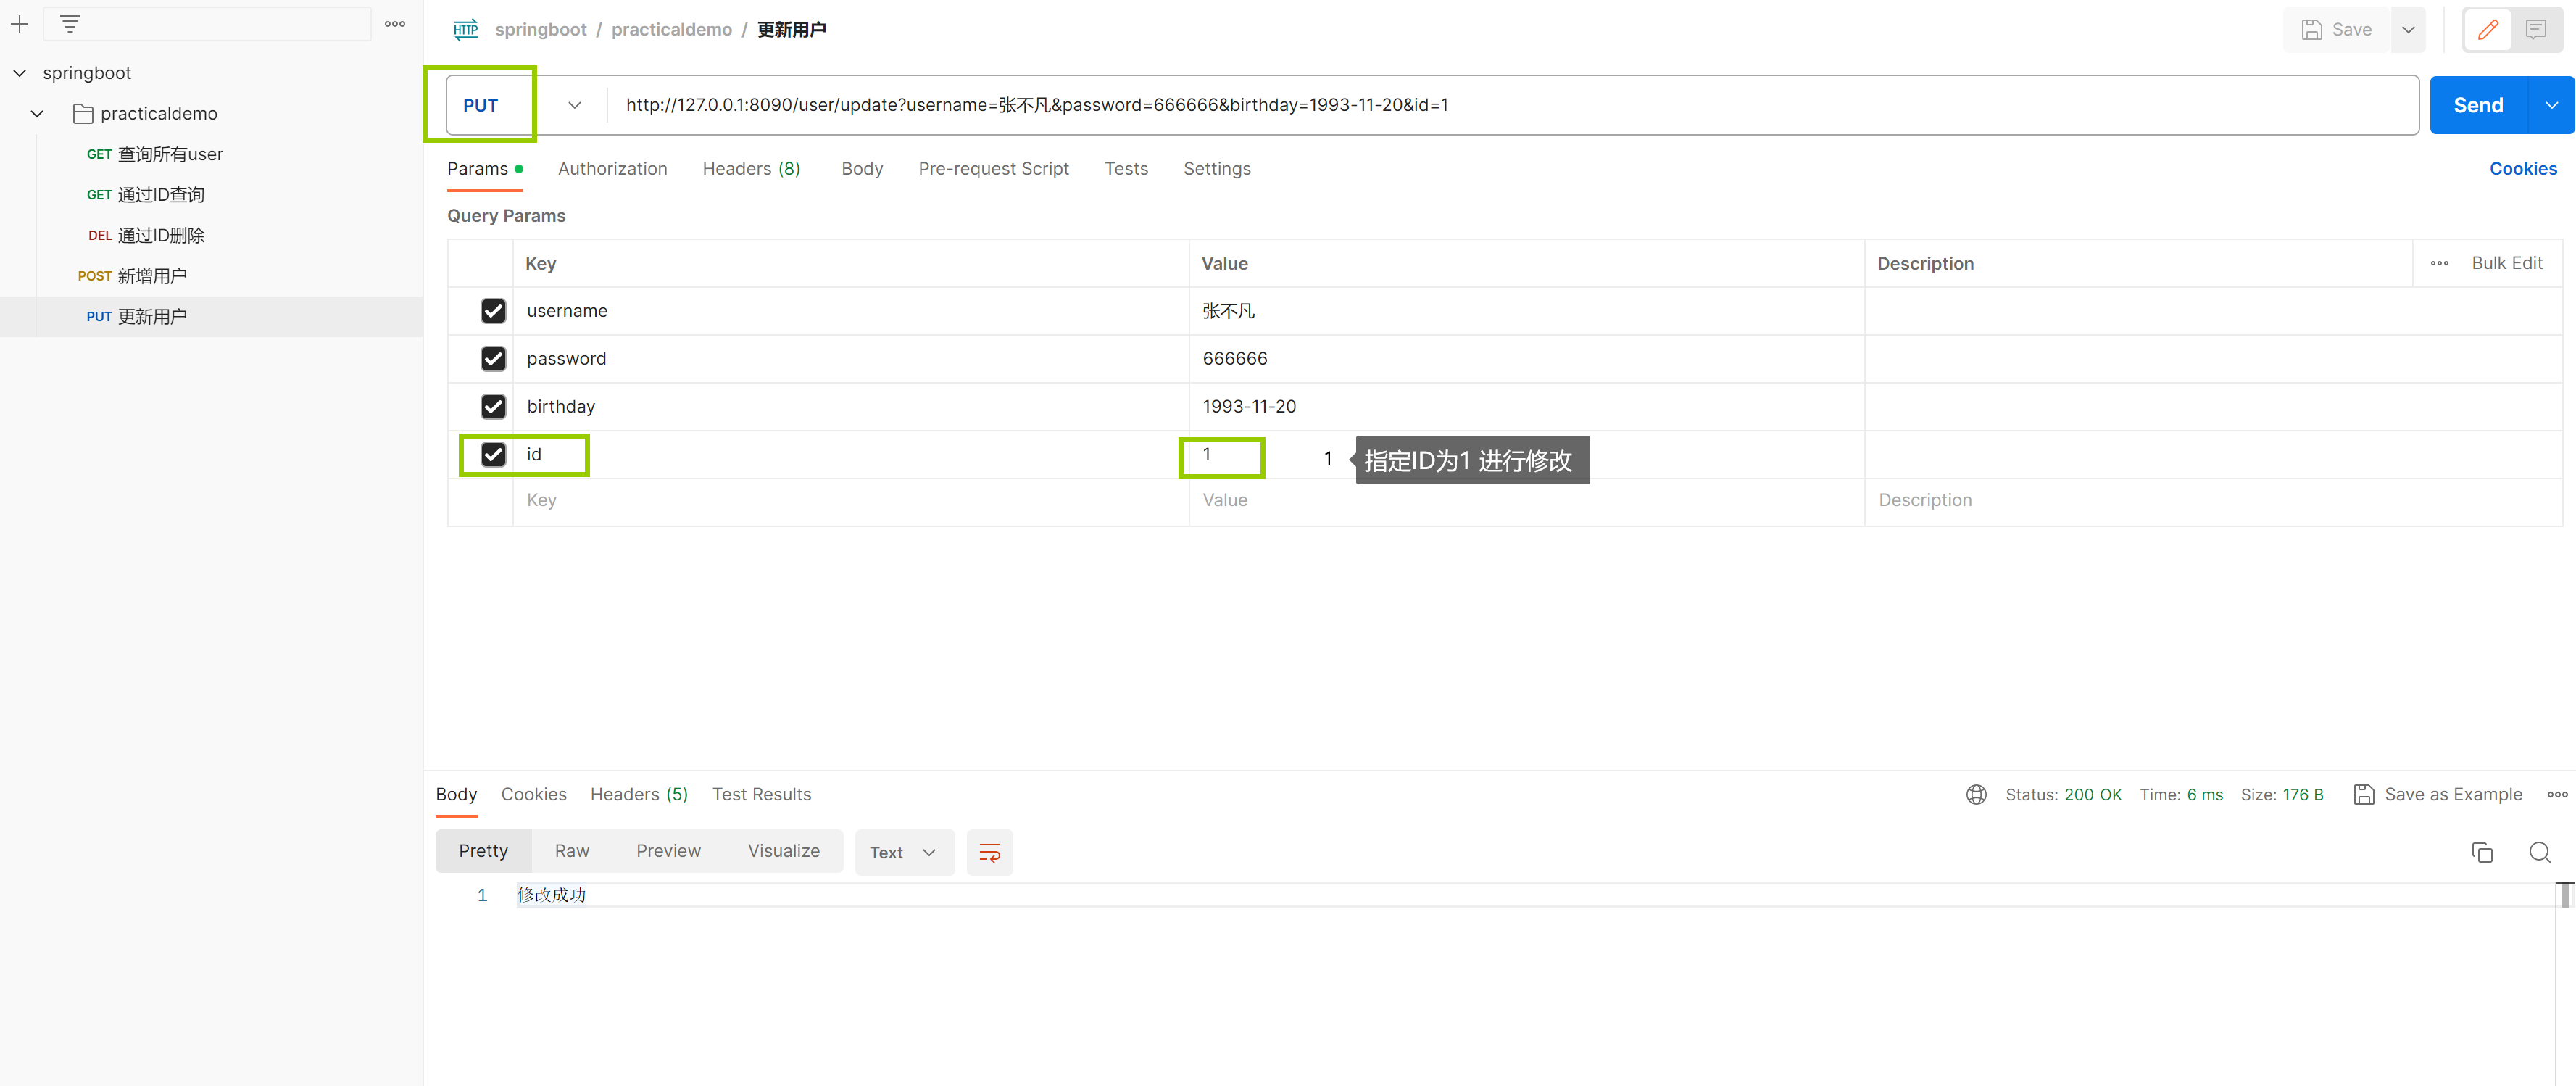
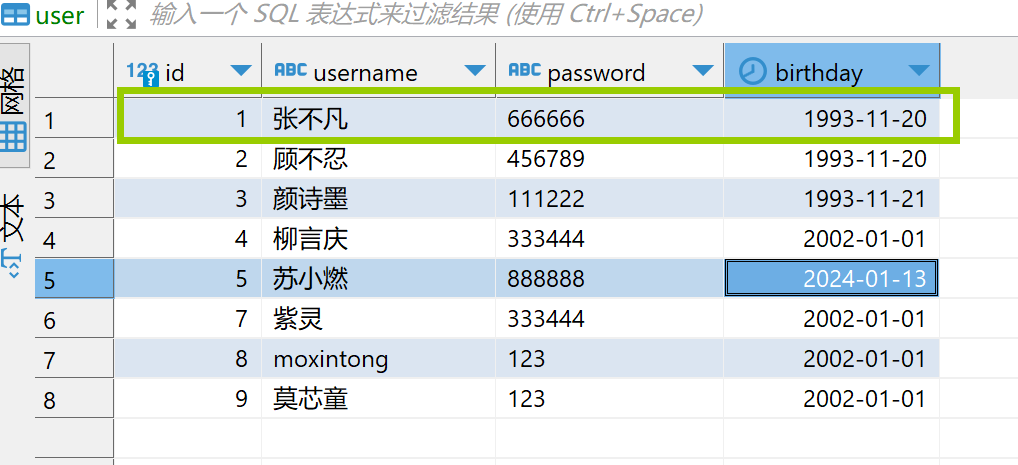
put 地址:http://127.0.0.1:8090/user/update?username=张不凡&password=666666&birthday=1993-11-20&id=1
    /**
     * 删除
     * @param user
     * @return
     */
    @PutMapping("/update")
    public String update(User user){
        userService.update(user);
        return "修改成功";
    }
测试
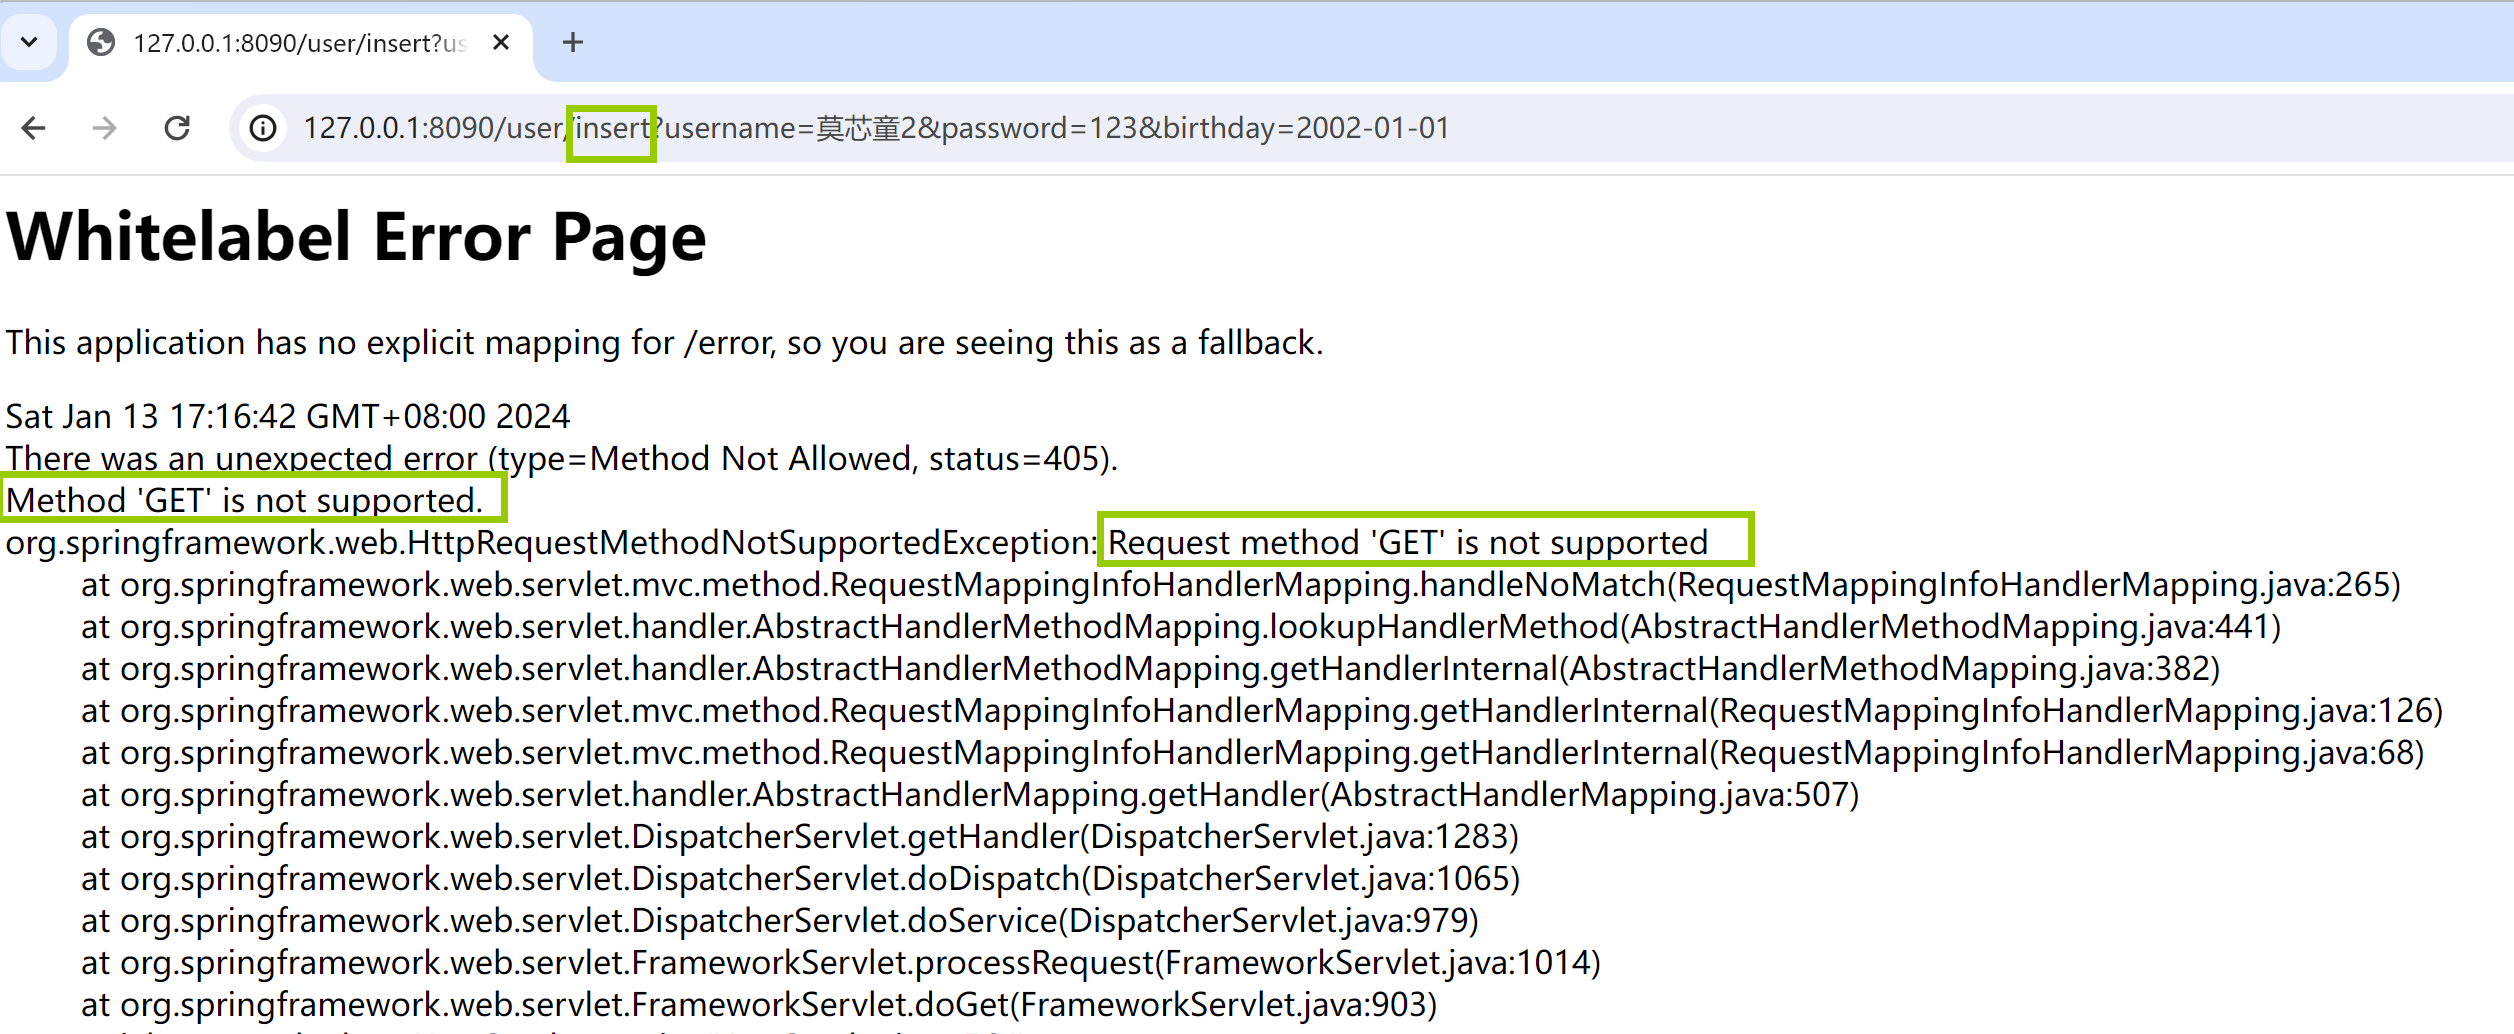
总结:测试的时候用postman进行测试,因为浏览器只支持 get请求的测试,不支持其他方式的请求
如用浏览器测试post请求,提示 : Method 'GET' is not supported.
即:请求的方法 ‘get’ 是不支持的
20.SpringBoot项目部署
使用mvn打包依赖
    <build>
        <plugins>
            <plugin>
                <groupId>org.springframework.boot</groupId>
                <artifactId>spring-boot-maven-plugin</artifactId> <!--打jar包时如果不配置该插件,打出来的jar包没有清单文件-->
                <configuration>
                    <excludes>
                        <exclude>
                            <groupId>org.projectlombok</groupId>
                            <artifactId>lombok</artifactId>
                        </exclude>
                    </excludes>
                </configuration>
            </plugin>
        </plugins>
    </build>
idea集成开发环境,maven打包及jar包存放的位置
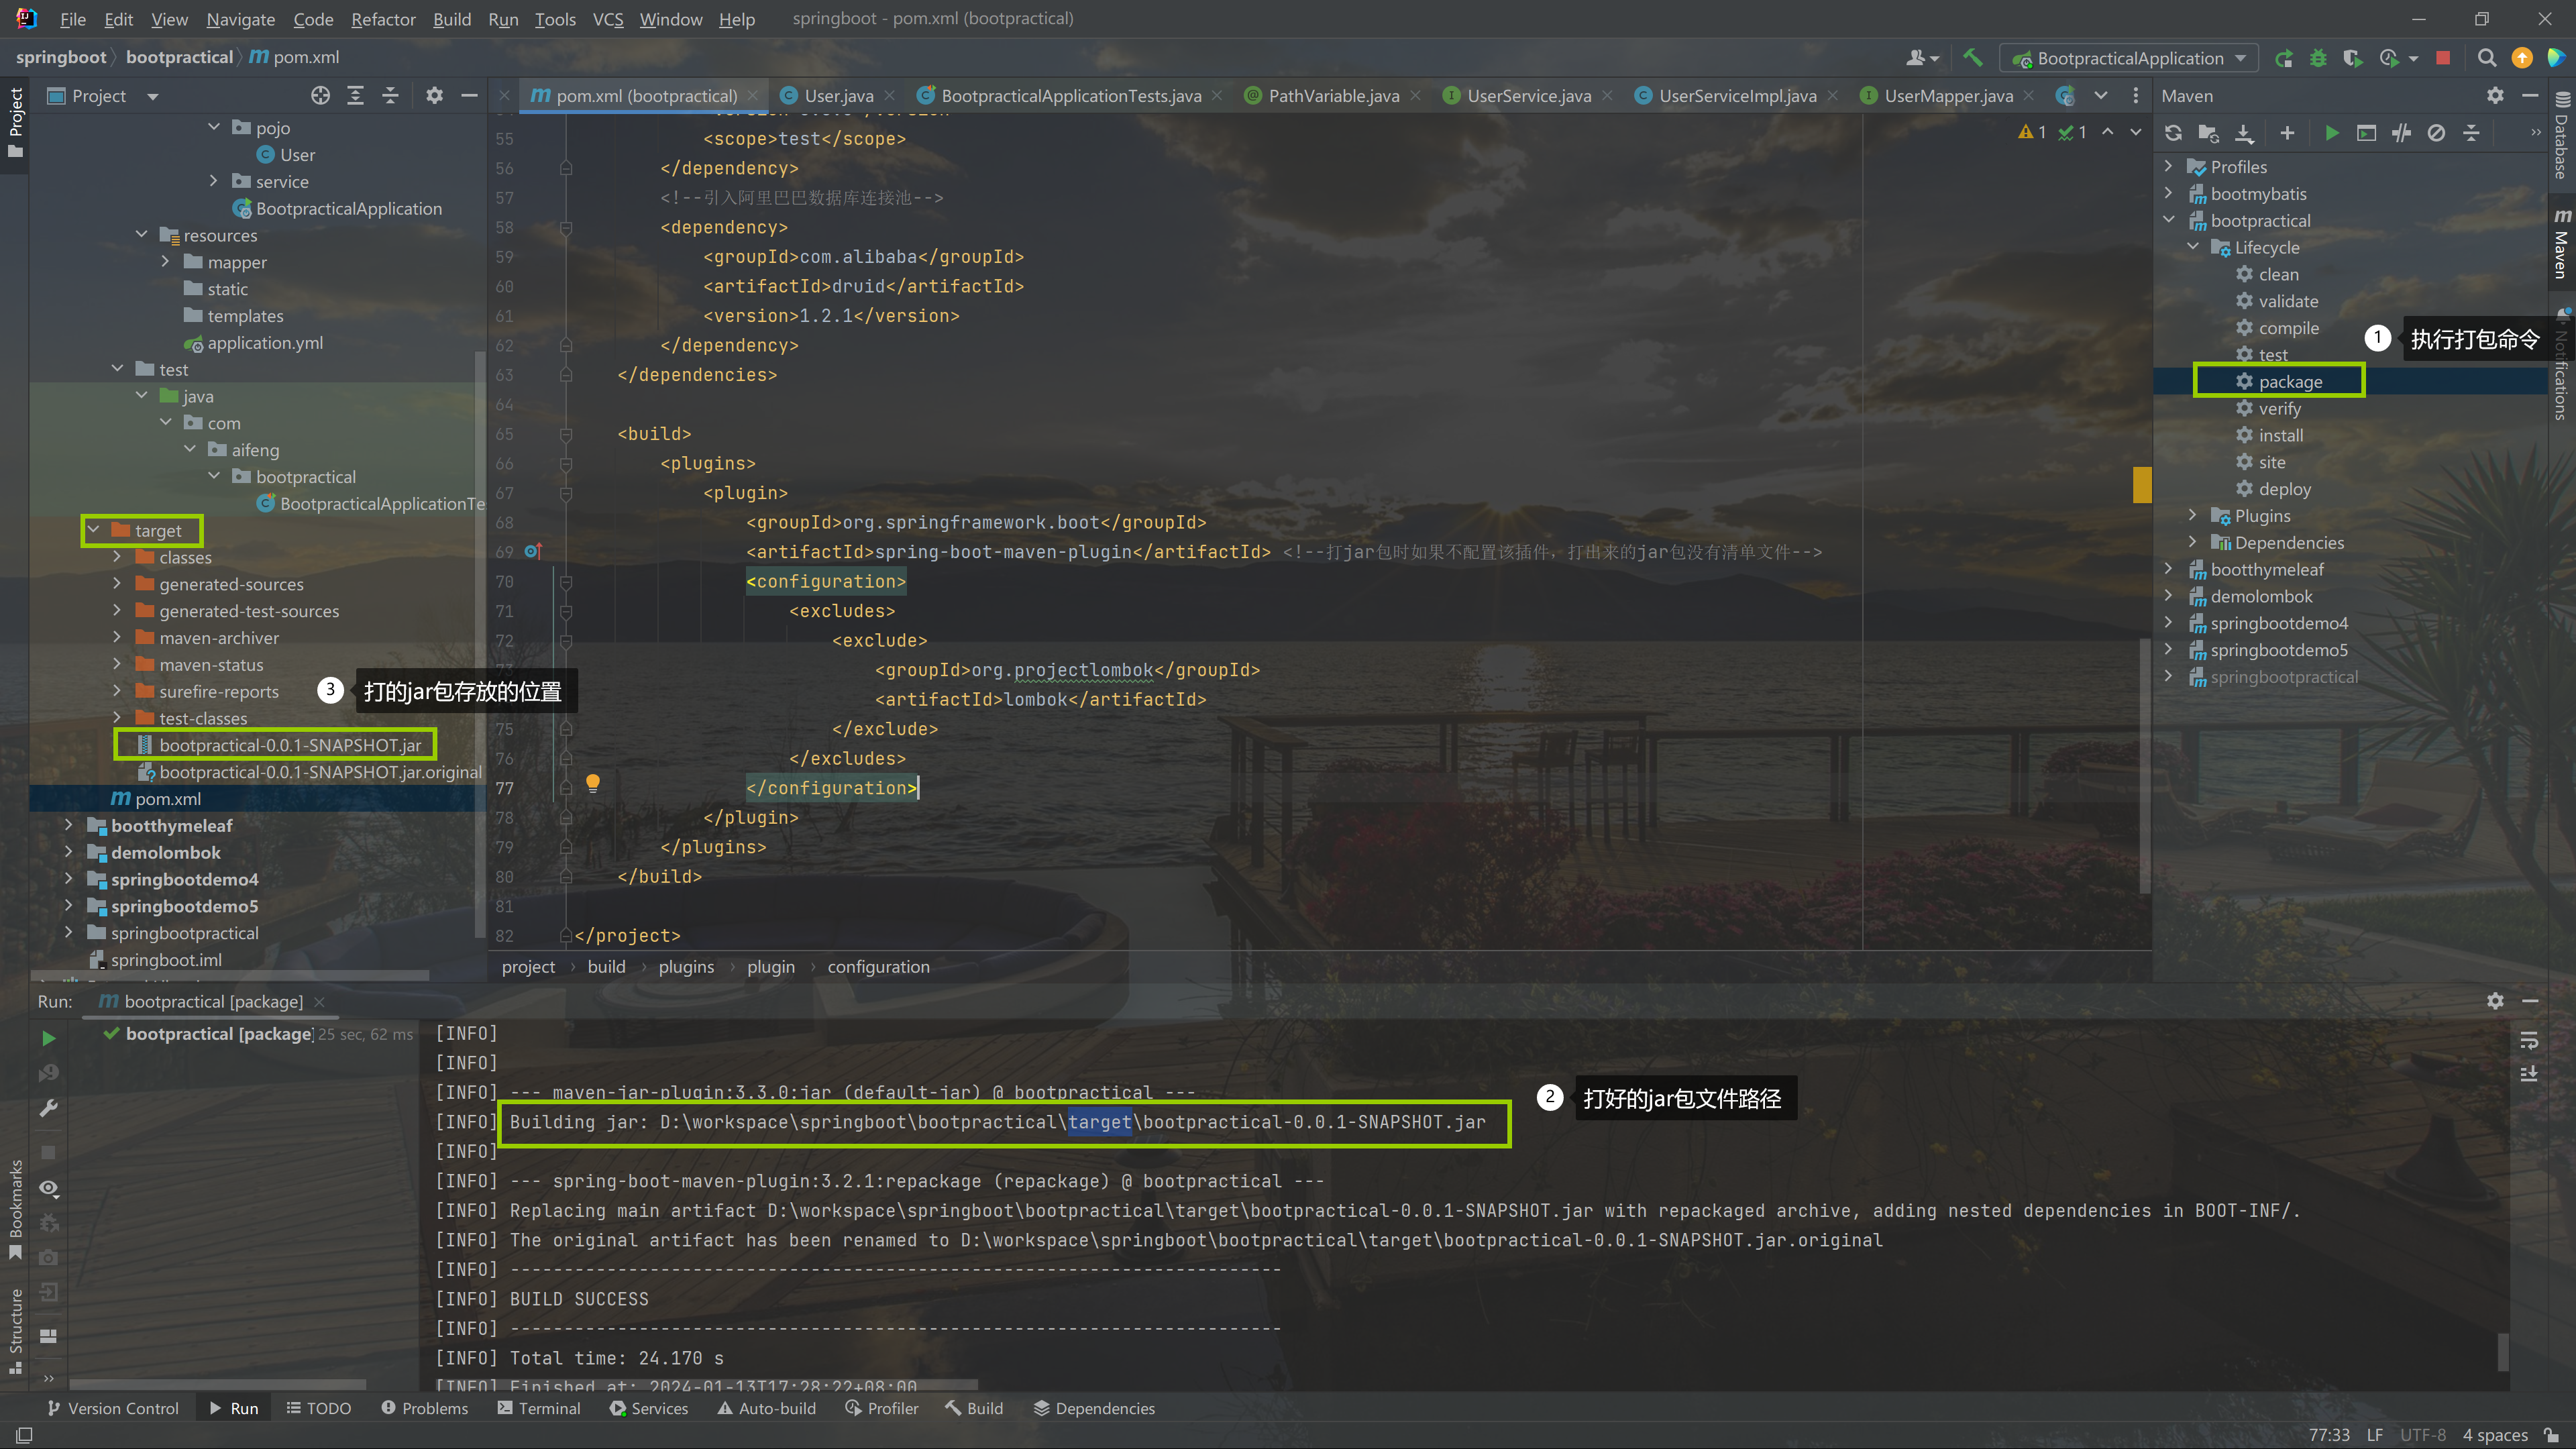
项目所运行的所有依赖都打包到 这个jar包中
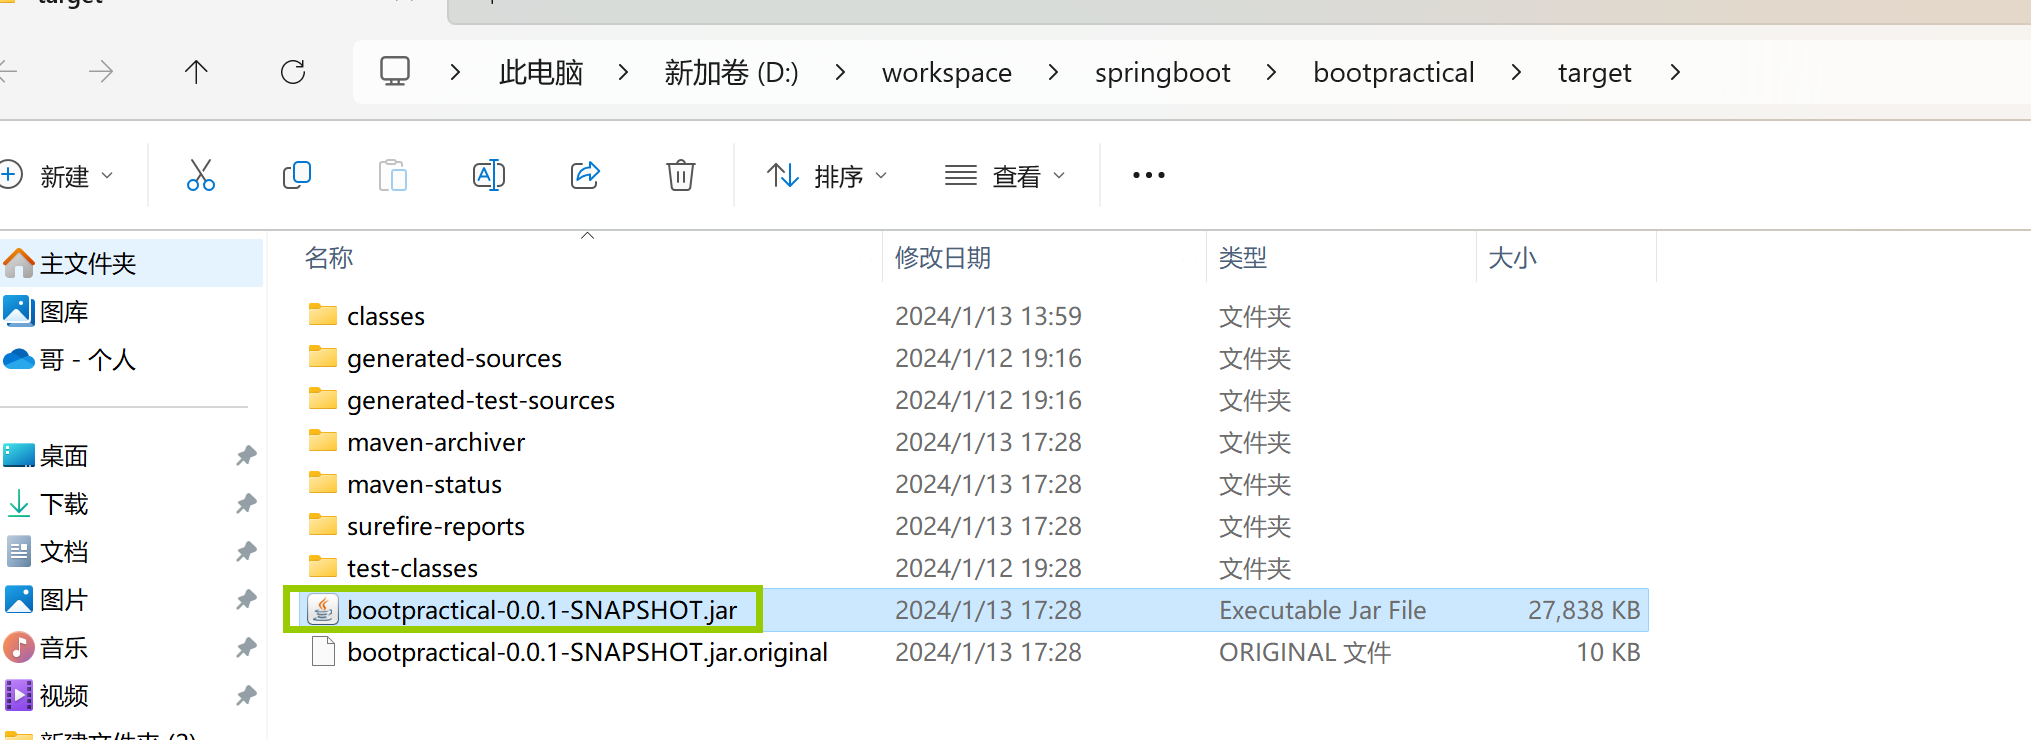
运行jar包命令
java 类名 : 是运行这个类
java -jar 包名:是运行包
java -jar 包名
使用cmd命令方式:

提示 Java 运行编译的版本不匹配:项目运行的版本为 jdk 21
cmd查看系统运行的Java版本为:Java11 ,查看之前环境变量配置过 jdk的版本为21 ,可能是配置没生效,因为在配置环境变量时,JAVA_HOME 的路径是复制过去的,考虑到可能是没有手动选择去触发路径生效,所有手动 浏览目录 选择 jdk_21 文件夹,然后cmd测试配置生效(刚开始以为是没有管理员运行,然后管理员运行之后是 jdk 21,这个时候我已经手动选择过目录文件夹了,然后再进行cmd测试,已经显示是jdk21了,应该手动触发之前,先看一下,管理员运行是个什么结果,然后再进行手动触发,这样就可以判断是不是管理员运行的影响了!!! )
Microsoft Windows [版本 10.0.22621.3007]
(c) Microsoft Corporation。保留所有权利。

D:\workspace\springboot\bootpractical\target>java -jar bootpractical-0.0.1-SNAPSHOT.jar
错误: 加载主类 org.springframework.boot.loader.launch.JarLauncher 时出现 LinkageError
        java.lang.UnsupportedClassVersionError: org/springframework/boot/loader/launch/JarLauncher has been compiled by a more recent version of the Java Runtime (class file version 61.0), this version of the Java Runtime only recognizes class file versions up to 55.0

D:\workspace\springboot\bootpractical\target>

cmd 执行jar包测试
提示: Web server failed to start. Port 8090 was already in use.
8090端口被占用,停掉本地idea 运行的springboot项目 然后再进行测试,查看运行成功
Microsoft Windows [版本 10.0.22621.3007]
(c) Microsoft Corporation。保留所有权利。

D:\workspace\springboot\bootpractical\target>java -jar bootpractical-0.0.1-SNAPSHOT.jar

  .   ____          _            __ _ _
 /\\ / ___'_ __ _ _(_)_ __  __ _ \ \ \ \
( ( )\___ | '_ | '_| | '_ \/ _` | \ \ \ \
 \\/  ___)| |_)| | | | | || (_| |  ) ) ) )
  '  |____| .__|_| |_|_| |_\__, | / / / /
 =========|_|==============|___/=/_/_/_/
 :: Spring Boot ::                (v3.2.1)

2024-01-13T18:23:10.206+08:00  INFO 29472 --- [           main] com.aifeng.BootpracticalApplication      : Starting BootpracticalApplication using Java 21.0.1 with PID 29472 (D:\workspace\springboot\bootpractical\target\bootpractical-0.0.1-SNAPSHOT.jar started by 18221 in D:\workspace\springboot\bootpractical\target)
2024-01-13T18:23:10.209+08:00  INFO 29472 --- [           main] com.aifeng.BootpracticalApplication      : No active profile set, falling back to 1 default profile: "default"
2024-01-13T18:23:11.297+08:00  INFO 29472 --- [           main] o.s.b.w.embedded.tomcat.TomcatWebServer  : Tomcat initialized with port 8090 (http)
2024-01-13T18:23:11.306+08:00  INFO 29472 --- [           main] o.apache.catalina.core.StandardService   : Starting service [Tomcat]
2024-01-13T18:23:11.306+08:00  INFO 29472 --- [           main] o.apache.catalina.core.StandardEngine    : Starting Servlet engine: [Apache Tomcat/10.1.17]
2024-01-13T18:23:11.331+08:00  INFO 29472 --- [           main] o.a.c.c.C.[Tomcat].[localhost].[/]       : Initializing Spring embedded WebApplicationContext
2024-01-13T18:23:11.332+08:00  INFO 29472 --- [           main] w.s.c.ServletWebServerApplicationContext : Root WebApplicationContext: initialization completed in 1053 ms
2024-01-13T18:23:11.980+08:00  WARN 29472 --- [           main] ConfigServletWebServerApplicationContext : Exception encountered during context initialization - cancelling refresh attempt: org.springframework.context.ApplicationContextException: Failed to start bean 'webServerStartStop'
2024-01-13T18:23:11.981+08:00  INFO 29472 --- [           main] com.alibaba.druid.pool.DruidDataSource   : {dataSource-0} closing ...
2024-01-13T18:23:12.091+08:00  INFO 29472 --- [           main] .s.b.a.l.ConditionEvaluationReportLogger :

Error starting ApplicationContext. To display the condition evaluation report re-run your application with 'debug' enabled.
2024-01-13T18:23:12.108+08:00 ERROR 29472 --- [           main] o.s.b.d.LoggingFailureAnalysisReporter   :

***************************
APPLICATION FAILED TO START
***************************

Description:

Web server failed to start. Port 8090 was already in use.

Action:

Identify and stop the process that's listening on port 8090 or configure this application to listen on another port.


D:\workspace\springboot\bootpractical\target>
windows:
D:\workspace\springboot\bootpractical\target>java -jar bootpractical-0.0.1-SNAPSHOT.jar
D:\workspace\springboot\bootpractical\target>java -jar bootpractical-0.0.1-SNAPSHOT.jar

  .   ____          _            __ _ _
 /\\ / ___'_ __ _ _(_)_ __  __ _ \ \ \ \
( ( )\___ | '_ | '_| | '_ \/ _` | \ \ \ \
 \\/  ___)| |_)| | | | | || (_| |  ) ) ) )
  '  |____| .__|_| |_|_| |_\__, | / / / /
 =========|_|==============|___/=/_/_/_/
 :: Spring Boot ::                (v3.2.1)

2024-01-13T18:27:16.303+08:00  INFO 25108 --- [           main] com.aifeng.BootpracticalApplication      : Starting BootpracticalApplication using Java 21.0.1 with PID 25108 (D:\workspace\springboot\bootpractical\target\bootpractical-0.0.1-SNAPSHOT.jar started by 18221 in D:\workspace\springboot\bootpractical\target)
2024-01-13T18:27:16.304+08:00  INFO 25108 --- [           main] com.aifeng.BootpracticalApplication      : No active profile set, falling back to 1 default profile: "default"
2024-01-13T18:27:17.319+08:00  INFO 25108 --- [           main] o.s.b.w.embedded.tomcat.TomcatWebServer  : Tomcat initialized with port 8090 (http)
2024-01-13T18:27:17.338+08:00  INFO 25108 --- [           main] o.apache.catalina.core.StandardService   : Starting service [Tomcat]
2024-01-13T18:27:17.338+08:00  INFO 25108 --- [           main] o.apache.catalina.core.StandardEngine    : Starting Servlet engine: [Apache Tomcat/10.1.17]
2024-01-13T18:27:17.363+08:00  INFO 25108 --- [           main] o.a.c.c.C.[Tomcat].[localhost].[/]       : Initializing Spring embedded WebApplicationContext
2024-01-13T18:27:17.368+08:00  INFO 25108 --- [           main] w.s.c.ServletWebServerApplicationContext : Root WebApplicationContext: initialization completed in 993 ms
2024-01-13T18:27:18.038+08:00  INFO 25108 --- [           main] o.s.b.w.embedded.tomcat.TomcatWebServer  : Tomcat started on port 8090 (http) with context path ''
2024-01-13T18:27:18.049+08:00  INFO 25108 --- [           main] com.aifeng.BootpracticalApplication      : Started BootpracticalApplication in 2.144 seconds (process running for 2.542)
postman执行查询用户测试,成功返回
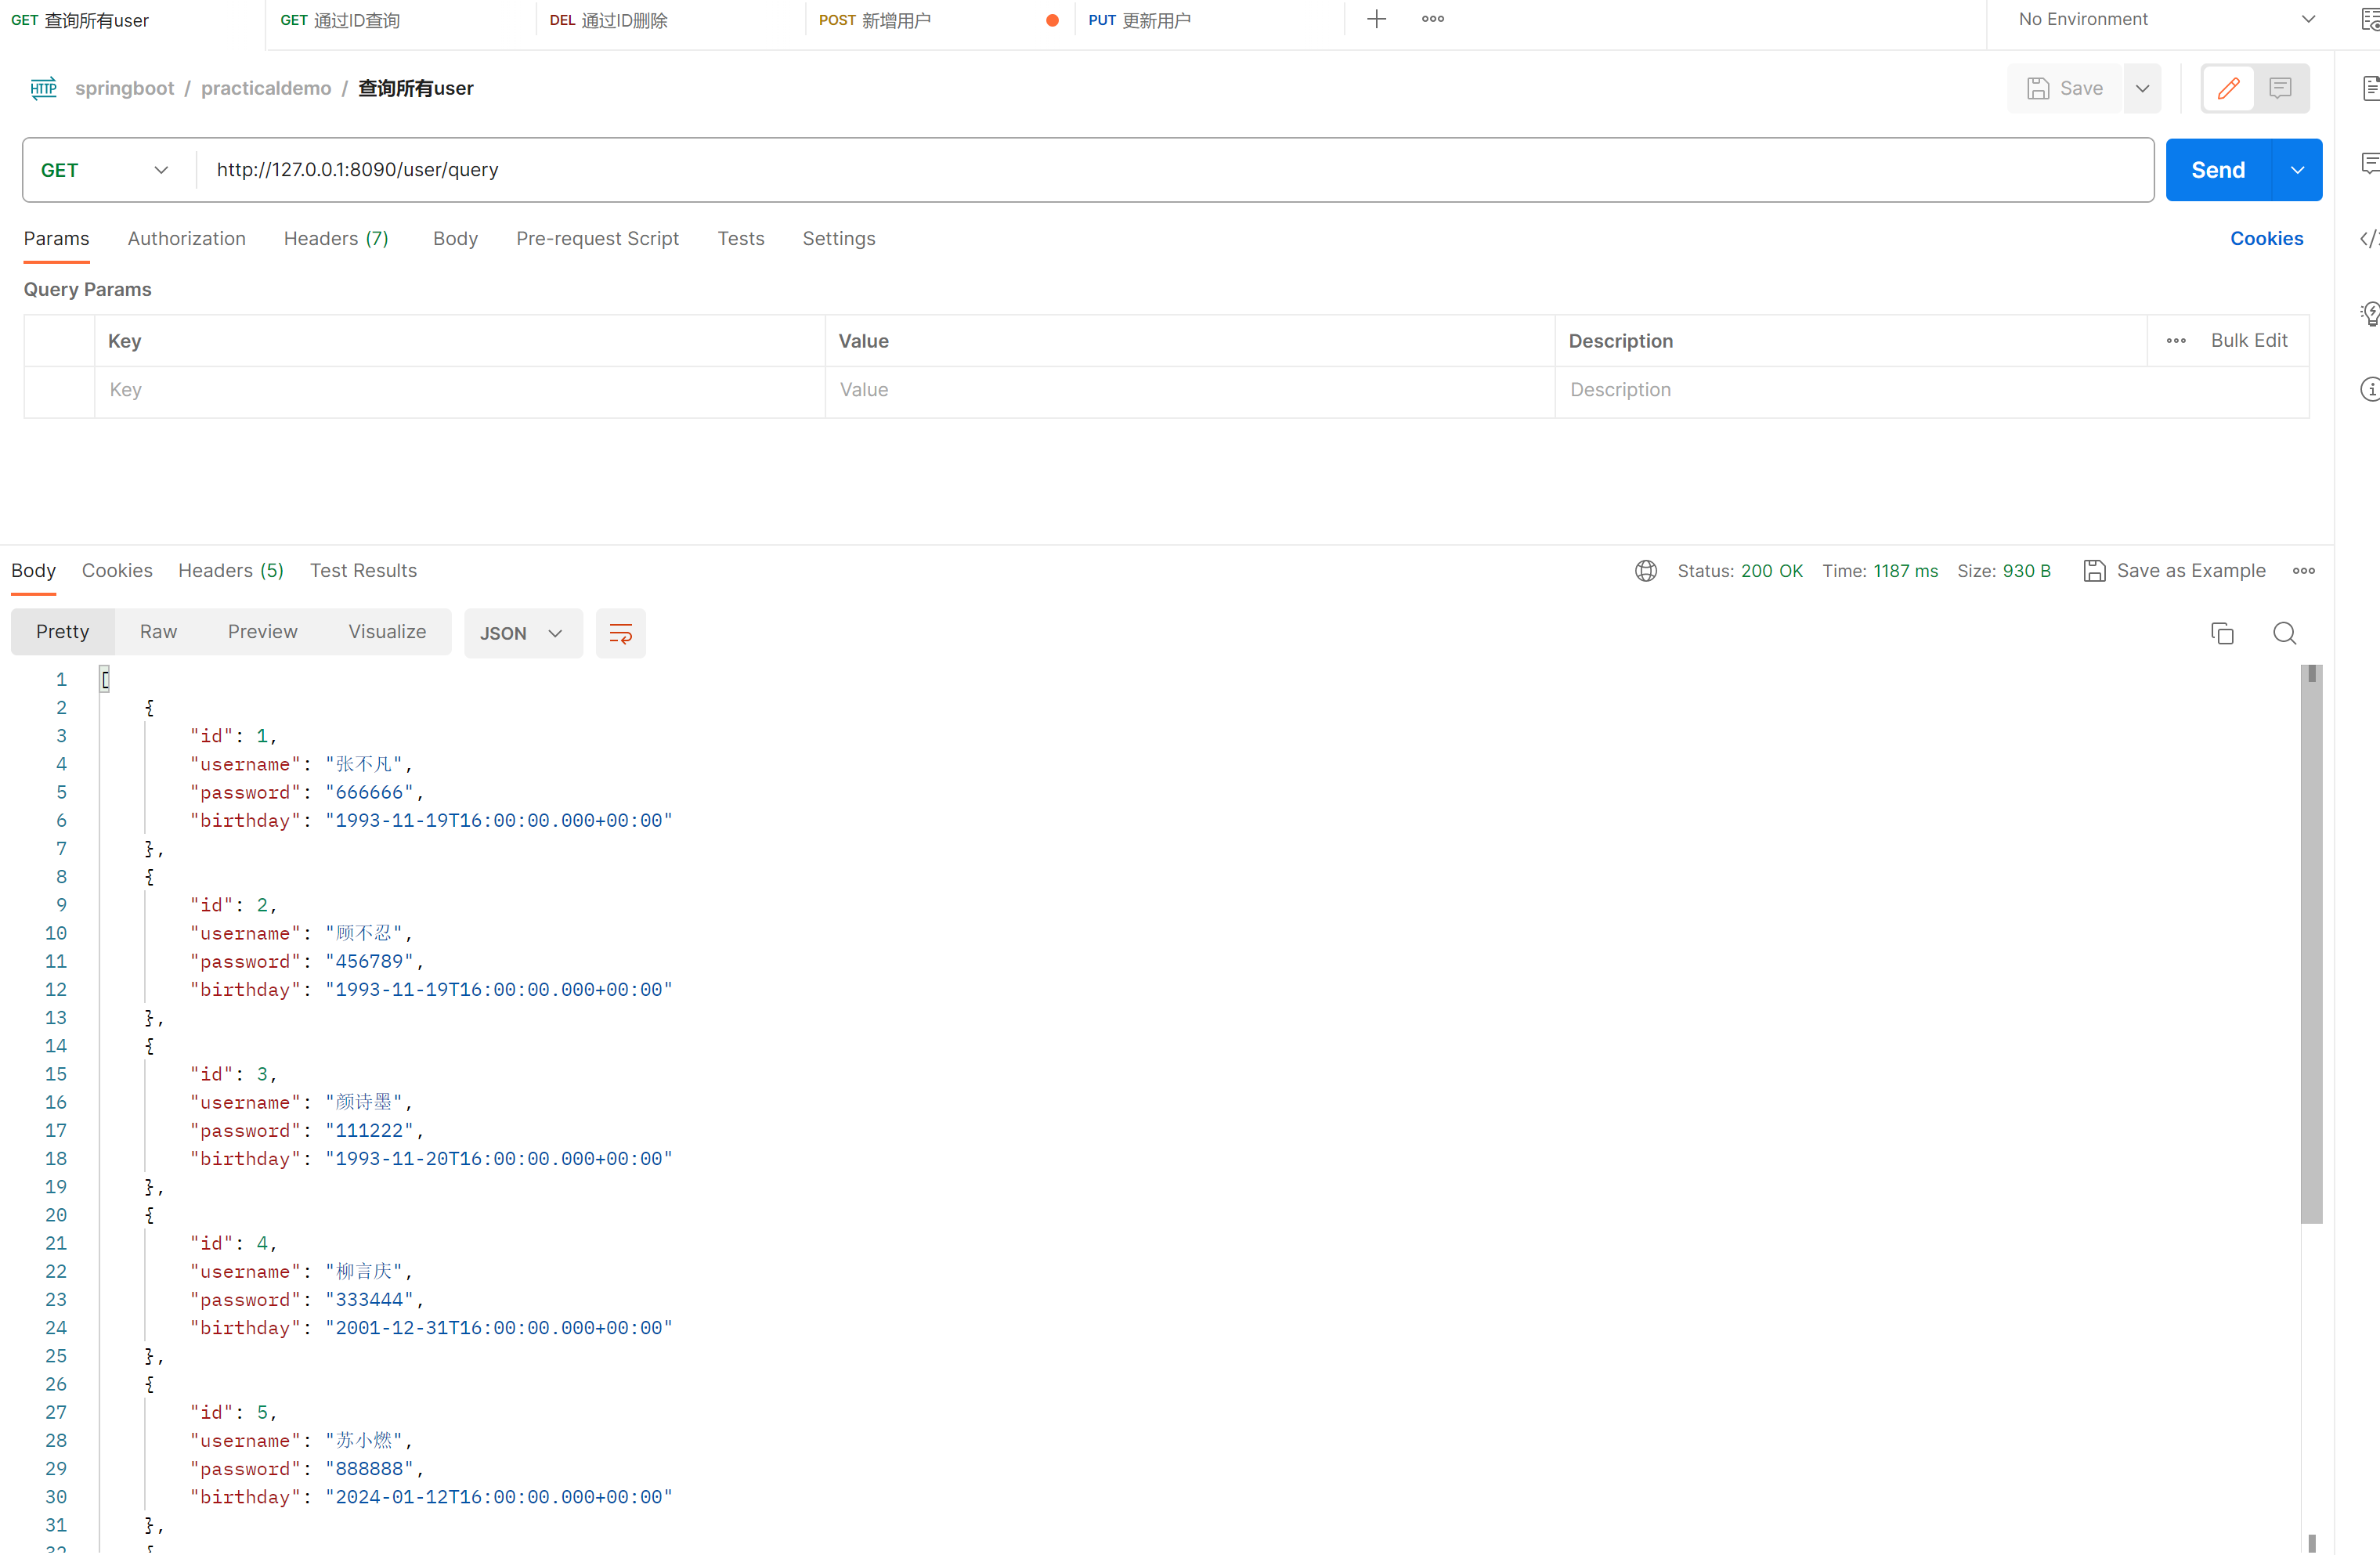
21.springboot 自测
阶段九模块一任务二: SpringBoot原理剖析及高级实战
共3道,答对3题
100
总分100分
-
1. 单选题SpringBoot和Mybatis整合时,需要扫描Mapper层,使用的注解是[单选题] *(30分)
A@MapperScan("com.lagou.mapper")- B@Scan(“com.lagou.mapper”)
- C@RepositoryScan(“com.lagou.mapper”)
- D@Repository(“com.lagou.mapper”)
 回答正确 +30分
答案解析
解析:@MapperScan作用:指定要变成实现类的接口所在的包,然后包下面的所有接口在编译之后都会生成相应的实现类,添加位置:是在Springboot启动类上面添加。
-
2. 单选题SpringBoot和Mybatis整合时,如何开启自动驼峰命名规则映射[单选题] *(35分)
- A
mybatis.configuration.map-underscore-to-camel-case: true - Bspring.mybatis.configuration.map-underscore-to-camel-case: true
- Cmybatis.configuration.camel-case: true
- Dspring.mybatis.configuration.camel-case: true
 回答正确 +35分
答案解析
解析:springboot开启mybatis驼峰命名匹配映射:mybatis.configuration.map-underscore-to-camel-case=true,该属性在org.apache.ibatis.session.Configuration中,Mybatis提供。
- A
-
3. 单选题SpringBoot以Jar文件格式进行项目部署,打包的命令是:[单选题] *(35分)
- AA.maven validate
- BB.maven deploy
- CC.maven compile
- DD.
maven package
 回答正确 +35分
答案解析
解析:mvn package依次执行了resources、compile、testResources、testCompile、test、jar(打包)等7个阶段。
024-01-13T18:27:17.319+08:00 INFO 25108 — [ main] o.s.b.w.embedded.tomcat.TomcatWebServer : Tomcat initialized with port 8090 (http)
2024-01-13T18:27:17.338+08:00 INFO 25108 — [ main] o.apache.catalina.core.StandardService : Starting service [Tomcat]
2024-01-13T18:27:17.338+08:00 INFO 25108 — [ main] o.apache.catalina.core.StandardEngine : Starting Servlet engine: [Apache Tomcat/10.1.17]
2024-01-13T18:27:17.363+08:00 INFO 25108 — [ main] o.a.c.c.C.[Tomcat].[localhost].[/] : Initializing Spring embedded WebApplicationContext
2024-01-13T18:27:17.368+08:00 INFO 25108 — [ main] w.s.c.ServletWebServerApplicationContext : Root WebApplicationContext: initialization completed in 993 ms
2024-01-13T18:27:18.038+08:00 INFO 25108 — [ main] o.s.b.w.embedded.tomcat.TomcatWebServer : Tomcat started on port 8090 (http) with context path ‘’
2024-01-13T18:27:18.049+08:00 INFO 25108 — [ main] com.aifeng.BootpracticalApplication : Started BootpracticalApplication in 2.144 seconds (process running for 2.542)
postman执行查询用户测试,成功返回

[外链图片转存中...(img-VdKTyhAg-1706022991069)]


##### 21.springboot 自测

阶段九模块一任务二: SpringBoot原理剖析及高级实战

共3道,答对3题

100[外链图片转存中...(img-MBbfCUdd-1706022991069)]

总分100分

- **1.** **单选题****SpringBoot和Mybatis整合时,需要扫描Mapper层,使用的注解是[单选题] \*****(30分)**

  - `A@MapperScan("com.lagou.mapper")`
  - B@Scan("com.lagou.mapper")
  - C@RepositoryScan("com.lagou.mapper")
  - D@Repository("com.lagou.mapper")

  [外链图片转存中...(img-o4XtvC5w-1706022991070)]回答正确 +30分

  答案解析

  解析:@MapperScan作用:指定要变成实现类的接口所在的包,然后包下面的所有接口在编译之后都会生成相应的实现类,添加位置:是在Springboot启动类上面添加。

- **2.** **单选题****SpringBoot和Mybatis整合时,如何开启自动驼峰命名规则映射[单选题] \*****(35分)**

  - A`mybatis.configuration.map-underscore-to-camel-case: true`
  - Bspring.mybatis.configuration.map-underscore-to-camel-case: true
  - Cmybatis.configuration.camel-case: true
  - Dspring.mybatis.configuration.camel-case: true

  [外链图片转存中...(img-E4mX0Qph-1706022991070)]回答正确 +35分

  答案解析

  解析:springboot开启mybatis驼峰命名匹配映射:mybatis.configuration.map-underscore-to-camel-case=true,该属性在org.apache.ibatis.session.Configuration中,Mybatis提供。

- **3.** **单选题****SpringBoot以Jar文件格式进行项目部署,打包的命令是:[单选题] \*****(35分)**

  - AA.maven validate
  - BB.maven deploy
  - CC.maven compile
  - DD.`maven package`

  [外链图片转存中...(img-UIE6b5M7-1706022991070)]回答正确 +35分

  答案解析

  解析:mvn package依次执行了resources、compile、testResources、testCompile、test、jar(打包)等7个阶段。
本文来自互联网用户投稿,该文观点仅代表作者本人,不代表本站立场。本站仅提供信息存储空间服务,不拥有所有权,不承担相关法律责任。 如若内容造成侵权/违法违规/事实不符,请联系我的编程经验分享网邮箱:chenni525@qq.com进行投诉反馈,一经查实,立即删除!
- Python教程
- 深入理解 MySQL 中的 HAVING 关键字和聚合函数
- Qt之QChar编码(1)
- MyBatis入门基础篇
- 用Python脚本实现FFmpeg批量转换
- 常微分方程数值解笔记-4
- 2024年职场利器:智能时代来临,每个人都需要了解的强大到离谱的20款AI工具!
- node 环境安装(M1 与 windows)
- DQL-分组查询以及WHERE与HAVING的区别
- ClassCastException(类转换异常)可能原因和解决方法
- 【别流口水】羡慕同学进了大厂核心部门,看懂这本书你也能行!
- springBoot容器功能
- 通过多组学调查揭示人类原发性和转移性脑肿瘤中T细胞表型多样性
- tcp/ip协议2实现的插图,数据结构5 (22 - 章)
- Node.js本地搭建简单页面小游戏