【刷题专栏—突破思维】栈和队列

前言:
本篇博客讲解有关栈及队列的习题:有效的括号、用队列实现栈、用栈实现队列、设计循环队列。
1. 有效的括号
题目链接:Leetcode 20. 有效的括号
题目介绍
给定一个只包括 ‘(’,‘)’,‘{’,‘}’,‘[’,‘]’ 的字符串 s ,判断字符串是否有效。
有效字符串需满足:
1.左括号必须用相同类型的右括号闭合。
2.左括号必须以正确的顺序闭合。
3.每个右括号都有一个对应的相同类型的左括号。
示例 1:
输入:s = “()”
输出:true
示例 2:
输入:s = “()[]{}”
输出:true
示例 3:
输入:s = “(]”
输出:false
这是一个典型的括号匹配问题,可以使用栈来解决。基本思路如下:
-
遍历字符串,对于每个字符:
- 如果是左括号(‘(’,‘{’,‘[’),将其压入栈。
- 如果是右括号(‘)’,‘}’,‘]’),则判断栈是否为空。
- 如果栈为空,说明没有匹配的左括号,返回 false。
- 如果栈不为空,弹出栈顶元素,并判断是否和当前右括号匹配。
- 如果匹配,继续遍历下一个字符。
- 如果不匹配,返回 false。
-
遍历完字符串后,检查栈是否为空。
- 如果栈为空,说明所有括号都匹配,返回 true。
- 如果栈不为空,说明有左括号没有匹配,返回 false。
代码实现:
// 定义栈元素的数据类型
typedef int STDataType;

// 定义栈结构体
typedef struct Stack {
    STDataType* a;   // 存储栈元素的数组
    int top;         // 标识栈顶
    int capacity;    // 容量
} ST;

// 初始化栈
void StackInit(ST* pst) {
    assert(pst);

    pst->a = NULL;
    pst->capacity = 0;
    pst->top = 0; // 指向栈顶下一个元素
}

// 销毁栈
void StackDestroy(ST* pst) {
    assert(pst);

    free(pst->a);
}

// 入栈
void StackPush(ST* pst, STDataType x) {
    assert(pst);

    // 如果栈满,进行动态扩容
    if (pst->top == pst->capacity) {
        int newcapacity = pst->capacity == 0 ? 4 : 2 * pst->capacity;
        STDataType* temp = realloc(pst->a, sizeof(STDataType) * newcapacity);
        if (temp == NULL) {
            perror("realloc fail");
            return;
        }

        pst->a = temp;
        pst->capacity = newcapacity;
    }

    pst->a[pst->top] = x;
    pst->top++;
}

// 出栈
void StackPop(ST* pst) {
    assert(pst);
    // 栈不为空
    assert(pst->top > 0);

    pst->top--;
}

// 获取栈顶元素
STDataType StackTop(ST* pst) {
    assert(pst);
    // 栈不为空
    assert(pst->top > 0);

    return pst->a[pst->top - 1];
}

// 判断栈是否为空
bool StackEmpty(ST* pst) {
    assert(pst);

    return pst->top == 0;
}

// 判断给定字符串是否是有效的括号组合
bool isValid(char* s) {
    ST st;
    StackInit(&st);

    // 遍历字符串
    while (*s) {
        if (*s == '[' || *s == '(' || *s == '{') {
            // 左括号入栈
            StackPush(&st, *s);
        } else {
            // 右括号处理
            // 如果栈为空,说明右括号多于左括号,返回 false
            if (StackEmpty(&st)) {
                StackDestroy(&st);
                return false;
            }

            char top = StackTop(&st);
            StackPop(&st);

            // 判断右括号和栈顶左括号是否匹配
            if ((*s == ']' && top != '[') ||
                (*s == ')' && top != '(') ||
                (*s == '}' && top != '{')) {
                StackDestroy(&st);
                return false;
            }
        }
        ++s;
    }

    // 栈为空,说明左括号多于右括号,返回 true
    bool ret = StackEmpty(&st);
    StackDestroy(&st);

    return ret;
}
2. 用队列实现栈
题目链接:225. 用队列实现栈
题目描述:
请你仅使用两个队列实现一个后入先出(LIFO)的栈,并支持普通栈的全部四种操作(push、top、pop 和 empty)。
实现 MyStack 类:
1.void push(int x) 将元素 x 压入栈顶。
2.int pop() 移除并返回栈顶元素。
3.int top() 返回栈顶元素。
4.boolean empty() 如果栈是空的,返回 true ;否则,返回 false 。
注意:
你只能使用队列的基本操作 —— 也就是 push to back、peek/pop from front、size 和 is empty 这些操作。
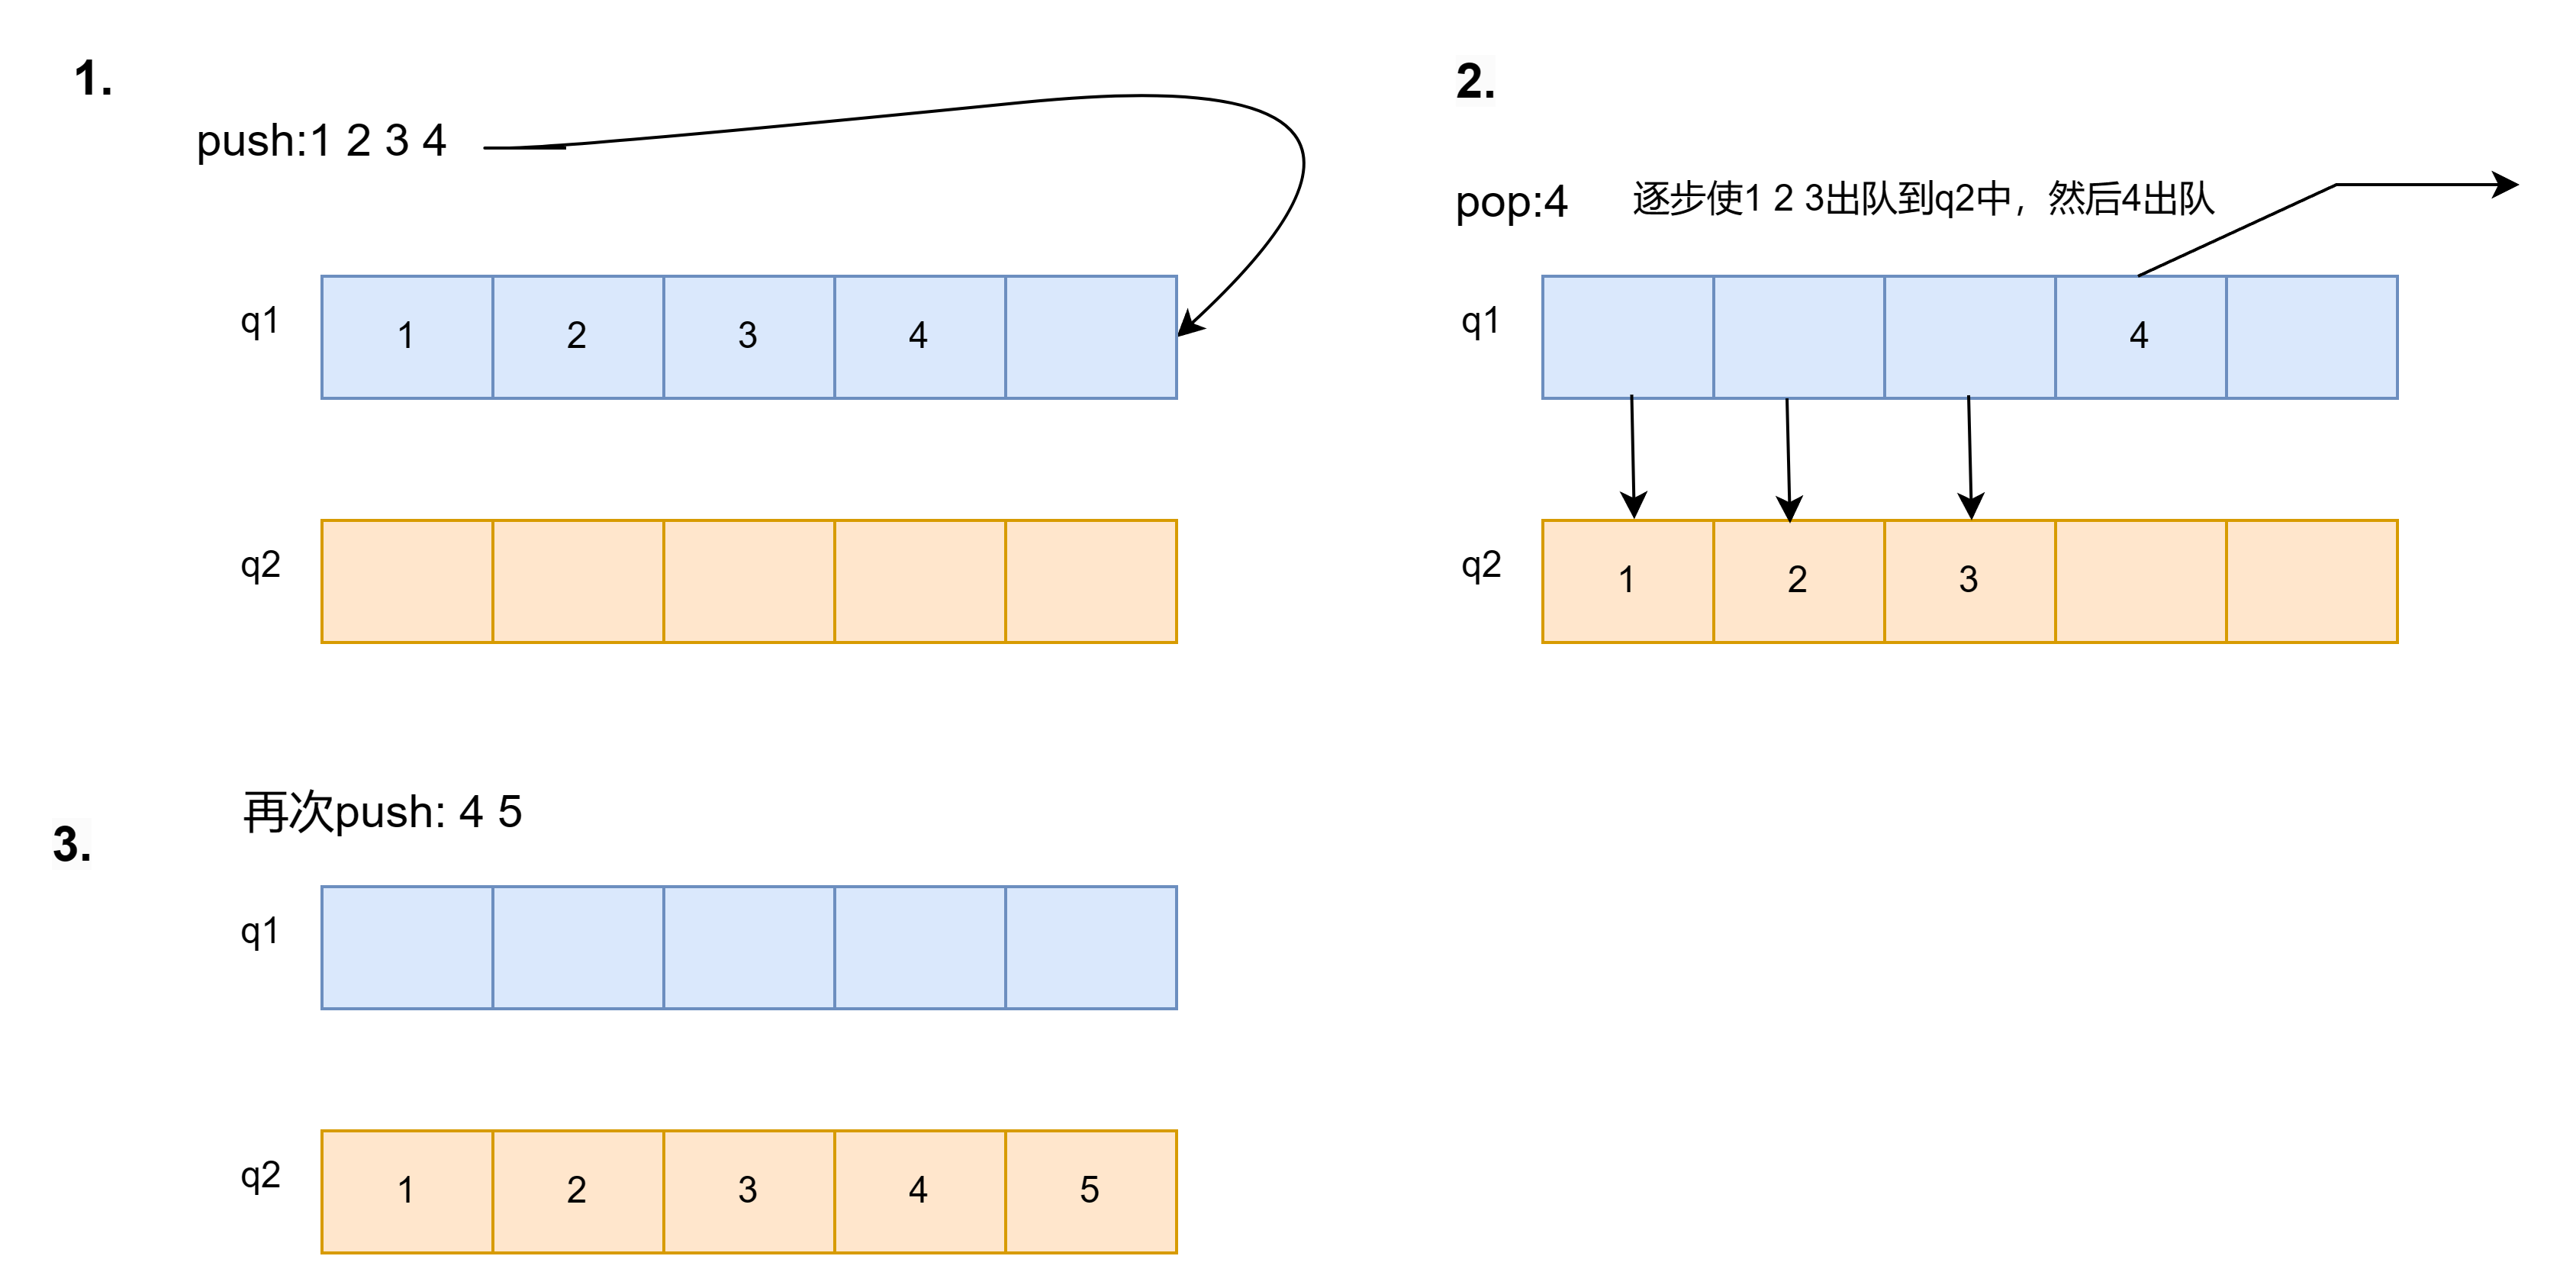
两个队列之间进行元素的转移,以模拟栈的后进先出(LIFO)特性。基本思路:
-
使用两个队列,分别称为queue1和queue2。
-
当需要push一个元素时,将其加入非空的队列(假设初始时选择queue1)。
-
当需要pop一个元素时,将非空队列的前n-1个元素出队并入队到另一个空队列,然后将剩余的最后一个元素出队(即模拟栈的pop操作)。
-
将队列互换,使得新的非空队列成为主队列。

代码实现:
// 定义队列中元素的数据类型
typedef int QDataType;

// 节点结构体,表示队列中的每个元素
typedef struct QueueNode {
    QDataType val;           // 元素的值
    struct QueueNode* next;  // 指向下一个节点的指针
} QNode;

// 队列结构体,包含队头、队尾和元素数量信息
typedef struct Queue {
    QNode* phead;  // 队头节点
    QNode* ptail;  // 队尾节点
    int size;      // 元素长度
} Queue;

// 初始化队列,设置队头、队尾为NULL,元素数量为0
void QueueInit(Queue* pq) {
    assert(pq);
    pq->phead = pq->ptail = NULL;
    pq->size = 0;
}

// 销毁队列,释放队列中每个节点的内存
void QueueDestroy(Queue* pq) {
    assert(pq);

    QNode* cur = pq->phead;
    while (cur) {
        QNode* next = cur->next;
        free(cur);
        cur = next;
    }
    pq->phead = pq->ptail = NULL;
    pq->size = 0;
}

// 入队操作,将元素加入队尾
void QueuePush(Queue* pq, QDataType x) {
    assert(pq);

    // 创建新节点
    QNode* newnode = (QNode*)malloc(sizeof(QNode));
    if (newnode == NULL) {
        perror("malloc fail");
        return;
    }

    // 设置节点值和指针
    newnode->val = x;
    newnode->next = NULL;

    // 判断队列是否为空,如果是,将队头和队尾都设置为新节点
    if (pq->ptail == NULL) {
        pq->ptail = pq->phead = newnode;
    } else {
        // 否则,将新节点连接到队尾,并更新队尾指针
        pq->ptail->next = newnode;
        pq->ptail = newnode;
    }

    // 更新元素数量
    pq->size++;
}

// 出队操作,删除队头元素
void QueuePop(Queue* pq) {
    assert(pq->phead);
    assert(pq);

    // 记录需要删除的节点
    QNode* del = pq->phead;
    // 更新队头指针
    pq->phead = pq->phead->next;
    // 释放节点内存
    free(del);
    del = NULL;

    // 如果队头为空,表示队列已空,更新队尾指针
    if (pq->phead == NULL)
        pq->ptail = NULL;

    // 更新元素数量
    pq->size--;
}

// 获取队头元素的值
QDataType QueueFront(Queue* pq) {
    assert(pq);
    assert(pq->phead);

    return pq->phead->val;
}

// 获取队尾元素的值
QDataType QueueBack(Queue* pq) {
    assert(pq);
    assert(pq->ptail);

    return pq->ptail->val;
}

// 判断队列是否为空
bool QueueEmpty(Queue* pq) {
    assert(pq);

    return pq->phead == NULL;
}

// 获取队列的元素数量
int QueueSize(Queue* pq) {
    assert(pq);

    return pq->size;
}


// 定义MyStack结构体,包含两个队列
typedef struct {
    Queue q1;
    Queue q2;
} MyStack;

// 创建并初始化MyStack结构体,内部调用QueueInit初始化两个队列
MyStack* myStackCreate() {
    MyStack* pst = (MyStack*)malloc(sizeof(MyStack));
    QueueInit(&pst->q1);
    QueueInit(&pst->q2);

    return pst;
}

// 入栈操作,将元素加入非空队列
void myStackPush(MyStack* obj, int x) {
    if (!QueueEmpty(&obj->q1)) {
        QueuePush(&obj->q1, x);
    } else {
        QueuePush(&obj->q2, x);
    }
}

// 出栈操作,模拟栈的pop操作
int myStackPop(MyStack* obj) {
    // 选择非空队列为需要操作的队列,将元素转移到另一队列,直到只剩一个元素
    Queue* emptyq = &obj->q1;
    Queue* nonemptyq = &obj->q2;
    if (!QueueEmpty(&obj->q1)) {
        emptyq = &obj->q2;
        nonemptyq = &obj->q1;
    }

    while (QueueSize(nonemptyq) > 1) {
        QueuePush(emptyq, QueueFront(nonemptyq));
        QueuePop(nonemptyq);
    }

    // 获取并删除最后一个元素,模拟栈的pop操作
    int top = QueueFront(nonemptyq);
    QueuePop(nonemptyq);
    return top;
}

// 获取栈顶元素的值
int myStackTop(MyStack* obj) {
    if (!QueueEmpty(&obj->q1)) {
        return QueueBack(&obj->q1);
    } else {
        return QueueBack(&obj->q2);
    }
}

// 判断栈是否为空
bool myStackEmpty(MyStack* obj) {
    return QueueEmpty(&obj->q1) && QueueEmpty(&obj->q2);
}

// 释放MyStack结构体和两个队列的内存
void myStackFree(MyStack* obj) {
    QueueDestroy(&obj->q1);
    QueueDestroy(&obj->q2);

    free(obj);
}
3. 用栈是实现队列
题目链接:Leetcode 232.用栈实现队列
题目描述:
请你仅使用两个栈实现先入先出队列。队列应当支持一般队列支持的所有操作(push、pop、peek、empty):
实现 MyQueue 类:
1.void push(int x) 将元素 x 推到队列的末尾
2.int pop() 从队列的开头移除并返回元素
3.int peek() 返回队列开头的元素
4.boolean empty() 如果队列为空,返回 true ;否则,返回 false
用两个栈来实现队列的基本思路:
-
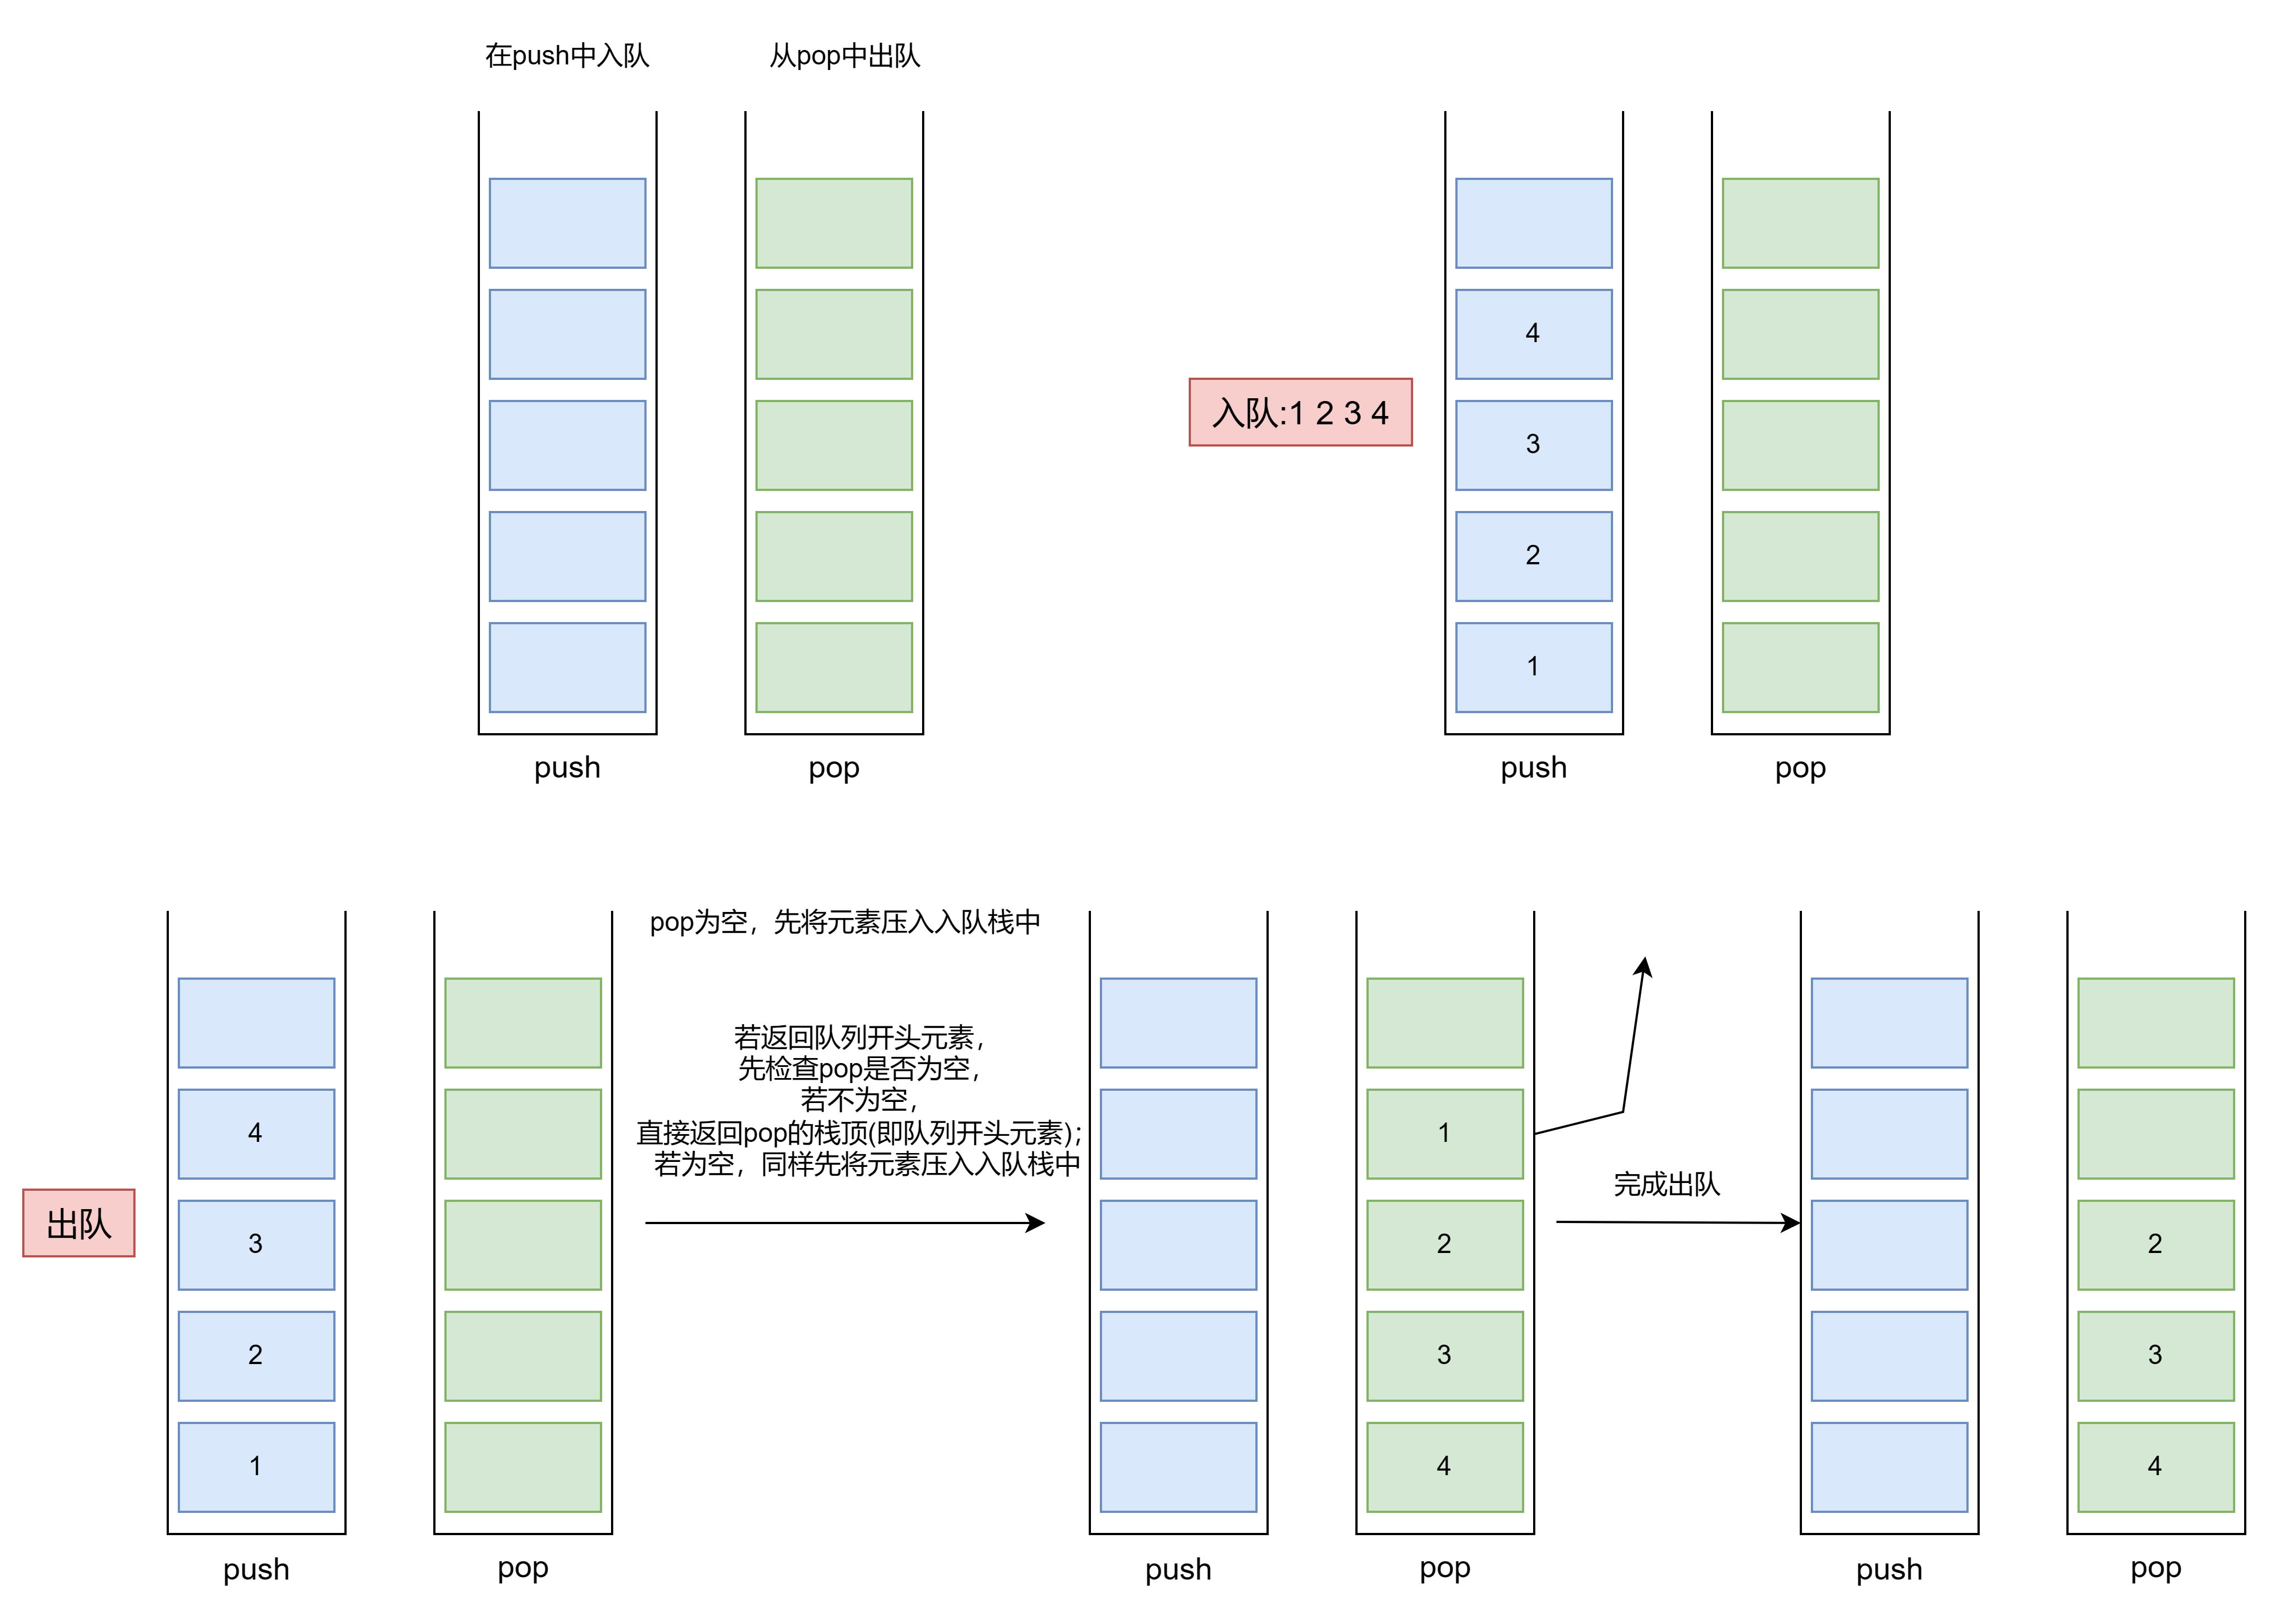
两个栈: 使用两个栈,一个用于入队(push操作),另一个用于出队(pop操作)。
-
入队操作: 将元素压入入队栈中。这样,最新的元素会始终位于栈顶,而最早加入的元素则位于栈底。
-
出队操作: 如果出队栈不为空,直接从出队栈弹出元素;否则,将入队栈的元素逐个弹出并压入出队栈,然后从出队栈弹出元素。这确保了队列的先进先出特性。

代码实现:
typedef int STDataType;

typedef struct Stack {
    STDataType* a;   // 栈数组
    int top;         // 标识栈顶
    int capacity;    // 容量
} ST;

// 栈的初始化
void StackInit(ST* pst) {
    assert(pst);
    pst->a = NULL;
    pst->capacity = 0;
    pst->top = 0;  // 指向栈顶下一个元素
}

// 栈的销毁
void StackDestroy(ST* pst) {
    assert(pst);
    free(pst->a);
}

// 入栈操作
void StackPush(ST* pst, STDataType x) {
    assert(pst);

    if (pst->top == pst->capacity) {
        int newcapacity = pst->capacity == 0 ? 4 : 2 * pst->capacity;
        STDataType* temp = realloc(pst->a, sizeof(STDataType) * newcapacity);
        if (temp == NULL) {
            perror("realloc fail");
            return;
        }

        pst->a = temp;
        pst->capacity = newcapacity;
    }

    pst->a[pst->top] = x;
    pst->top++;
}

// 出栈操作
void StackPop(ST* pst) {
    assert(pst);
    // 不为空
    assert(pst->top > 0);

    pst->top--;
}

// 获取栈顶元素
STDataType StackTop(ST* pst) {
    assert(pst);
    // 不为空
    assert(pst->top > 0);

    return pst->a[pst->top - 1];
}

// 判断栈是否为空
bool StackEmpty(ST* pst) {
    assert(pst);
    return pst->top == 0;
}

// 获取栈的大小
int StackSize(ST* pst) {
    assert(pst);
    return pst->top;
}

// 队列结构
typedef struct {
    ST pushst;  // 入队栈
    ST popst;   // 出队栈
} MyQueue;

// 创建一个新的队列
MyQueue* myQueueCreate() {
    MyQueue* obj = (MyQueue*)malloc(sizeof(MyQueue));
    if (obj != NULL) {
        StackInit(&obj->pushst);
        StackInit(&obj->popst);
    }

    return obj;
}

// 将元素入队
void myQueuePush(MyQueue* obj, int x) {
    StackPush(&obj->pushst, x);
}

// 查看队头元素
int myQueuePeek(MyQueue* obj) {
    // popst为空,StackEmpty(&obj->popst)为真
    // popst不为空,直接执行return StackPop(&obj->popst);
    if (StackEmpty(&obj->popst)) {
        // pushst若不为空,将pushst中数据推入popst中
        while (!StackEmpty(&obj->pushst)) {
            StackPush(&obj->popst, StackTop(&obj->pushst));
            StackPop(&obj->pushst);
        }
    }
    return StackTop(&obj->popst);
}

// 出队操作
int myQueuePop(MyQueue* obj) {
    STDataType front = myQueuePeek(obj);
    StackPop(&obj->popst);

    return front;
}

// 判断队列是否为空
bool myQueueEmpty(MyQueue* obj) {
    return StackEmpty(&obj->pushst) && StackEmpty(&obj->popst);
}

// 释放队列内存
void myQueueFree(MyQueue* obj) {
    StackDestroy(&obj->pushst);
    StackDestroy(&obj->popst);
    free(obj);
}
4. 设计循环队列
题目链接:Leetcode 622. 设计循环队列
题目描述:
设计你的循环队列实现。 循环队列是一种线性数据结构,其操作表现基于 FIFO(先进先出)原则并且队尾被连接在队首之后以形成一个循环。它也被称为“环形缓冲器”。
循环队列的一个好处是我们可以利用这个队列之前用过的空间。在一个普通队列里,一旦一个队列满了,我们就不能插入下一个元素,即使在队列前面仍有空间。但是使用循环队列,我们能使用这些空间去存储新的值。
你的实现应该支持如下操作:
1.MyCircularQueue(k): 构造器,设置队列长度为 k 。
2.Front: 从队首获取元素。如果队列为空,返回 -1 。
3.Rear: 获取队尾元素。如果队列为空,返回 -1 。
4.enQueue(value): 向循环队列插入一个元素。如果成功插入则返回真。
5.deQueue(): 从循环队列中删除一个元素。如果成功删除则返回真。
6.isEmpty(): 检查循环队列是否为空。
7.isFull(): 检查循环队列是否已满。
示例:
MyCircularQueue circularQueue = new MyCircularQueue(3); // 设置长度为 3
circularQueue.enQueue(1); // 返回 true
circularQueue.enQueue(2); // 返回 true
circularQueue.enQueue(3); // 返回 true
circularQueue.enQueue(4); // 返回 false,队列已满
circularQueue.Rear(); // 返回 3
circularQueue.isFull(); // 返回 true
circularQueue.deQueue(); // 返回 true
circularQueue.enQueue(4); // 返回 true
circularQueue.Rear(); // 返回 4
基本思路:
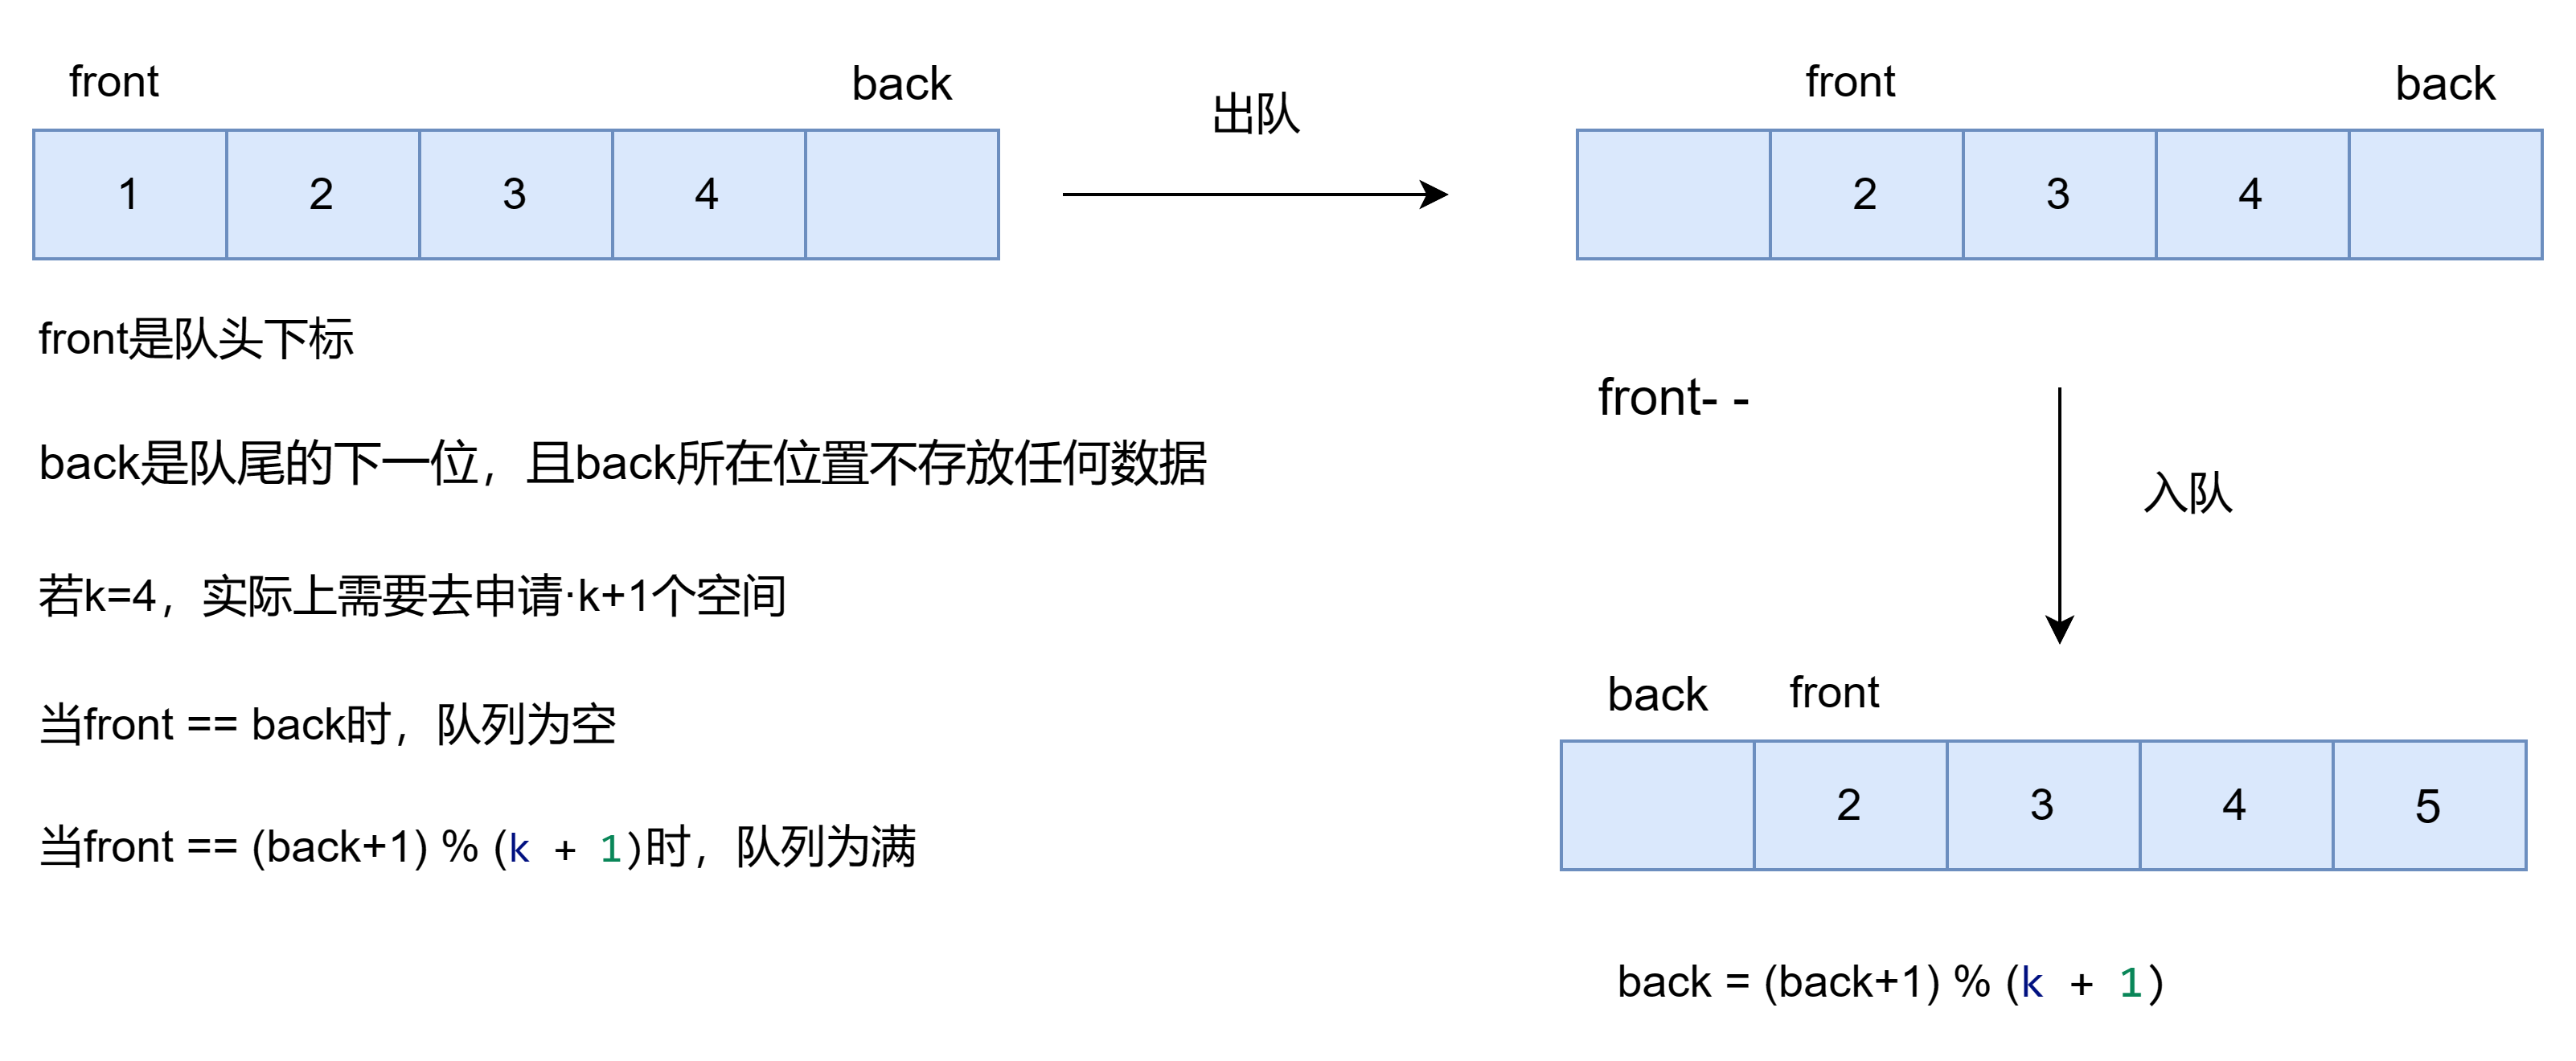
在实现循环队列时,我们选择数组来实现。相对于循环链表,数组实现循环队列更加容易访问数据,且在空间上连续。

代码实现:
// 定义循环队列的结构体
typedef struct {
    int* a;     // 用于存储队列元素的数组
    int front;   // 指向队列头部
    int back;    // 指向队列尾部的下一位
    int k;       // 队列的容量
} MyCircularQueue;

// 创建循环队列并初始化
MyCircularQueue* myCircularQueueCreate(int k) {
    // 分配内存并初始化结构体成员
    MyCircularQueue* obj = (MyCircularQueue*)malloc(sizeof(MyCircularQueue));
    obj->a = (int*)malloc(sizeof(int) * (k + 1)); // 长度为 k+1,避免判满和判空时的歧义
    obj->front = 0;
    obj->back = 0;
    obj->k = k;

    return obj;
}

// 判断循环队列是否为空
bool myCircularQueueIsEmpty(MyCircularQueue* obj) {
    return obj->back == obj->front;
}

// 获取循环队列尾部元素
int myCircularQueueRear(MyCircularQueue* obj) {
    if (myCircularQueueIsEmpty(obj)) {
        return -1; // 队列为空,返回特定值表示错误
    } else {
        return obj->a[(obj->back + obj->k) % (obj->k + 1)]; // 利用取模操作实现循环
    }
}

// 判断循环队列是否已满
bool myCircularQueueIsFull(MyCircularQueue* obj) {
    return (obj->back + 1) % (obj->k + 1) == obj->front; // 利用取模操作实现循环
}

// 入队操作
bool myCircularQueueEnQueue(MyCircularQueue* obj, int value) {
    if (myCircularQueueIsFull(obj)) {
        return false; // 队列已满,无法入队
    }
    obj->a[obj->back] = value; // 将元素存储在队尾
    ++obj->back; // 尾指针后移
    obj->back %= (obj->k + 1); // 利用取模操作实现循环
    return true;
}

// 出队操作
bool myCircularQueueDeQueue(MyCircularQueue* obj) {
    if (myCircularQueueIsEmpty(obj)) {
        return false; // 队列为空,无法出队
    }
    ++obj->front; // 头指针后移
    obj->front %= (obj->k + 1); // 利用取模操作实现循环
    return true;
}

// 获取循环队列头部元素
int myCircularQueueFront(MyCircularQueue* obj) {
    if (myCircularQueueIsEmpty(obj)) {
        return -1; // 队列为空,返回特定值表示错误
    }
    return obj->a[obj->front]; // 返回队头元素
}

// 释放循环队列的内存
void myCircularQueueFree(MyCircularQueue* obj) {
    free(obj->a);
    free(obj);
}

如果你喜欢这篇文章,点赞👍+评论+关注??哦!
欢迎大家提出疑问,以及不同的见解。
本文来自互联网用户投稿,该文观点仅代表作者本人,不代表本站立场。本站仅提供信息存储空间服务,不拥有所有权,不承担相关法律责任。 如若内容造成侵权/违法违规/事实不符,请联系我的编程经验分享网邮箱:chenni525@qq.com进行投诉反馈,一经查实,立即删除!
- Python教程
- 深入理解 MySQL 中的 HAVING 关键字和聚合函数
- Qt之QChar编码(1)
- MyBatis入门基础篇
- 用Python脚本实现FFmpeg批量转换
- 【电商项目实战】购物车完善
- mybatisplus saveBatch版本问题导致CPU打满生产问题定位
- NFS概念与应用
- chatgpt4.0国内直接使用,激活不限次数免费!为年终做准备。
- 【史上最小白】变分自编码器 VAE:从降维本质,到自编码器,再到变分自编码器
- 基于SSM的影视创作论坛(有报告)。Javaee项目。ssm项目。
- 深度学习(3)--递归神经网络(RNN)和词向量模型Word2Vec
- 副业类小报童热门专栏TOP15
- Modbus协议学习第二篇之Modbus poll & slave仿真软件初体验
- 【代码随想录12】144. 二叉树的前序遍历 145. 二叉树的后序遍历 94. 二叉树的中序遍历