pve8.1版本安装及环境初始化过程记录
发布时间:2023年12月17日
背景
经历pve旧版本奔溃事件,果断重新购买了装备,做个稳定的pve环境,旧主机用于折腾其他系统,硬盘一定要用好的。
1.pve8.1.3系统版本安装
下载地址?Download Proxmox software, datasheets, agreements?使用种子下载会快一点儿
方式1 官方镜像直接安装,建议使用Etcher、refus一定用dd模式写入,我用ventoy一直提示找不到镜像文件,后来换了个写盘工具就可以了。
方式2 从7.4版本升级8.1.3
我的新设备直接安装8.1版本是一直卡在loading_drivers:xxx界面不知道什么问题(可能是服务器主板的问题)所以曲线救国,先安装7.4版本再升级到8.1,发现可行。
升级过程如下,先安装7.4版本,下载iso,用写盘工具制作安装即可。bookworm 代表debian12
1.更换 Debian系统源
cp /etc/apt/sources.list /etc/apt/sources.list_bak
nano /etc/apt/sources.list

清除原内容替换为以下
#国内清华镜像源
deb http://mirrors.tuna.tsinghua.edu.cn/debian bookworm main contrib non-free non-free-firmware
deb http://mirrors.tuna.tsinghua.edu.cn/debian bookworm-updates main contrib non-free non-free-firmware
deb http://mirrors.tuna.tsinghua.edu.cn/debian bookworm-backports main contrib non-free non-free-firmware
deb-src http://mirrors.tuna.tsinghua.edu.cn/debian bookworm main contrib non-free non-free-firmware
deb-src http://mirrors.tuna.tsinghua.edu.cn/debian bookworm-updates main contrib non-free non-free-firmware
deb-src http://mirrors.tuna.tsinghua.edu.cn/debian bookworm-backports main contrib non-free non-free-firmware
deb http://mirrors.tuna.tsinghua.edu.cn/debian-security bookworm-security main contrib non-free non-free-firmware
deb-src http://mirrors.tuna.tsinghua.edu.cn/debian-security bookworm-security main contrib non-free non-free-firmware

添加pve-8软件包仓库
echo "deb https://mirrors.tuna.tsinghua.edu.cn/proxmox/debian/pve bookworm pve-no-subscription" > /etc/apt/sources.list.d/pve-enterprise.list

更新ceph包仓库
echo "deb http://download.proxmox.com/debian/ceph-quincy bookworm no-subscription" > /etc/apt/sources.list.d/ceph.list
wget https://enterprise.proxmox.com/debian//proxmox-release-bookworm.gpg -O /etc/apt/trusted.gpg.d/proxmox-release-bookworm.gpg

apt update
apt dist-upgrade -y


弹出页面
一路默认回车就完了

pveversion 确认版本

##pve-manager/8.1.3/b46aac3b42da5d15 (running kernel: 5.15.102-1-pve)
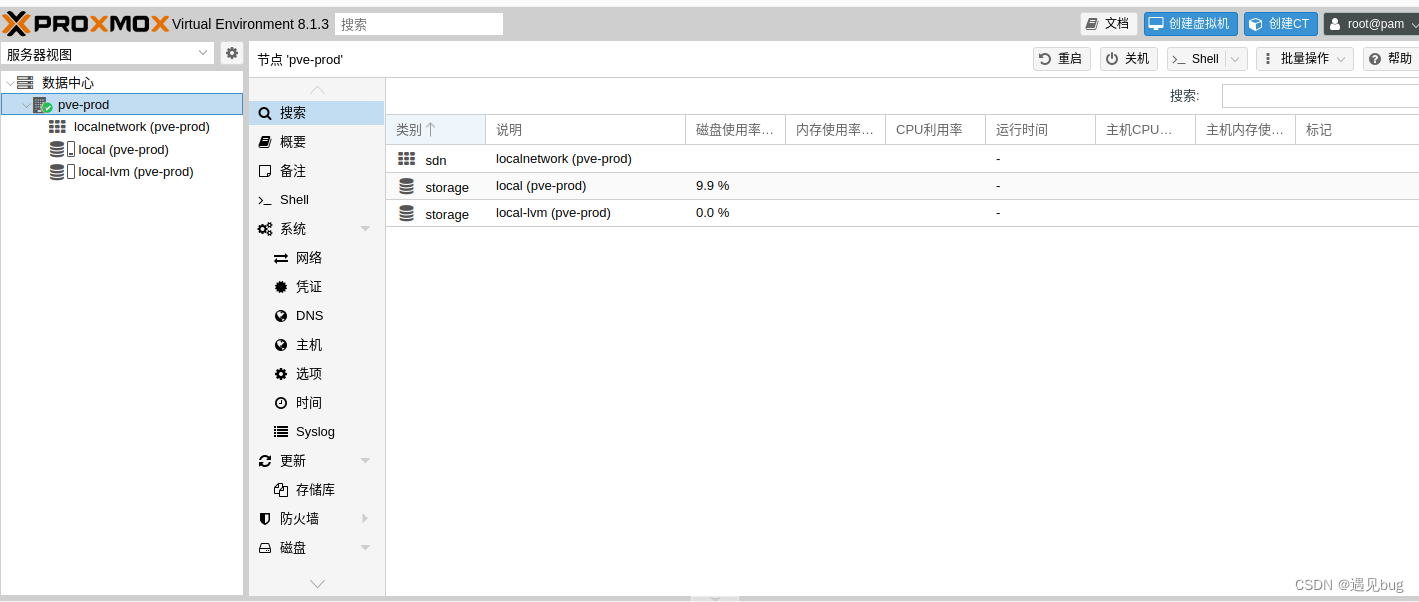
安装完成 主界面比7版本多了个localnetwork
 ?
?
2.pve 环境初始化,主要是换源,去掉未订阅提示等
#LXC仓库源更换
sed -i.bak "s#http://download.proxmox.com/images#https://mirrors.ustc.edu.cn/proxmox/images#g" /usr/share/perl5/PVE/APLInfo.pm
wget -O /var/lib/pve-manager/apl-info/mirrors.ustc.edu.cn https://mirrors.ustc.edu.cn/proxmox/images/aplinfo-pve-8.dat
systemctl restart pvedaemon


#去掉订阅弹窗
sed -i_orig "s/data.status === 'Active'/true/g" /usr/share/pve-manager/js/pvemanagerlib.js
sed -i_orig "s/if (res === null || res === undefined || \!res || res/if(/g" /usr/share/javascript/proxmox-widget-toolkit/proxmoxlib.js
sed -i_orig "s/.data.status.toLowerCase() !== 'active'/false/g" /usr/share/javascript/proxmox-widget-toolkit/proxmoxlib.js
systemctl restart pveproxy
lxc源主要是用于下载lxc模板时速度可以快些
 ?
?
3.配置网络环境,没需要可以不配置
修改ip
nano /etc/network/interfaces
修改 host文件
nano /etc/hosts
修改启动界面打印地址
nano /etc/issue
service networking restart
4.安装常用软件
安装网络工具 #ifconfig
apt-get  -y install net-tools
5.pve8.1安装docker环境 ,参照debian的安装
参考?
docker 官网Install Docker Engine | Docker Docs
1.卸载旧版 初次安装可跳过
$ apt-get remove docker.io docker-doc docker-compose podman-docker containerd runc
2.安装前置环境
apt-get install -y ca-certificates curl gnupg2 apt-transport-https software-properties-common
3.添加官方gpg 秘钥
install -m 0755 -d /etc/apt/keyrings
curl -fsSL https://download.docker.com/linux/debian/gpg | gpg --dearmor -o /etc/apt/keyrings/docker.gpg
chmod a+r /etc/apt/keyrings/docker.gpg

4.配置docker仓库 镜像地址

 echo \
  "deb [arch=$(dpkg --print-architecture) signed-by=/etc/apt/keyrings/docker.gpg] https://download.docker.com/linux/debian \
  $(. /etc/os-release && echo "$VERSION_CODENAME") stable" | \
  tee /etc/apt/sources.list.d/docker.list > /dev/null

必须执行一下apt update

5.安装docker 最新版
apt-get install docker-ce docker-ce-cli containerd.io docker-buildx-plugin docker-compose-plugin

安装指定版本
apt-cache madison docker-ce 从缓存中查询
apt-get install docker-ce=24.0.0 docker-ce-cli=24.0.0 containerd.io=24.0.0 docker-buildx-plugin=24.0.0 docker-compose-plugin=24.0.0

6.验证
docker -v
docker run hello-world
设置开机启动
systemctl enable docker.service

7.更换docker的镜像地址 为自己的阿里云镜像仓库地址
tee /etc/docker/daemon.json <<-'EOF'
{
  "registry-mirrors": ["https://xxxxxxxx.mirror.aliyuncs.com"]
}
EOF

8.安装docker-compose
方式1 直接下载

https://github.com/docker/compose/tags 查看版本
##方法1 下载较慢
curl -SL https://github.com/docker/compose/releases/download/2.23.3/docker-compose-`uname -s`-`uname -m` -o /usr/local/bin/docker-compose
##方法2 自己下载完成后上传到/usr/local/bin 目录下
执行授权
chmod +x /usr/local/bin/docker-compose
验证
docker-compose -v

安装完成后续可以直接拷贝到虚拟机使用
#方法3
拷贝到其他机器上
scp -r /usr/local/bin/docker-compose root@192.168.3.111:/usr/local/bin/
文章来源:https://blog.csdn.net/qq_32429805/article/details/135048004
本文来自互联网用户投稿,该文观点仅代表作者本人,不代表本站立场。本站仅提供信息存储空间服务,不拥有所有权,不承担相关法律责任。 如若内容造成侵权/违法违规/事实不符,请联系我的编程经验分享网邮箱:chenni525@qq.com进行投诉反馈,一经查实,立即删除!
本文来自互联网用户投稿,该文观点仅代表作者本人,不代表本站立场。本站仅提供信息存储空间服务,不拥有所有权,不承担相关法律责任。 如若内容造成侵权/违法违规/事实不符,请联系我的编程经验分享网邮箱:chenni525@qq.com进行投诉反馈,一经查实,立即删除!
最新文章
- Python教程
- 深入理解 MySQL 中的 HAVING 关键字和聚合函数
- Qt之QChar编码(1)
- MyBatis入门基础篇
- 用Python脚本实现FFmpeg批量转换
- 深度剖析 ThreadLocal 内存泄露问题及解决方案
- 接口测试基础(超详细)
- 网络安全复习--简答整理
- <url-pattern>/</url-pattern>与<url-pattern>/*</url-pattern>的区别
- Linux文件系统与日志分析
- MongoDB vs MySQL:项目选择哪一个数据库系统?
- git 常用命令 提交commit
- 项目成本管理
- 【华为机试】2023年真题B卷(python)-计算疫情扩散时间
- map|二分查找|离线查询|LeetCode:2736最大和查询