BI工具调研
1、前言
目前公司使用Tableau作为BI工具,但是感觉不是很好用,且国内市场已经不维护了,所以打算换下BI工具,因此需要针对当前市场开源和商业的BI工具进行调研,看看是买商业的还是用开源的。
基于以下部分开源的做了一个表格对照。

2、各个开源BI工具网站
https://superset.apache.org/docs/databases/installing-database-drivers/
https://dataease.io/
https://www.metabase.com/
https://redash.io/
https://www.jaspersoft.com/why-jaspersoft
3、dataease是国内开源工具,文档比较简单易懂,这里就不介绍了
4、Superset 基本介绍
1.1 简介
Apache Superset(孵化)是一个现代化的企业级商业智能Web应用程序。
1.2 特点
1)快速创建可交互的、直观形象的数据集合
2)有丰富的可视化方法来分析数据,且具有灵活的扩展能力
3)具有可扩展的、高粒度的安全模型,可以用复杂规则来控制访问权限。目前支持主要的认证提供商:DB、OpenID、LDAP、OAuth、和Flask AppBuiler的REMOTE_USER
4)使用简单的语法,就可以控制数据在UI中的展现方式
5)通过SQLAlchemy与大多数讲SQL的RDBMS集成
6)与Druid深度结合,可快速的分析大数据
7)配置缓存来快速加载仪表盘
1.3 数据库依赖
除了Sqlite (它是Python标准库的一部分)之外,Superset不捆绑连接到数据库。其他均需要为要用作元数据数据库的数据库安装所需的包,以及连接到要通过Superset访问的数据库所需的包。
下面是一些连接方式(本文只列举几种常用类型):
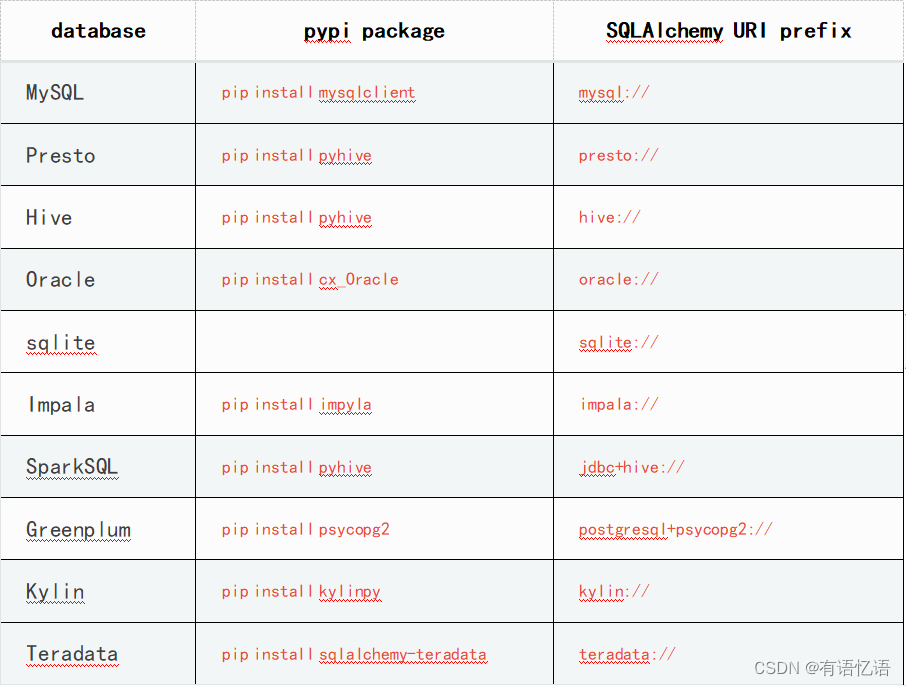
更多数据库连接方式请访问:
http://superset.incubator.apache.org/installation.html#getting-started
2.1安装地址
Superset同时支持Python2和Python3, 这里以Python3作为演示。它支持pip形式的下载,不过我不建议直接安装,因为Superset的依赖包较多,如果直接安装,很容易和现有的模块产生冲突。
这里需要先搭建Python的虚拟环境。虚拟环境可以帮助我们在单机上建立多个版本的Python。简而言之,即可以Python2和Python3共存,也能Python3.3、3.4、3.5共济一堂,彼此间互相独立。这里以Anaconda自带的conda工具为例,采取在线安装的方式,耗时较长,请耐心等待。
1.Superset官网地址
http://superset.incubator.apache.org
2.Anaconda 官网地址
https://www.anaconda.com/distribution/
2.2 Superset环境准备及安装
1.添加系统依赖
[ybb@hadoop104 ~]$ sudo yum upgrade python-setuptools
[ybb@hadoop104 ~]$ sudo yum install gcc gcc-c++ libffi-devel python-devel python-pip python-wheel openssl-devel libsasl2-devel openldap-devel
2.安装Anaconda
(1)把Anaconda3-2019.03-Linux-x86_64.sh上传到linux的/opt/software目录下
(2)运行Anaconda3-2019.03-Linux-x86_64.sh文件进行程序安装
[ybb@hadoop104 software]$ bash Anaconda3-2019.03-Linux-x86_64.sh
Welcome to Anaconda3 2019.03

In order to continue the installation process, please review the license
agreement.
Please, press ENTER to continue		#点击“Enter”查看“许可证协议”
>>>
===================================
Anaconda End User License Agreement
===================================
....
Notice of Third Party Software Licenses
=======================================
....
Cryptography Notice
===================
....
Do you accept the license terms? [yes|no]
[no] >>>
Please answer 'yes' or 'no':'		#是否接受license协议,输入yes
>>> yes

Anaconda3 will now be installed into this location:
/home/ybb/anaconda3

  - Press ENTER to confirm the location		#按回车键确认安装路径
  - Press CTRL-C to abort the installation	#按'CTRL-C'取消安装或者指定安装目录
  - Or specify a different location below

[/home/ybb/anaconda3] >>>/opt/module/anaconda3
#此处可以输入安装路径/opt/module/anaconda3,输入之后按回车,注意此目录必须不存在
PREFIX=/opt/module/anaconda3
installing: python-3.7.3-h0371630_0 ...
Python 3.7.3
installing: conda-env-2.6.0-1 ...
installing: blas-1.0-mkl ...
........
installing: seaborn-0.9.0-py37_0 ...
installing: anaconda-2019.03-py37_0 ...
installation finished.
Do you wish the installer to initialize Anaconda3
by running conda init? [yes|no] #初始化程序安装路径环境变量,自动在.bashrc中添加
[no] >>> no #这里我们输入no,如果输入yes,开机就会自动进入base环境,于我们无意。
WARNING: The conda.compat module is deprecated and will be removed in a future release.
no change     /opt/module/anaconda3/condabin/conda
no change     /opt/module/anaconda3/bin/conda
no change     /opt/module/anaconda3/bin/conda-env
no change     /opt/module/anaconda3/bin/activate
no change     /opt/module/anaconda3/bin/deactivate
no change     /opt/module/anaconda3/etc/profile.d/conda.sh
no change     /opt/module/anaconda3/etc/fish/conf.d/conda.fish
no change     /opt/module/anaconda3/shell/condabin/Conda.psm1
no change     /opt/module/anaconda3/shell/condabin/conda-hook.ps1
no change     /opt/module/anaconda3/lib/python3.7/site-packages/xonsh/conda.xsh
no change     /opt/module/anaconda3/etc/profile.d/conda.csh
modified      /home/ybb/.bashrc

==> For changes to take effect, close and re-open your current shell. <==

If you'd prefer that conda's base environment not be activated on startup,
   set the auto_activate_base parameter to false:

conda config --set auto_activate_base false

Thank you for installing Anaconda3!

===========================================================================

Anaconda and JetBrains are working together to bring you Anaconda-powered
environments tightly integrated in the PyCharm IDE.

PyCharm for Anaconda is available at:
https://www.anaconda.com/pycharm
(3)为Anaconda配置环境变量
[ybb@hadoop104 anaconda3]$ sudo vim /etc/profile
export CONDA_HOME=/opt/module/anaconda3
export PATH=
P
A
T
H
:
PATH:
PATH:CONDA_HOME/bin
[ybb@hadoop104 anaconda3]$ source /etc/profile
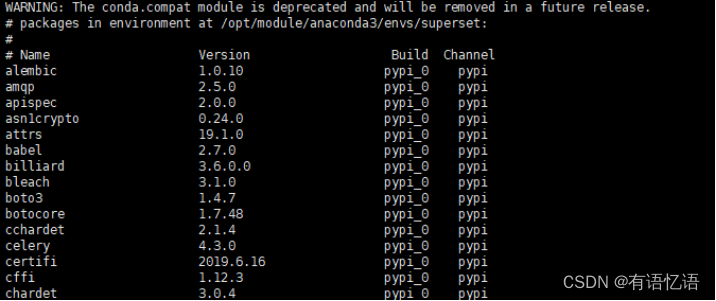
[ybb@hadoop104 anaconda3]$ conda list #对Anaconda进行验证,出现下列情况即成功
(4)修改Anaconda 的镜像文件
在安装Anaconda用户的家目录下(/home/ybb/)创建 ‘.condarc’文件,并添加如下内容:
[ybb@hadoop104 ~]$ vim .condarc
channels:
- https://mirrors.tuna.tsinghua.edu.cn/anaconda/pkgs/free/
- https://mirrors.tuna.tsinghua.edu.cn/anaconda/cloud/conda-forge/
- https://mirrors.tuna.tsinghua.edu.cn/anaconda/pkgs/free/
show_channel_urls: true
2.安装Superset
(1)为了避免依赖冲突,创建superset的虚拟环境。
[ybb@hadoop104 ~]$ conda create -n superset python=3
(2)进入/退出superset环境
[ybb@hadoop104 anaconda3]$ conda activate superset #进入
(superset) [ybb@hadoop104 anaconda3]$
(superset) [ybb@hadoop104 anaconda3]$ conda deactivate #退出
[ybb@hadoop104 anaconda3]$
(3)安装 pip 和setuptools最新版,命令如下(包较大,执行时间有点长,出现Read time out,请重新执行一遍当前命令,支持断点续传):
(superset) [ybb@hadoop104 anaconda3]$ pip install --upgrade setuptools pip
(superset) [ybb@hadoop104 anaconda3]$ pip install superset
自动退出及安装完成
(4)创建一个admin用户:
(superset) [ybb@hadoop104 anaconda3]$ fabmanager create-admin --app superset
(5)初始化数据库
(superset) [ybb@hadoop104 anaconda3]$ superset db upgrade
错误提示:
"Can’t determine which FROM clause to join "
sqlalchemy.exc.InvalidRequestError: Can’t determine which FROM clause to join from, there are multiple FROMS which can join to this entity. Try adding an explicit ON clause to help resolve the ambiguity.
解决方案:
(superset) [ybb@hadoop104 anaconda3]$ pip install sqlalchemy==1.2.18
(6)加载一些样例,并进行初始化
(superset) [ybb@hadoop104 anaconda3]$ superset load_examples
(superset) [ybb@hadoop104 anaconda3]$ superset init
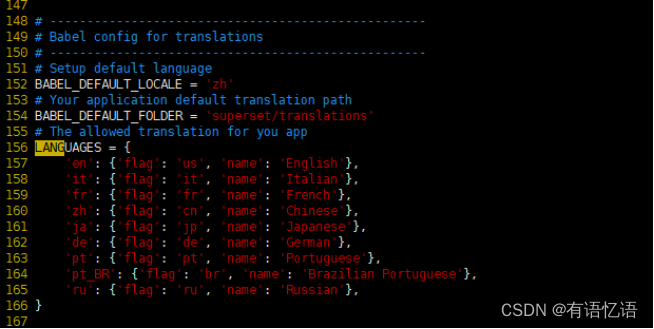
(7)web页面进行汉化(可自主选择):
(superset) [ybb@hadoop104 anaconda3]$ vim /opt/module/anaconda3/envs/superset/lib/python3.6/site-packages/superset/config.py
找到BABEL_DEFAULT_LOCALE=’en’改为BABEL_DEFAULT_LOCALE = ‘zh’
(superset) [ybb@hadoop104 anaconda3]$ cd /opt/module/anaconda3/envs/superset/lib/python3.6/site-packages/superset/
(superset) [ybb@hadoop104 superset]$ mkdir -p translations/zh/LC_MESSAGES
(superset) [ybb@hadoop104 superset]$ wget ‘https://github.com/apache/incubator-superset/blob/master/superset/translations/zh/LC_MESSAGES/messages.mo’
(8)安装mysql连接支持
(superset) [ybb@hadoop104 anaconda3]$ sudo yum install mysql-devel
(superset) [ybb@hadoop104 anaconda3]$ pip install mysqlclient
(9)启用web页面
(superset) [ybb@hadoop104 ~]$ superset runserver ([-p port]可指定其他端口,默认8088)
2019-06-21 20:18:36,438:INFO:root:The Gunicorn 'superset runserver' command is deprecated. Please use the 'gunicorn' command instead.
Starting server with command:
gunicorn -w 2 --timeout 60 -b  0.0.0.0:8088 --limit-request-line 0 --limit-request-field_size 0 superset:app

[2019-06-21 20:18:36 +0800] [2985] [INFO] Starting gunicorn 19.9.0
[2019-06-21 20:18:36 +0800] [2985] [INFO] Listening at: http://0.0.0.0:8088 (2985)
[2019-06-21 20:18:36 +0800] [2985] [INFO] Using worker: sync
[2019-06-21 20:18:36 +0800] [2988] [INFO] Booting worker with pid: 2988
[2019-06-21 20:18:36 +0800] [2989] [INFO] Booting worker with pid: 2989
浏览器访问:http://hadoop104:8088
登陆账户和密码均为第四步执行创建的。
3.1 创建Mysql数据库连接
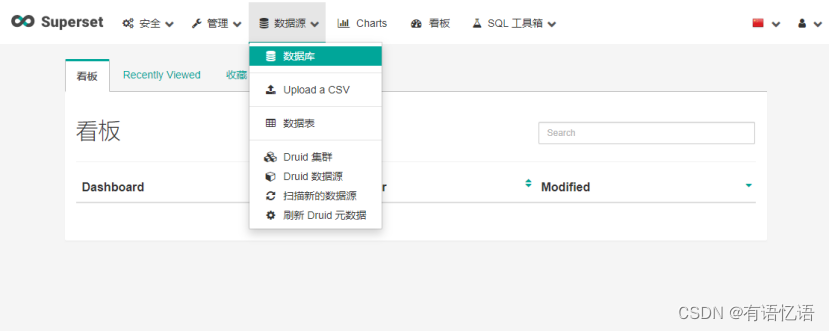
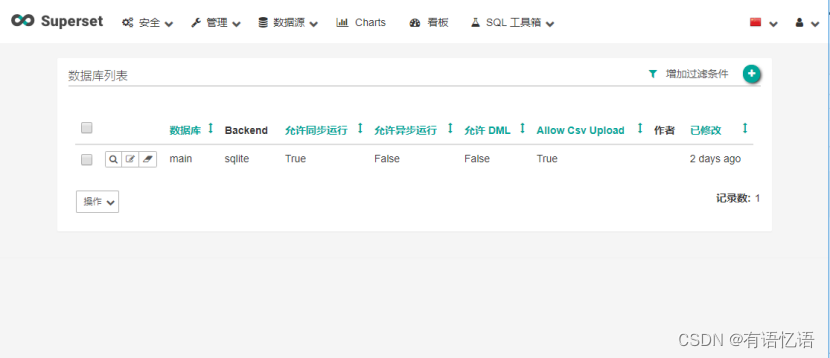
1)登陆之后点击数据源(Source) ->数据库(Databases)
2)点击右上角加号(+)添加数据源
3)添加Mysql数据
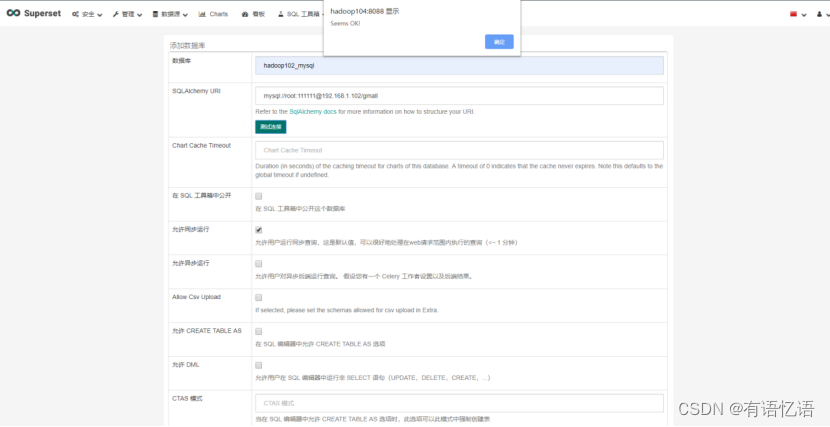
1.SQL Alchemy URI编写规范:mysql://账号:密码@IP/数据库名称
2.点击测试连接,出现“Seems OK!”表示连接成功,下方展示出所有表名称。
3.勾选“在SQL工具箱中公开”,可以使用SQL语句查询。
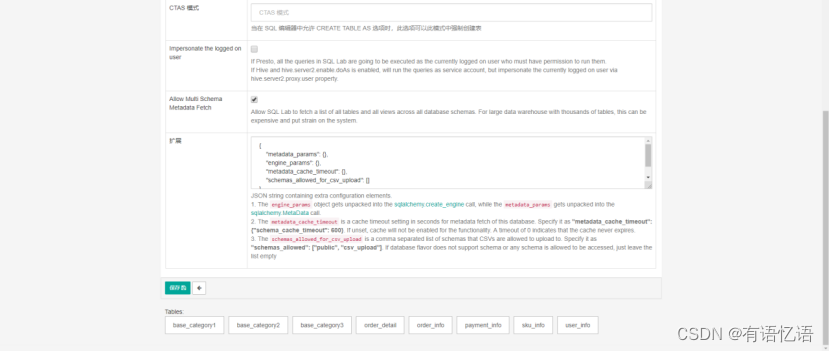
4.其他根据需求进行勾选,无过多要求,随后点击最下方“保存(save)”。
4)添加成功
3.2 添加Mysql数据库的表格
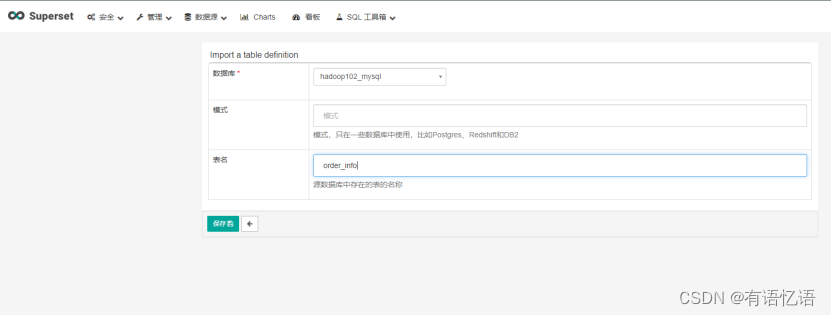
1)添加数据表
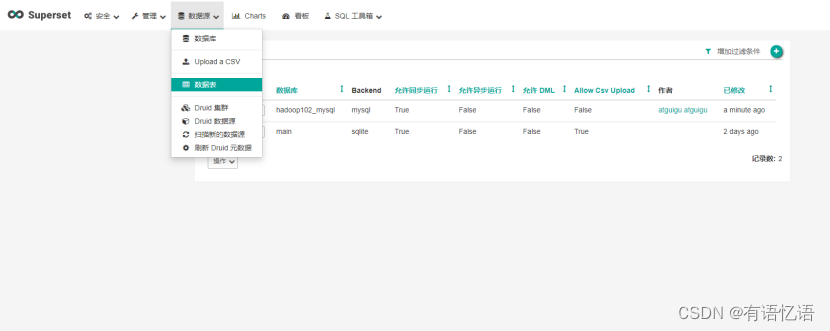
2)点击加号(+),添加表格,并保存
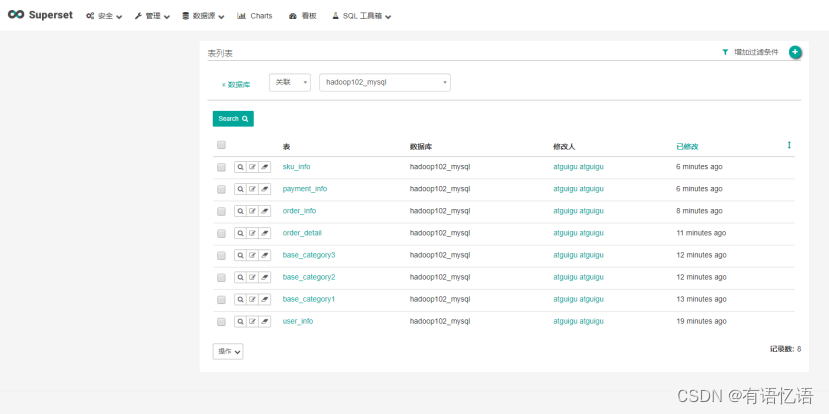
gmall数据库表格名称:base_category1 | base_category2 |base_category3 |order_detail |order_info |payment_info |sku_info |user_info
3)添加完成,可点击“过滤条件”选择不同维度对展示列表进行过滤。
3.3 表的查看与编辑
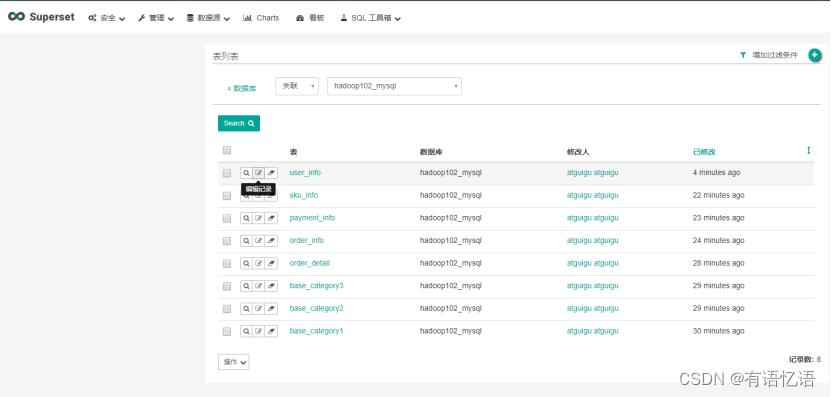
1)点击编辑
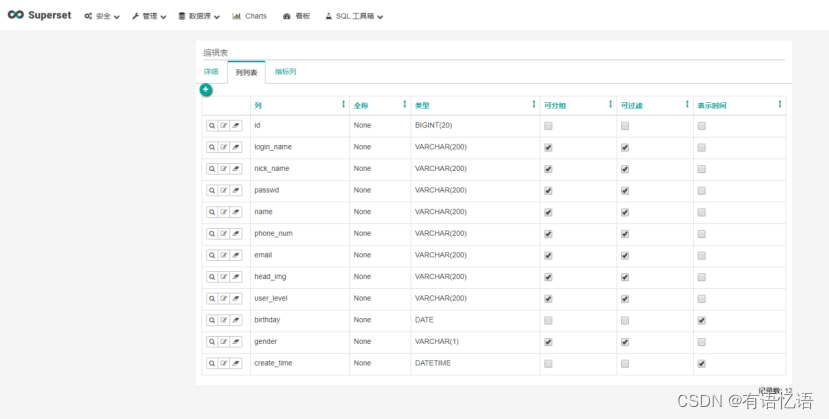
2)列表展示
1.在“详细”页中可通过sql语法对数据进行提前过滤操作,后续的操作基于本次查询的基础上进行实现。
2.可对表结构、数据类型、是否可进行group、filter、count、sum、min、max操作等进行编辑。
3.可通过sql语法添加一些新的列和列指标。
本文来自互联网用户投稿,该文观点仅代表作者本人,不代表本站立场。本站仅提供信息存储空间服务,不拥有所有权,不承担相关法律责任。 如若内容造成侵权/违法违规/事实不符,请联系我的编程经验分享网邮箱:chenni525@qq.com进行投诉反馈,一经查实,立即删除!
- Python教程
- 深入理解 MySQL 中的 HAVING 关键字和聚合函数
- Qt之QChar编码(1)
- MyBatis入门基础篇
- 用Python脚本实现FFmpeg批量转换
- 轻度听力损失需要助听器吗?
- 自存angular 复制功能 使用angular material design Clipboard cdk
- peropure·AI:开创智能助手新纪元
- 喜讯!云起无垠斩获“东升杯”国际创业大赛“优秀奖”
- 昌吉驾考学车刷题宝典_准橙考试网
- 如何使用synplify综合vivado IP
- 对接讯飞聊天机器人接口--复盘
- Linux 赛题FTP配置
- Linux系统下修改MySQL用户权限的方法
- 基于Java Web贫困认定管理平台论文