zabbix安装部署
目录
?14.安装zabbix_get工具,能够在命令行终端使用zabbix_get获取agent的监控值?
**********************************解决zabbix server图形乱码********************************
1.安装NTP(Network Time Protocol)服务,统一集群时间
3.获取zabbix下载源(同zabbix server的安装)
6.启动zabbix agent2,并配置zabbix-agent2开机自启
9.验证zabbix agent2与zabbix server联通
*********************无密码状态下修改数据库密码*******************
实验前准备
修改主机名
vi /etc/hostname
vi /etc/hosts


修改网卡
nmtui

zabbix-server: 192.168.60.128
zabbix-agent:192.168.60.132


关闭防火墙
systemctl stop firewalld
systemctl disable firewalld
    =(systemctl disable firewalld --now)
service iptables stop
setenforce 0


编辑配置文件
vi /etc/selinux/config
SELINUX=disabled
安装zabbix server
1.配置zabbix下载
使用阿里云的镜像站获取下载源
rpm -Uvh https://mirrors.aliyun.com/zabbix/zabbix/5.0/rhel/7/x86_64/zabbix-release-5.0-1.el7.noarch.rpm?清空yum缓存
yum clean all若报错,出现If you’d like to turn off curl’s verification of the certificate, use
the -k (or --insecure) option.的提示
下载cacert.pem文件
wget ?https://curl.haxx.se/ca/cacert.pem
修改/etc/profile文件,在末尾添加
export CURL_CA_BUNDLE=/etc/cacert.pem
2.将zabbix下载源替换成国内阿里云下载源
①安装wget
yum install wget?②下载阿里云Centos-7的repo文件
wget http://mirrors.aliyun.com/repo/Centos-7.repo?③替换系统的repo文件
cp CentOS-Base.repo CentOS-Base.repo.bak
mv Centos-7.repo CentOS-Base.repo
④更新yum源
yum clean all
yum makecache
yum update
⑤更换zabbix下载源
sed -i 's#http://repo.zabbix.com#https://mirrors.aliyun.com/zabbix#' /etc/yum.repos.d/zabbix.repo3.安装zabbix server、agent
yum install zabbix-server-mysql zabbix-agent -y4.在scl环境下安装zabbix前端
①安装centos软件集,software collections(SCL),该软件可以使用户在同一个操作系统中安装和使用多个版本的软件,而不会影响整个系统的安装包。在此处,是为了安装高版本的php
yum install centos-release-scl -y②修改配置文件,开启zabbix前端源
vi /etc/yum.repos.d/zabbix.repo[zabbix-frontend]
...
enabled=1
...
③安装zabbix前端包
yum install zabbix-web-mysql-scl zabbix-apache-conf-scl?-y?④可以使用scl --list查看php
[root@zabbix-server ~]# scl --list
rh-php72?
5.安装mysql数据库(也可以使用MariaDB)
①查看系统是否安装了mysql
yum list installed | grep mysql[root@zabbix-server ~]# yum list installed | grep mysql
rh-php72-php-mysqlnd.x86_64 ? ? ?7.2.24-1.el7 ? ? ? ? ? ? ? ? ? @centos-sclo-rh?
zabbix-server-mysql.x86_64 ? ? ? 5.0.40-1.el7 ? ? ? ? ? ? ? ? ? @zabbix ? ? ? ??
zabbix-web-mysql-scl.noarch ? ? ?5.0.40-1.el7 ? ? ? ? ? ? ? ? ? @zabbix-frontend?
②若出现上述没有的mysql则需使用yum remove命令删除
③下载rpm源
wget dev.mysql.com/get/mysql-community-release-el7-5.noarch.rpm④下载好的rpm文件
yum install mysql-community-release-el7-5.noarch.rpm -y⑤修改mysql仓库文件
?vi /etc/yum.repos.d/mysql-community.repo# Enable to use MySQL 5.6
[mysql56-community]
name=MySQL 5.6 Community Server
baseurl=http://repo.mysql.com/yum/mysql-5.6-community/el/7/$basearch/
enabled=0
gpgcheck=1
gpgkey=file:/etc/pki/rpm-gpg/RPM-GPG-KEY-mysql
# Note: MySQL 5.7 is currently in development. For use at your own risk.
# Please read with sub pages: https://dev.mysql.com/doc/relnotes/mysql/5.7/en/
[mysql57-community-dmr]
name=MySQL 5.7 Community Server Development Milestone Release
baseurl=http://repo.mysql.com/yum/mysql-5.7-community/el/7/$basearch/
enabled=1
gpgcheck=1
gpgkey=https://repo.mysql.com/RPM-GPG-KEY-mysql-2022
⑥使用yum安装mysql
yum install mysql-community-server -y⑦启动mysql服务
service mysqld start设置开机自启动
systemctl enable mysqld6.设置数据库密码
①获取临时登录密码
grep "password" /var/log/mysqld.log②登录mysql
mysql -u root -p③修改mysql密码策略
set global validate_password_policy=0;

set global validate_password_length=1;
④修改mysql密码
alter user 'root'@'localhost' identified by '123456';7.初始化数据库
登录mysql,并在mysql数据库中创建zabbix数据库和zabbix用户
create database zabbix character set utf8 collate utf8_bin;

create user zabbix@localhost identified by '123456';

grant all privileges on zabbix.* to zabbix@localhost;
8.退出mysql后,将初始数据库导入数据库
zcat /usr/share/doc/zabbix-server-mysql*/create.sql.gz | mysql -uzabbix -p zabbix9.为zabbix server配置数据库密码
vi /etc/zabbix/zabbix_server.conf?DBPassword=123456
10.配置前端时区,去掉前面的分号
vi /etc/opt/rh/rh-php72/php-fpm.d/zabbix.confphp_value[date.timezone] = Asia/Shanghai
11.启动zabbix server和agent进程
systemctl restart zabbix-server zabbix-agent httpd rh-php72-php-fpm12.将进程设置为开机自启动
systemctl enable zabbix-server zabbix-agent httpd rh-php72-php-fpm13 .访问主机zabbix界面
http://192.168.60.128/zabbix
初始账号为Admin,密码为zabbix
14.安装zabbix_get工具,能够在命令行终端使用zabbix_get获取agent的监控值?
yum install -y zabbix-get
zabbix_get -s 127.0.0.1 -p 10050 -k "system.cpu.load[all,avg1]"**********************************解决zabbix server图形乱码********************************
1.安装中文字体(文泉驿字体)
yum install -y wqy-microhei-fonts2.使用\cp,拷贝,命令前面加斜杠表示还原命令本意,在系统默认条件下,使用cp命令=使用cp -i命令,-i 表示若目标文件已存在,则会询问是否覆盖。输入alias可以看到哪些命令是以别名的形式执行的。
强制复制字体文件
\cp /usr/share/fonts/wqy-microhei/wqy-microhei.ttc /usr/share/fonts/dejavu/DejaVuSans.ttf再次回到zabbix界面,自动刷新后,乱码问题被修复
安装zabbix客户端(agent2)
1.安装NTP(Network Time Protocol)服务,统一集群时间
①在两台机器上均安装ntpdate服务
yum install ntpdate -y②在两台机器上调整时间,使其与aliyun ntp服务器一致
ntpdate -u ntp.aliyun.com2.统一时区
在所有服务器上执行,备份当前的时区配置
?mv /etc/localtime /etc/localtime.bak在所有服务器上执行,将上海时区连接到当前时区
ln -s /usr/share/zoneinfo/Asia/Shanghai /etc/localtime3.获取zabbix下载源(同zabbix server的安装)
rpm -Uvh https://mirrors.aliyun.com/zabbix/zabbix/5.0/rhel/7/x86_64/zabbix-release-5.0-1.el7.noarch.rpm4.安装zabbix agent2
yum install zabbix-agent2 -y5.查看zabbix agent2配置文件和启动命令
启动脚本:/usr/sbin/zabbix_agent2
配置文件:/etc/zabbix/zabbix_agent2.conf
6.启动zabbix agent2,并配置zabbix-agent2开机自启
systemctl start zabbix-agent2
systemctl enable zabbix-agent2
7.修改agent2配置文件
①利用正则表达式,排除掉#或$开头的注释内容
grep -Ev '^#|^$' /etc/zabbix/zabbix_agent2.conf②修改zabbix server地址,修改为server所在地址
vi /etc/zabbix/zabbix_agent2.confServer=192.168.10.131
ServerActive=192.168.10.131
Hostname=zabbix-agent
8.重启zabbix agent2
systemctl restart zabbix-agent29.验证zabbix agent2与zabbix server联通
使用zabbix_get,查看zabbix agent机器的hostname?,如果联通能够查看到hostname
zabbix_get -s '192.168.10.132' -p 10050 -k 'system.hostname'
[root@zabbix-server ~]# zabbix_get -s '192.168.60.132' -p 10050 -k 'system.hostname'
zabbix-agent
将zabbix agent添加到zabbix server
- 打开zabbix server的界面
- 在配置菜单中找到主机,选择创建主机

3.输入主机名称,群组选择Linux servers,主机ip,连接到ip,端口选择10050

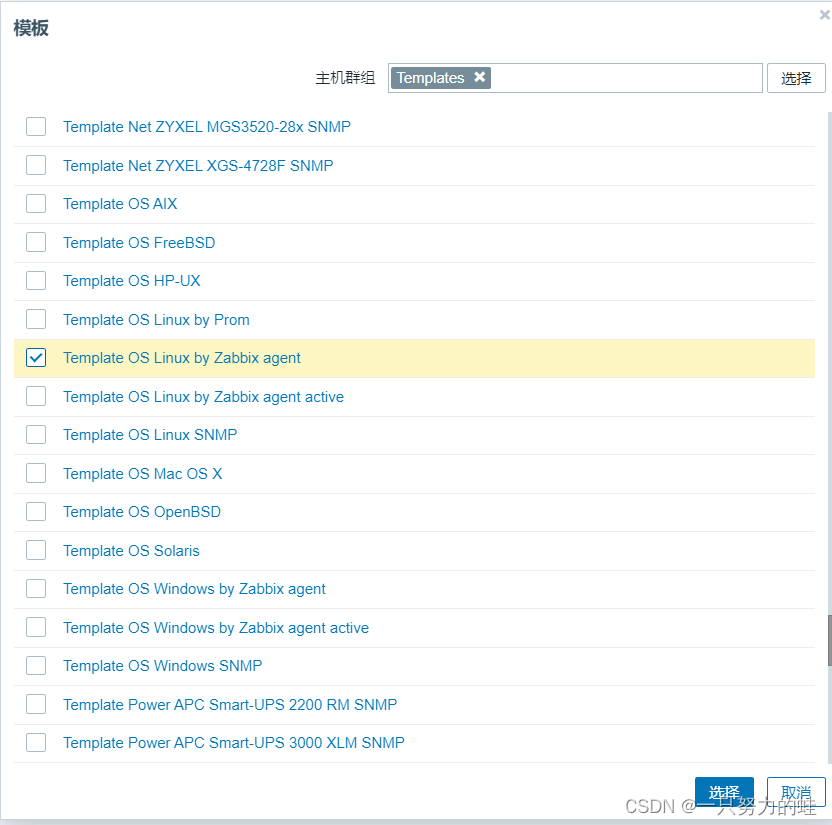
4.选择模板,模板选择Template OS Linux by Zabbix agent,点击添加


5.在主机中可看到新添加的机器,等待1-2分钟,可用性ZBX变绿色,表示已监控到Zabbix agent

*********************无密码状态下修改数据库密码*******************
1.编辑mysql配置文件
vi /etc/my.cnf在[mysqld]字段下增加
skip-grant-tables
2.重启mysql服务
service mysql restart3.直接登录mysql
mysql -u root4.直接登录mysql
use mysql;5.更新密码
UPDATE user SET authentication_string = password ('[123456]') WHERE User = 'root';6.使配置生效
flush privileges;7.退出,修改mysql配置文件,将1步中添加的内容删掉
8.再次重启mysql,密码已被修改
本文来自互联网用户投稿,该文观点仅代表作者本人,不代表本站立场。本站仅提供信息存储空间服务,不拥有所有权,不承担相关法律责任。 如若内容造成侵权/违法违规/事实不符,请联系我的编程经验分享网邮箱:chenni525@qq.com进行投诉反馈,一经查实,立即删除!
- Python教程
- 深入理解 MySQL 中的 HAVING 关键字和聚合函数
- Qt之QChar编码(1)
- MyBatis入门基础篇
- 用Python脚本实现FFmpeg批量转换
- 【书生·浦语大模型实战营第6课】OpenCompass大模型评测
- OpenAI ChatGPT-4开发笔记2024-04:Chat之Tool之2:multiple functions
- 【SpringBoot应用篇】【AOP+注解】SpringBoot+SpEL表达式基于注解实现权限控制
- vue,适配电脑不同分辨问题,适配比例为100%和125%分辨率导致页面样式错乱问题
- ARM day4 汇编及硬件编程
- 监控系统企业架构演进史-初入Prometheus
- 【解决方案】智能语音模块,东胜物联远场语音解决方案让控制更简单,应用于智能家居等场景
- 2024更新阿里云域名优惠口令大全_优惠口令获取方法
- vue的异步更新 $nextTick
- 【spring】代码生成器