双数据源同步的思考
Survive by day and develop by night.
talk for import biz , show your perfect code,full busy,skip hardness,make a better result,wait for change,challenge Survive.
happy for hardess to solve denpendies.
目录


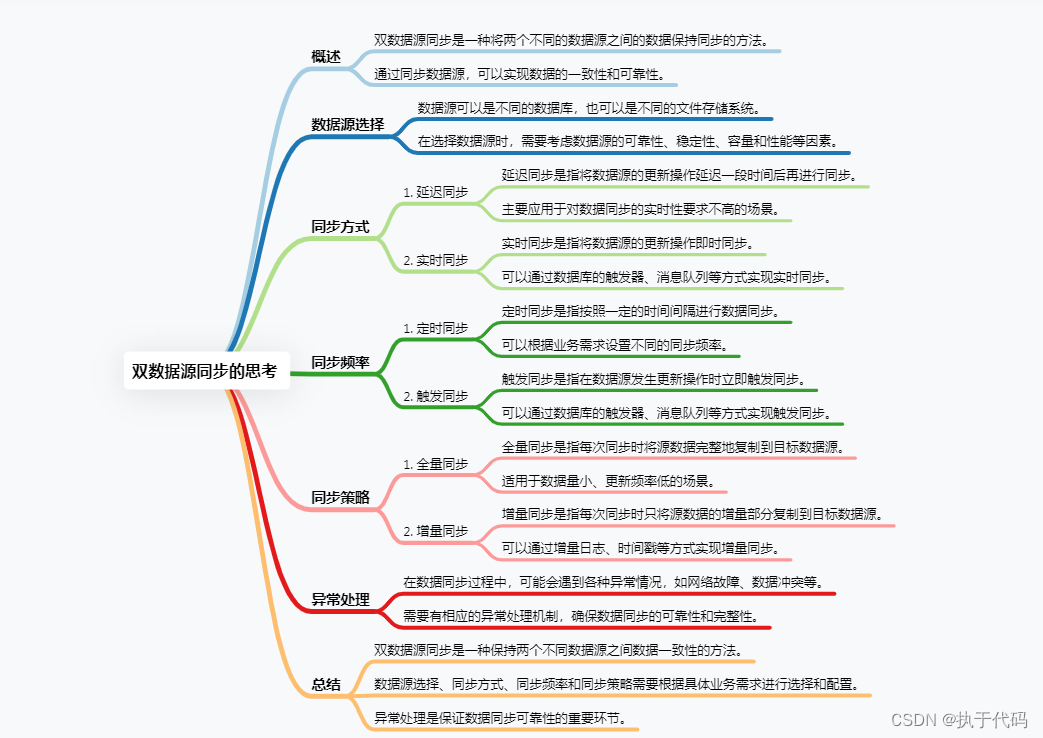
概述
当需要将数据从一个数据源同步到另一个数据源时,可以采用以下方法和步骤:
方法:
- 手动同步:通过编写脚本或使用工具进行手动数据同步。
- 定时任务:设置定时任务,定期执行数据同步操作。
- 数据库触发器:使用数据库触发器监测源数据的变化,并实时同步到目标数据源。
- 数据同步工具:使用专业的数据同步工具,如Sqoop、DataX等。
步骤:
- 确定源数据源和目标数据源的连接信息,包括数据库类型、主机地址、端口号、用户名、密码等。
- 创建目标数据源的表结构,确保与源数据源的表结构一致或可以映射。
- 根据需求,选择合适的同步方法(手动同步、定时任务、数据库触发器或数据同步工具)并实施。
- 编写数据同步脚本或配置数据同步工具,设置正确的数据源连接信息和同步规则。
- 执行数据同步操作,验证数据是否成功同步到目标数据源。
- 监测同步过程中的错误和异常情况,并及时处理。
- 定期检查同步结果,确保数据持续同步且一致性良好。
- 根据实际情况,优化数据同步的性能和稳定性,例如调整同步频率、优化SQL查询语句等。
那我们用程序怎么写呢?
需求:
设计思路
实现思路分析
1.简单实现
以下是一个示例的Java代码,用于将数据从一个数据源同步到另一个数据源:
import java.sql.*;

public class DataSync {

    public static void main(String[] args) {
        // 数据源1的连接参数
        String sourceUrl = "jdbc:mysql://localhost:3306/source_database";
        String sourceUsername = "root";
        String sourcePassword = "password";

        // 数据源2的连接参数
        String targetUrl = "jdbc:mysql://localhost:3306/target_database";
        String targetUsername = "root";
        String targetPassword = "password";

        // 同步数据的SQL查询
        String query = "SELECT * FROM source_table";

        try (
            // 创建数据源1的连接
            Connection sourceConnection = DriverManager.getConnection(sourceUrl, sourceUsername, sourcePassword);
            // 创建数据源2的连接
            Connection targetConnection = DriverManager.getConnection(targetUrl, targetUsername, targetPassword);
            // 创建数据源1的查询语句
            Statement sourceStatement = sourceConnection.createStatement();
            // 创建数据源2的插入语句
            Statement targetStatement = targetConnection.createStatement();
            // 执行数据源1的查询语句,并获取结果集
            ResultSet resultSet = sourceStatement.executeQuery(query)
        ) {
            // 遍历结果集
            while (resultSet.next()) {
                // 获取每一行数据的字段值
                int id = resultSet.getInt("id");
                String name = resultSet.getString("name");
                // 可以根据需要获取其他字段的值

                // 在数据源2中插入同步的数据
                String insertQuery = "INSERT INTO target_table (id, name) VALUES (" + id + ", '" + name + "')";
                targetStatement.executeUpdate(insertQuery);
            }

            System.out.println("数据同步完成!");
        } catch (SQLException e) {
            e.printStackTrace();
        }
    }
}
请根据实际情况修改连接参数和SQL查询语句,确保正确连接到两个数据源,并适应要同步的数据表和字段名称。
**
2.Spring+ mybatis 技术
**
在Spring Boot中,你可以使用MyBatis作为持久层框架,来实现从一个数据源将数据同步到另一个数据源。
首先,需要在pom.xml文件中添加MyBatis和相关的数据库驱动依赖:
<dependencies>
    <!-- MyBatis -->
    <dependency>
        <groupId>org.mybatis.spring.boot</groupId>
        <artifactId>mybatis-spring-boot-starter</artifactId>
    </dependency>
    <!-- 数据库驱动 -->
    <dependency>
        <groupId>com.mysql</groupId>
        <artifactId>mysql-connector-java</artifactId>
    </dependency>
</dependencies>
然后,在application.properties文件中配置两个数据源的连接信息:
# 第一个数据源
spring.datasource.url=jdbc:mysql://localhost:3306/source_db
spring.datasource.username=source_user
spring.datasource.password=source_password

# 第二个数据源
spring.target-datasource.url=jdbc:mysql://localhost:3306/target_db
spring.target-datasource.username=target_user
spring.target-datasource.password=target_password
接下来,创建两个数据源的配置类DataSourceConfig和TargetDataSourceConfig:
@Configuration
@MapperScan(basePackages = "com.example.source.mapper", sqlSessionTemplateRef = "sourceSqlSessionTemplate")
public class DataSourceConfig {
    @Bean
    @ConfigurationProperties(prefix = "spring.datasource")
    public DataSource sourceDataSource() {
        return DataSourceBuilder.create().build();
    }

    @Bean
    public SqlSessionFactory sourceSqlSessionFactory(DataSource sourceDataSource) throws Exception {
        SqlSessionFactoryBean factoryBean = new SqlSessionFactoryBean();
        factoryBean.setDataSource(sourceDataSource);

        return factoryBean.getObject();
    }

    @Bean
    public SqlSessionTemplate sourceSqlSessionTemplate(SqlSessionFactory sourceSqlSessionFactory) {
        return new SqlSessionTemplate(sourceSqlSessionFactory);
    }
}

@Configuration
@MapperScan(basePackages = "com.example.target.mapper", sqlSessionTemplateRef = "targetSqlSessionTemplate")
public class TargetDataSourceConfig {
    @Bean
    @ConfigurationProperties(prefix = "spring.target-datasource")
    public DataSource targetDataSource() {
        return DataSourceBuilder.create().build();
    }

    @Bean
    public SqlSessionFactory targetSqlSessionFactory(DataSource targetDataSource) throws Exception {
        SqlSessionFactoryBean factoryBean = new SqlSessionFactoryBean();
        factoryBean.setDataSource(targetDataSource);

        return factoryBean.getObject();
    }

    @Bean
    public SqlSessionTemplate targetSqlSessionTemplate(SqlSessionFactory targetSqlSessionFactory) {
        return new SqlSessionTemplate(targetSqlSessionFactory);
    }
}
然后,定义两个数据源对应的Mapper接口和SQL语句,分别在com.example.source.mapper和com.example.target.mapper包中。
最后,创建一个服务类SyncService,在这个类中使用两个数据源的Mapper接口来实现数据同步的逻辑:
@Service
public class SyncService {
    @Autowired
    private SourceMapper sourceMapper;

    @Autowired
    private TargetMapper targetMapper;

    public void syncData() {
        List<SourceData> sourceDataList = sourceMapper.getAllData();

        // 将sourceDataList同步到target数据源中
        for (SourceData sourceData : sourceDataList) {
            targetMapper.insertData(sourceData);
        }
    }
}
最后,在Spring Boot的启动类中添加@EnableAutoConfiguration注解和@EnableScheduling注解,用于自动配置和调度任务:
@SpringBootApplication
@EnableScheduling
public class Application {
    public static void main(String[] args) {
        SpringApplication.run(Application.class, args);
    }
}
这样,每次启动应用程序时,都会自动执行数据同步的任务。
以上就是使用Spring Boot和MyBatis进行数据从一个数据源同步到另一个数据源的方法。你可以根据自己的实际需求进行修改和扩展。
参考资料和推荐阅读
参考资料
官方文档
开源社区
博客文章
书籍推荐
1.https://www.jb51.net/article/258781.htm
2.https://blog.csdn.net/weixin_44735933/article/details/123061281
3.https://blog.csdn.net/m0_64136740/article/details/129517492
欢迎阅读,各位老铁,如果对你有帮助,点个赞加个关注呗!同时,期望各位大佬的批评指正~,如果有兴趣,可以加文末的交流群,大家一起进步哈
本文来自互联网用户投稿,该文观点仅代表作者本人,不代表本站立场。本站仅提供信息存储空间服务,不拥有所有权,不承担相关法律责任。 如若内容造成侵权/违法违规/事实不符,请联系我的编程经验分享网邮箱:chenni525@qq.com进行投诉反馈,一经查实,立即删除!