Ansible-playbook-------Template,tags,roles模块
Template模块
Jinja模板架构,通过模板可以实现向模板文件传参(python转义)把占位符参数传到配置文件中去
生成一个目标文本文件,传递变量到需要配置文件当中。(web开发)
template其实可以理解为外部传参
我们可以用Template模块,远程安装部署httpd,nginx
通过Template模块远程部署HTTP和NGINX
首先在本地yum安装一个httpd
对本机httpd的配置文件进行复制后修改
cp /etc/httpd/conf/httpd.conf /opt/httpd.conf.j2

j2为Temlpate可识别的后缀
httpd.conf.j2 在文件中配置的是占位符(声明的变量)
接下来就是对httpd.conf.j2配置文件进行修改
line? 42

line 95

line 119

然后配置/etc/ansible/hosts
/etc/ansible/hosts 配置了主机的占位符名称和j2文件中的占位符一致(定义参数:占位符的参数的参数声明好)playbook当中,template模块来吧模块参数传给的目标的配置文件
[webservers]

20.0.0.20 port=20.0.0.20:80 server_name=www.zzr.com:80 root_dir=/etc/httpd/htdocs

其中 port,server_name,root_dir都是httpd.conf.j2里面指定的内容

!!!注意,名称要一一对应!!!

[dbservers]
20.0.0.30 port=20.0.0.20:80 server_name=www.zzr.com:80 root_dir=/etc/httpd/htdocs

在目标主机上部署httpd
最后一步,编写playbook
- hosts: all
  remote_user: root
  vars:
    - package: httpd
    - service: httpd
  tasks:
    - name: install httpd
      yum: name={{package}}


    - name: install configure file
      template: src=/opt/httpd.conf.j2 dest=/etc/httpd/conf/httpd.conf
使用template模板
      notify:
        - restart httpd

    - name: create root_dir
      file:
        path: /etc/httpd/htdocs
        state: directory

    - name: start httpd
      service: name={{service}} enabled=true state=started
  handlers:
    - name: restart httpd
      service: name={{service}} state=restarted

httpd.conf.j2 在文件中配置的是占位符(声明的变量)
/etc/ansible/hosts 配置了主机的占位符名称和j2文件中的占位符一致(定义参数:占位符的参数的参数声明好)
playbook当中,template模块来吧模块参数传给的目标的配置文件
该脚本运行之后,成功之后就可以去目标主机去查看
vim /etc/httpd/conf/httpd.conf


到此,httpd就部署完成
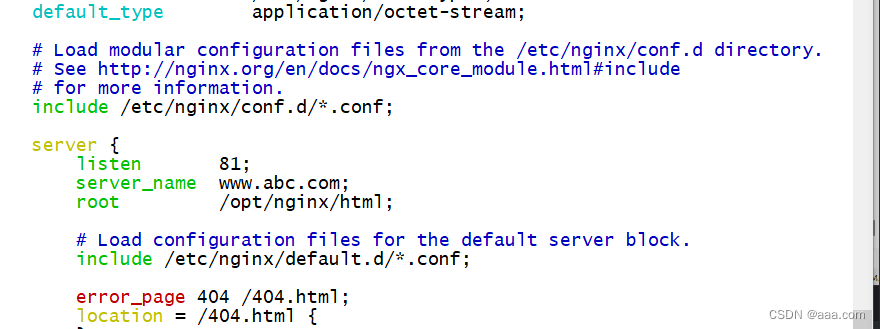
我们也可以用相同的方法去部署nginx
首先在本机yum安装一个nginx
对本机的nginx进行修改
cp /etc/nginx/nginx.conf /opt/nginx.conf.j2
然后对/etc/ansible/hosts修改
配置yml文件
vim nginx.yml

- hosts: all
  remote_user: root
  vars:
    - package: nginx
    - service: nginx
  tasks:
    - name: install nginx
      yum: name={{package}}


    - name: install configure file
      template: src=/opt/nginx.conf.j2 dest=/etc/nginx/nginx.conf
      notify:
        - restart nginx

    - name: create root_dir
      file:
        path: /opt/nginx/html
        state: directory

    - name: start nginx
      service: name={{service}} enabled=true state=started
  handlers:
    - name: restart nginx
      service: name={{service}} state=restarted

wq

ansible-playbook nginx.yml

最后一步去目标主机查看

到此,nginx部署完成
tags标签模块
标签模块,可以在playbook当中为任务设定标签(tags),我们在运行playbook时,可以通过指定任务标签,来实现只运行的标签任务。
和 --start-at 相似但又不完全相同
--start-at 和 --tags 的区别
--start-at:是指定位置之后全部运行
--tags:是运行指定部分
任务标签的种类:
- always:不管你是否指定了运行标签,任务都会执行
- never:即使运行了指定标签,该任务也不会执行
- debug:调试任务
- setup:收集主机信息
自定义标签:
- per_tasks:指定标签之前的任务
- port_tasks:运行指定标签之后的任务
我们用一串简单的代码来展示一下标签的用法
- hosts: all
  remote_user: root
  tasks:
   - name: tag debug
     debug:
       msg: "this is test1"
     tags:
       - debug

   - name: tag setup
     setup:
     tags:
       - setup

   - name: tag always
     debug:
       msg: "run"
     tags:
       - always
   - name: tag never
     debug:
       msg: "never run"
     tags:
       - never
在目标主机 touch guoqi.txt 标签always
在目标主机复制文件 /opt/abc.txt 标签never
第一次运行playbook不指定标签,查看文件生成情况。指定标签为never,再查看文件生成情况

ansible-playbook tag.yml --tag="never"

ansible-playbook tag.yml --tag="always"
never标签,选中也不执行。

我们修改标签


因为有always(不管你是否指定了运行标签,任务都会执行 )的原因,他还是会执行前面内容


运行完之后,他只会运行你已经选择的标签
Roles模块
又叫角色
ansible层次化,结构化的组织playbook,使用了rolse(角色)
可以根据层次的结构,自动装载变量文件,task,以及handlers等等
rolse:分别把变量 文件 任务 模块 以及处理器,防止单独的目录当中,使用rolse模块来一键调用这些文件。(类似于docker-compose)
rolse的结构图
-----------web------总目录,角色

files    存放copy和script模块调用的文件

templates  存放j2的模板文件

tasks  包含任务的目录

------main.yml  角色运行的任务

handlers   包含处理器的目录

----------main.yml

vars:存放变量的目录

---------main.yml

defaults  包含默认变量的目录

----------main.yml

meta    #包含元信息的目录

---------------main.yml

site.yml用来调用所有的配置文件。
相当于每一层都有一个main.yml
实验部署
通过roles来同时部署httpd,mysql,php
实验架构:

在? /etc/ansible/roles 下创建httpd? mysql? ?php? 三个目录
每个目录都创建? defaulte , files , meta , tasks , vars?, handlers ,.并且每个目录下都有main.yml文件
1.httpd/tasks/main.yml
- name: install httpd
  yum: name={{pkg}}
- name: start httpd
  service: enabled=true name={{svc}} state=started

1.2httpd/vars/main.yml
pkg: httpd
svc: httpd

2.mysql/tasks/main.yml
- name: install mysql
  yum: name={{pkg}}
- name: start mysql
  service: enabled=true name={{svc}} state=started
2.2mysql/vars/main.yml
pkg:
  - mariadb
  - mariadb-server
svc: mariadb

3.php/tasks/main.yml
- name: install php
  yum: name={{pkg}}
- name: start php-fpm
  service: enabled=true name={{svc}} state=started
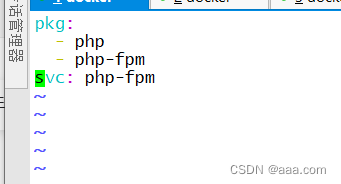
3.2 php/vars/main.yml
pkg:
  - php
  - php-fpm
svc: php-fpm
最后我们在roles目录下创建site,yml文件
- hosts: 20.0.0.50
  remote_user: root
  roles:
   - httpd
   - mysql
   - php
即可。
roles这个模块。site.yml相当于电影的总导演,他来选择哪个软件上场表演(安装/操作),而httpd,mysql,php相当于电影中的演员,只有被导演选中才能上场,就算没被选中,该软件的配置内容也不能少。
本文来自互联网用户投稿,该文观点仅代表作者本人,不代表本站立场。本站仅提供信息存储空间服务,不拥有所有权,不承担相关法律责任。 如若内容造成侵权/违法违规/事实不符,请联系我的编程经验分享网邮箱:chenni525@qq.com进行投诉反馈,一经查实,立即删除!
- Python教程
- 深入理解 MySQL 中的 HAVING 关键字和聚合函数
- Qt之QChar编码(1)
- MyBatis入门基础篇
- 用Python脚本实现FFmpeg批量转换
- unocss+iconify技术在vue项目中使用20000+的图标
- 短视频ai剪辑分发矩阵系统源码3年技术团队开发搭建打磨
- 知识图谱系统在人工智能领域的应用与前景
- C#winform数字图像处理技术灰度图像
- SpringBoot里MyBatis - SQL执行过程
- 全罐喂养一个月多少钱?适合猫咪全罐喂养的性价比猫罐头推荐
- kafka详解
- Java项目-瑞吉外卖项目优化Day1
- Report the POCV Coefficient and Derating
- 云卷云舒:2024数据库发展趋势预测-长图版
