SpringBoot-开启Actuator监控
Spring Boot Actuator是Spring Boot提供的一种管理和监控应用程序的框架,可以帮助我们了解应用程序的运行状况,提供HTTP端点来暴露应用程序的不同方面,如健康状况、指标、日志和运行时信息等。
开启Actuator监控,我们可以通过HTTP端点获取应用程序的详细信息,包括健康状况、指标、日志和运行时信息等。方便我们进行监控和诊断。Spring Boot Actuator提供了多种端点,可以通过配置文件或代码来启用和定制端点。
通过开启Actuator监控以下是在Spring Boot应用程序中开启Actuator监控的详细步骤:
一、pom.xml添加Actuator依赖项
首先,在pom.xml文件中添加Actuator依赖项。这可以通过以下配置完成:
<dependency>
????<groupId>org.springframework.boot</groupId>
????<artifactId>spring-boot-starter-actuator</artifactId>
</dependency>
然后,刷新Maven项目以更新相关的jar包。
二、配置Actuator端点路径
在application.yml或application.properties中配置Actuator端点的路径。
以下是一个配置的例子:
management:
??endpoints:
????jmx:
??????exposure:
????????include: '*'

????web:
??????exposure:
????????include: '*'
????????exclude: configprops
????????# 排除对配置信息的监控,每次浏览这个节点的时候,
????????# 数据库的链接就一直释放不掉, 最后导致超时,因为配置信息的监控也不重要,
????#enabled-by-default: true

??info:
????env:
??????enabled: true

??endpoint:
????health:
??????show-details: always
通过这个配置,我们可以定制Actuator的端点,包括JMX和Web端点的暴露。在这里,我们使用通配符 '*' 包含所有端点,但排除了 configprops。
三、启动项目访问Actuator端点
启动Spring Boot应用程序,并访问Actuator端点,地址通常为:
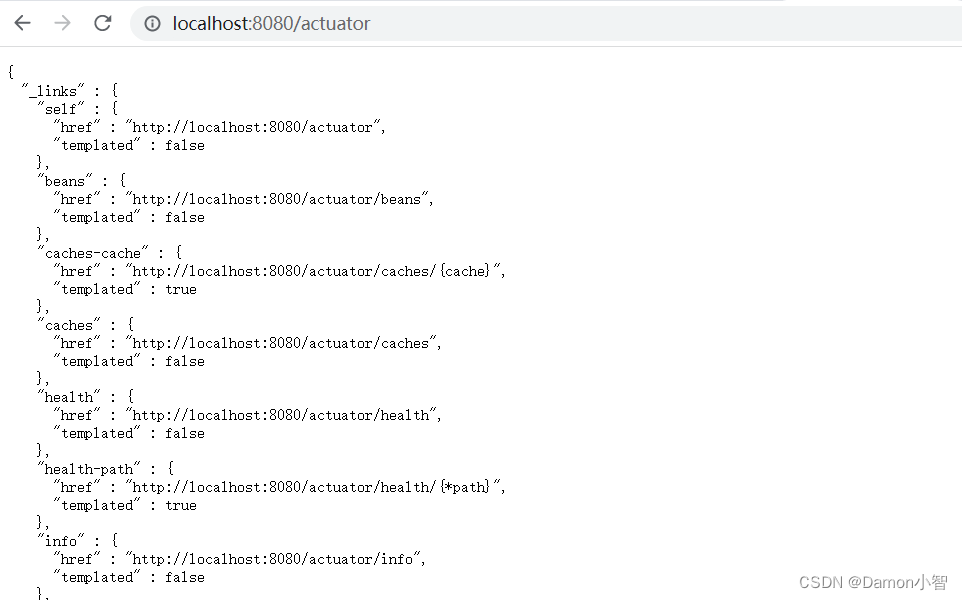
http://localhost:8080/actuator访问成功结果应为下图:

访问成功,Actuator开启完成。
成功访问后,Actuator监控就已经成功开启。现在,我们可以通过HTTP端点获取应用程序的各种信息,为我们日常对项目的监控和诊断提供了便利。
四、开启Actuator监控的好处
开启Spring Boot Actuator监控带来了许多好处,使得应用程序的管理和监控更加方便有效。以下是一些开启Spring Boot Actuator监控的好处:
- 实时监控应用健康状况:Actuator提供了健康状况端点,可以通过HTTP请求实时获取应用程序的健康状况,包括内存使用情况、线程情况、数据库连接情况等。
- 性能指标监控:通过Actuator的指标端点,可以获取应用程序的性能指标,包括内存使用率、GC活动、线程池状态等,帮助开发者及时发现和解决性能问题。
- 日志级别动态调整:Actuator提供了日志级别的端点,可以通过HTTP请求动态调整应用程序的日志级别,方便调试和排查问题,而无需重新部署应用。
- 运行时信息查看:Actuator的info端点提供了应用程序的运行时信息,包括自定义信息、环境变量等,帮助开发者更全面地了解应用程序的运行环境。
- 端点定制与扩展:可以通过配置文件或代码定制和扩展Actuator的端点,根据实际需求选择性地开启或关闭某些端点,以及添加自定义端点,提高灵活性。
- 与监控工具集成:Actuator提供了与多种监控工具(如Prometheus、Grafana等)的集成支持,可以将监控数据导入到这些工具中进行更强大的可视化和分析。
- 异常端点:Actuator的`/actuator/dump`端点提供了当前线程的栈追踪,有助于诊断应用程序的异常情况。
- 应用信息暴露:可以通过Actuator端点暴露应用程序的元数据信息,例如Git提交信息、构建时间等,有助于更好地管理应用的版本信息。
总体而言,开启Spring Boot Actuator监控为开发者提供了丰富的应用程序信息和管理工具,有助于更好地监测、调试和维护应用程序,提高了开发和运维的效率。
五、代码实例演示
下面我们做一个代码示例的演示:
import org.springframework.boot.SpringApplication;
import org.springframework.boot.autoconfigure.SpringBootApplication;
import org.springframework.web.bind.annotation.GetMapping;
import org.springframework.web.bind.annotation.RestController;

@SpringBootApplication
public class ActuatorDemoApplication {

    public static void main(String[] args) {
        SpringApplication.run(ActuatorDemoApplication.class, args);
    }
}

@RestController
class HelloController {

    @GetMapping("/hello")
    public String hello() {
        return "Hello, Actuator Demo!";
    }
}
在这个简单的 Spring Boot 应用中,我们定义了一个 HelloController 控制器,提供了一个简单的 /hello 接口返回 "Hello, Actuator Demo!"。接下来,我们需要在 pom.xml 文件中添加 Actuator 的依赖:
<dependency>
    <groupId>org.springframework.boot</groupId>
    <artifactId>spring-boot-starter-actuator</artifactId>
</dependency>
然后,在 application.properties 或 application.yml 文件中配置 Actuator 的端点:
management:
  endpoints:
    web:
      exposure:
        include: '*'
上述配置中的 exposure.include: '*' 表示开放所有的 Actuator 端点。在实际生产环境中,可能需要更具体的配置。
启动应用后,我们可以通过以下地址访问 Actuator 的端点:
- http://localhost:8080/actuator/health:查看应用的健康状况。
- http://localhost:8080/actuator/metrics:查看应用的指标信息。
- http://localhost:8080/actuator/loggers:查看和修改应用的日志配置。
- http://localhost:8080/actuator/info:查看应用的信息。
这个例子演示了如何在 Spring Boot 应用中使用 Actuator 进行监控和管理。当然,Actuator 还提供了更多的端点和功能,具体的使用可以根据实际需求进行配置和扩展。
本文来自互联网用户投稿,该文观点仅代表作者本人,不代表本站立场。本站仅提供信息存储空间服务,不拥有所有权,不承担相关法律责任。 如若内容造成侵权/违法违规/事实不符,请联系我的编程经验分享网邮箱:chenni525@qq.com进行投诉反馈,一经查实,立即删除!
- Python教程
- 深入理解 MySQL 中的 HAVING 关键字和聚合函数
- Qt之QChar编码(1)
- MyBatis入门基础篇
- 用Python脚本实现FFmpeg批量转换
- 帆软笔记-决策表报对象使用(两表格联动)
- IOS高德地图SDK接入-Swift
- [总线概述]
- 稳定匹配算法及其栈优化
- 我们在 MaxPatrol SIEM 信息安全事件监控系统中新增了 62 条威胁检测规则
- 【EFCore仓储模式】介绍一个EFCore的Repository实现
- 知识竞赛中主持人如何进行赛场控制
- 拥抱AIGC,应用AIGC,「AIGC短视频+数字人运营学习路线图」30天挑战。
- LeetCode刷题17:深度优先搜索解决547. 省份数量
- c++学习笔记-提高篇-STL标准模板库4(set容器、map容器)