【高可用】使用Keepalived实现SFTP服务的高可用
使用Keepalived实现SFTP服务的高可用
背景
这个事情的背景是生产环境的数据采集流程时不时会出问题(这个也是不可避免的),目前的处理手段是:所有的数据接口服务器(也就是存放原始数据等待采集的服务器)都部署一模一样的2台,数据也传的一模一样,然后当采集程序采集当前节点的数据异常的时候,由运维人员去改配置手动的切换。
这样操作面临的问题不用多说,首先就是时效性的问题,就算数据断了能够及时发出告警,等到运维人员处理完成那也是至少几十分钟后了,所以高可用的实现还是很有必要的。
简单调研下来还是只能用Keepalived来做这个软负载,毕竟客户不愿意出钱(铁公鸡)去购买F5设备这些东西做硬负载,所以就基于这个目标开干。
由于是做高可用,且我们的使用场景不是主备,应该是角色相同的两个服务器,所以不使用Keepalived的抢占式机制,改为非抢占。
准备工作
服务器和VIP
准备2台服务器和一个VIP:
- 服务器A:172.18.0.26,sftp等服务提前装好
- 服务器B:172.18.0.27,sftp等服务提前装好
- VIP:172.18.0.78,虚拟IP,用于对外访问,在AB之间漂移
Keepalived软件
因为官网提供的是源码包的下载,为了方便后续实施人员在环境上做安装操作,做成RPM包更稳妥点,Centos7的官方仓库RPM包也是很老的版本,好像是1.3.X的,最新版已经2.2.8了,所以这里要自己打一下包,先写SPEC文件,保存为keepalived.spec:
%bcond_without snmp
%bcond_without vrrp
%bcond_without sha1
%bcond_with profile
%bcond_with debug
%if 0%{?rhel} && 0%{?rhel} <= 6
%bcond_with nftables
%bcond_with track_process
%bcond_with libiptc
%else
%bcond_without nftables
%bcond_without track_process
%bcond_without libiptc
%endif

%global _hardened_build 1

Name: keepalived
Summary: High Availability monitor built upon LVS, VRRP and service pollers
Version: 2.2.8
Release: 1%{?dist}
License: GPLv2+
URL: http://www.keepalived.org/
Group: System Environment/Daemons

Source0: http://www.keepalived.org/software/keepalived-%{version}.tar.gz
Source1: keepalived.service
Source2: keepalived.init

# distribution specific definitions
%define use_systemd (0%{?fedora} && 0%{?fedora} >= 18) || (0%{?rhel} && 0%{?rhel} >= 7) || (0%{?suse_version} == 1315)

%if %{use_systemd}
Requires(post): systemd
Requires(preun): systemd
Requires(postun): systemd
%else
Requires(post): /sbin/chkconfig
Requires(preun): /sbin/chkconfig
Requires(preun): /sbin/service
Requires(postun): /sbin/service
%endif

BuildRoot: %{_tmppath}/%{name}-%{version}-%{release}-root-%(%{__id_u} -n)
%if %{with snmp}
BuildRequires: net-snmp-devel
%endif
%if %{use_systemd}
BuildRequires: systemd-units
%endif
BuildRequires: openssl-devel
BuildRequires: libnl3-devel
BuildRequires: ipset-devel
BuildRequires: iptables-devel
BuildRequires: libnfnetlink-devel

%if (0%{?rhel} && 0%{?rhel} >= 7)
Requires: ipset-libs
%endif

%description
Keepalived provides simple and robust facilities for load balancing
and high availability to Linux system and Linux based infrastructures.
The load balancing framework relies on well-known and widely used
Linux Virtual Server (IPVS) kernel module providing Layer4 load
balancing. Keepalived implements a set of checkers to dynamically and
adaptively maintain and manage load-balanced server pool according
their health. High availability is achieved by VRRP protocol. VRRP is
a fundamental brick for router failover. In addition, keepalived
implements a set of hooks to the VRRP finite state machine providing
low-level and high-speed protocol interactions. Keepalived frameworks
can be used independently or all together to provide resilient
infrastructures.

%prep
%setup -q

%build
%configure \
    %{?with_debug:--enable-debug} \
    %{?with_profile:--enable-profile} \
    %{!?with_vrrp:--disable-vrrp} \
    %{?with_snmp:--enable-snmp --enable-snmp-rfc} \
    %{?with_sha1:--enable-sha1} \
    %{!?with_nftables:--disable-nftables} \
    %{!?with_track_process:--disable-track-process} \
    %{!?with_libiptc:--disable-libiptc}
%{__make} %{?_smp_mflags} STRIP=/bin/true

%install
rm -rf %{buildroot}
make install DESTDIR=%{buildroot}
rm -rf %{buildroot}%{_sysconfdir}/keepalived/samples/
rm -rf %{buildroot}%{_defaultdocdir}/keepalived/
%if %{use_systemd}
rm -rf %{buildroot}%{_initrddir}/
%{__install} -p -D -m 0644 %{SOURCE1} %{buildroot}%{_unitdir}/keepalived.service
%else
rm %{buildroot}%{_sysconfdir}/init/keepalived.conf
%{__install} -p -D -m 0755 %{SOURCE2} %{buildroot}%{_initrddir}/keepalived
%endif
mkdir -p %{buildroot}%{_libexecdir}/keepalived

%clean
rm -rf %{buildroot}

%post
%if %{use_systemd}
%systemd_post keepalived.service
%else
/sbin/chkconfig --add keepalived
%endif

%preun
%if %{use_systemd}
%systemd_preun keepalived.service
%else
if [ "$1" -eq 0 ]; then
    /sbin/service keepalived stop >/dev/null 2>&1
    /sbin/chkconfig --del keepalived
fi
%endif

%postun
%if %{use_systemd}
%systemd_postun_with_restart keepalived.service
%else
if [ "$1" -eq 1 ]; then
    /sbin/service keepalived condrestart >/dev/null 2>&1 || :
fi
%endif

%files
%defattr(-,root,root,-)
%attr(0755,root,root) %{_sbindir}/keepalived
%config(noreplace) %attr(0644,root,root) %{_sysconfdir}/sysconfig/keepalived
%config(noreplace) %attr(0644,root,root) %{_sysconfdir}/keepalived/keepalived.conf.sample
%doc AUTHOR ChangeLog CONTRIBUTORS COPYING README README.md TODO
%doc doc/keepalived.conf.SYNOPSIS doc/samples/keepalived.conf.*
%dir %{_sysconfdir}/keepalived/
%dir %{_libexecdir}/keepalived/
%if %{with snmp}
%{_datadir}/snmp/mibs/KEEPALIVED-MIB.txt
%{_datadir}/snmp/mibs/VRRP-MIB.txt
%{_datadir}/snmp/mibs/VRRPv3-MIB.txt
%endif
%{_bindir}/genhash
%if %{use_systemd}
%{_unitdir}/keepalived.service
%else
%{_initrddir}/keepalived
%endif
%{_mandir}/man1/genhash.1*
%{_mandir}/man5/keepalived.conf.5*
%{_mandir}/man8/keepalived.8*
把这个spec文件放在rpmbuild/SPECS下,把官网下载的源码包放在rpmbuild/SOURCES下然后执行编译命令:
rpmbuild -bb ~/rpmbuild/SPECS/keepalived.spec
该命令成功后会在rpmbuild/RPMS/x86_64/目录下生成这两个rpm包:

我们只需要用keepalived-2.2.8-1.el7.x86_64.rpm包就行了。
实施
安装Keepalived软件
rpm包拷贝到服务器A和服务器B上做安装,或者自己会做yum就做成yum装,要方便些,不用到处scp:
rpm -ivh keepalived-2.2.8-1.el7.x86_64.rpm

如果报了缺少libnetsnmp之类的依赖,需要安装几个依赖软件:
yum install -y net-snmp-libs net-snmp-agent-libs

配置服务器
上面说到,我们使用的是非抢占式的模式,所以配置文件这样写,只要注意改动几个特别说明的字段就可以:
! Configuration File for keepalived

global_defs {
   notification_email {
     acassen@firewall.loc
     failover@firewall.loc
     sysadmin@firewall.loc
   }
   notification_email_from Alexandre.Cassen@firewall.loc
   smtp_server 192.168.200.1
   smtp_connect_timeout 30
   router_id LVS_DEVEL
   vrrp_skip_check_adv_addr
   vrrp_garp_interval 0
   vrrp_gna_interval 0
}

# 节点配置内容
vrrp_instance VI_1 {
    state BACKUP
    interface p1p2 # 绑定VIP的网卡,根据实际情况填写
    nopreempt # 配置为非抢占式,必填
    virtual_router_id 53 # A和B服务器保持一致即可
    mcast_src_ip 172.18.0.26 # 当前节点的IP,根据情况填写
    priority 100 # A和B服务不一样就行
    advert_int 1
    authentication {
        auth_type PASS
        auth_pass 1111 # A和B节点保持一致即可
    }
    virtual_ipaddress {
        172.18.0.78 # VIP
    }
}

# 注意此处
virtual_server 172.18.0.78 22 { # 虚拟服务
    delay_loop 6
    lb_algo rr
    lb_kind DR
    nat_mask 255.255.255.0
    persistence_timeout 0
    protocol TCP

    real_server 172.18.0.26 22 { # 实际对应的服务,这是A服务器的
        weight 1
        TCP_CHECK {
            connect_timeout 8
            nb_get_retry 3
            delay_before_retry 3
            connect_port 22 # 服务端口
        }
    }

    real_server 172.18.0.27 22 { # 实际对应的服务,这是B服务器的
        weight 1
        TCP_CHECK {
            connect_timeout 8
            nb_get_retry 3
            delay_before_retry 3
            connect_port 22 # 服务端口
        }
    }
}
按照上述配置配置好2台服务器,然后分别启动keepalived服务:
systemctl start keepalived
systemctl status keepalived

我们可以通过ip addr查看当前vip绑定的机器是服务器B

测试验证
接下来测试验证一下高可用的能力,为了方便区分,首先在两个服务器的root目录下放不同的文件,如果使用别的用户测试就放在对应用户的默认目录下就行,编写以下的测试脚本:
import time
import paramiko

host = "172.18.0.78"
username = "root"
password = "xxxxx"

print("开始运行测试脚本")
ssh_client = paramiko.SSHClient()
print("首次建立ssh和sftp连接")
ssh_client.set_missing_host_key_policy(paramiko.WarningPolicy)
ssh_client.connect(hostname=host, username=username, password=password)
sftp = ssh_client.open_sftp()
while True:
    try:
        tran = ssh_client.get_transport()
        if tran.is_active():
            print("检测到ssh连接已经建立,直接执行测试逻辑")
            # 如果连接已经建立
            print(sftp.listdir())
        else:

            ssh_client.connect(
                hostname=host, username=username, password=password)
            sftp = ssh_client.open_sftp()
    except Exception as e:
        print("检测到ssh发生主备切换,重新建立sftp连接")
        ssh_client.connect(hostname=host, username=username, password=password)
        sftp = ssh_client.open_sftp()
    time.sleep(10)
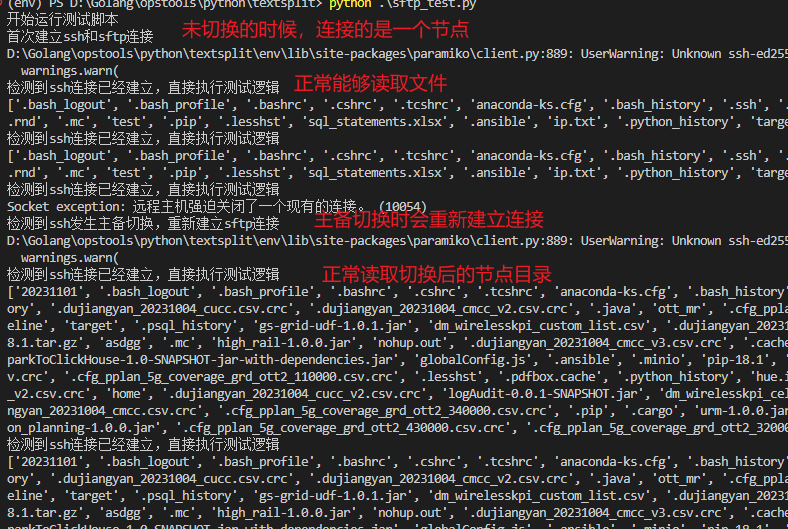
脚本会每隔十秒就在sftp上面列出以下当前目录,运行起来:

然后我们后台去停止主节点(当前是服务器B)的keepalived服务:
systemctl stop keepalived

ok,大功告成
本文来自互联网用户投稿,该文观点仅代表作者本人,不代表本站立场。本站仅提供信息存储空间服务,不拥有所有权,不承担相关法律责任。 如若内容造成侵权/违法违规/事实不符,请联系我的编程经验分享网邮箱:chenni525@qq.com进行投诉反馈,一经查实,立即删除!