超声波模块的驱动(STM32、51单片机等)
发布时间:2024年01月07日
一、前言
本文旨在分享单片机对超声波模块的驱动,测量距离和显示
 ?
?
二、超声波的驱动?
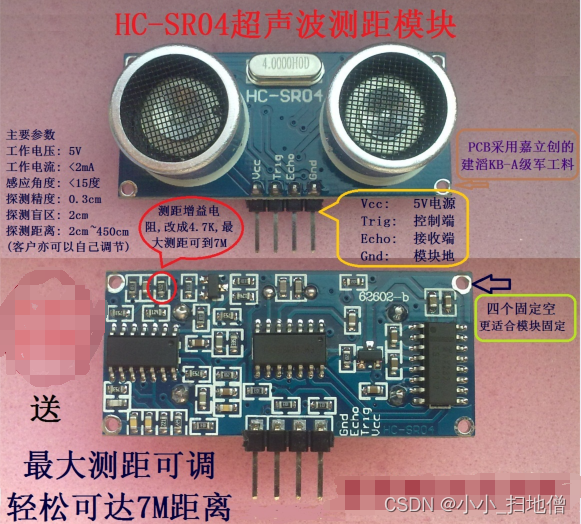
1、超声波模块

2、模块性能
(1)TCT40-16T/R1 压电陶瓷超声传感器(通用型)
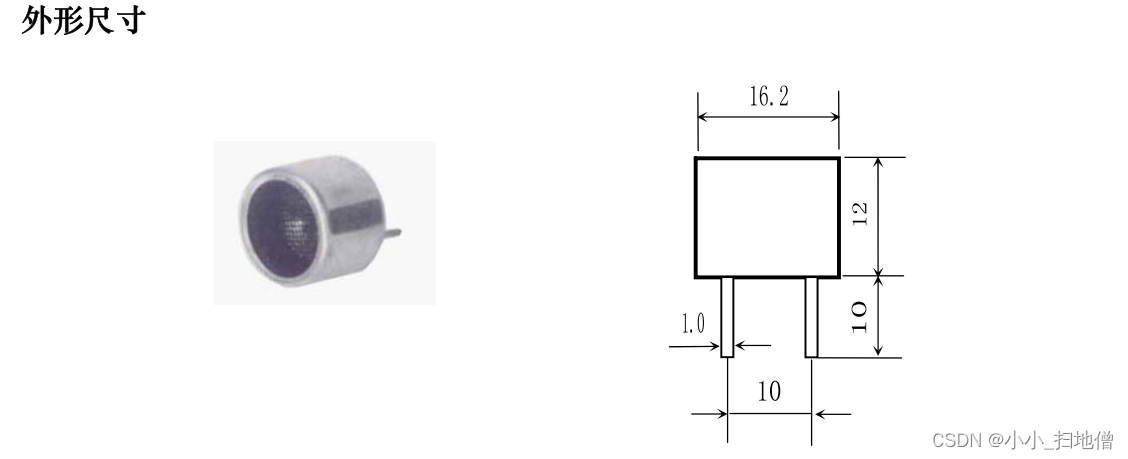


3、接口定义
Vcc、 Trig(控制端)、 Echo(接收端)、 Gnd
4、使用方法
控制口发一个 10US 以上的高电平,就可以在接收口等待高电平输出.一有输出就可以开定时器计时,当此口变为低电平时就可以读定时器的值,此时就为此次测距的时间,方可算出距离.如此不断的周期测,就可以达到你移动测量的值了。
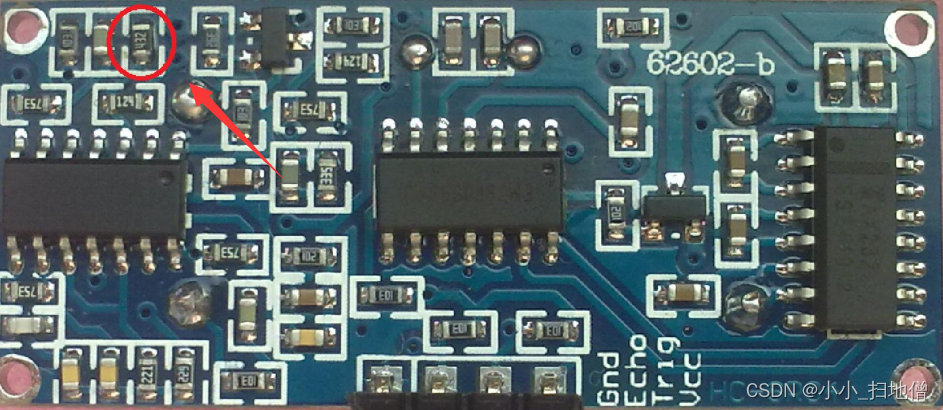
?5、最远探测距离调节
上图标志电阻即 R3,可以调节最大探测距离。R3 电阻为 392,探测距离最大 4.5M 左右,探测角度小于 15 度;R3 电阻为 472,探测距离最大 7M 左右,探测角度小于 30 度;出厂默认 392,即最大探测距离 4.5M 左右。R3 电阻大,接收部分增益高,检测距离大,但检测角度会相应变大,容易检测到前方旁边的物体。当然,客户在不要求很高的测试距离的条件下,
可以改小 R3 来减小探测角度,这时最大测距会减小。
6、工作原理?
(1)采用 IO 触发测距,给至少 10us 的高电平信号;
(2)模块自动发送 8 个 40khz 的方波,自动检测是否有信号返回;
(3)有信号返回,通过 IO 输出一高电平,高电平持续的时间就是
(4)超声波从发射到返回的时间.测试距离=(高电平时间*声速(340M/S))/2;
7、注意事项?
1:此模块不宜带电连接,如果要带电连接,则先让模块的 Gnd 端先连接。否则会影响
模块工作。
2:测距时,被测物体的面积不少于 0.5 平方米且要尽量平整。否则会影响测试结果。
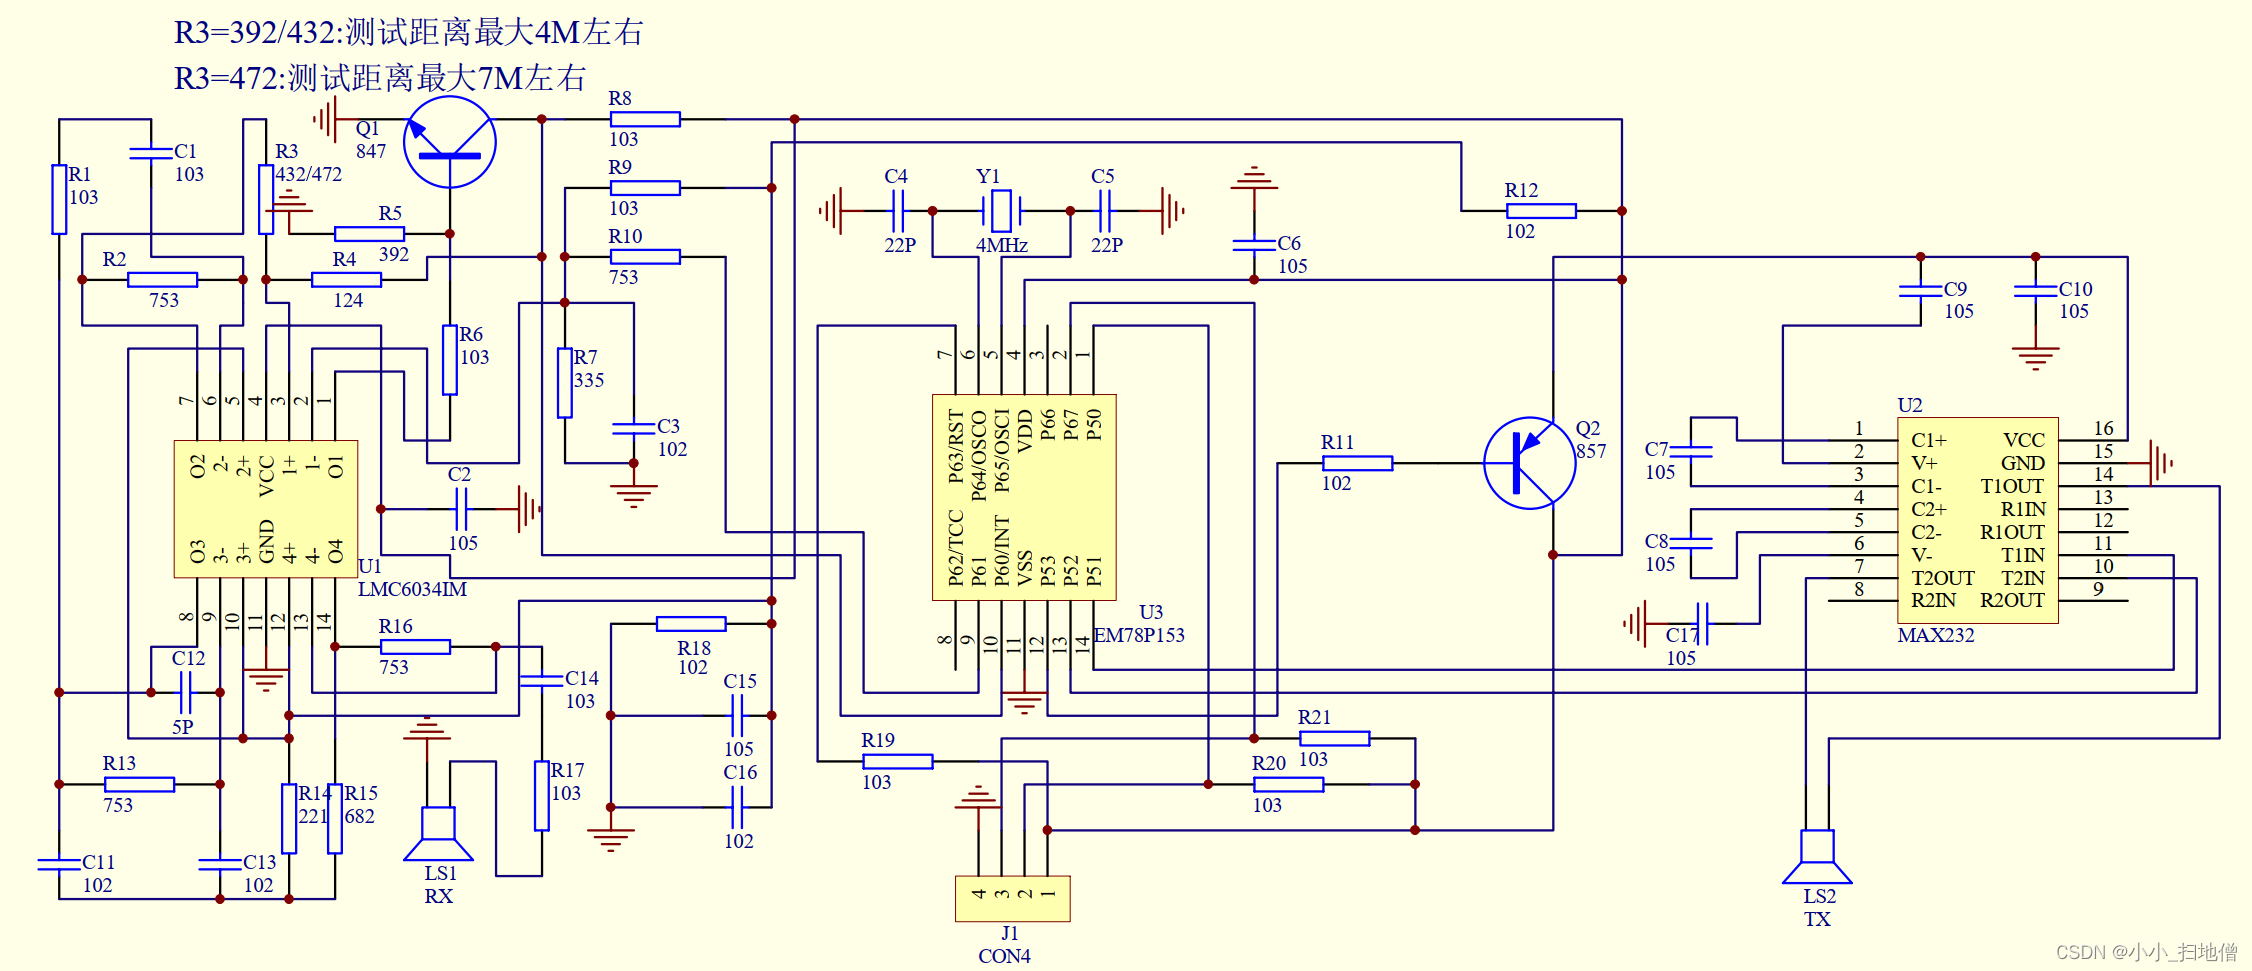
8、模块原理图
三、驱动代码
1、超声波PIC单片机C程序
//
//     PIC16F877 + HC-SR04 + LCD03 example
//     Written October 2008 , using HITECH PIC16 compiler
//
//		 Note - assumes a 20MHz crystal, which is 5MHz timer clock
//		 A 1:4 prescaler is used to give a 1.25MHz timer count (0.8uS per tick)
//
//     This code is Freeware - Use it for any purpose you like.
//
///


#include <pic.h>
#include <stdio.h>

__CONFIG(0x3b32);

#define trig	RB0
#define echo	RB1

void clrscn(void);							// prototypes
void cursor(char pos);
void print(char *p);
void setup(void);
unsigned int get_srf04(void);

char s[21];										// buffer used to hold text to print

void main(void)
{
unsigned int range;

	setup();										// sets up the PIC16F877 I2C port
	clrscn();									// clears the LCD03 disply
	cursor(2);									// sets cursor to 1st row of LCD03
	sprintf(s,"SRF04 Ranger Test");		// text, printed into our buffer
	print(s);									// send it to the LCD03

	while(1) {									// loop forever
		range = get_srf04();					// get range from srf04 (round trip flight time in 0.8uS units)
		cursor(24);								// sets cursor to 2nd row of LCD03
		sprintf(s,"Range = %dcm  ", range/72);	// convert to cm
		print(s);								// send it to the LCD03
		cursor(44);								// sets cursor to 3rd row of LCD03
		sprintf(s,"Range = %dinch  ", range/185);	// convert to inches
		print(s);								// send it to the LCD03

		TMR1H = 0;								// 52mS delay - this is so that the SRF04 ranging is not too rapid
		TMR1L = 0;								// and the previous pulse has faded away before we start the next one
		T1CON = 0x21;							// 1:4 prescale and running
		TMR1IF = 0;
		while(!TMR1IF);						// wait for delay time
		TMR1ON = 0;								// stop timer
	}
}

unsigned int get_srf04(void)
{
	TMR1H = 0xff;						// prepare timer for 10uS pulse
	TMR1L = -14;
	T1CON = 0x21;						// 1:4 prescale and running
	TMR1IF = 0;
	trig = 1;							// start trigger pulse
	while(!TMR1IF);					// wait 10uS
	trig = 0;							// end trigger pulse
	TMR1ON = 0;							// stop timer

	TMR1H = 0;							// prepare timer to measure echo pulse
	TMR1L = 0;
	T1CON = 0x20;						// 1:4 prescale but not running yet
	TMR1IF = 0;
	while(!echo && !TMR1IF);		// wait for echo pulse to start (go high)
	TMR1ON = 1;							// start timer to measure pulse
	while(echo && !TMR1IF);			// wait for echo pulse to stop (go low)
	TMR1ON = 0;							// stop timer
	return (TMR1H<<8)+TMR1L;		// TMR1H:TMR1L contains flight time of the pulse in 0.8uS units
}

void clrscn(void)
{
	SEN = 1;								// send start bit
	while(SEN);							// and wait for it to clear

	SSPIF = 0;
	SSPBUF = 0xc6;						// LCD02 I2C address
	while(!SSPIF);						// wait for interrupt
	SSPIF = 0;							// then clear it.

	SSPBUF = 0;							// address of register to write to
	while(!SSPIF);						//
	SSPIF = 0;							//

	SSPBUF = 12;						// clear screen
	while(!SSPIF);						//
	SSPIF = 0;							//

	SSPBUF = 4;							// cursor off
	while(!SSPIF);						//
	SSPIF = 0;							//

	PEN = 1;								// send stop bit
	while(PEN);							//
}


void cursor(char pos)
{
	SEN = 1;								// send start bit
	while(SEN);							// and wait for it to clear

	SSPIF = 0;
	SSPBUF = 0xc6;						// LCD02 I2C address
	while(!SSPIF);						// wait for interrupt
	SSPIF = 0;							// then clear it.

	SSPBUF = 0;							// address of register to write to
	while(!SSPIF);						//
	SSPIF = 0;							//

	SSPBUF = 2;							// set cursor
	while(!SSPIF);						//
	SSPIF = 0;							//
	SSPBUF = pos;						//
	while(!SSPIF);						//
	SSPIF = 0;							//

	PEN = 1;								// send stop bit
	while(PEN);							//
}


void print(char *p)
{
	SEN = 1;								// send start bit
	while(SEN);							// and wait for it to clear

	SSPIF = 0;
	SSPBUF = 0xc6;				// LCD02 I2C address
	while(!SSPIF);				// wait for interrupt
	SSPIF = 0;					// then clear it.

	SSPBUF = 0;					// address of register to write to
	while(!SSPIF);				//
	SSPIF = 0;					//

	while(*p) {
		SSPBUF = *p++;			// write the data
		while(!SSPIF);			//
		SSPIF = 0;				//
	}

	PEN = 1;					// send stop bit
	while(PEN);					//
}


void setup(void)
{
unsigned long x;

	TRISB = 0xfe;				// RB0 (trig) is output
	PORTB = 0xfe;				// and starts low

	TRISC = 0xff;
	PORTC = 0xff;

	SSPSTAT = 0x80;
	SSPCON = 0x38;
	SSPCON2 = 0x00;
	SSPADD = 50;				// SCL = 91khz with 20Mhz Osc

	for(x=0; x<300000L; x++);		// wait for LCD03 to initialise
}
2、超声波测距51C程序
//晶振=8M
//MCU=STC10F04XE
//P0.0-P0.6共阳数码管引脚
//Trig  = P1^0
//Echo  = P3^2
#include <reg52.h>     //包括一个52标准内核的头文件
#define uchar unsigned char //定义一下方便使用
#define uint  unsigned int
#define ulong unsigned long
//***********************************************
sfr  CLK_DIV = 0x97; //为STC单片机定义,系统时钟分频
                     //为STC单片机的IO口设置地址定义
sfr   P0M1   = 0X93;
sfr   P0M0   = 0X94;
sfr   P1M1   = 0X91;
sfr   P1M0   = 0X92;
sfr	P2M1   = 0X95;
sfr	P2M0   = 0X96;
//***********************************************
sbit Trig  = P1^0; //产生脉冲引脚
sbit Echo  = P3^2; //回波引脚
sbit test  = P1^1; //测试用引脚

uchar code SEG7[10]={0xC0,0xF9,0xA4,0xB0,0x99,0x92,0x82,0xF8,0x80,0x90};//数码管0-9
uint distance[4];  //测距接收缓冲区
uchar ge,shi,bai,temp,flag,outcomeH,outcomeL,i;  //自定义寄存器
bit succeed_flag;  //测量成功标志
//********函数声明
void conversion(uint temp_data);
void delay_20us();
//void pai_xu();

void main(void)   // 主程序
{  uint distance_data,a,b;
   uchar CONT_1;
   CLK_DIV=0X03; //系统时钟为1/8晶振(pdf-45页)
     P0M1 = 0;   //将io口设置为推挽输出
     P1M1 = 0;
     P2M1 = 0;
     P0M0 = 0XFF;
     P1M0 = 0XFF;
     P2M0 = 0XFF;
   i=0;
   flag=0;
	test =0;
	Trig=0;       //首先拉低脉冲输入引脚
	TMOD=0x11;    //定时器0,定时器1,16位工作方式
	TR0=1;	     //启动定时器0
   IT0=0;        //由高电平变低电平,触发外部中断
	ET0=1;        //打开定时器0中断
 //ET1=1;        //打开定时器1中断
	EX0=0;        //关闭外部中断
	EA=1;         //打开总中断0


while(1)         //程序循环
	{
  EA=0;
	     Trig=1;
        delay_20us();
        Trig=0;         //产生一个20us的脉冲,在Trig引脚
        while(Echo==0); //等待Echo回波引脚变高电平
	     succeed_flag=0; //清测量成功标志
	     EX0=1;          //打开外部中断
	 	  TH1=0;          //定时器1清零
        TL1=0;          //定时器1清零
	     TF1=0;          //
        TR1=1;          //启动定时器1
   EA=1;

      while(TH1 < 30);//等待测量的结果,周期65.535毫秒(可用中断实现)
		  TR1=0;          //关闭定时器1
        EX0=0;          //关闭外部中断

    if(succeed_flag==1)
	     {
		   distance_data=outcomeH;                //测量结果的高8位
           distance_data<<=8;                   //放入16位的高8位
		     distance_data=distance_data|outcomeL;//与低8位合并成为16位结果数据
            distance_data*=12;                  //因为定时器默认为12分频
           distance_data/=58;                   //微秒的单位除以58等于厘米
         }                                      //为什么除以58等于厘米,  Y米=(X秒*344)/2
			                                       // X秒=( 2*Y米)/344 ==》X秒=0.0058*Y米 ==》厘米=微秒/58
    if(succeed_flag==0)
		   {
            distance_data=0;                    //没有回波则清零
		   	test = !test;                       //测试灯变化
           }

     ///       distance[i]=distance_data; //将测量结果的数据放入缓冲区
     ///        i++;
  	  ///	 if(i==3)
	  ///	     {
	  ///	       distance_data=(distance[0]+distance[1]+distance[2]+distance[3])/4;
     ///        pai_xu();
     ///        distance_data=distance[1];


	   a=distance_data;
       if(b==a) CONT_1=0;
       if(b!=a) CONT_1++;
       if(CONT_1>=3)
		   { CONT_1=0;
			  b=a;
			  conversion(b);
			}
	  ///		 i=0;
 	  ///		}
	 }
}
//***************************************************************
//外部中断0,用做判断回波电平
INTO_()  interrupt 0   // 外部中断是0号
 {
     outcomeH =TH1;    //取出定时器的值
     outcomeL =TL1;    //取出定时器的值
     succeed_flag=1;   //至成功测量的标志
     EX0=0;            //关闭外部中断
  }
//****************************************************************
//定时器0中断,用做显示
timer0() interrupt 1  // 定时器0中断是1号
   {
 	 TH0=0xfd; //写入定时器0初始值
	 TL0=0x77;
	 switch(flag)
      {case 0x00:P0=ge; P2=0xfd;flag++;break;
	    case 0x01:P0=shi;P2=0xfe;flag++;break;
	    case 0x02:P0=bai;P2=0xfb;flag=0;break;
      }
   }
//*****************************************************************
/*
//定时器1中断,用做超声波测距计时
timer1() interrupt 3  // 定时器0中断是1号
    {
TH1=0;
TL1=0;
     }
*/
//******************************************************************
//显示数据转换程序
void conversion(uint temp_data)
 {
    uchar ge_data,shi_data,bai_data ;
    bai_data=temp_data/100 ;
    temp_data=temp_data%100;   //取余运算
    shi_data=temp_data/10 ;
    temp_data=temp_data%10;   //取余运算
    ge_data=temp_data;

    bai_data=SEG7[bai_data];
    shi_data=SEG7[shi_data];
    ge_data =SEG7[ge_data];

    EA=0;
    bai = bai_data;
    shi = shi_data;
    ge  = ge_data ;
	 EA=1;
 }
//******************************************************************
void delay_20us()
 {  uchar bt ;
    for(bt=0;bt<100;bt++);
 }
/*
void pai_xu()
  {  uint t;
  if (distance[0]>distance[1])
    {t=distance[0];distance[0]=distance[1];distance[1]=t;} /*交换值
  if(distance[0]>distance[2])
    {t=distance[2];distance[2]=distance[0];distance[0]=t;} /*交换值
  if(distance[1]>distance[2])
    {t=distance[1];distance[1]=distance[2];distance[2]=t;} /*交换值
    }
*/
3、超声波测距LC1602显示
SMC1602A(16*2)模拟口线接线方式
连接线图:
       ---------------------------------------------------
       |LCM-----51   |	LCM-----51   |	LCM------51      |
       --------------------------------------------------|
       |DB0-----P1.0 |	DB4-----P1.4 |	RW-------P3.4    |
       |DB1-----P1.1 |	DB5-----P1.5 |	RS-------P3.3    |
       |DB2-----P1.2 |	DB6-----P1.6 |	E--------P3.5    |
       |DB3-----P1.3 |	DB7-----P1.7 |	VLCD接1K电阻到GND|
       ---------------------------------------------------
接线:模块TRIG接 P2.6  ECH0 接P2.7


[注:AT89x51使用12M或11.0592M晶振,实测使用11.0592M]
=============================================================*/
#include <AT89x51.H>		//器件配置文件
#include <intrins.h>
#define  RX  P2_7
#define  TX  P2_6

#define LCM_RW  P3_4 //定义LCD引脚
#define LCM_RS  P3_3
#define LCM_E   P3_5
#define LCM_Data  P1

#define Key_Data P2_0 //定义Keyboard引脚
#define Key_CLK  P3_2

#define Busy    0x80 //用于检测LCM状态字中的Busy标识

void LCMInit(void);
void DisplayOneChar(unsigned char X, unsigned char Y, unsigned char DData);
void DisplayListChar(unsigned char X, unsigned char Y, unsigned char code *DData);
void Delay5Ms(void);
void Delay400Ms(void);
void Decode(unsigned char ScanCode);
void WriteDataLCM(unsigned char WDLCM);
void WriteCommandLCM(unsigned char WCLCM,BuysC);

unsigned char ReadDataLCM(void);
unsigned char ReadStatusLCM(void);
unsigned char code mcustudio[] ={"mcustudio.com.cn"};
unsigned char code email[] =    {"fhwxaoo@163.com "};
unsigned char code Cls[] =      {"                "};
unsigned char code ASCII[15] =    {'0','1','2','3','4','5','6','7','8','9','.','-','M'};

static unsigned char DisNum = 0; //显示用指针
       unsigned int  time=0;
	   unsigned long S=0;
	   bit      flag =0;
	   unsigned char disbuff[4]	   ={ 0,0,0,0,};


//写数据
void WriteDataLCM(unsigned char WDLCM)
{
	ReadStatusLCM(); //检测忙
	LCM_Data = WDLCM;
	LCM_RS = 1;
	LCM_RW = 0;
	LCM_E = 0; //若晶振速度太高可以在这后加小的延时
	LCM_E = 0; //延时
	LCM_E = 1;
}

//写指令
void WriteCommandLCM(unsigned char WCLCM,BuysC) //BuysC为0时忽略忙检测
{
	if (BuysC) ReadStatusLCM(); //根据需要检测忙
	LCM_Data = WCLCM;
	LCM_RS = 0;
	LCM_RW = 0;
	LCM_E = 0;
	LCM_E = 0;
	LCM_E = 1;
}

//读数据
unsigned char ReadDataLCM(void)
{
	LCM_RS = 1;
	LCM_RW = 1;
	LCM_E = 0;
	LCM_E = 0;
	LCM_E = 1;
	return(LCM_Data);
}

//读状态
unsigned char ReadStatusLCM(void)
{
	LCM_Data = 0xFF;
	LCM_RS = 0;
	LCM_RW = 1;
	LCM_E = 0;
	LCM_E = 0;
	LCM_E = 1;
	while (LCM_Data & Busy); //检测忙信号
	return(LCM_Data);
}

void LCMInit(void) //LCM初始化
{
	LCM_Data = 0;
	WriteCommandLCM(0x38,0); //三次显示模式设置,不检测忙信号
	Delay5Ms();
	WriteCommandLCM(0x38,0);
	Delay5Ms();
	WriteCommandLCM(0x38,0);
	Delay5Ms();

	WriteCommandLCM(0x38,1); //显示模式设置,开始要求每次检测忙信号
	WriteCommandLCM(0x08,1); //关闭显示
	WriteCommandLCM(0x01,1); //显示清屏
	WriteCommandLCM(0x06,1); // 显示光标移动设置
	WriteCommandLCM(0x0F,1); // 显示开及光标设置
}

//按指定位置显示一个字符
void DisplayOneChar(unsigned char X, unsigned char Y, unsigned char DData)
{
	Y &= 0x1;
	X &= 0xF; //限制X不能大于15,Y不能大于1
	if (Y) X |= 0x40; //当要显示第二行时地址码+0x40;
	X |= 0x80; //算出指令码
	WriteCommandLCM(X, 1); //发命令字
	WriteDataLCM(DData); //发数据
}

//按指定位置显示一串字符
void DisplayListChar(unsigned char X, unsigned char Y, unsigned char code *DData)
{
	unsigned char ListLength;

  ListLength = 0;
	Y &= 0x1;
	X &= 0xF; //限制X不能大于15,Y不能大于1
	while (DData[ListLength]>0x19) //若到达字串尾则退出
		{
			if (X <= 0xF) //X坐标应小于0xF
				{
					DisplayOneChar(X, Y, DData[ListLength]); //显示单个字符
					ListLength++;
					X++;
				}
		}
}

//5ms延时
void Delay5Ms(void)
{
	unsigned int TempCyc = 5552;
	while(TempCyc--);
}

//400ms延时
void Delay400Ms(void)
{
	unsigned char TempCycA = 5;
	unsigned int TempCycB;
	while(TempCycA--)
		{
			TempCycB=7269;
			while(TempCycB--);
		};
}
/********************************************************/
    void Conut(void)
	{
	 time=TH0*256+TL0;
	 TH0=0;
	 TL0=0;

	 S=(time*1.7)/100;     //算出来是CM
	 if((S>=700)||flag==1) //超出测量范围显示“-”
	 {
	  flag=0;

	  DisplayOneChar(0, 1, ASCII[11]);
	  DisplayOneChar(1, 1, ASCII[10]);	//显示点
	  DisplayOneChar(2, 1, ASCII[11]);
	  DisplayOneChar(3, 1, ASCII[11]);
	  DisplayOneChar(4, 1, ASCII[12]);	//显示M
	 }
	 else
	 {
	  disbuff[0]=S%1000/100;
	  disbuff[1]=S%1000%100/10;
	  disbuff[2]=S%1000%10 %10;
	  DisplayOneChar(0, 1, ASCII[disbuff[0]]);
	  DisplayOneChar(1, 1, ASCII[10]);	//显示点
	  DisplayOneChar(2, 1, ASCII[disbuff[1]]);
	  DisplayOneChar(3, 1, ASCII[disbuff[2]]);
	  DisplayOneChar(4, 1, ASCII[12]);	//显示M
	 }
	}
/********************************************************/
     void zd0() interrupt 1 		 //T0中断用来计数器溢出,超过测距范围
  {
    flag=1;							 //中断溢出标志
  }
/********************************************************/
     void  StartModule() 		         //启动模块
  {
	  TX=1;			                     //启动一次模块
	  _nop_();
	  _nop_();
	  _nop_();
	  _nop_();
	  _nop_();
	  _nop_();
	  _nop_();
	  _nop_();
	  _nop_();
	  _nop_();
	  _nop_();
	  _nop_();
	  _nop_();
	  _nop_();
	  _nop_();
	  _nop_();
	  _nop_();
	  _nop_();
	  _nop_();
	  _nop_();
	  _nop_();
	  TX=0;
  }
/********************************************************/
void delayms(unsigned int ms)
{
	unsigned char i=100,j;
	for(;ms;ms--)
	{
		while(--i)
		{
			j=10;
			while(--j);
		}
	}
}
/*********************************************************/
void main(void)
{
	unsigned char TempCyc;
	Delay400Ms(); //启动等待,等LCM讲入工作状态
	LCMInit(); //LCM初始化
	Delay5Ms(); //延时片刻(可不要)
	DisplayListChar(0, 0, mcustudio);
	DisplayListChar(0, 1, email);
	ReadDataLCM();//测试用句无意义
	for (TempCyc=0; TempCyc<10; TempCyc++)
	Delay400Ms(); //延时
	DisplayListChar(0, 1, Cls);
	while(1)
	{
	 TMOD=0x01;		   //设T0为方式1,GATE=1;
	 TH0=0;
	 TL0=0;
	 ET0=1;             //允许T0中断
	 EA=1;			   //开启总中断

	while(1)
	  {
	     StartModule();
		// DisplayOneChar(0, 1, ASCII[0]);
	     while(!RX);		//当RX为零时等待
	     TR0=1;			    //开启计数
	     while(RX);			//当RX为1计数并等待
	     TR0=0;				//关闭计数
         Conut();			//计算
		 delayms(80);		//80MS

	  }
	}
}
4、超声波测距LCD12864显示
/******************************************************************************/
/*  Name:  LCD12864(St7920/St7921)+超声波测距模块+STC89C52                    */
/*  HC-SR04 超声波测距模块 DEMO 程序									      */
/*  晶振:11.0592M                                                            */
/*  接线:模块TRIG接 P1.2  ECH0 接P1.1										  */
/*      RS(CS)    接  P3.3;	 											      */
/*      RW(SID)   接  P3.4;										              */
/*      E(SCLK)   接  P3.5;											          */
/*      PSB       接  GND 串行模式										      */
/******************************************************************************/
    #include   <AT89X51.H>
	#include   <intrins.h>
//引脚定义
    sbit     RX    =  P1 ^ 1;
    sbit     TX    =  P1 ^ 2;
    sbit     CS    =  P3 ^ 3;	//片选 高电平有效 单片LCD使用时可固定高电平
    sbit     SID   =  P3 ^ 4;	//数据
    sbit     SCLK  =  P3 ^ 5;	//时钟

//Function Definition 函数声明
void Delay(int num);
void Init_DS18B20(void);
unsigned char ReadOneChar(void);
void WriteOneChar(unsigned char dat);
unsigned int ReadTemperature(void);
void clock_out(unsigned char dd);
unsigned char clock_in(void);
unsigned char read_clock(unsigned char ord);
void write_clock(unsigned char ord, unsigned char dd);
void Disp(void);
void id_case1_key(void);
void id_case2_key(void);
void Set_time(unsigned char sel,bit sel_1);
void Timer0_Init(void);
void Init_1302(void);
void Set_Bell(unsigned char sel, bit sel_1);
void Bell(void);
//12864
void Write_char(bit start, unsigned char ddata);
void Send_byte(unsigned char bbyte);
void Delaynms(unsigned int di);
void Lcd_init(void);
void Disp_img(unsigned char *img);
void LCD_Write_string(unsigned char X,unsigned char Y,unsigned char *s);
void LCD_set_xy( unsigned char x, unsigned char y );
unsigned char code num[]={"0123456789 :.-"};
unsigned char code waves[]={"超声波测距系统"};
unsigned char code znwk[] ={"智能微控工作室"};
unsigned char code CM[] =  {"M"};
unsigned int  time=0;
         long S=0;
         bit  flag =0;
unsigned char disbuff[4]	   ={ 0,0,0,0,};
unsigned char code logo[]={
/*--  调入了一幅图像:logo.bmp  -- */
/*--  宽度x高度=128x64 欢迎使用本产品LOGO --*/
/*--  调入了一幅图像:C:\Documents and Settings\lwd\桌面\新建文件夹\X.bmp  --*/
/*--  宽度x高度=128x64  --*/
0x00,0x00,0x00,0x00,0x00,0x00,0x00,0x00,0x00,0x00,0x00,0x00,0x00,0x00,0x00,0x00,
0x00,0x00,0x00,0x00,0x00,0x00,0x00,0x00,0x00,0x00,0x00,0x00,0x00,0x00,0x00,0x00,
0x00,0x00,0x00,0x00,0x00,0x00,0x00,0x00,0x00,0x00,0x00,0x00,0x00,0x00,0x00,0x00,
0x00,0x00,0x00,0xC0,0x00,0x00,0x00,0x00,0x00,0x00,0x60,0x00,0x00,0x00,0x00,0x00,
0x00,0x00,0x00,0xE0,0x00,0x00,0x0C,0x00,0x00,0x40,0x70,0x00,0x00,0x00,0x80,0x00,
0x00,0x00,0x00,0xE0,0x00,0x00,0x1E,0x00,0x00,0x60,0x70,0x00,0x00,0x0F,0xE0,0x00,
0x00,0x00,0x01,0xC0,0x00,0x60,0x3C,0x00,0x00,0xE0,0x60,0x00,0x1F,0xFF,0xE0,0x00,
0x00,0x00,0x03,0x80,0x00,0x70,0x70,0x40,0x00,0xE0,0x7E,0x00,0x1F,0xE0,0xC0,0x00,
0x00,0x00,0x03,0x00,0x00,0x73,0xC3,0xF0,0x01,0xC3,0xFC,0x00,0x38,0xE1,0xC0,0x00,
0x00,0x03,0xC6,0x3C,0x00,0x33,0x9F,0xF0,0x03,0x8F,0xC0,0x00,0x30,0xC1,0xC0,0x00,
0x00,0x3F,0xEF,0xFE,0x00,0x03,0x1C,0xE0,0x07,0x01,0xCC,0x00,0x31,0xF1,0x80,0x00,
0x00,0x79,0xDF,0xBC,0x00,0x06,0x18,0xC0,0x0E,0x01,0xFE,0x00,0x77,0xF9,0x80,0x00,
0x00,0x01,0xB0,0x30,0x01,0xC6,0x19,0xC0,0x1E,0x7F,0xDE,0x00,0x6F,0x83,0x80,0x00,
0x00,0x23,0xAC,0x60,0x0F,0xE6,0xF1,0x80,0x3E,0x7B,0x38,0x00,0x61,0x83,0x00,0x00,
0x00,0x37,0x0E,0x00,0x0F,0xC7,0xB7,0x80,0xEC,0x63,0x30,0x00,0xE3,0x03,0x00,0x00,
0x00,0x3E,0x0E,0x00,0x01,0x8F,0x37,0x01,0xCC,0x6F,0xF0,0x00,0xC7,0xF7,0x00,0x00,
0x00,0x1E,0x0C,0x00,0x03,0x1E,0x66,0x03,0x0C,0x7F,0x00,0x01,0xFF,0xE6,0x00,0x00,
0x00,0x1E,0x1C,0x00,0x03,0x1C,0x60,0x02,0x19,0xAC,0x00,0x01,0x96,0x06,0x00,0x00,
0x00,0x3E,0x3E,0x00,0x03,0x18,0x60,0x00,0x19,0xFC,0x00,0x03,0x86,0x0E,0x00,0x00,
0x00,0x7E,0x36,0x00,0x03,0x00,0xC0,0x00,0x38,0x78,0x00,0x03,0x06,0x0C,0x00,0x00,
0x00,0xE6,0x67,0x00,0x03,0x00,0xC0,0x00,0x30,0x78,0x00,0x06,0x0C,0x0C,0x00,0x00,
0x01,0xC6,0xC3,0x80,0x7F,0xF0,0xC0,0x00,0x30,0xFE,0x00,0x0E,0x0C,0x1C,0x00,0x00,
0x03,0x81,0x83,0xC0,0x78,0xFF,0x80,0x00,0x61,0xCF,0x80,0x1C,0x08,0x18,0x00,0x00,
0x06,0x07,0x03,0xE0,0x00,0x1F,0xFF,0xE0,0x67,0x07,0xE0,0x38,0x18,0xF8,0x00,0x00,
0x08,0x0E,0x01,0xF8,0x00,0x07,0xFF,0x80,0xCE,0x03,0xF8,0x60,0x00,0x70,0x00,0x00,
0x00,0x18,0x01,0xF8,0x00,0x01,0xFC,0x00,0xC0,0x01,0xFC,0xC0,0x00,0x70,0x00,0x00,
0x00,0x00,0x00,0x00,0x00,0x00,0x00,0x00,0x00,0x00,0x00,0x00,0x00,0x60,0x00,0x00,
0x00,0x00,0x00,0x00,0x00,0x00,0x00,0x00,0x00,0x00,0x00,0x00,0x00,0x00,0x00,0x00,
0x00,0x00,0x00,0x00,0x00,0x00,0x00,0x00,0x00,0x00,0x00,0x00,0x00,0x00,0x00,0x00,
0x00,0x00,0x00,0x00,0x00,0x00,0x10,0x00,0x00,0x00,0x00,0x00,0x00,0x00,0x00,0x00,
0x00,0x00,0x06,0x00,0x00,0x00,0x1C,0x00,0x00,0x00,0x00,0x00,0x00,0x00,0x00,0x00,
0x00,0x00,0x07,0x00,0x00,0x00,0x1C,0x00,0x00,0x00,0x00,0x00,0x00,0x00,0x00,0x00,
0x00,0x00,0x06,0x00,0x00,0x00,0x0C,0xE0,0x00,0x01,0xE0,0x00,0x00,0x00,0x00,0x00,
0x00,0x00,0x0E,0x00,0x00,0x00,0x3F,0xE0,0x00,0xFF,0xF0,0x00,0x38,0x00,0xE0,0x00,
0x00,0x00,0x0C,0x00,0x00,0x0F,0xFF,0x80,0x00,0xF8,0xF0,0x00,0x38,0x00,0xE0,0x00,
0x00,0x00,0x0C,0xF0,0x00,0x0F,0xC7,0x00,0x00,0x60,0xE0,0x00,0x38,0x00,0xE0,0x00,
0x00,0x00,0x1F,0xF0,0x00,0x01,0x8E,0x00,0x00,0x60,0xC0,0x00,0x70,0x01,0xC0,0x00,
0x00,0x07,0xFF,0x80,0x00,0x01,0x8C,0x00,0x00,0xE1,0x80,0x00,0x70,0x01,0xC0,0x00,
0x00,0x07,0xF8,0x00,0x00,0x01,0x98,0x00,0x00,0xDF,0xC0,0x00,0x70,0x01,0xC0,0x00,
0x00,0x00,0x78,0x00,0x00,0x01,0xBF,0xE0,0x00,0xFF,0x00,0x00,0x60,0x01,0x80,0x00,
0x00,0x00,0xFC,0x00,0x00,0x7F,0xFF,0xE0,0x00,0xC0,0x00,0x00,0xE0,0x03,0x80,0x00,
0x00,0x01,0xFE,0x00,0x00,0x7F,0xF8,0x00,0x00,0x00,0x00,0x00,0xC0,0x03,0x00,0x00,
0x00,0x03,0xB7,0x00,0x00,0x60,0x00,0x00,0x00,0x00,0x3C,0x00,0xC0,0x03,0x00,0x00,
0x00,0x07,0x67,0x00,0x00,0x60,0x00,0x00,0x03,0x9F,0xFE,0x00,0x80,0x02,0x00,0x00,
0x00,0x0E,0x63,0x80,0x00,0xE0,0x00,0x01,0xFF,0xCF,0x1E,0x01,0x80,0x06,0x00,0x00,
0x00,0x1C,0xE1,0xE0,0x00,0xC0,0x00,0x00,0xE3,0x9C,0x38,0x01,0x80,0x06,0x00,0x00,
0x00,0x38,0xC1,0xF8,0x01,0xC0,0x00,0x00,0xC3,0x18,0x30,0x00,0x00,0x00,0x00,0x00,
0x00,0xE0,0xFC,0xFE,0x03,0x80,0x00,0x01,0xC7,0x18,0x60,0x00,0x00,0x00,0x00,0x00,
0x01,0xDF,0xF8,0xFE,0x03,0x00,0x00,0x01,0x8E,0x1B,0xE0,0x07,0x00,0x1C,0x00,0x00,
0x07,0x07,0x80,0x00,0x07,0x00,0x00,0x01,0xFF,0x3F,0xE0,0x07,0x00,0x1C,0x00,0x00,
0x0C,0x03,0x80,0x00,0x0E,0x00,0x00,0x01,0xF0,0x38,0x00,0x0F,0x00,0x3C,0x00,0x00,
0x00,0x03,0x00,0x00,0x1C,0x00,0x00,0x01,0x00,0x20,0x00,0x06,0x00,0x18,0x00,0x00,
0x00,0x03,0x00,0x00,0x38,0x00,0x00,0x00,0x00,0x00,0x00,0x00,0x00,0x00,0x00,0x00,
0x00,0x03,0x00,0x00,0xE0,0x00,0x00,0x00,0x00,0x00,0x00,0x00,0x00,0x00,0x00,0x00,
0x00,0x02,0x00,0x01,0xC0,0x00,0x00,0x00,0x00,0x00,0x00,0x00,0x00,0x00,0x00,0x00,
0x00,0x00,0x00,0x00,0x00,0x00,0x00,0x00,0x00,0x00,0x00,0x00,0x00,0x00,0x00,0x00,
0x00,0x00,0x00,0x00,0x00,0x00,0x00,0x00,0x00,0x00,0x00,0x00,0x00,0x00,0x00,0x00,
0x00,0x00,0x00,0x00,0x00,0x00,0x00,0x00,0x00,0x00,0x00,0x00,0x00,0x00,0x00,0x00,
0x00,0x00,0x00,0x00,0x00,0x00,0x00,0x00,0x00,0x00,0x00,0x00,0x00,0x00,0x00,0x00,
0x00,0x00,0x00,0x00,0x00,0x00,0x00,0x00,0x00,0x00,0x00,0x00,0x00,0x00,0x00,0x00,
0x00,0x00,0x00,0x00,0x00,0x00,0x00,0x00,0x00,0x00,0x00,0x00,0x00,0x00,0x00,0x00,
0x00,0x00,0x00,0x00,0x00,0x00,0x00,0x00,0x00,0x00,0x00,0x00,0x00,0x00,0x00,0x00,
0x00,0x00,0x00,0x00,0x00,0x00,0x00,0x00,0x00,0x00,0x00,0x00,0x00,0x00,0x00,0x00,
0x00,0x00,0x00,0x00,0x00,0x00,0x00,0x00,0x00,0x00,0x00,0x00,0x00,0x00,0x00,0x00,
};

/******************************************************************************/
void Lcd_init(void)	//初始化LCD
{
	Delaynms(10); //启动等待,等LCM讲入工作状态
  	CS=1;
  	Write_char(0,0x30);  //8 位介面,基本指令集
  	Write_char(0,0x0c);  //显示打开,光标关,反白关
  	Write_char(0,0x01);  //清屏,将DDRAM的地址计数器归零
}

/******************************************************************************/
void Write_char(bit start, unsigned char ddata) //写指令或数据
{
	unsigned char start_data,Hdata,Ldata;
  	if(start==0)
		start_data=0xf8;	 //写指令
    else
    	start_data=0xfa;  //写数据

  	Hdata=ddata&0xf0;		  //取高四位
  	Ldata=(ddata<<4)&0xf0;  //取低四位
  	Send_byte(start_data);	  //发送起始信号
  	Delaynms(5); //延时是必须的
  	Send_byte(Hdata);	      //发送高四位
  	Delaynms(1);  //延时是必须的
  	Send_byte(Ldata);		  //发送低四位
  	Delaynms(1);  //延时是必须的
}

/******************************************************************************/
void Send_byte(unsigned char bbyte) //发送一个字节
{
	unsigned char i;
 	for(i=0;i<8;i++)
   	{
   		SID=bbyte&0x80; //取出最高位
 		SCLK=1;
   		SCLK=0;
   		bbyte<<=1; //左移
   	}
}

/******************************************************************************/
void Delaynms(unsigned int di) //延时
{
	unsigned int da,db;
 	for(da=0;da<di;da++)
   		for(db=0;db<10;db++);
}

/******************************************************************************/
void Disp_img(unsigned char  *img)	//图形方式12864显示字模221 横向取膜
{
	unsigned char i,j;
	unsigned int k = 0;

	Write_char(0,0x36); //图形方式
	for(i=0;i<32;i++)
  	{
		Write_char(0,0x80+i);
		Write_char(0,0x80);
    	for(j=0;j<16;j++)
		{
			Write_char(1,img[k++]);
		}
  	}

 	for(i=0;i<32;i++)
  	{
		Write_char(0,0x80+i);
		Write_char(0,0x88);
    	for(j=0;j<16;j++)
		{
			Write_char(1,img[k++]);
  		}
	}
}

/******************************************************************************/
void Clr_Scr(void)//清屏函数
{
	Write_char(0,0x01);
}

/******************************************************************************/
void LCD_set_xy( unsigned char x, unsigned char y )
{	//设置LCD显示的起始位置,X为行,Y为列
    unsigned char address;
	switch(x)
	{
		case 0: address = 0x80 + y; break;
    	case 1: address = 0x80 + y; break;
		case 2: address = 0x90 + y; break;
   	 	case 3: address = 0x88 + y; break;
		case 4: address = 0x98 + y; break;
		default:address = 0x80 + y; break;
	}
    Write_char(0, address);
}

/******************************************************************************/
void LCD_Write_string(unsigned char X,unsigned char Y,unsigned char *s)
{	//	中英文字符串显示函数
	LCD_set_xy( X, Y );

    while (*s)
    {
		Write_char( 1, *s );
	    s ++;
		Delaynms(1);
	}
}

/******************************************************************************/
void LCD_Write_number(unsigned char s)//	数字显示函数
{
	Write_char(1,num[s]);
	Delaynms(1);
}
/******************************************************************************/
void Lcd_Mark2(void)
{
	Clr_Scr();//清屏
	LCD_Write_string(1,0,znwk);//
	LCD_Write_string(2,0,waves);//
	LCD_Write_string(3,7,CM);//
}

/********************************************************/
    void Conut(void)
	{
	   time=TH0*256+TL0;
	   TH0=0;
	   TL0=0;
	   S=time*1.87/100;       //算出来是CM	  11。0592M晶振
	   if(flag==1)		      //超出测量
	  {
	   flag=0;
	   LCD_set_xy( 3, 4 );
	   LCD_Write_number(13);
	   LCD_Write_number(12);
	   LCD_set_xy( 3, 5 );
	   LCD_Write_number(13);
	   LCD_Write_number(13);

	   }
	 else
	  {
	   disbuff[1]=S%1000/100;
	   disbuff[2]=S%1000%100/10;
	   disbuff[3]=S%1000%10 %10;
	   LCD_set_xy( 3, 4 );
	   LCD_Write_number(disbuff[1]);
	   LCD_Write_number(12);
	   LCD_set_xy( 3, 5 );
	   LCD_Write_number(disbuff[2]);
	   LCD_Write_number(disbuff[3]);
	  }
	}
/********************************************************/
void delayms(unsigned int ms)
{
	unsigned char i=100,j;
	for(;ms;ms--)
	{
		while(--i)
		{
			j=10;
			while(--j);
		}
	}
}
/********************************************************/
     void zd0() interrupt 1 		 //T0中断用来计数器溢出,超过测距范围
  {
    flag=1;							 //中断溢出标志
  }
/********************************************************/
   void  StartModule() 		         //T1中断用来扫描数码管和计800MS启动模块
  {
	  TX=1;			                 //800MS  启动一次模块
	  _nop_();
	  _nop_();
	  _nop_();
	  _nop_();
	  _nop_();
	  _nop_();
	  _nop_();
	  _nop_();
	  _nop_();
	  _nop_();
	  _nop_();
	  _nop_();
	  _nop_();
	  _nop_();
	  _nop_();
	  _nop_();
	  _nop_();
	  _nop_();
	  _nop_();
	  _nop_();
	  _nop_();
	  TX=0;
  }
/********************************************************/
void main(void)
{
    TMOD=0x01;		   //设T0为方式1,GATE=1
	TH0=0;
	TL0=0;
	TR0=1;

	Lcd_init();       //设置液晶显示器
	Clr_Scr();        //清屏
	Disp_img(logo);	  //显示欢迎使用本产品LOGO
	Delaynms(1000);
	Lcd_init();       //从图形显示状态下返回
    Lcd_Mark2();


	while(1)
	{
	 StartModule();
	 		        	//计算
	 while(!RX);		//当RX为零时等待
	 TR0=1;			    //开启计数
	 while(RX);			//当RX为1计数并等待
	 TR0=0;				//关闭计数
	 Conut();
	 delayms(80);		//80MS

	}

}
?5、超声波测距串口显示
/***********************************************************************************************************/
//HC-SR04 超声波测距模块 DEMO 程序
//晶振:11。0592
//接线:模块TRIG接 P1.2  ECH0 接P1.1
//串口波特率9600
/***********************************************************************************************************/
	#include   <AT89X51.H>
	#include   <intrins.h>
    #include   <STDIO.H>

    #define uchar unsigned  char
    #define uint  unsigned   int
	#define  RX  P1_1
    #define  TX  P1_2


	unsigned int  time=0;
	unsigned int  timer=0;
	float         S=0;
    bit           flag =0;


/********************************************************/
    void Conut(void)
	{
	 time=TH0*256+TL0;
	 TH0=0;
	 TL0=0;
	 S=(time*1.87)/100;     //算出来是CM
	 if(flag==1)		    //超出测量
	 {
	  flag=0;
	  printf("-----\n");
	 }

	  printf("S=%f\n",S);
	}
/********************************************************/
void delayms(unsigned int ms)
{
	unsigned char i=100,j;
	for(;ms;ms--)
	{
		while(--i)
		{
			j=10;
			while(--j);
		}
	}
}
/********************************************************/
     void zd0() interrupt 1 		 //T0中断用来计数器溢出,超过测距范围
  {
    flag=1;							 //中断溢出标志
  }
/********************************************************/
   void  StartModule() 		         //T1中断用来扫描数码管和计800MS启动模块
  {
	  TX=1;			                 //800MS  启动一次模块
	  _nop_();
	  _nop_();
	  _nop_();
	  _nop_();
	  _nop_();
	  _nop_();
	  _nop_();
	  _nop_();
	  _nop_();
	  _nop_();
	  _nop_();
	  _nop_();
	  _nop_();
	  _nop_();
	  _nop_();
	  _nop_();
	  _nop_();
	  _nop_();
	  _nop_();
	  _nop_();
	  _nop_();
	  TX=0;
  }
/********************************************************/
void main(void)
{
    TMOD=0x21;		   //设T0为方式1,GATE=1;
	SCON=0x50;
	TH1=0xFD;
	TL1=0xFD;
	TH0=0;
	TL0=0;
	TR0=1;
	ET0=1;             //允许T0中断
	TR1=1;			   //开启定时器
	TI=1;

	EA=1;			   //开启总中断


	while(1)
	{
	 StartModule();
	 while(!RX);		//当RX为零时等待
	 TR0=1;			    //开启计数
	 while(RX);			//当RX为1计数并等待
	 TR0=0;				//关闭计数
     Conut();			//计算
	 delayms(100);		//100MS

	}

}
6、超声波测距数码管显示
/***********************************************************************************************************/
//hc-sr04 超声波测距模块 DEMO 程序
//晶振:11。0592
//接线:模块TRIG接 P0.2  ECH0 接P0.1
//数码管:共阳数码管P1接数据口,P2.5 P2.4 P2.3接选通数码管
/***********************************************************************************************************/
		     #include <AT89x51.H>		//器件配置文件
			 #include <intrins.h>
			 #define  RX  P0_1
			 #define  TX  P0_2
			 unsigned int  time=0;
			 unsigned int  timer=0;
			 unsigned char posit=0;
			 unsigned long S=0;
			 bit      flag =0;
			 unsigned char const discode[] ={ 0xC0,0xF9,0xA4,0xB0,0x99,0x92,0x82,0xF8,0x80,0x90,0xBF,0xff/*-*/};
			 unsigned char const positon[3]={ 0xdf,0xef,0xf7};
			 unsigned char disbuff[4]	   ={ 0,0,0,0,};
/********************************************************/
    void Display(void)				 //扫描数码管
	{
	 if(posit==0)
	 {P1=(discode[disbuff[posit]])&0x7f;}
	 else
	 {P1=discode[disbuff[posit]];}
	  P2=positon[posit];
	  if(++posit>=3)
	  posit=0;
	}
/********************************************************/
    void Conut(void)
	{
	 time=TH0*256+TL0;
	 TH0=0;
	 TL0=0;

	 S=(time*1.7)/100;     //算出来是CM
	 if((S>=700)||flag==1) //超出测量范围显示“-”
	 {
	  flag=0;
	  disbuff[0]=10;	   //“-”
	  disbuff[1]=10;	   //“-”
	  disbuff[2]=10;	   //“-”
	 }
	 else
	 {
	  disbuff[0]=S%1000/100;
	  disbuff[1]=S%1000%100/10;
	  disbuff[2]=S%1000%10 %10;
	 }
	}
/********************************************************/
     void zd0() interrupt 1 		 //T0中断用来计数器溢出,超过测距范围
  {
    flag=1;							 //中断溢出标志
  }
/********************************************************/
   void  zd3()  interrupt 3 		 //T1中断用来扫描数码管和计800MS启动模块
  {
	 TH1=0xf8;
	 TL1=0x30;
	 Display();
	 timer++;
	 if(timer>=400)
	 {
	  timer=0;
	  TX=1;			                //800MS  启动一次模块
	  _nop_();
	  _nop_();
	  _nop_();
	  _nop_();
	  _nop_();
	  _nop_();
	  _nop_();
	  _nop_();
	  _nop_();
	  _nop_();
	  _nop_();
	  _nop_();
	  _nop_();
	  _nop_();
	  _nop_();
	  _nop_();
	  _nop_();
	  _nop_();
	  _nop_();
	  _nop_();
	  _nop_();
	  TX=0;
	 }
  }
/*********************************************************/

	void  main(  void  )

  {
    TMOD=0x11;		   //设T0为方式1,GATE=1;
	TH0=0;
	TL0=0;
	TH1=0xf8;		   //2MS定时
	TL1=0x30;
	ET0=1;             //允许T0中断
	ET1=1;			   //允许T1中断
	TR1=1;			   //开启定时器
	EA=1;			   //开启总中断

	while(1)
	{
	 while(!RX);		//当RX为零时等待
	 TR0=1;			    //开启计数
	 while(RX);			//当RX为1计数并等待
	 TR0=0;				//关闭计数
     Conut();			//计算
	}

  }
7、STM32串口显示
#include "stm32f10x.h"
#include <stdio.h>

#define TRIG_PIN GPIO_Pin_0
#define ECHO_PIN GPIO_Pin_1

void delay_us(uint32_t us) {
    us *= (SystemCoreClock / 1000000) / 9;
    while (us--) {
        __NOP();
    }
}

float measure_distance(void) {
    GPIO_SetBits(GPIOA, TRIG_PIN);
    delay_us(10);
    GPIO_ResetBits(GPIOA, TRIG_PIN);

    while (!GPIO_ReadInputDataBit(GPIOA, ECHO_PIN));

    TIM_Cmd(TIM2, ENABLE);
    while (GPIO_ReadInputDataBit(GPIOA, ECHO_PIN));

    TIM_Cmd(TIM2, DISABLE);
    uint16_t duration = TIM_GetCounter(TIM2);
    float distance = duration * 0.017;

    return distance;
}

int main(void) {
    RCC_APB2PeriphClockCmd(RCC_APB2Periph_GPIOA | RCC_APB2Periph_AFIO, ENABLE);
    RCC_APB1PeriphClockCmd(RCC_APB1Periph_TIM2, ENABLE);

    GPIO_InitTypeDef GPIO_InitStructure;
    GPIO_InitStructure.GPIO_Pin = TRIG_PIN;
    GPIO_InitStructure.GPIO_Mode = GPIO_Mode_Out_PP;
    GPIO_InitStructure.GPIO_Speed = GPIO_Speed_50MHz;
    GPIO_Init(GPIOA, &GPIO_InitStructure);

    GPIO_InitStructure.GPIO_Pin = ECHO_PIN;
    GPIO_InitStructure.GPIO_Mode = GPIO_Mode_IPU;
    GPIO_InitStructure.GPIO_Speed = GPIO_Speed_50MHz;
    GPIO_Init(GPIOA, &GPIO_InitStructure);

    TIM_TimeBaseInitTypeDef TIM_TimeBaseStructure;
    TIM_TimeBaseStructure.TIM_Period = 0xFFFF;
    TIM_TimeBaseStructure.TIM_Prescaler = SystemCoreClock / 1000000 - 1;
    TIM_TimeBaseStructure.TIM_ClockDivision = 0;
    TIM_TimeBaseStructure.TIM_CounterMode = TIM_CounterMode_Up;
    TIM_TimeBaseInit(TIM2, &TIM_TimeBaseStructure);

    while (1) {
        float distance = measure_distance();
        printf("Distance: %.2f cm\n", distance);

        // 延时一段时间,进行下一次测距
        delay_us(100000);
    }
}
四、结语
以上就是我对超声波模块驱动的分享,希望我的分享对你有所帮助!下面给读者提供一些资料,需要的读者可以私信我或者入群领取(815239036),收到私信后我会及时回复!
文章来源:https://blog.csdn.net/m0_73931287/article/details/135446321
本文来自互联网用户投稿,该文观点仅代表作者本人,不代表本站立场。本站仅提供信息存储空间服务,不拥有所有权,不承担相关法律责任。 如若内容造成侵权/违法违规/事实不符,请联系我的编程经验分享网邮箱:chenni525@qq.com进行投诉反馈,一经查实,立即删除!
本文来自互联网用户投稿,该文观点仅代表作者本人,不代表本站立场。本站仅提供信息存储空间服务,不拥有所有权,不承担相关法律责任。 如若内容造成侵权/违法违规/事实不符,请联系我的编程经验分享网邮箱:chenni525@qq.com进行投诉反馈,一经查实,立即删除!
最新文章
- Python教程
- 深入理解 MySQL 中的 HAVING 关键字和聚合函数
- Qt之QChar编码(1)
- MyBatis入门基础篇
- 用Python脚本实现FFmpeg批量转换
- SpringBoot项目打包
- 【Verilog】期末复习——设计有32个16位存储器的ROM
- 心疼|四款免费实用电脑软件,因太过出色而遭同行嫉妒
- java中string转timestamp(日期类型转换)
- 如何让一个域名解析出不同的IP地址
- 【每日一题】购买两块巧克力
- React16源码: React中的updateMode的源码实现
- Windows如何开启telnet
- Docker多平台安装与配置指南
- [Spring 从模拟开始学习源码]`@Value`的底层实现
