图像数据增广
目录
一、常用的图像增广方法
???????具体使用哪种数据增广方式取决于测试集中可能出现什么样的数据,数据增广本质上就是让训练集的数据尽可能取接近测试集的数据,使其能够模拟测试集中可能出现的所有情况。
1、随机翻转
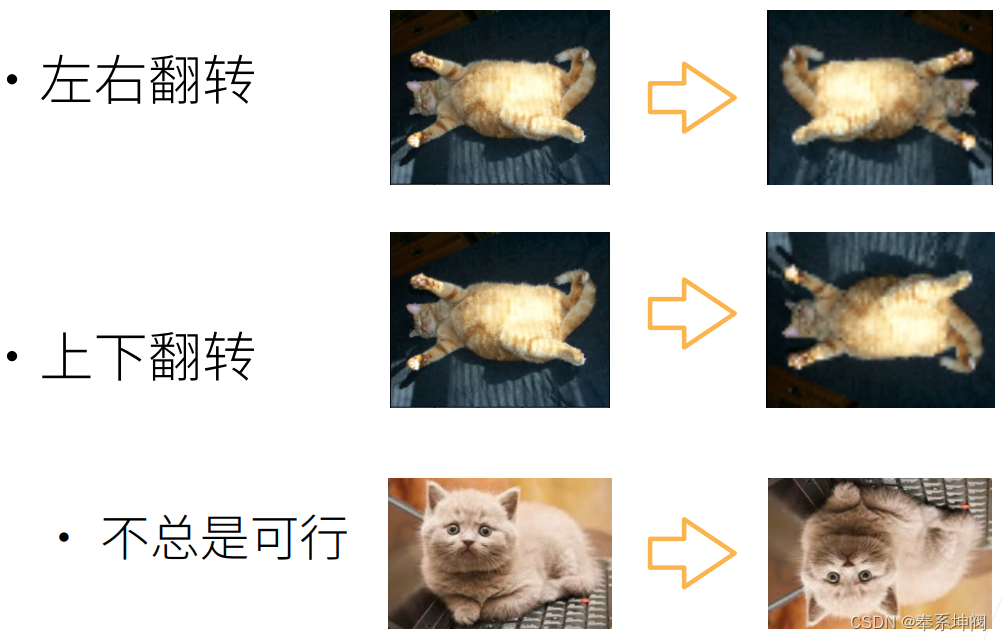
???????翻转图片又分为左右翻转和上下翻转,左右翻转图像通常不会改变对象的类别。这是最早且最广泛使用的图像增广方法之一。
???????左右翻转一般没什么问题,但是上下翻转一般不总是可行,比如建筑物的图片,上下翻转的话就比较奇怪。

2、随机裁剪
???????随机高宽比:在3/4和4/3之间随机取一个数字作为高宽比。随机大小:裁剪的部分占原始图片大小的百分比。随机位置:在图片的随机位置进行切割。

3、随机颜色变换
???????改变图片的亮度、对比度、饱和度和色调等。

二、图像代码实现
???????图像增广在对训练图像进行一系列的随机变化之后,生成相似但不同的训练样本,从而扩大了训练集的规模。此外,应用图像增广的原因是,随机改变训练样本可以减少模型对某些属性的依赖,从而提高模型的泛化能力。例如,我们可以以不同的方式裁剪图像,使感兴趣的对象出现在不同的位置,减少模型对于对象出现位置的依赖。我们还可以调整亮度、颜色等因素来降低模型对颜色的敏感度。
import torch
import torchvision
from torch import nn
from d2l import torch as d2l
???????在对常用图像增广方法的探索时,我们将使用下面这个尺寸为400×500的图像作为示例。

d2l.set_figsize()
img = d2l.Image.open('../img/cat1.jpg')
d2l.plt.imshow(img)
<matplotlib.image.AxesImage at 0x26567e52ac0>
1、定义图像显示辅助函数
???????大多数图像增广方法都具有一定的随机性。为了便于观察图像增广的效果,我们下面定义辅助函数`apply`。此函数在输入图像`img`上多次运行图像增广方法`aug`并显示所有结果。
def apply(img, aug, num_rows=2, num_cols=4, scale=1.5):
    Y = [aug(img) for _ in range(num_rows * num_cols)]
    d2l.show_images(Y, num_rows, num_cols, scale=scale)
2、随机翻转
???????对于图像我们可以进行上下和左右翻转。
(1)左右翻转
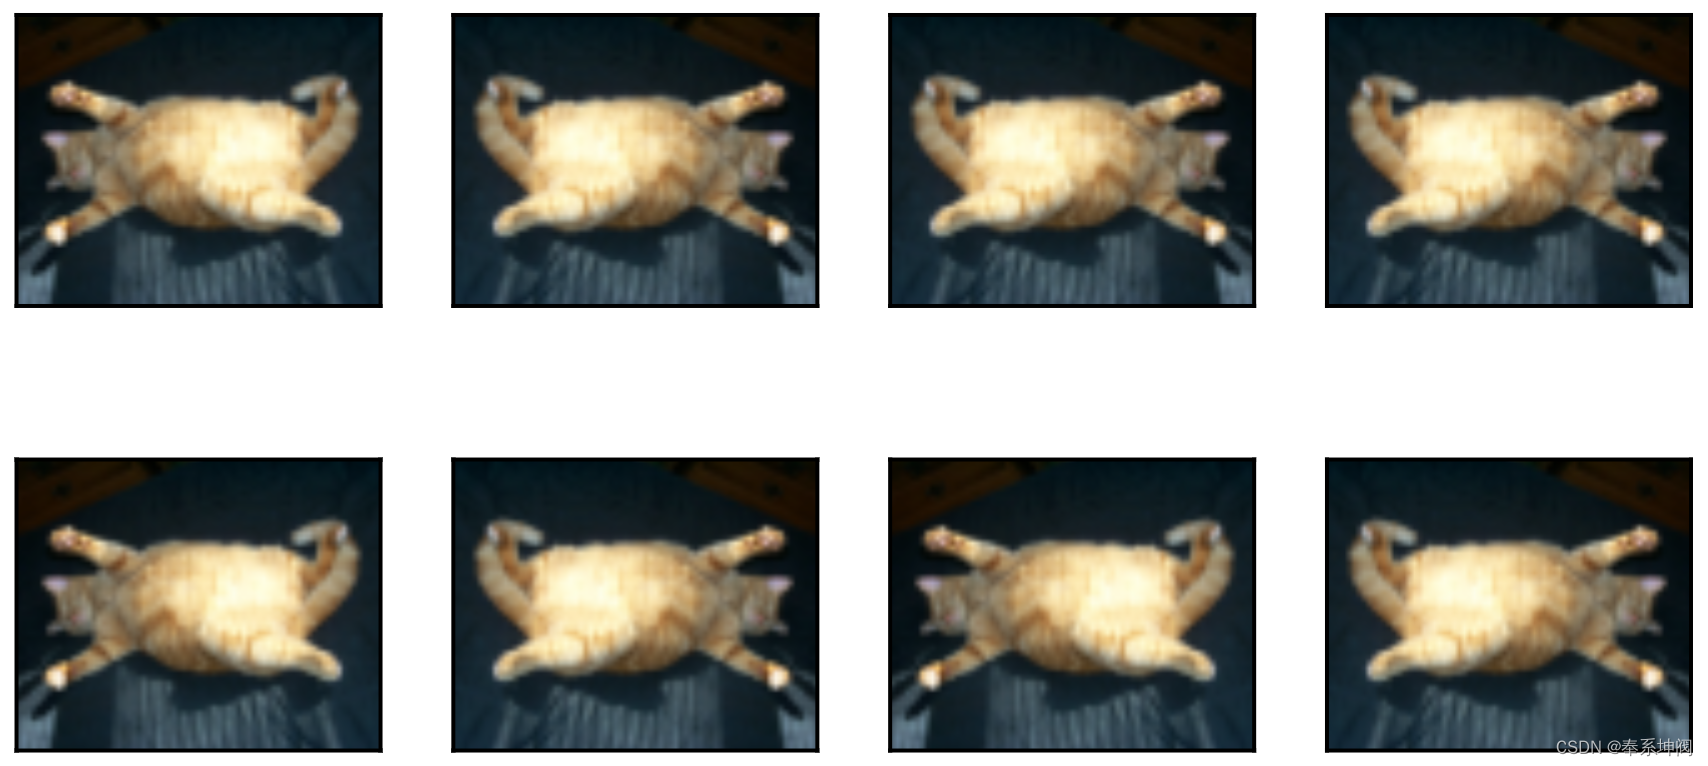
???????左右翻转图像通常不会改变对象的类别。这是最早且最广泛使用的图像增广方法之一。接下来,我们使用`transforms`模块来创建`RandomFlipLeftRight`实例,这样就各有50%的几率使图像向左或向右翻转。
apply(img, torchvision.transforms.RandomHorizontalFlip())
(2)上下翻转
???????上下翻转图像不如左右图像翻转那样常用。但是,至少对于这个示例图像,上下翻转不会妨碍识别。接下来,我们创建一个`RandomFlipTopBottom`实例,使图像各有50%的几率向上或向下翻转。
apply(img, torchvision.transforms.RandomVerticalFlip())3、随机裁剪
???????在我们使用的示例图像中,猫位于图像的中间,但并非所有图像都是这样。池化层可以降低卷积层对目标位置的敏感性。另外,我们可以通过对图像进行随机裁剪,使物体以不同的比例出现在图像的不同位置。这也可以降低模型对目标位置的敏感性。
???????下面的代码将随机裁剪一个面积为原始面积10%到100%的区域,该区域的宽高比从0.5~2之间随机取值。然后,区域的宽度和高度都被缩放到200像素。
shape_aug = torchvision.transforms.RandomResizedCrop(
    size=(200, 200), scale=(0.1, 1), ratio=(0.5, 2)) # size:宽度和高度缩放到的像素  scale:随机裁剪区域的面积占比  ratio:随机裁剪区域的宽高比
apply(img, shape_aug)
4、随机颜色变换
???????另一种增广方法是改变颜色。我们可以改变图像颜色的四个方面:亮度、对比度、饱和度和色调。
(1)随机改变图像亮度(brightness)
在下面的示例中,我们随机更改图像的亮度,随机值为原始图像的50%()到150%(
)之间。
apply(img, torchvision.transforms.ColorJitter(    # jitter:抖动,颤动:物体或信号的不稳定、快速的抖动或颤动
    brightness=0.5, contrast=0, saturation=0, hue=0))
(2)随机改变图像色调(hue)
???????同样,我们可以随机更改图像的色调。?
apply(img, torchvision.transforms.ColorJitter(
    brightness=0, contrast=0, saturation=0, hue=0.5))
(3)随机改变图像亮度、对比度、饱和度和色调
???????我们还可以创建一个`RandomColorJitter`实例,并设置如何同时随机更改图像的亮度(brightness)、对比度(contrast)、饱和度(saturation)和色调(hue)。
color_aug = torchvision.transforms.ColorJitter(
    brightness=0.5, contrast=0.5, saturation=0.5, hue=0.5)
apply(img, color_aug)
5、结合多种图像增广方法
???????在实践中,我们将结合多种图像增广方法。比如,我们可以通过使用一个`Compose`实例来综合上面定义的不同的图像增广方法,并将它们应用到每个图像。
augs = torchvision.transforms.Compose([
    torchvision.transforms.RandomHorizontalFlip(), color_aug, shape_aug])
apply(img, augs)
三、使用图像增广进行训练
1、下载数据集
???????让我们使用图像增广来训练模型。这里,我们使用CIFAR-10数据集,而不是我们之前使用的Fashion-MNIST数据集。这是因为Fashion-MNIST数据集中对象的位置和大小已被规范化,而CIFAR-10数据集中对象的颜色和大小差异更明显。CIFAR-10数据集中的前32个训练图像如下所示。
all_images = torchvision.datasets.CIFAR10(train=True, root="../data",
                                          download=True)
d2l.show_images([all_images[i][0] for i in range(32)], 4, 8, scale=0.8)
Downloading https://www.cs.toronto.edu/~kriz/cifar-10-python.tar.gz to ../data\cifar-10-python.tar.gz
100.0%
Extracting ../data\cifar-10-python.tar.gz to ../data
array([<AxesSubplot:>, <AxesSubplot:>, <AxesSubplot:>, <AxesSubplot:>,
<AxesSubplot:>, <AxesSubplot:>, <AxesSubplot:>, <AxesSubplot:>,
<AxesSubplot:>, <AxesSubplot:>, <AxesSubplot:>, <AxesSubplot:>,
<AxesSubplot:>, <AxesSubplot:>, <AxesSubplot:>, <AxesSubplot:>,
<AxesSubplot:>, <AxesSubplot:>, <AxesSubplot:>, <AxesSubplot:>,
<AxesSubplot:>, <AxesSubplot:>, <AxesSubplot:>, <AxesSubplot:>,
<AxesSubplot:>, <AxesSubplot:>, <AxesSubplot:>, <AxesSubplot:>,
<AxesSubplot:>, <AxesSubplot:>, <AxesSubplot:>, <AxesSubplot:>],
dtype=object)
2、读取图像并增广
???????为了在预测过程中得到确切的结果,我们通常对训练样本只进行图像增广,且在预测过程中不使用随机操作的图像增广。在这里,我们只使用最简单的随机左右翻转。此外,我们使用`ToTensor`实例将一批图像转换为深度学习框架所要求的格式,即形状为(批量大小,通道数,高度,宽度)的32位浮点数,取值范围为0~1。
train_augs = torchvision.transforms.Compose([
     torchvision.transforms.RandomHorizontalFlip(),
     torchvision.transforms.ToTensor()])

test_augs = torchvision.transforms.Compose([
     torchvision.transforms.ToTensor()])
???????接下来,我们定义一个辅助函数,以便于读取图像和应用图像增广。PyTorch数据集提供的`transform`参数应用图像增广来转化图像。
def load_cifar10(is_train, augs, batch_size):
    dataset = torchvision.datasets.CIFAR10(root="../data", train=is_train,
                                           transform=augs, download=True)
    dataloader = torch.utils.data.DataLoader(dataset, batch_size=batch_size,
                    shuffle=is_train, num_workers=d2l.get_dataloader_workers())
    return dataloader
3、多GPU训练
???????我们在CIFAR-10数据集上训练ResNet-18模型。接下来,我们定义一个函数,使用多GPU对模型进行训练和评估。
def train_batch_ch13(net, X, y, loss, trainer, devices):
    """用多GPU进行小批量训练"""
    if isinstance(X, list):
        # 微调BERT中所需
        X = [x.to(devices[0]) for x in X]
    else:
        X = X.to(devices[0])
    y = y.to(devices[0])
    net.train()
    trainer.zero_grad()
    pred = net(X)
    l = loss(pred, y)
    l.sum().backward()
    trainer.step()
    train_loss_sum = l.sum()
    train_acc_sum = d2l.accuracy(pred, y)
    return train_loss_sum, train_acc_sum
def train_ch13(net, train_iter, test_iter, loss, trainer, num_epochs,
devices=d2l.try_all_gpus()):
"""用多GPU进行模型训练"""
timer, num_batches = d2l.Timer(), len(train_iter)
animator = d2l.Animator(xlabel='epoch', xlim=[1, num_epochs], ylim=[0, 1],
legend=['train loss', 'train acc', 'test acc'])
net = nn.DataParallel(net, device_ids=devices).to(devices[0])
for epoch in range(num_epochs):
# 4个维度:储存训练损失,训练准确度,实例数,特点数
metric = d2l.Accumulator(4)
for i, (features, labels) in enumerate(train_iter):
timer.start()
l, acc = train_batch_ch13(
net, features, labels, loss, trainer, devices)
metric.add(l, acc, labels.shape[0], labels.numel())
timer.stop()
if (i + 1) % (num_batches // 5) == 0 or i == num_batches - 1:
animator.add(epoch + (i + 1) / num_batches,
(metric[0] / metric[2], metric[1] / metric[3],
None))
test_acc = d2l.evaluate_accuracy_gpu(net, test_iter)
animator.add(epoch + 1, (None, None, test_acc))
print(f'loss {metric[0] / metric[2]:.3f}, train acc '
f'{metric[1] / metric[3]:.3f}, test acc {test_acc:.3f}')
print(f'{metric[2] * num_epochs / timer.sum():.1f} examples/sec on '
f'{str(devices)}')???????现在,我们可以定义`train_with_data_aug`函数,使用图像增广来训练模型。该函数获取所有的GPU,并使用Adam作为训练的优化算法,将图像增广应用于训练集,最后调用刚刚定义的用于训练和评估模型的`train_ch13`函数。
batch_size, devices, net = 256, d2l.try_all_gpus(), d2l.resnet18(10, 3)

def init_weights(m):
    if type(m) in [nn.Linear, nn.Conv2d]:
        nn.init.xavier_uniform_(m.weight)

net.apply(init_weights)

def train_with_data_aug(train_augs, test_augs, net, lr=0.001):
    train_iter = load_cifar10(True, train_augs, batch_size)
    test_iter = load_cifar10(False, test_augs, batch_size)
    loss = nn.CrossEntropyLoss(reduction="none")
    trainer = torch.optim.Adam(net.parameters(), lr=lr)
    train_ch13(net, train_iter, test_iter, loss, trainer, 10, devices)
???????让我们使用基于随机左右翻转的图像增广来训练模型。
train_with_data_aug(train_augs, test_augs, net)loss 0.173, train acc 0.941, test acc 0.854
4183.9 examples/sec on [device(type='cuda', index=0), device(type='cuda', index=1)]
四、总结
- 图像增广基于现有的训练数据生成随机图像,来提高模型的泛化能力。
- 为了在预测过程中得到确切的结果,我们通常对训练样本只进行图像增广,而在预测过程中不使用带随机操作的图像增广。
- 深度学习框架提供了许多不同的图像增广方法,这些方法可以被同时应用。
本文来自互联网用户投稿,该文观点仅代表作者本人,不代表本站立场。本站仅提供信息存储空间服务,不拥有所有权,不承担相关法律责任。 如若内容造成侵权/违法违规/事实不符,请联系我的编程经验分享网邮箱:chenni525@qq.com进行投诉反馈,一经查实,立即删除!
- Python教程
- 深入理解 MySQL 中的 HAVING 关键字和聚合函数
- Qt之QChar编码(1)
- MyBatis入门基础篇
- 用Python脚本实现FFmpeg批量转换
- 地方债务余额数据,Shp、excel格式,2008-2020年,含公共财政收入、支出、负债率等多个字段
- 35岁京东员工也不能拥有的面试机会,何为平等?
- 文章解读与仿真程序复现思路——电力自动化设备EI\CSCD\北大核心《考虑碳排放流的电-气互联系统源荷互动低碳经济调度》
- Java——IO流
- 87230系列USB连续波功率探头
- 全国职业院校技能大赛windows+openvpn配置
- Docker 如何安装 MySQL 并实现远程连接
- squid SSL https
- as安装后第一次创建项目,出现gradle下载错误,或无法创建run/debug的启动
- springboot集成flowable工作流