YOLOv5改进系列(28)——添加DSConv注意力卷积(ICCV 2023|用于管状结构分割的动态蛇形卷积)


 【YOLOv5改进系列】前期回顾:
YOLOv5改进系列(0)——重要性能指标与训练结果评价及分析
YOLOv5改进系列(5)——替换主干网络之 MobileNetV3
YOLOv5改进系列(6)——替换主干网络之 ShuffleNetV2
YOLOv5改进系列(9)——替换主干网络之EfficientNetv2
??????YOLOv5改进系列(10)——替换主干网络之GhostNet
YOLOv5改进系列(11)——添加损失函数之EIoU、AlphaIoU、SIoU、WIoU
YOLOv5改进系列(13)——更换激活函数之SiLU,ReLU,ELU,Hardswish,Mish,Softplus,AconC系列等YOLOv5改进系列(14)——更换NMS(非极大抑制)之 DIoU-NMS、CIoU-NMS、EIoU-NMS、GIoU-NMS 、SIoU-NMS、Soft-NMS
YOLOv5改进系列(16)——添加EMA注意力机制(ICASSP2023|实测涨点)
YOLOv5改进系列(17)——更换IoU之MPDIoU(ELSEVIER 2023|超越WIoU、EIoU等|实测涨点)
YOLOv5改进系列(18)——更换Neck之AFPN(全新渐进特征金字塔|超越PAFPN|实测涨点)
YOLOv5改进系列(19)——替换主干网络之Swin TransformerV1(参数量更小的ViT模型)
YOLOv5改进系列(21)——替换主干网络之RepViT(清华 ICCV 2023|最新开源移动端ViT)
YOLOv5改进系列(22)——替换主干网络之MobileViTv1(一种轻量级的、通用的移动设备 ViT)
YOLOv5改进系列(23)——替换主干网络之MobileViTv2(移动视觉 Transformer 的高效可分离自注意力机制)
YOLOv5改进系列(24)——替换主干网络之MobileViTv3(移动端轻量化网络的进一步升级)
YOLOv5改进系列(25)——添加LSKNet注意力机制(大选择性卷积核的领域首次探索)
YOLOv5改进系列(26)——添加RFAConv注意力卷积(感受野注意力卷积运算)
目录
![]()
🚀?一、DSConv介绍?
学习资料:
- 论文题目:《Dynamic Snake Convolution based on Topological Geometric Constraints for Tubular Structure Segmentation》
- 论文地址:https://arxiv.org/abs/2307.08388
- 源码地址:https://github.com/YaoleiQi/DSCNet
1.1?DSConv简介
背景
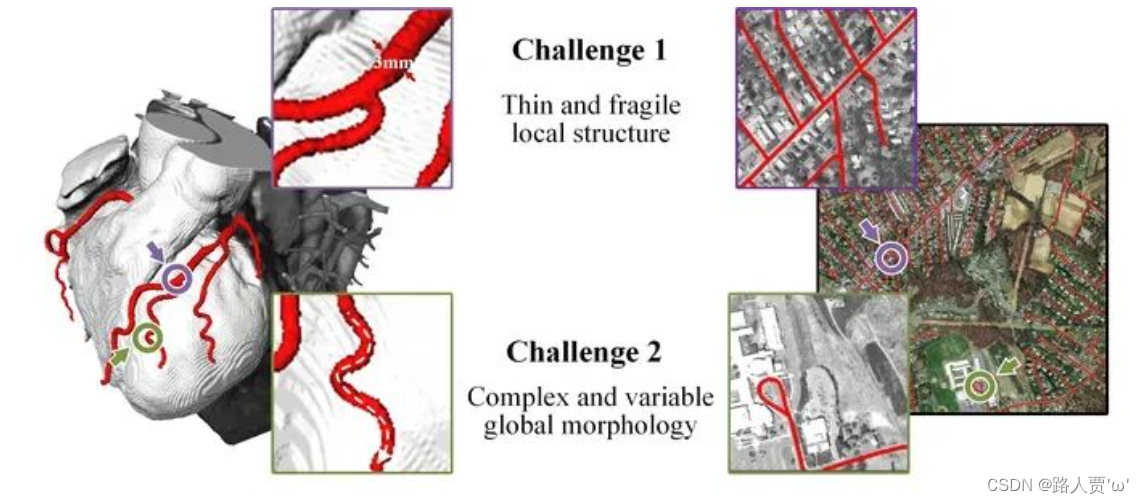
管状结构(例如血管、道路)是临床、自然界等各领域场景中十分重要的一种结构,其精确分割可以保证下游任务的准确性与效率。但管状结构的精确提取仍然面临着众多挑战:
- 细长且脆弱的局部结构。如下图所示,细长的结构仅占整个图像的一小部分,像素的组成有限。此外,这些结构容易受到复杂背景的干扰,因此模型很难精确分辨目标的细微变化,从而导致分割出现破碎与断裂。
- 复杂且多变的全局形态。如下图所示,我们可以看出细长管状结构复杂多变的形态,即使在同一张图像中也是如此。位于不同区域的目标的形态变化取决于分支的数量、分叉的位置,路径长度以及其在图像中的位置。因此当数据表现出未曾见过的形态特征时,模型倾向于过拟合到已见过的特征,无法识别未见过的特征形态,从而导致泛化性较弱。
本文主要工作?
本文关注到管状结构细长连续的特点,并利用这一信息在神经网络以下三个阶段同时增强感知:特征提取、特征融合和损失约束。分别设计了动态蛇形卷积(Dynamic Snake Convolution),多视角特征融合策略与连续性拓扑约束损失。我们同时给出了基于 2D 和 3D 的方法设计,通过实验证明了本文所提出的?DSCNet?在管状结构分割任务上提供了更好的精度和连续性。?
?1.2?动态蛇形卷积

目的:
- 希望卷积核一方面能够自由地贴合结构学习特征
- 另一方面能够在约束条件下不偏离目标结构太远
可变形卷积:
- 操控单个卷积核形变的所有偏置(offset),是在网络中一次性全部学到的
- 对于这一个偏置只有一个范围的约束,即感受野范围(extend)
- 控制所有的卷积发生形变,是依赖于整个网络最终的损失约束回传,这个变化过程是相当自由的。?
1.3??多视角特征融合策略

目的:
- 管状结构的走向与视角不是单一的,因此在设计中融合多视角特征也是必然的选择。
挑战:
- 融合更多的特征会导致更大的网络负载以及出现冗余。
方法:
- 在特征融合的训练过程中加入了分组与dropout的策略,一定程度上缓解了网络内内存的压力并避免模型陷入过拟合。?
?1.4?连续性拓扑约束损失
目的:
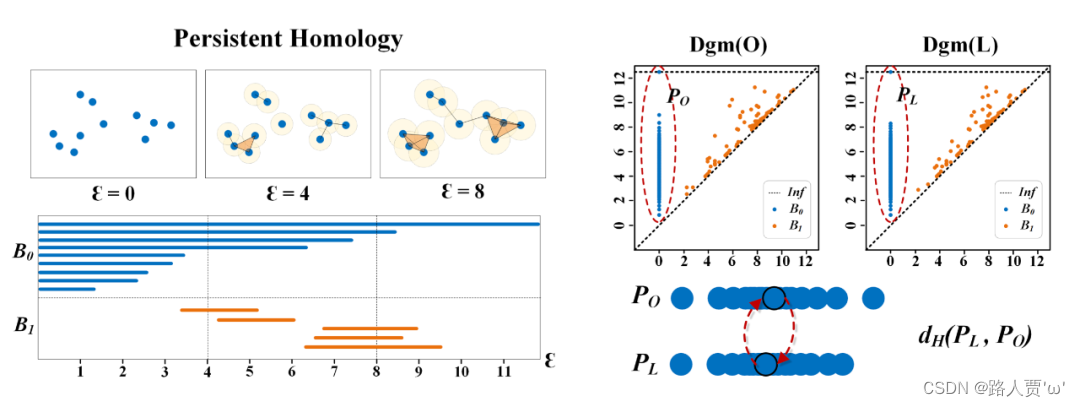
- 构建数据的拓扑结构,并提取复杂管状结构中的高维关系,也就是持续同源性(Persistence Homology, PH)。
启发:
- 假设 PO 的上端存在着一个异常的离散点(横坐标表示出现的时间,纵坐标表示消失的时间),这表明存在一个构件直到最后才与其他构件获得连接从而消失。
方法:?
- 本文中采用的是豪斯多夫距离(Hausdorff Distance, HD),HD 也是用于衡量点集相似度的一个重要算法,对离散点也非常敏感。
# -*- coding: utf-8 -*-

import torch

from torch import nn
from torch.nn.functional import max_pool3d


class crossentry(nn.Module):

    def __init__(self):
        super().__init__()

    def forward(self, y_true, y_pred):
        smooth = 1e-6
        return -torch.mean(y_true * torch.log(y_pred + smooth))


class cross_loss(nn.Module):

    def __init__(self):
        super().__init__()

    def forward(self, y_true, y_pred):
        smooth = 1e-6
        return -torch.mean(y_true * torch.log(y_pred + smooth) +
                           (1 - y_true) * torch.log(1 - y_pred + smooth))


'''
Another Loss Function proposed by us in IEEE transactions on Image Precessing:
Paper: https://ieeexplore.ieee.org/abstract/document/9611074
Code: https://github.com/YaoleiQi/Examinee-Examiner-Network
'''


class Dropoutput_Layer(nn.Module):

    def __init__(self):
        super().__init__()

    def forward(self, y_true, y_pred, alpha=0.4):
        smooth = 1e-6
        w = torch.abs(y_true - y_pred)
        w = torch.round(w + alpha)
        loss_ce = (
            -((torch.sum(w * y_true * torch.log(y_pred + smooth)) /
               torch.sum(w * y_true + smooth)) +
              (torch.sum(w * (1 - y_true) * torch.log(1 - y_pred + smooth)) /
               torch.sum(w * (1 - y_true) + smooth))) / 2)
        return loss_ce
🚀二、具体添加方法
2.1 添加顺序?
(1)models/common.py ? ?--> ?加入新增的网络结构
(2) ? ? models/yolo.py ? ? ? --> ?设定网络结构的传参细节,将DSConv类名加入其中。(当新的自定义模块中存在输入输出维度时,要使用qw调整输出维度)
(3) models/yolov5*.yaml ?--> ?新建一个文件夹,如yolov5s_DSConv.yaml,修改现有模型结构配置文件。(当引入新的层时,要修改后续的结构中的from参数)
(4) ? ? ? ? train.py ? ? ? ? ? ? ? ?--> ?修改‘--cfg’默认参数,训练时指定模型结构配置文件?
2.2 具体添加步骤?
第①步:在common.py中添加DCConv模块?
将下面的DSConv代码复制粘贴到common.py文件的末尾。
# by:迪菲赫尔曼
import warnings
import torch
from torch import nn

warnings.filterwarnings("ignore")

"""
This code is mainly the deformation process of our DSConv
"""

class DSConv(nn.Module):

    def __init__(self, in_ch, out_ch, kernel_size, extend_scope, morph,
                 if_offset):
        """
        动态蛇形卷积
        :param in_ch: 输入通道
        :param out_ch: 输出通道
        :param kernel_size: 卷积核的大小
        :param extend_scope: 扩展范围(默认为此方法的1)
        :param morph: 卷积核的形态主要分为两种类型,沿x轴(0)和沿y轴(1)(详细信息请参阅论文)
        :param if_offset: 是否需要变形,如果为False,则是标准卷积核
        """
        super(DSConv, self).__init__()
        # use the <offset_conv> to learn the deformable offset
        # offset_conv: 学习可变形偏移的卷积层
        self.offset_conv = nn.Conv2d(in_ch, 2 * kernel_size, 3, padding=1)
        self.bn = nn.BatchNorm2d(2 * kernel_size)
        self.kernel_size = kernel_size

        # two types of the DSConv (along x-axis and y-axis)
        # dsc_conv_x 和 dsc_conv_y:两种动态蛇形卷积层,分别沿x轴和y轴。
        self.dsc_conv_x = nn.Conv2d(
            in_ch,
            out_ch,
            kernel_size=(kernel_size, 1),
            stride=(kernel_size, 1),
            padding=0,
        )
        self.dsc_conv_y = nn.Conv2d(
            in_ch,
            out_ch,
            kernel_size=(1, kernel_size),
            stride=(1, kernel_size),
            padding=0,
        )

        # gn:组归一化层
        self.gn = nn.GroupNorm(out_ch // 4, out_ch)
        self.relu = nn.ReLU(inplace=True)

        # extend_scope:扩展范围
        self.extend_scope = extend_scope
        # morph:卷积核形态的类型
        self.morph = morph
        # if_offset:指示是否需要变形的布尔值
        self.if_offset = if_offset

    def forward(self, f):
        offset = self.offset_conv(f)
        offset = self.bn(offset)
        # We need a range of deformation between -1 and 1 to mimic the snake's swing
        offset = torch.tanh(offset)
        input_shape = f.shape
        dsc = DSC(input_shape, self.kernel_size, self.extend_scope, self.morph)
        deformed_feature = dsc.deform_conv(f, offset, self.if_offset)
        if self.morph == 0:
            x = self.dsc_conv_x(deformed_feature.type(f.dtype))
            x = self.gn(x)
            x = self.relu(x)
            return x
        else:
            x = self.dsc_conv_y(deformed_feature.type(f.dtype))
            x = self.gn(x)
            x = self.relu(x)
            return x


# Core code, for ease of understanding, we mark the dimensions of input and output next to the code
class DSC(object):

    def __init__(self, input_shape, kernel_size, extend_scope, morph):
        self.num_points = kernel_size
        self.width = input_shape[2]
        self.height = input_shape[3]
        self.morph = morph
        self.extend_scope = extend_scope  # offset (-1 ~ 1) * extend_scope

        # define feature map shape
        """
        B: Batch size  C: Channel  W: Width  H: Height
        """
        self.num_batch = input_shape[0]
        self.num_channels = input_shape[1]

    """
    input: offset [B,2*K,W,H]  K: Kernel size (2*K: 2D image, deformation contains <x_offset> and <y_offset>)
    output_x: [B,1,W,K*H]   coordinate map
    output_y: [B,1,K*W,H]   coordinate map
    """

    def _coordinate_map_3D(self, offset, if_offset):
        """
        1.输入为偏移 (offset) 和是否需要偏移 (if_offset)。
        2.根据输入特征图的形状、卷积核大小、扩展范围以及形态类型,生成二维坐标映射。
        3.如果形态类型为0,表示沿x轴,生成y坐标映射;如果形态类型为1,表示沿y轴,生成x坐标映射。
        4.根据偏移和扩展范围调整坐标映射。
        5.返回生成的坐标映射。
        """
        device = offset.device
        # offset
        y_offset, x_offset = torch.split(offset, self.num_points, dim=1)

        y_center = torch.arange(0, self.width).repeat([self.height])
        y_center = y_center.reshape(self.height, self.width)
        y_center = y_center.permute(1, 0)
        y_center = y_center.reshape([-1, self.width, self.height])
        y_center = y_center.repeat([self.num_points, 1, 1]).float()
        y_center = y_center.unsqueeze(0)

        x_center = torch.arange(0, self.height).repeat([self.width])
        x_center = x_center.reshape(self.width, self.height)
        x_center = x_center.permute(0, 1)
        x_center = x_center.reshape([-1, self.width, self.height])
        x_center = x_center.repeat([self.num_points, 1, 1]).float()
        x_center = x_center.unsqueeze(0)

        if self.morph == 0:
            """
            Initialize the kernel and flatten the kernel
                y: only need 0
                x: -num_points//2 ~ num_points//2 (Determined by the kernel size)
                !!! The related PPT will be submitted later, and the PPT will contain the whole changes of each step
            """
            y = torch.linspace(0, 0, 1)
            x = torch.linspace(
                -int(self.num_points // 2),
                int(self.num_points // 2),
                int(self.num_points),
            )

            y, x = torch.meshgrid(y, x)
            y_spread = y.reshape(-1, 1)
            x_spread = x.reshape(-1, 1)

            y_grid = y_spread.repeat([1, self.width * self.height])
            y_grid = y_grid.reshape([self.num_points, self.width, self.height])
            y_grid = y_grid.unsqueeze(0)  # [B*K*K, W,H]

            x_grid = x_spread.repeat([1, self.width * self.height])
            x_grid = x_grid.reshape([self.num_points, self.width, self.height])
            x_grid = x_grid.unsqueeze(0)  # [B*K*K, W,H]

            y_new = y_center + y_grid
            x_new = x_center + x_grid

            y_new = y_new.repeat(self.num_batch, 1, 1, 1).to(device)
            x_new = x_new.repeat(self.num_batch, 1, 1, 1).to(device)

            y_offset_new = y_offset.detach().clone()

            if if_offset:
                y_offset = y_offset.permute(1, 0, 2, 3)
                y_offset_new = y_offset_new.permute(1, 0, 2, 3)
                center = int(self.num_points // 2)

                # The center position remains unchanged and the rest of the positions begin to swing
                # This part is quite simple. The main idea is that "offset is an iterative process"
                y_offset_new[center] = 0
                for index in range(1, center):
                    y_offset_new[center + index] = (y_offset_new[center + index - 1] + y_offset[center + index])
                    y_offset_new[center - index] = (y_offset_new[center - index + 1] + y_offset[center - index])
                y_offset_new = y_offset_new.permute(1, 0, 2, 3).to(device)
                y_new = y_new.add(y_offset_new.mul(self.extend_scope))

            y_new = y_new.reshape(
                [self.num_batch, self.num_points, 1, self.width, self.height])
            y_new = y_new.permute(0, 3, 1, 4, 2)
            y_new = y_new.reshape([
                self.num_batch, self.num_points * self.width, 1 * self.height
            ])
            x_new = x_new.reshape(
                [self.num_batch, self.num_points, 1, self.width, self.height])
            x_new = x_new.permute(0, 3, 1, 4, 2)
            x_new = x_new.reshape([
                self.num_batch, self.num_points * self.width, 1 * self.height
            ])
            return y_new, x_new

        else:
            """
            Initialize the kernel and flatten the kernel
                y: -num_points//2 ~ num_points//2 (Determined by the kernel size)
                x: only need 0
            """
            y = torch.linspace(
                -int(self.num_points // 2),
                int(self.num_points // 2),
                int(self.num_points),
            )
            x = torch.linspace(0, 0, 1)

            y, x = torch.meshgrid(y, x)
            y_spread = y.reshape(-1, 1)
            x_spread = x.reshape(-1, 1)

            y_grid = y_spread.repeat([1, self.width * self.height])
            y_grid = y_grid.reshape([self.num_points, self.width, self.height])
            y_grid = y_grid.unsqueeze(0)

            x_grid = x_spread.repeat([1, self.width * self.height])
            x_grid = x_grid.reshape([self.num_points, self.width, self.height])
            x_grid = x_grid.unsqueeze(0)

            y_new = y_center + y_grid
            x_new = x_center + x_grid

            y_new = y_new.repeat(self.num_batch, 1, 1, 1)
            x_new = x_new.repeat(self.num_batch, 1, 1, 1)

            y_new = y_new.to(device)
            x_new = x_new.to(device)
            x_offset_new = x_offset.detach().clone()

            if if_offset:
                x_offset = x_offset.permute(1, 0, 2, 3)
                x_offset_new = x_offset_new.permute(1, 0, 2, 3)
                center = int(self.num_points // 2)
                x_offset_new[center] = 0
                for index in range(1, center):
                    x_offset_new[center + index] = (x_offset_new[center + index - 1] + x_offset[center + index])
                    x_offset_new[center - index] = (x_offset_new[center - index + 1] + x_offset[center - index])
                x_offset_new = x_offset_new.permute(1, 0, 2, 3).to(device)
                x_new = x_new.add(x_offset_new.mul(self.extend_scope))

            y_new = y_new.reshape(
                [self.num_batch, 1, self.num_points, self.width, self.height])
            y_new = y_new.permute(0, 3, 1, 4, 2)
            y_new = y_new.reshape([
                self.num_batch, 1 * self.width, self.num_points * self.height
            ])
            x_new = x_new.reshape(
                [self.num_batch, 1, self.num_points, self.width, self.height])
            x_new = x_new.permute(0, 3, 1, 4, 2)
            x_new = x_new.reshape([
                self.num_batch, 1 * self.width, self.num_points * self.height
            ])
            return y_new, x_new

    """
    input: input feature map [N,C,D,W,H];coordinate map [N,K*D,K*W,K*H]
    output: [N,1,K*D,K*W,K*H]  deformed feature map
    """

    def _bilinear_interpolate_3D(self, input_feature, y, x):
        """
         1.输入为输入特征图 (input_feature)、y坐标映射 (y) 和x坐标映射 (x)。
         2.进行三维双线性插值,获取变形后的特征。
         3.返回插值得到的变形特征。
        """
        device = input_feature.device
        y = y.reshape([-1]).float()
        x = x.reshape([-1]).float()

        zero = torch.zeros([]).int()
        max_y = self.width - 1
        max_x = self.height - 1

        # find 8 grid locations
        y0 = torch.floor(y).int()
        y1 = y0 + 1
        x0 = torch.floor(x).int()
        x1 = x0 + 1

        # clip out coordinates exceeding feature map volume
        y0 = torch.clamp(y0, zero, max_y)
        y1 = torch.clamp(y1, zero, max_y)
        x0 = torch.clamp(x0, zero, max_x)
        x1 = torch.clamp(x1, zero, max_x)

        input_feature_flat = input_feature.flatten()
        input_feature_flat = input_feature_flat.reshape(
            self.num_batch, self.num_channels, self.width, self.height)
        input_feature_flat = input_feature_flat.permute(0, 2, 3, 1)
        input_feature_flat = input_feature_flat.reshape(-1, self.num_channels)
        dimension = self.height * self.width

        base = torch.arange(self.num_batch) * dimension
        base = base.reshape([-1, 1]).float()

        repeat = torch.ones([self.num_points * self.width * self.height
                             ]).unsqueeze(0)
        repeat = repeat.float()

        base = torch.matmul(base, repeat)
        base = base.reshape([-1])

        base = base.to(device)

        base_y0 = base + y0 * self.height
        base_y1 = base + y1 * self.height

        # top rectangle of the neighbourhood volume
        index_a0 = base_y0 - base + x0
        index_c0 = base_y0 - base + x1

        # bottom rectangle of the neighbourhood volume
        index_a1 = base_y1 - base + x0
        index_c1 = base_y1 - base + x1

        # get 8 grid values
        value_a0 = input_feature_flat[index_a0.type(torch.int64)].to(device)
        value_c0 = input_feature_flat[index_c0.type(torch.int64)].to(device)
        value_a1 = input_feature_flat[index_a1.type(torch.int64)].to(device)
        value_c1 = input_feature_flat[index_c1.type(torch.int64)].to(device)

        # find 8 grid locations
        y0 = torch.floor(y).int()
        y1 = y0 + 1
        x0 = torch.floor(x).int()
        x1 = x0 + 1

        # clip out coordinates exceeding feature map volume
        y0 = torch.clamp(y0, zero, max_y + 1)
        y1 = torch.clamp(y1, zero, max_y + 1)
        x0 = torch.clamp(x0, zero, max_x + 1)
        x1 = torch.clamp(x1, zero, max_x + 1)

        x0_float = x0.float()
        x1_float = x1.float()
        y0_float = y0.float()
        y1_float = y1.float()

        vol_a0 = ((y1_float - y) * (x1_float - x)).unsqueeze(-1).to(device)
        vol_c0 = ((y1_float - y) * (x - x0_float)).unsqueeze(-1).to(device)
        vol_a1 = ((y - y0_float) * (x1_float - x)).unsqueeze(-1).to(device)
        vol_c1 = ((y - y0_float) * (x - x0_float)).unsqueeze(-1).to(device)

        outputs = (value_a0 * vol_a0 + value_c0 * vol_c0 + value_a1 * vol_a1 +
                   value_c1 * vol_c1)

        if self.morph == 0:
            outputs = outputs.reshape([
                self.num_batch,
                self.num_points * self.width,
                1 * self.height,
                self.num_channels,
            ])
            outputs = outputs.permute(0, 3, 1, 2)
        else:
            outputs = outputs.reshape([
                self.num_batch,
                1 * self.width,
                self.num_points * self.height,
                self.num_channels,
            ])
            outputs = outputs.permute(0, 3, 1, 2)
        return outputs

    def deform_conv(self, input, offset, if_offset):
        """
        1.输入为原始特征图 (input)、偏移 (offset) 和是否需要偏移 (if_offset)。
        2.调用 _coordinate_map_3D 方法获取坐标映射。
        3.调用 _bilinear_interpolate_3D 方法进行双线性插值,得到变形后的特征。
        4.返回变形后的特征。
        """
        y, x = self._coordinate_map_3D(offset, if_offset)
        deformed_feature = self._bilinear_interpolate_3D(input, y, x)
        return deformed_feature

#---------------------------------YOLOv5 专用部分↓---------------------------------
class DSConv_Bottleneck(nn.Module):
    # DSConv bottleneck
    def __init__(self, c1, c2, shortcut=True, g=1, e=0.5):  # ch_in, ch_out, shortcut, groups, expansion
        super().__init__()
        c_ = int(c2 * e)  # hidden channels
        self.cv1 = Conv(c1, c_, 1, 1)
        self.cv2 = Conv(c_, c2, 3, 1, g=g)
        self.add = shortcut and c1 == c2
        self.snc = DSConv(c2, c2, 3, 1, 1, True)

    def forward(self, x):
        return x + self.snc(self.cv2(self.cv1(x))) if self.add else self.snc(self.cv2(self.cv1(x)))


class DSConv_C3(nn.Module):
    # DSConv Bottleneck with 3 convolutions
    def __init__(self, c1, c2, n=1, shortcut=True, g=1, e=0.5):  # ch_in, ch_out, number, shortcut, groups, expansion

        super().__init__()
        c_ = int(c2 * e)  # hidden channels
        self.cv1 = Conv(c1, c_, 1, 1)
        self.cv2 = Conv(c1, c_, 1, 1)
        self.cv3 = Conv(2 * c_, c2, 1)  # act=FReLU(c2)
        self.m = nn.Sequential(*(DSConv_Bottleneck(c_, c_, shortcut, g, e=1.0) for _ in range(n)))

    def forward(self, x):
        return self.cv3(torch.cat((self.m(self.cv1(x)), self.cv2(x)), dim=1))

#---------------------------------YOLOv5 专用部分↑---------------------------------
第②步:修改yolo.py文件??
再来修改yolo.py,在parse_model函数中找到?elif m is nn.BatchNorm2d:语句,在其后面加上下面代码:?
elif m in (DSConv, DSConv_C3):
            c1, c2 = ch[f], args[0]
            if c2 != nc:
                c2 = make_divisible(c2 * gw, 8)
            args = [c1, c2, *args[1:]]
            if m is DSConv_C3:
                args.insert(2, n)  # number of repeats
                n = 1
?如下图所示:

第③步:创建自定义的yaml文件??
第1种,替换conv结构
# YOLOv5 🚀 by Ultralytics, GPL-3.0 license

# Parameters
nc: 80  # number of classes
depth_multiple: 0.33  # model depth multiple
width_multiple: 0.5  # layer channel multiple
anchors:
  - [10,13, 16,30, 33,23]  # P3/8
  - [30,61, 62,45, 59,119]  # P4/16
  - [116,90, 156,198, 373,326]  # P5/32

# YOLOv5 v6.0 backbone
backbone:
  # [from, number, module, args]
  [[-1, 1, Conv, [64, 6, 2, 2]],  # 0-P1/2
   [-1, 1, Conv, [128, 3, 2]],  # 1-P2/4
   [-1, 3, C3, [128]],
   [-1, 1, Conv, [256, 3, 2]],  # 3-P3/8
   [-1, 6, C3, [256]],
   [-1, 1, Conv, [512, 3, 2]],  # 5-P4/16
   [-1, 9, C3, [512]],
   [-1, 1, Conv, [1024, 3, 2]],  # 7-P5/32
   [-1, 3, C3, [1024]],
   [-1, 1, SPPF, [1024, 5]],  # 9
  ]

# YOLOv5 v6.0 head
head:
  [[-1, 1, Conv, [512, 1, 1]],
   [-1, 1, nn.Upsample, [None, 2, 'nearest']],
   [[-1, 6], 1, Concat, [1]],  # cat backbone P4
   [-1, 3, C3, [512]],  # 13

   [-1, 1, Conv, [256, 1, 1]],
   [-1, 1, nn.Upsample, [None, 2, 'nearest']],
   [[-1, 4], 1, Concat, [1]],  # cat backbone P3
   [-1, 3, DSConv, [256, 3,1,1,True]],  # 17 (P3/8-small)

   [-1, 1, Conv, [256, 3, 2]],
   [[-1, 14], 1, Concat, [1]],  # cat head P4
   [-1, 3, DSConv, [512, 3,1,1,True]],  # 20 (P4/16-medium)

   [-1, 1, Conv, [512, 3, 2]],
   [[-1, 10], 1, Concat, [1]],  # cat head P5
   [-1, 3, DSConv, [1024, 3,1,1,True]],  # 23 (P5/32-large)

   [[17, 20, 23], 1, Detect, [nc, anchors]],  # Detect(P3, P4, P5)
  ]
这里要注意一个问题,替换时DSConv参数是需要做对应修改:

如下图栗子所示:?

如果直接改模块名会出现缺参报错:
TypeError: __init__() missing 2 required positional arguments: 'morph' and 'if_offset'
第2种,替换C3模块?
# YOLOv5 🚀 by Ultralytics, GPL-3.0 license

# Parameters
nc: 80  # number of classes
depth_multiple: 0.33  # model depth multiple
width_multiple: 0.5  # layer channel multiple
anchors:
  - [10,13, 16,30, 33,23]  # P3/8
  - [30,61, 62,45, 59,119]  # P4/16
  - [116,90, 156,198, 373,326]  # P5/32

# YOLOv5 v6.0 backbone
backbone:
  # [from, number, module, args]
  [[-1, 1, Conv, [64, 6, 2, 2]],  # 0-P1/2
   [-1, 1, Conv, [128, 3, 2]],  # 1-P2/4
   [-1, 3, DSConv_C3, [128]],
   [-1, 1, Conv, [256, 3, 2]],  # 3-P3/8
   [-1, 6, DSConv_C3, [256]],
   [-1, 1, Conv, [512, 3, 2]],  # 5-P4/16
   [-1, 9, DSConv_C3, [512]],
   [-1, 1, Conv, [1024, 3, 2]],  # 7-P5/32
   [-1, 3, DSConv_C3, [1024]],
   [-1, 1, SPPF, [1024, 5]],  # 9
  ]

# YOLOv5 v6.0 head
head:
  [[-1, 1, Conv, [512, 1, 1]],
   [-1, 1, nn.Upsample, [None, 2, 'nearest']],
   [[-1, 6], 1, Concat, [1]],  # cat backbone P4
   [-1, 3, C3, [512]],  # 13

   [-1, 1, Conv, [256, 1, 1]],
   [-1, 1, nn.Upsample, [None, 2, 'nearest']],
   [[-1, 4], 1, Concat, [1]],  # cat backbone P3
   [-1, 3, C3, [256, False]],  # 17 (P3/8-small)

   [-1, 1, Conv, [256, 3, 2]],
   [[-1, 14], 1, Concat, [1]],  # cat head P4
   [-1, 3, C3, [512, False]],  # 20 (P4/16-medium)

   [-1, 1, Conv, [512, 3, 2]],
   [[-1, 10], 1, Concat, [1]],  # cat head P5
   [-1, 3, C3, [1024, False]],  # 23 (P5/32-large)

   [[17, 20, 23], 1, Detect, [nc, anchors]],  # Detect(P3, P4, P5)
  ]
替换C3模块直接改模块名字就行。?
代码参考:
改进YOLO系列 | YOLOv5/v7 引入 Dynamic Snake Convolution | 动态蛇形卷积_yolov7加入dynamic snake convolution-CSDN博客
第④步:验证是否加入成功
运行yolo.py
第1种?

第2种??
 ?这样就OK啦!
🌟本人YOLOv5系列导航
??? ?🍀YOLOv5源码详解系列:??
YOLOv5源码逐行超详细注释与解读(1)——项目目录结构解析
??????YOLOv5源码逐行超详细注释与解读(2)——推理部分detect.py
YOLOv5源码逐行超详细注释与解读(3)——训练部分train.py
YOLOv5源码逐行超详细注释与解读(4)——验证部分val(test).py
YOLOv5源码逐行超详细注释与解读(5)——配置文件yolov5s.yaml
YOLOv5源码逐行超详细注释与解读(6)——网络结构(1)yolo.py
YOLOv5源码逐行超详细注释与解读(7)——网络结构(2)common.py
???? ?🍀YOLOv5入门实践系列:??
YOLOv5入门实践(2)——手把手教你利用labelimg标注数据集
YOLOv5入门实践(5)——从零开始,手把手教你训练自己的目标检测模型(包含pyqt5界面)

本文来自互联网用户投稿,该文观点仅代表作者本人,不代表本站立场。本站仅提供信息存储空间服务,不拥有所有权,不承担相关法律责任。 如若内容造成侵权/违法违规/事实不符,请联系我的编程经验分享网邮箱:chenni525@qq.com进行投诉反馈,一经查实,立即删除!
- Python教程
- 深入理解 MySQL 中的 HAVING 关键字和聚合函数
- Qt之QChar编码(1)
- MyBatis入门基础篇
- 用Python脚本实现FFmpeg批量转换
- 【本科生机器学习】【Python】【北京航空航天大学】课题报告:支持向量机(Support Vector Machine, SVM)初步研究【下、实验部分(二)】)
- 从Click理解移动端App开发
- James Adams - 树莓派5计划中的双重标准
- Qlik Sense Ports
- 【Canvas】使用canvas实现多点连线效果
- (1)(1.13) SiK无线电高级配置(一)
- 智能车培训——硬件篇:电源转换的硬件设计
- 【RocketMQ-Bug】RocketMQ 在使用中的常见问题
- 《数据分析-Tableau》Tableau详细入门教程
- 前端子项目共用node_modules