Spring中Bean对象的存储与读取
创建 Maven 项目
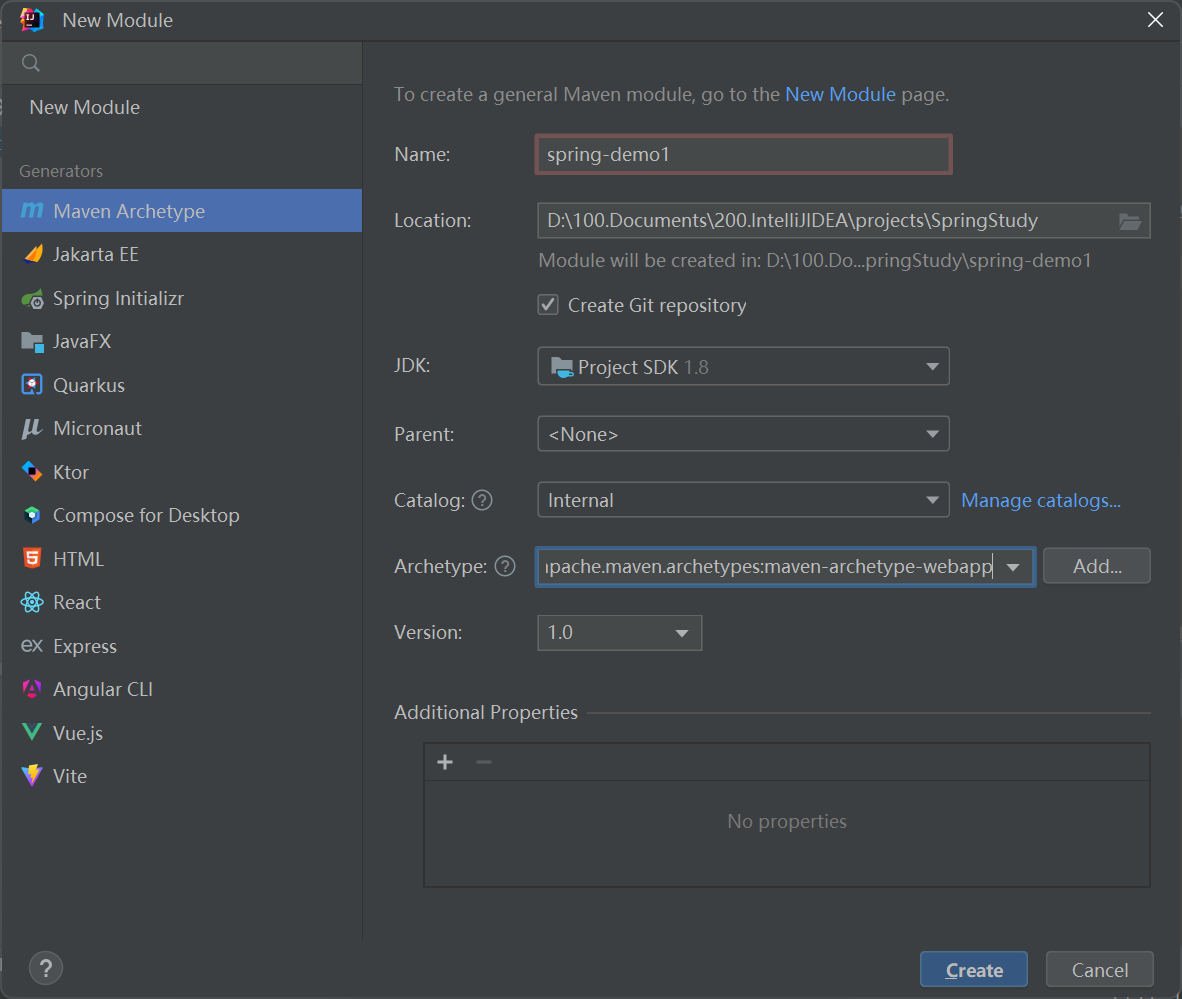
添加 Spring 框架支持
在项目的 pom.xml 中添加 Spring 支持
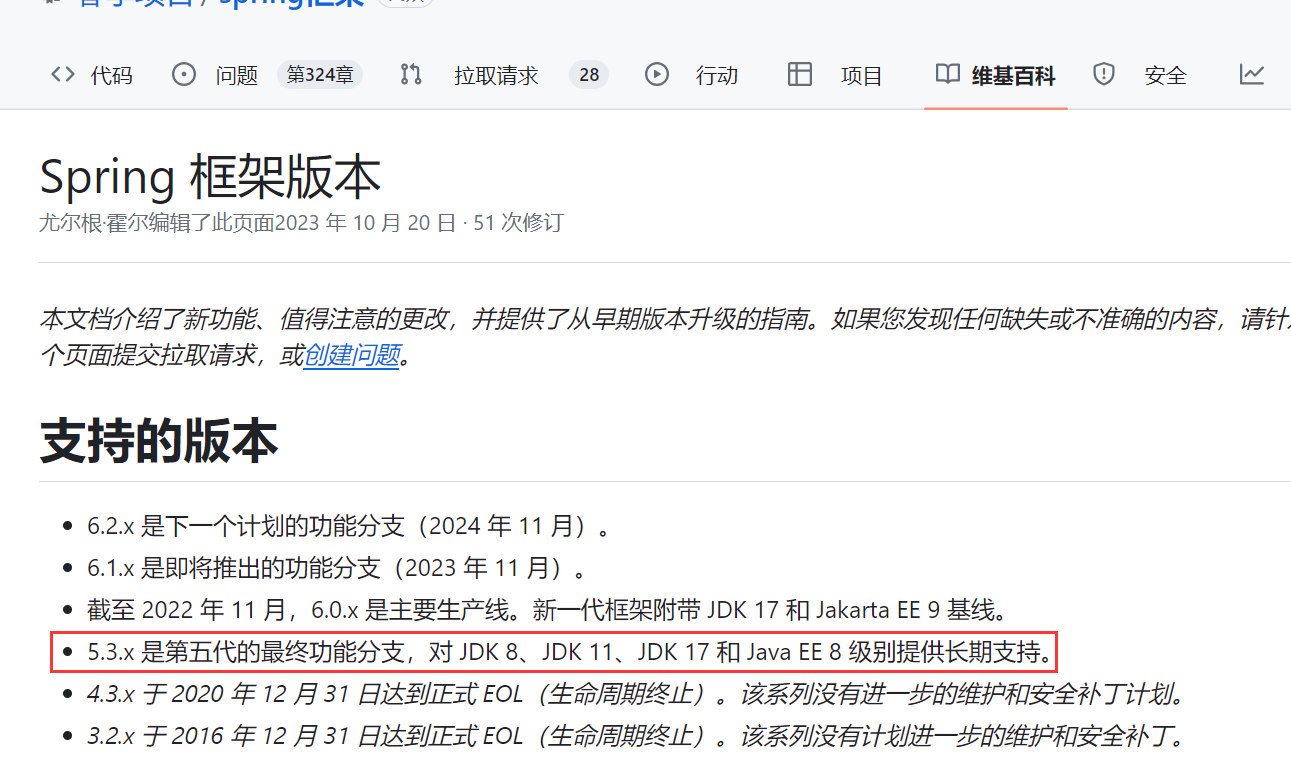
如何选定版本环境:打开官网,点击github图标

jdk8最后一个Spring版本是5.3.x,Spring6.0.x最低需要jdk17
<dependencies>
        <dependency>
            <groupId>org.springframework</groupId>
            <artifactId>spring-beans</artifactId>
            <version>5.3.31</version>
        </dependency>
</dependencies>
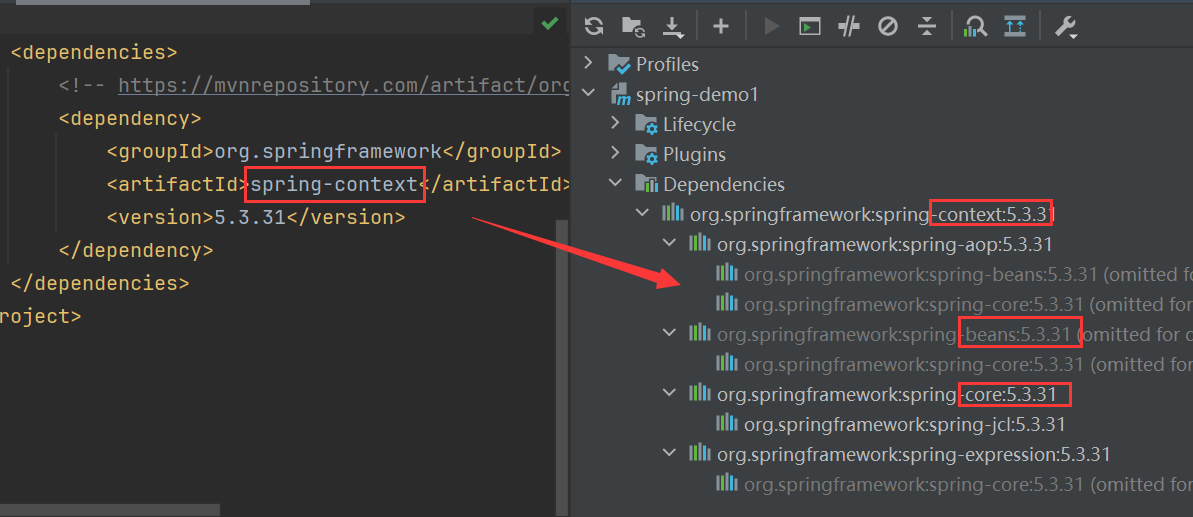
版本冲突问题Maven自己处理
version : 可以选择带有 RELEASE结尾或者纯数字结尾,这样的版本更稳定
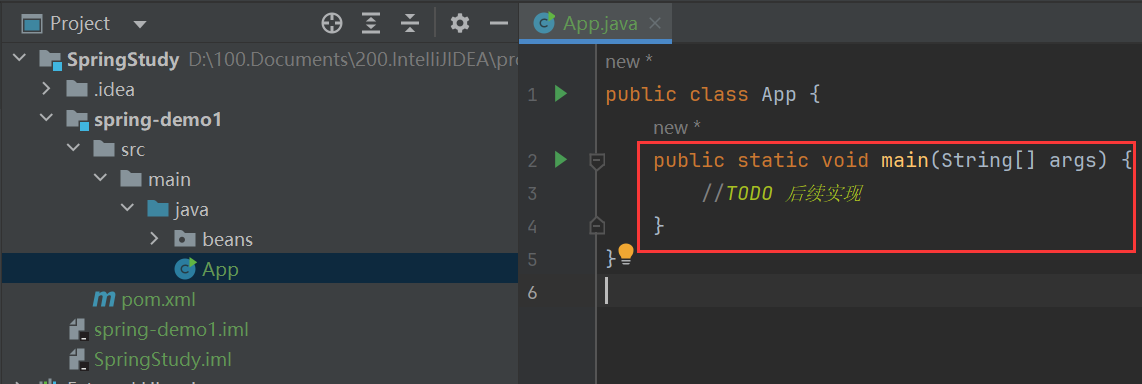
添加一个启动类
项目下创建一个main方法的启动类
存储 Bean 对象
- 存储 Bean 之前,要先有 Bean 才行

- 将创建的 Bean 注册到 Spring 容器中
这里并非实际意义上的存储,而是类似于交给 IoC 容器进行托管

在 resources 目录下添加 spring-config.xml 模板代码
<?xml version="1.0" encoding="UTF-8"?>
<beans xmlns="http://www.springframework.org/schema/beans"
       xmlns:xsi="http://www.w3.org/2001/XMLSchema-instance"
       xsi:schemaLocation="http://www.springframework.org/schema/beans http://www.springframework.org/schema/beans/spring-beans.xsd">
</beans>
- 从 Spring 中取出 bean 对象
取 bean 需要先得到 Spring 对象(Spring上下文)

获取并使用 Bean 对象,分为以下3步
- 获取Spring上下文
- 上下文获取 Bean
- 使用 Bean
如果获取多个 Bean 的话,重复以上2,3步骤
两种方式获取Spring 上下文对比
Spring 上下文可以使用 ApplicationContext 或者 BeanFactory获取
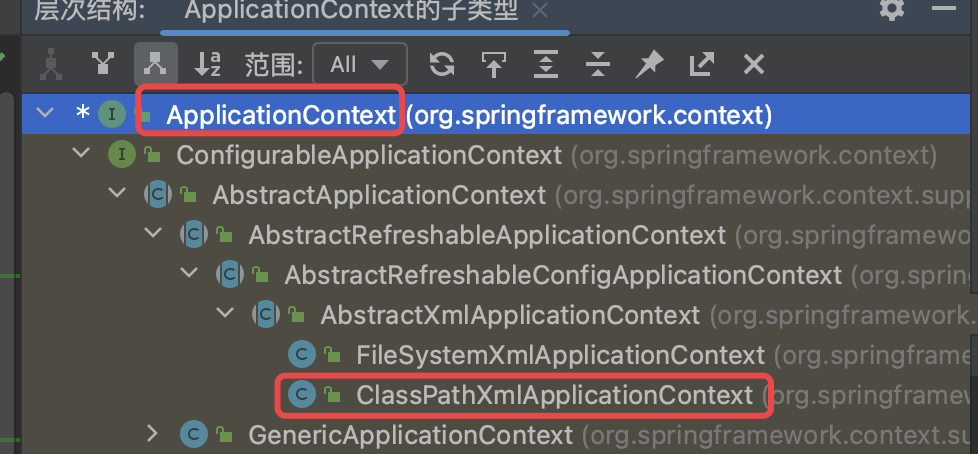
ApplicationContext顶层接口
ApplicationContext context = new ClassPathXmlApplicationContext("spring-config.xml");
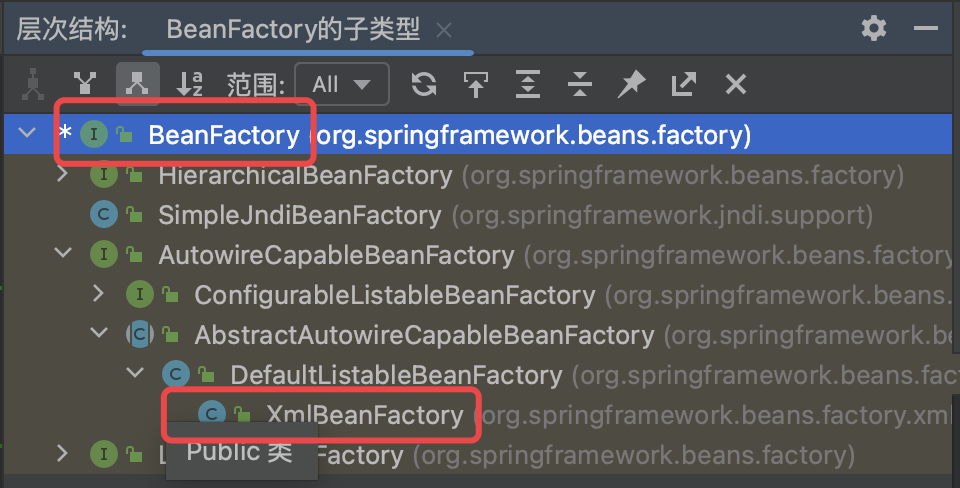
BeanFactory顶层接口
BeanFactory beanFactory = new XmlBeanFactory(new ClassPathResource("spring-config.xml"));
继承关系

ApplicationContext 和 BeanFactory 效果是一样的,BeanFactory 属于 ApplicationContext 子类,它们区别如下
-
继承角度:Spring 容器有两个顶级接口:BeanFactory 和 ApplicationContext
-
其中 BeanFactory 提供了基础的访问容器的能力,而 ApplicationContext 属于 BeanFactory 的子类,除了 BeanFactory 的所有功能外,它还拥有独特的特性,添加了对国际化的支持、资源访问的支持、以及事件传播等方面的支持
-
性能角度:ApplicationContext 是一次性加载并初始化所有的 Bean 对象「更方便」;BeanFactory 是按需加载并初始化「更轻量」
ClassPathXmlApplicationContext 属于 ApplicationContext 的子类,拥有 ApplicationContext 的所有功能是通过 xml 的配置来获取所有的 Bean 容器的
获取指定的 Bean 对象
ApplicationContext context = new ClassPathXmlApplicationContext("Spring-config.xml");
        User user = (User) context.getBean("user");
        user.sayHi();
        BeanFactory beanFactory = new XmlBeanFactory(new ClassPathResource("Spring-config.xml"));
        User user1 = (User) beanFactory.getBean("user");
        user1.sayHi();


// 运行结果
你好
你好
注意事项
Bean 的 id 要一一对应
<beans>
        <bean id="user" class="Beans.User"></bean>
</beans>
User user = (User) context.getBean("user");
User user1 = (User) beanFactory.getBean("user");
getBean 方法的更多用法
getBean() 方法很多重载,我们也可以使用其他方法来获取 Bean 对象
先看一下 getBean() 源码
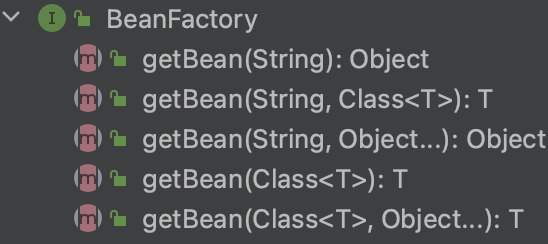
getBean(String, Class): 先根据 id 匹配,再根据Class匹配
当有两个相同 id 的时候利用此方法查询会 报错Nouni
get(Class, String): 先根据Class匹配,再根据 id 匹配
当有两个的Bean,利用此方法,则会 报错Nouni
ApplicationContext context = new ClassPathXmlApplicationContext("Spring-config.xml");
User user = context.getBean(User.class);

User user1 = context.getBean("user1", User.class);
二者的区别
当有多个重复的对象被注册到 Bean 中的时候,只能通过 id属性 来获取
![[外链图片转存失败,源站可能有防盗链机制,建议将图片保存下来直接上传(img-XwSPGiLV-1651373641288)(/Users/cxf/Desktop/MarkDown/images/注册重复的Bean.png)]](https://img-blog.csdnimg.cn/a906ff626c00457a953b4b4a04430b57.png)
<beans>
        <bean id="user" class="Beans.User"></bean>
        <bean id="user1" class="Beans.User"></bean>
        <bean id="user2" class="Beans.User"></bean>
</beans>
如果继续使用 context.getBean(User.class) 就会报错。应该搭配 id 一起使用
![[外链图片转存失败,源站可能有防盗链机制,建议将图片保存下来直接上传(img-bxQ95tb6-1651373641288)(/Users/cxf/Desktop/MarkDown/images/注册重复的Bean报错.png)]](https://img-blog.csdnimg.cn/24af0c6e37d1428c956091558d543caf.png)
总结Spring使用流程
- 操作容器之前,先要有容器
- 存对象
- 创建 Bean「普通类」
- 将 Bean 注册「配置」到 Spring-config.xml 中
- 取对象
- 得到 Spring 上下文,并读取到 Spring 的配置文件
- 获取某一个 Bean 对象
- 使用 Bean 对象
![[外链图片转存失败,源站可能有防盗链机制,建议将图片保存下来直接上传(img-R9uFOUgn-1651373641289)(/Users/cxf/Desktop/MarkDown/images/使用流程.png)]](https://img-blog.csdnimg.cn/3569e23f0f944f1f853516c68c3bf5e8.png)
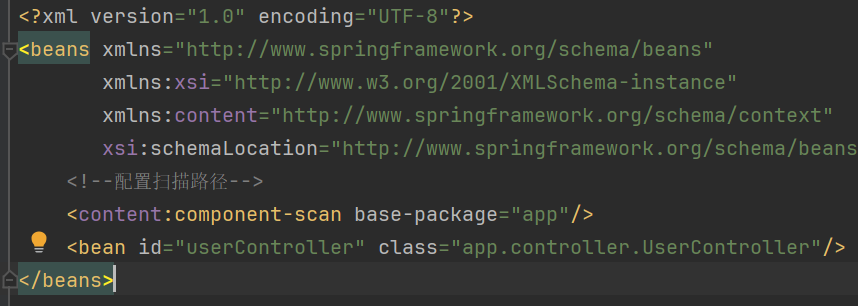
配置扫描路径配合注解进行存储Bean对象
在上述操作过程中,我们发现存储对象并没有想象中的那么 简单,所以就有了更简单的操作 Bean对象 的方法
Spring 更简单的存储对象和读取对象核心是使用注解
之前我们还需要在 Spring 的配置文件 spring-config.xml 中添加一行 bean 注册内容才行
![[外链图片转存失败,源站可能有防盗链机制,建议将图片保存下来直接上传(img-WEAR2KLN-1651373641289)(/Users/cxf/Desktop/MarkDown/images/注册重复的Bean.png)]](https://img-blog.csdnimg.cn/2672c5db36fe480580c3c66443334f7d.png)
因此 Spring 中为了方便注册,我们只需要配置一个存储对象的扫描包即可「目录中的所有 Bean 被添加注解后都会被注册到 Spring 容器中」
配置扫描路径代码模板
<?xml version="1.0" encoding="UTF-8"?>
<beans xmlns="http://www.springframework.org/schema/beans"
       xmlns:xsi="http://www.w3.org/2001/XMLSchema-instance"
       xmlns:content="http://www.springframework.org/schema/context"
       xsi:schemaLocation="http://www.springframework.org/schema/beans http://www.springframework.org/schema/beans/spring-beans.xsd http://www.springframework.org/schema/context https://www.springframework.org/schema/context/spring-context.xsd">
    <content:component-scan base-package="/Beans"></content:component-scan>
</beans>
对比之前的 Spring-config.xml 发现多了标红的两行,这两行就是注册扫描的包
![[外链图片转存失败,源站可能有防盗链机制,建议将图片保存下来直接上传(img-dzz9lltK-1651373641290)(/Users/cxf/Desktop/MarkDown/images/注册扫描的包.png)]](https://img-blog.csdnimg.cn/f601cdf9504d4903a15c935f3cef93eb.png)
也就是说,即使添加了注解,如果不是在配置的扫描报下的类对象,也是不能被存储的 Spring 中的
五大类注解
想把扫描包中的 Bean 添加到 Spring,由两类注解类型可以实现
- 类注解:@Controller、@Service、@Repository、@Component、@Configuration
- 方法注解:@Bean「必须结合类注解才能起效」
这么多注解的原因
我们发现它们的功能是一样的,都能达到 添加注解注册Bean 的功能,那么为何还要有这么多注解类型呢?
这就和每个省市都有自己的车牌号一样。全国的各个地区买的相同类型的车都是一样的,但是车牌号却不同:湖北的车有鄂A:武汉的车;鄂B:黄石的车;鄂C:十堰的车。。。这样做的好处就是节约了车牌号以外还可以查看车辆的归属地方便车管局管理。
那么为什么需要这么多的类注解也是一样的原因,就是让程序员看到类注解之后就能直接了解当前类的用途
- @Controller:业务逻辑层
- @Service:服务层
- @Repository:持久层
- @Configuration:配置层
程序的工程分层调用流程如下:
![[外链图片转存失败,源站可能有防盗链机制,建议将图片保存下来直接上传(img-ZnBODXy0-1651373641291)(/Users/cxf/Desktop/MarkDown/images/程序的工程分层调用.png)]](https://img-blog.csdnimg.cn/408e2ac71fd643bc956916a0e7c5c149.png)
@Component是其它注解的父类
![[外链图片转存失败,源站可能有防盗链机制,建议将图片保存下来直接上传(img-TpHIUISM-1651373641291)(/Users/cxf/Desktop/MarkDown/images/类注解之间的关系.png)]](https://img-blog.csdnimg.cn/9d10484d614d44a18d7a39870831d041.png)
发现这 4个 注解里都有一个注解 @Component,说明他们本身就是属于 @Component子类
在看 @Component的源码
![[外链图片转存失败,源站可能有防盗链机制,建议将图片保存下来直接上传(img-We6k8uwI-1651373641292)(/Users/cxf/Desktop/MarkDown/images/@Component的源码.png)]](https://img-blog.csdnimg.cn/96e1ad3075074991b7d8e6ca3c794460.png)
源码溯源就到此为止了,只需要了解它们四个实现了@Component接口即可
Bean 的命名源码
通过注解注册的bean名称有自己的一套默认规则:
- 第一第二首字母是大写的话就是原类名
- 其余是小驼峰方式命名
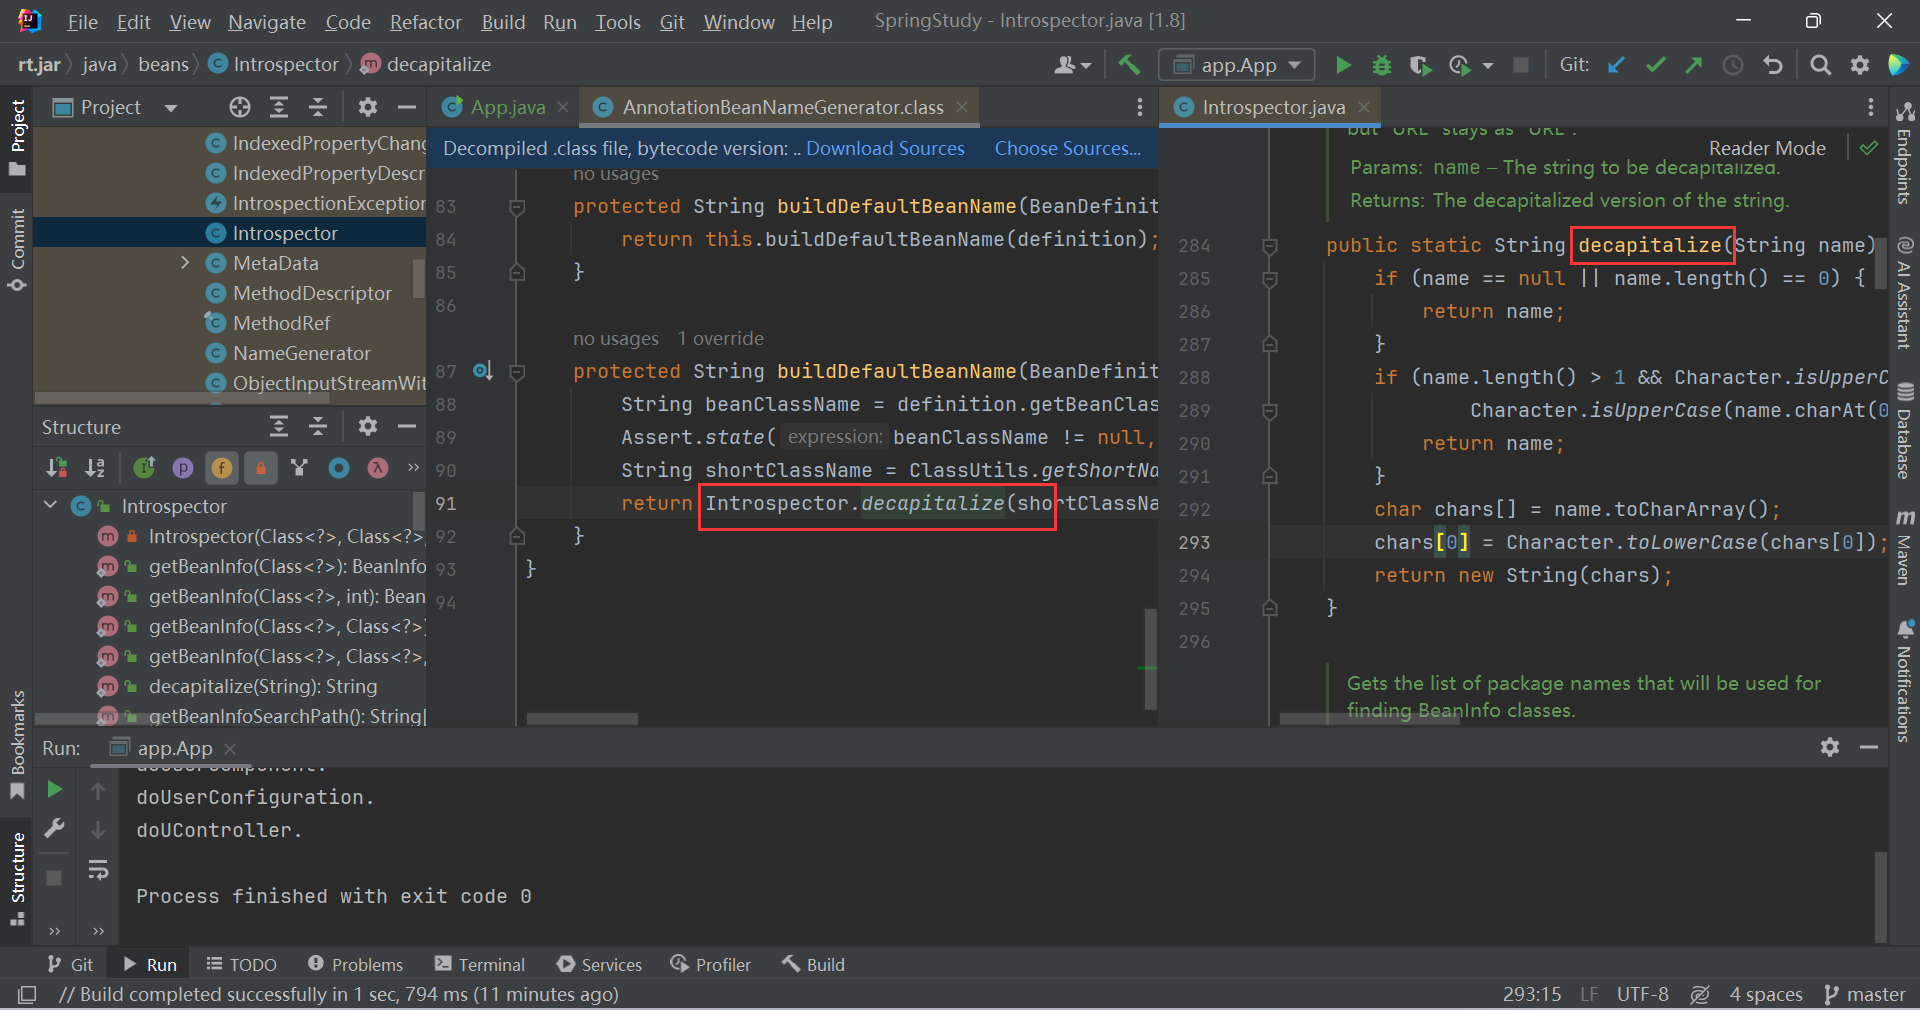
public static String decapitalize(String name) {
    if (name == null || name.length() == 0) {
        return name;
    }
  	// 如果类名长度大于1,并且前俩字母都是大写就直接返回原类名
    if (name.length() > 1 && Character.isUpperCase(name.charAt(1)) &&
            Character.isUpperCase(name.charAt(0))) {
        return name;
    }
  	// 否则就是将首字母小写再返回
    char chars[] = name.toCharArray();
    chars[0] = Character.toLowerCase(chars[0]);
    return new String(chars);
}
方法注解
类注解是添加到某个类上的,而方法注解是放到某个方法上的
@Bean要搭配类注解一起使用才可以将方法存储到 Spring 中
model层
package app.model;

public class User {
    private Integer id;
    private String userName;
    private Integer age;

    public Integer getId() {
        return id;
    }

    public void setId(Integer id) {
        this.id = id;
    }

    public String getUserName() {
        return userName;
    }

    public void setUserName(String userName) {
        this.userName = userName;
    }

    public Integer getAge() {
        return age;
    }

    public void setAge(Integer age) {
        this.age = age;
    }
}
service层
package app.service;

import app.model.User;
import org.springframework.context.annotation.Bean;
import org.springframework.stereotype.Service;

@Service
public class UserService {
    public void doUserService() {
        System.out.println("doUserService.");
    }

    public User getUser() {
        User user = new User();
        user.setId(1);
        user.setUserName("张三");
        user.setAge(18);
        return user;
    }
}
controller层
package app.controller;

import app.model.User;
import app.service.UserService;
import org.springframework.beans.factory.annotation.Autowired;
import org.springframework.context.annotation.Bean;
import org.springframework.stereotype.Controller;

// 也可以通过 xml 中 bean 标签注册
@Controller
public class UserController {
	@Autowired
    private UserService userService;

    public void doUserController() {
        System.out.println("doUserController.");
    }

	@Bean
    public User getUser() {
        return userService.getUser();
    }
}
获取@Bean对象:bean名称采取的是方法名而非类名
// 1.获取 Spring 上下文
BeanFactory beanFactory = new ClassPathXmlApplicationContext("spring-config.xml");
// @Bean方法注解
User user = beanFactory.getBean("getUser", User.class);
重命名 Bean
同一项目下类名一般不会出现重复但方法名有意外情况
- 不同类名出现同一个方法名
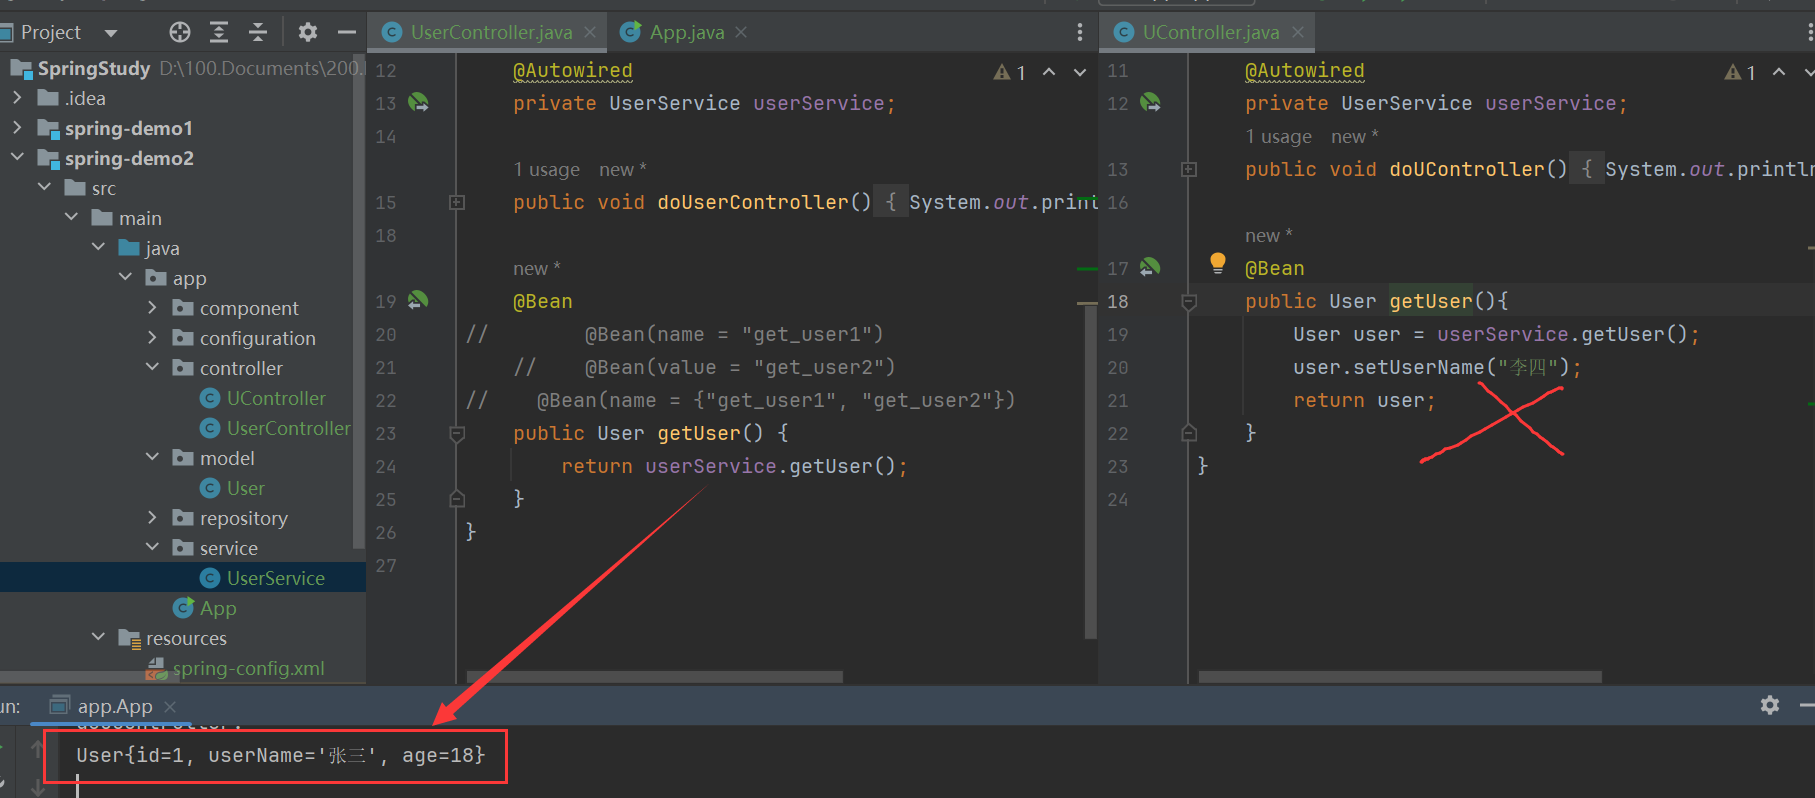
- 同一类中出现方法重载
此时如果调用会报错,因为@Bean注解无法添加参数
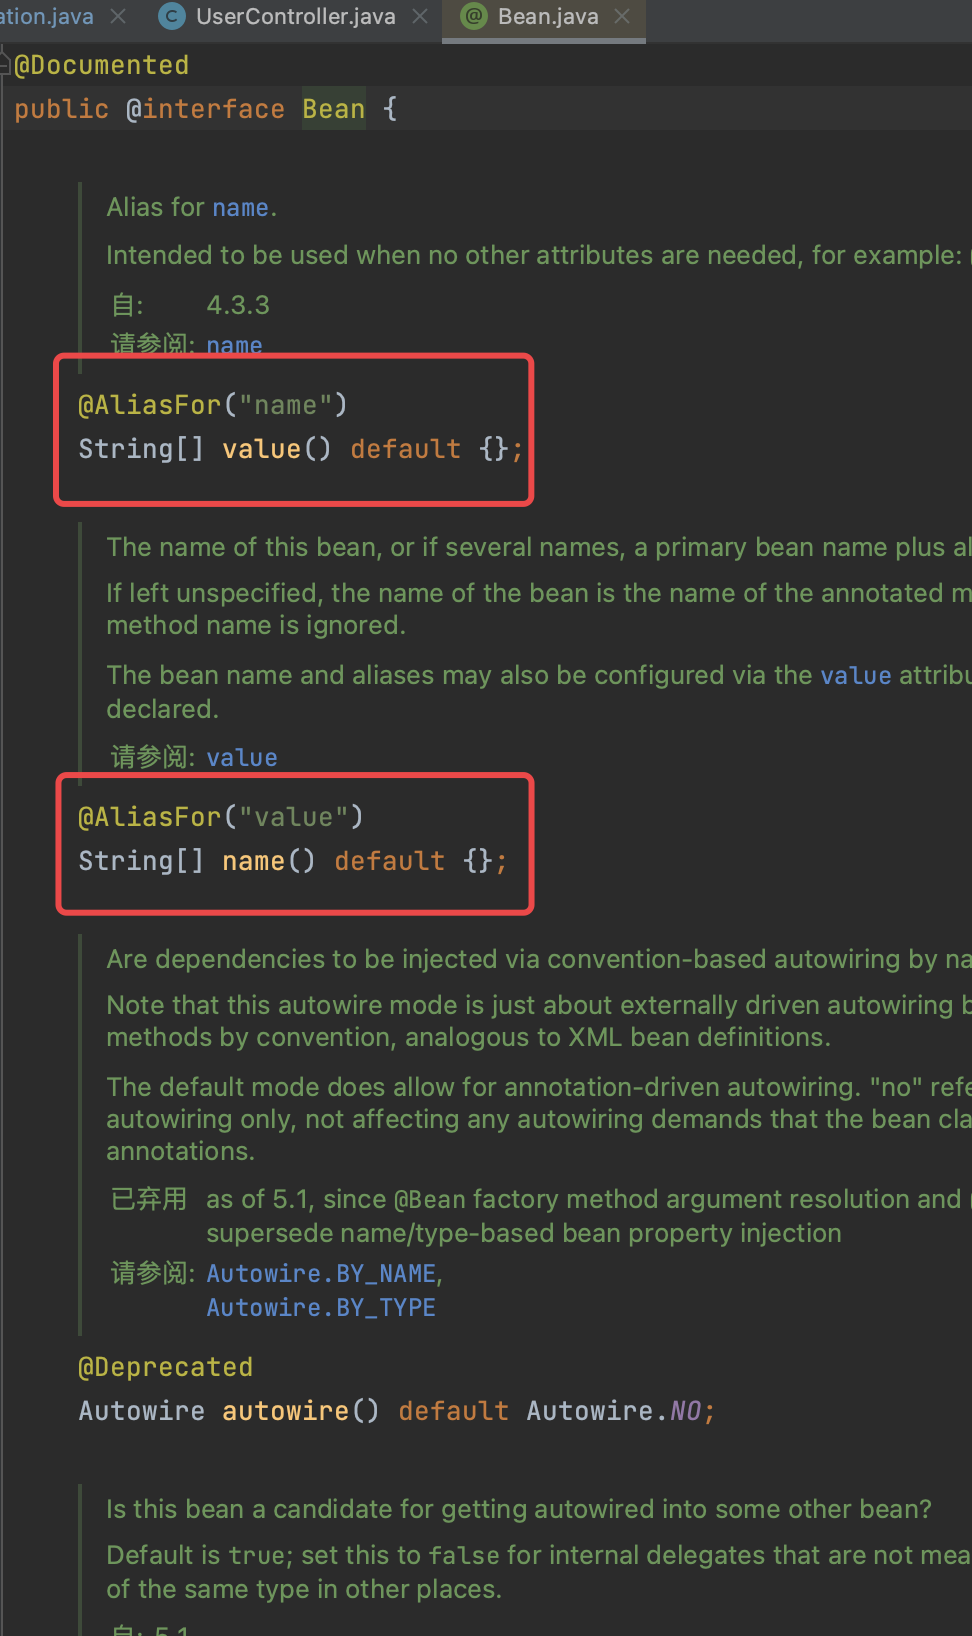
查看 @Bean 源码会发现 name 是一个数组,因此可以填入很多bean的名称。但一般一个就够。
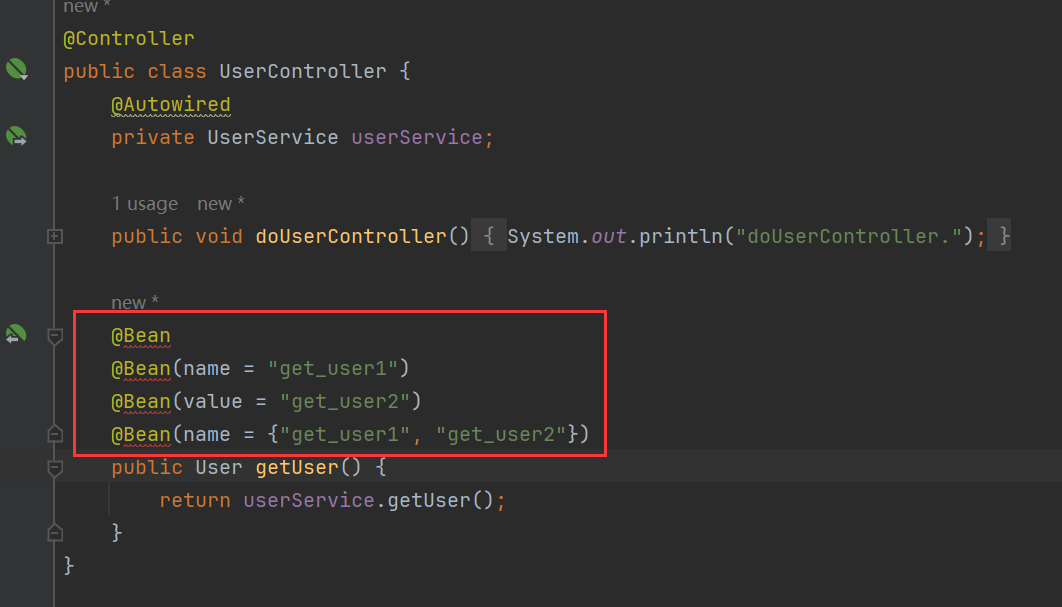
3种方式给Bean重命名。重命名之后就不能通过方法名获取Bean对象了
获取Bean对象(对象装配)
回顾之前在存储bean对象之后是如何获取的
- new
- 先得到Spring上下文,再通过getBean获取
- 更简单的获取方式:对象注入
这里就讲解一下对象注入
对象装配:获取 Bean 对象
对象注入:把对象取出来放在某个类中
对象注入有 3 种方法
- 属性注入
- 构造方法注入
- Setter注入
属性注入
@Autowired: 现根据类型查找再根据名称查找。所以bean的名称随意给都可以,这里按照标准给的是 userService
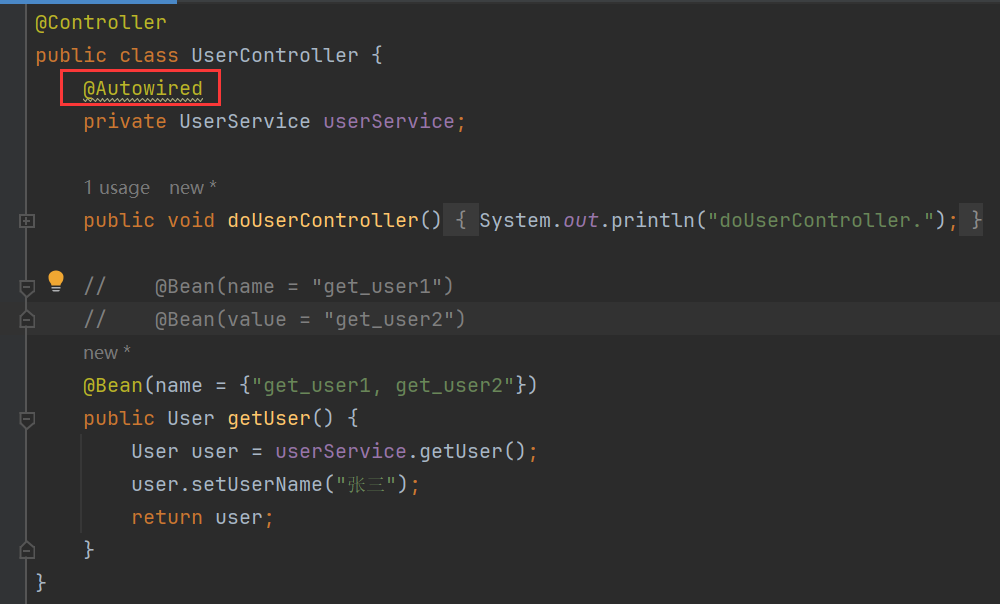
优点:写法简单
缺点:
- 功能缺陷:不支持final修饰
- 通用性问题:只适用于IoC容器,非IoC容器无法使用
- 更容易违背单一设计原则(因为使用简单,所以滥用风险更大)
Setter 注入
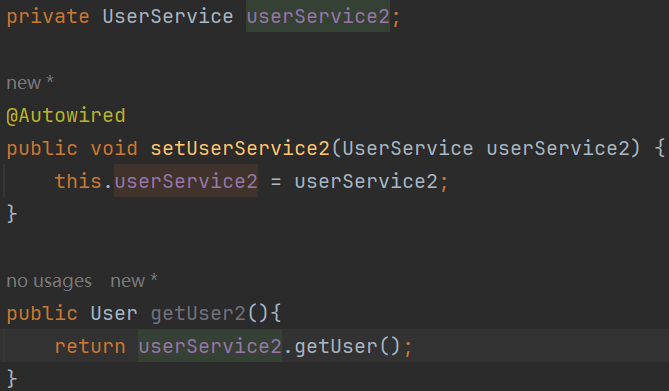
优点:符合单一设计原则
缺点:
- 功能缺陷:不能诸如一个不可变对象【不能被final修饰】
- 注入对象可能会被改变
构造方法注入
final不加也可以,对于专业版IDEA会提示进行final修饰
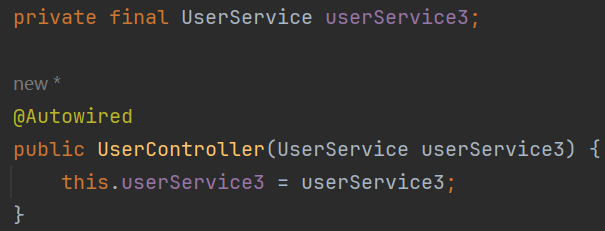
当当前类中只有一个构造方法的时候可以省略@Autowired
优点:
- 支持final修饰注入不可变对象
- 注入对象不会被更改
- 完全初始化
- 通用性更好
另外一种对象装配的关键字:@Resource
仅支持两种装配方式,不支持构造方法注入。用法和@Autowired一样
- 属性注入
- Setter注入
@Resource支持更多的参数【JDK自带】
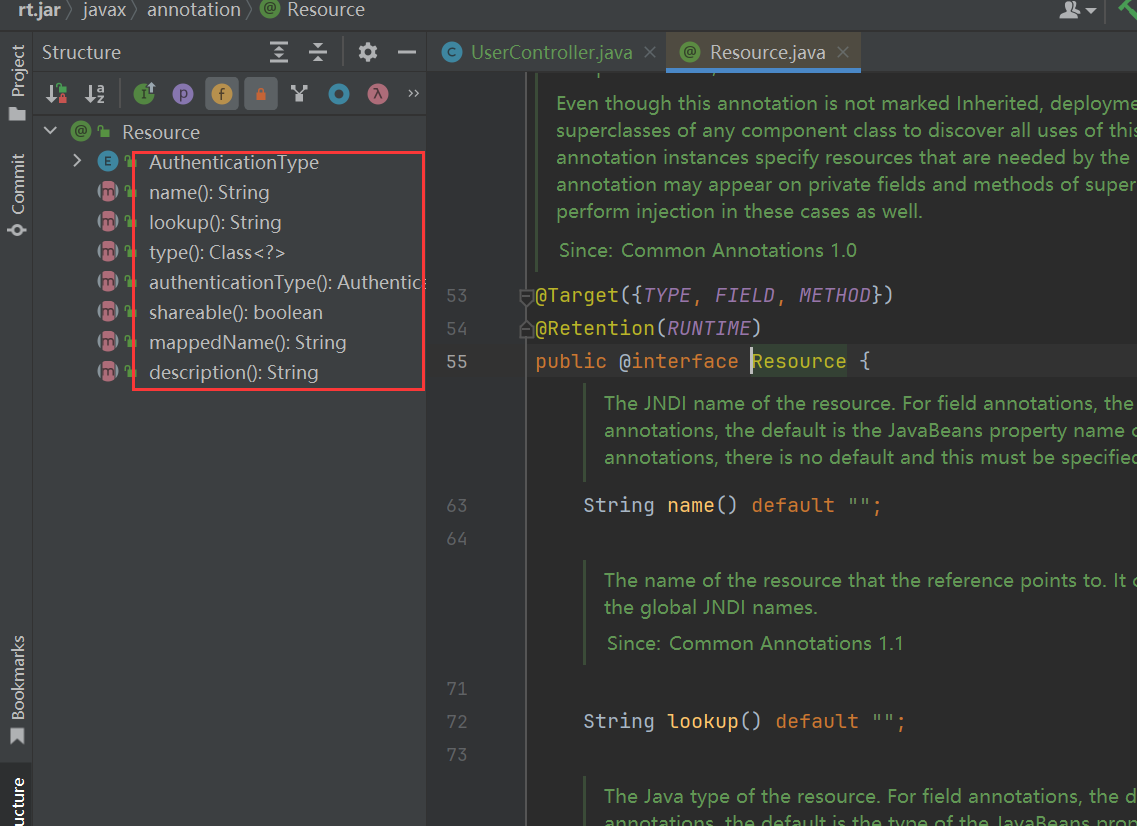
经常用的是name参数,如果Spring中 @Bean 注解存储的Bean对象制定了名称,那么此时可以通过name属性用于指定获取对应名称的bean
同一个类型注入多个Bean对象
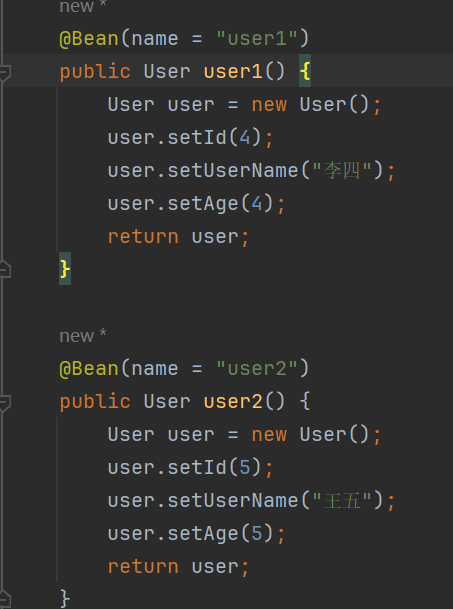
获取Bean对象的时候需要指定bean名称,否则会在运行时报错

此时因为是user1,@Autowired现根据type查找会发现有多个User类型的Bean对象然后再根据name查找就会获取到user1的bean对象
此时对于开发而言,user1这样的明明肯定不符合规定,因此需要一个修改一下bean的名字才行。所以引入了@Resource注解
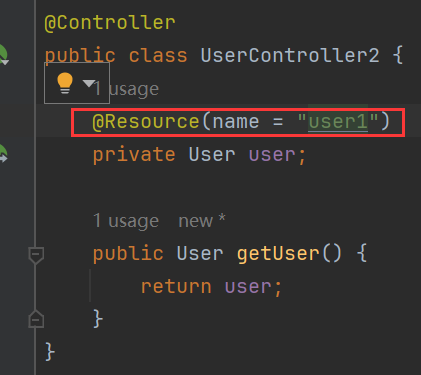
但是@Resource注解由于不支持构造方法注入,如果仍然想用Spring的@Autowired注解使用构造方法注入就需要引入一个新注解解决名字的问题:@Qualifier
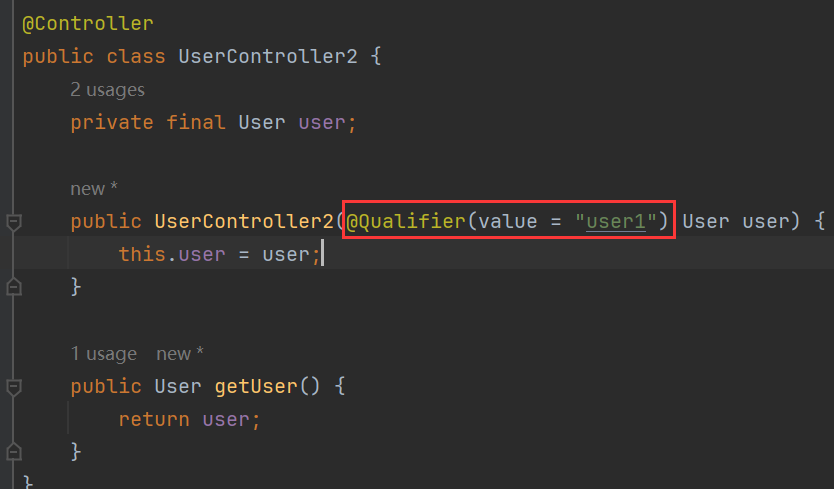
@Autowired VS @Resource
| @Autowired | @Resouce | |
|---|---|---|
| 来源 | 来自Spring | 来自 JDK |
| 使用时参数不同 | 搭配@Qualifier获取指定名称bean | 支持更多的参数,可以设置 name 来获取指定 Bean |
| 修饰对象不同 | 修饰属性,构造方法,Setter | 修饰属性,Setter |
Bean的生命周期
对象注入
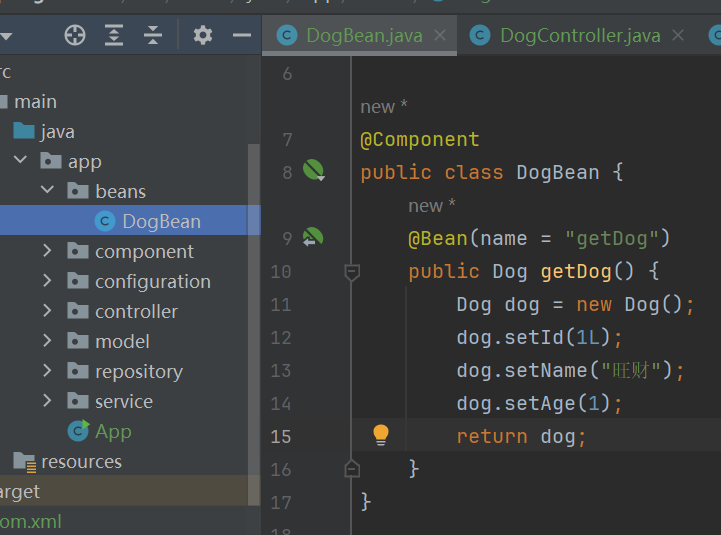
对象获取
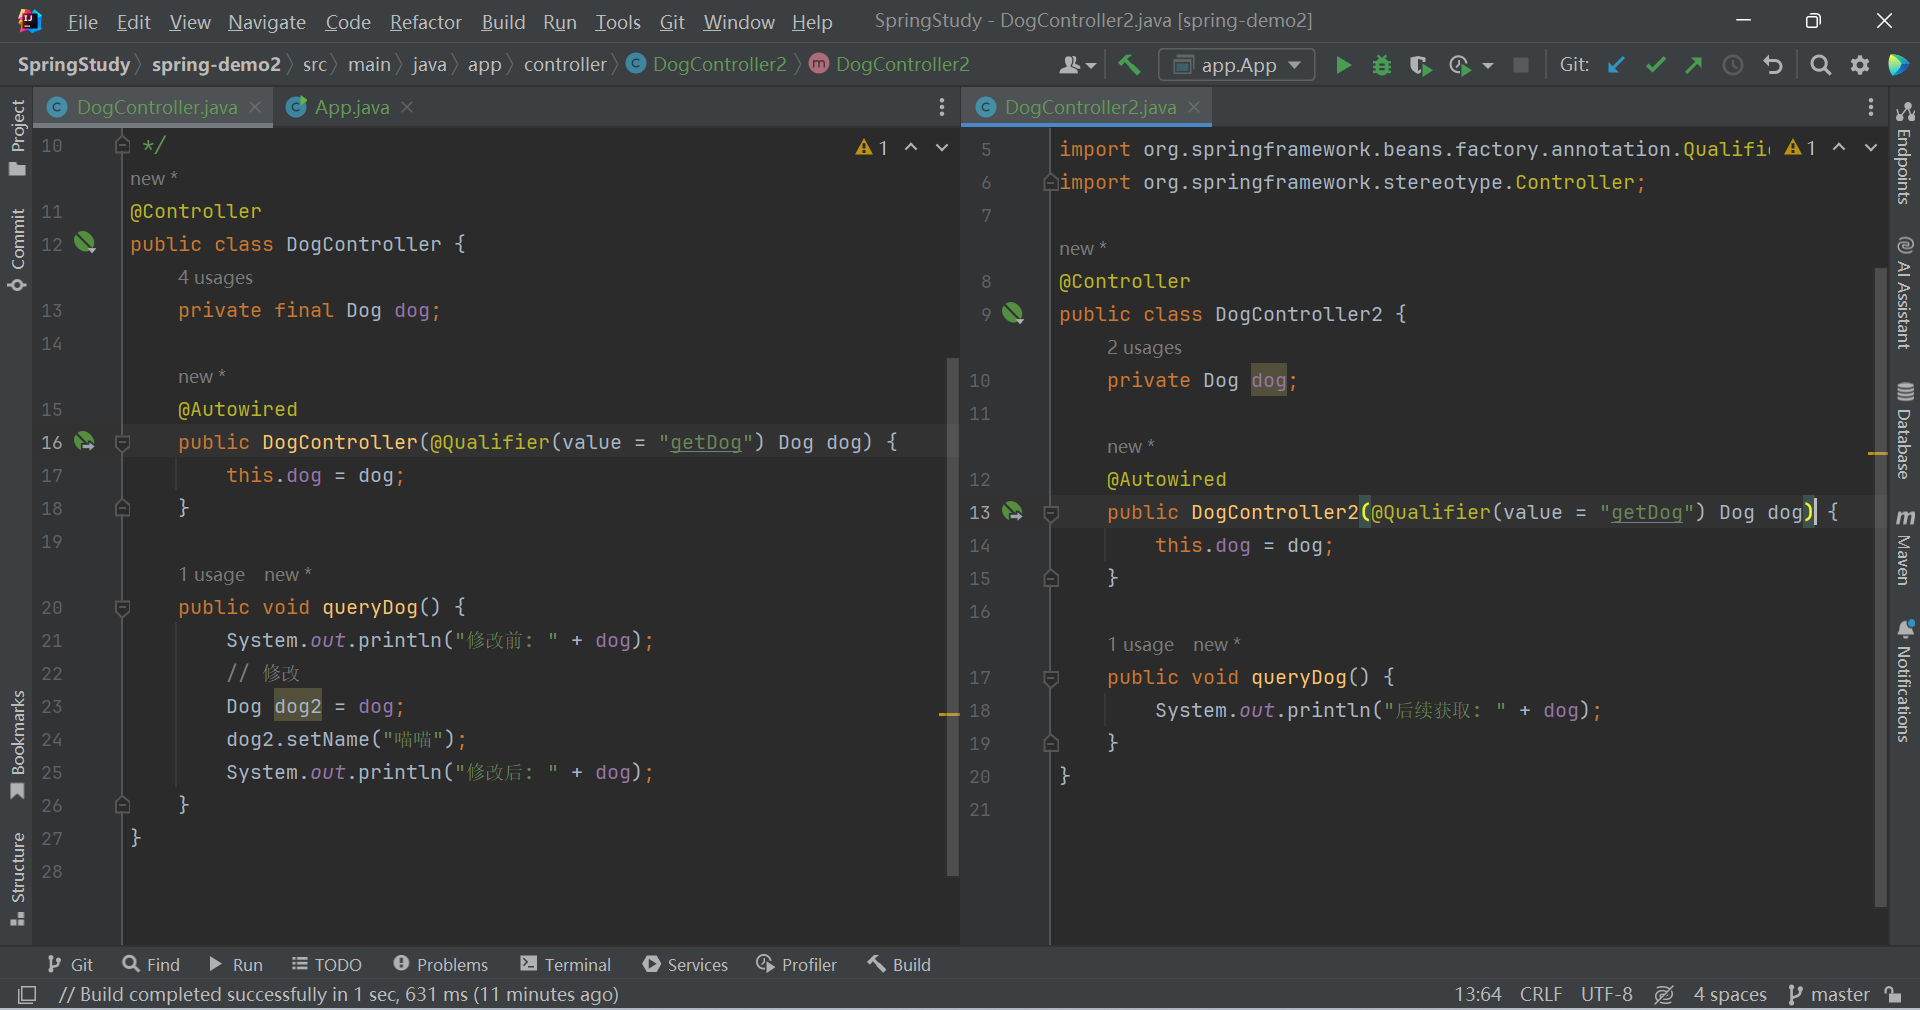
运行结果

修改前: Dog{id=1, name='旺财', age=1}
修改后: Dog{id=1, name='喵喵', age=1}
后续获取: Dog{id=1, name='喵喵', age=1}
会发现由于单例模式,导致公共的Bean对象被修改之后,后续获取的Bean都会被修改
因此就引入Bean的作用域【从之前的代码区域提升到现在框架区域】
- singleton: 单例
Spring默认作用域,通常无状态的Bean使用该作用域无状态:表示该Bean对象的属性状态不需要更新
- prototype: 原型【多例】
通常有状态的Bean使用该作用域 - request: 请求
每次http请求会创建新的Bean,同一次http请求中创建的bean是同一个Bean【限定Spring MVC中使用】 - session: 会话
同一个http session中创建的Bean是同一个Bean【限定Spring MVC中使用】 - application: 全局
在同一个Spring上下文中创建的Bean是同一个Bean【限定Spring MVC中使用】 - websocket: HTTP WebSocket作用域
在一个WebSocket的生命周期中创建的Bean是同一个Bean【限定Spring WebSocket中使用】
设置的方式有两种
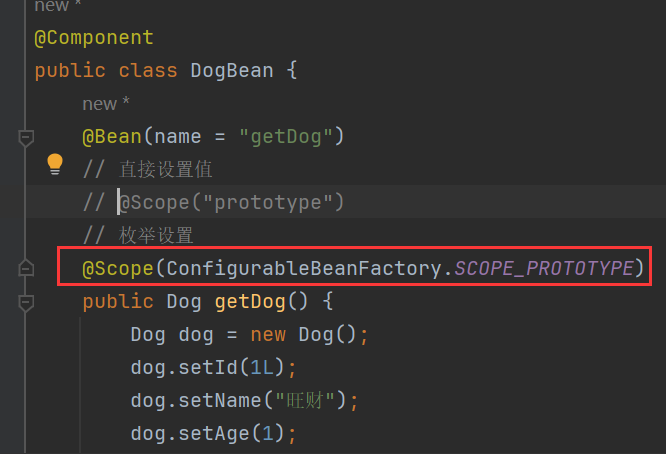
此时运行结果
修改前: Dog{id=1, name='旺财', age=1}
修改后: Dog{id=1, name='喵喵', age=1}
后续获取: Dog{id=1, name='旺财', age=1}
Bean的生命周期
- 实例化【≠初始化,仅仅是分配内存空间】
- 设置属性【DI依赖注入】
- 初始化
- 执行各种通知
- 初始化的前置方法
xml:义init-method
注解:@PostConstruct注解 - 初始化方法
- 初始化后置方法
- 使用Bean
- 销毁Bean
会发现注解的执行顺序先于xml
Spring 主要执行流程
- 启动容器

- Bean初始化
配置文件中的扫描路径,扫描路径下的类
- 注入Bean
扫描路径下将带有5大类注解的类添加进Spring IoC容器中 - 使用Bean
@Bean、@Autowired、@Resource注解将对应的方法、类成员进行装配 - 销毁Bean
- 关闭容器
本文来自互联网用户投稿,该文观点仅代表作者本人,不代表本站立场。本站仅提供信息存储空间服务,不拥有所有权,不承担相关法律责任。 如若内容造成侵权/违法违规/事实不符,请联系我的编程经验分享网邮箱:chenni525@qq.com进行投诉反馈,一经查实,立即删除!
- Python教程
- 深入理解 MySQL 中的 HAVING 关键字和聚合函数
- Qt之QChar编码(1)
- MyBatis入门基础篇
- 用Python脚本实现FFmpeg批量转换
- nginx的编译安装(详细步骤)
- Linux系统Nvidia显卡驱动安装方法
- DS|堆栈
- 操作系统【文件管理】
- Linux 命令解释程序(shell)的模拟实现
- Python数据分析案例33——新闻文本主题多分类(Transformer, 组合模型) 模型保存
- 24.两两交换链表中的节点
- 翻译: Streamlit从入门到精通 部署一个机器学习应用程序 四
- inpaint anything插件成功安装后,web界面不显示
- 【数据结构】二叉树(遍历,递归)