SpringBoot、Java AOP实现方式
SpringBoot、Java AOP实现方式
搭建项目环境
我这里直接使用Maven创建项目之后再pom.xml中导入包
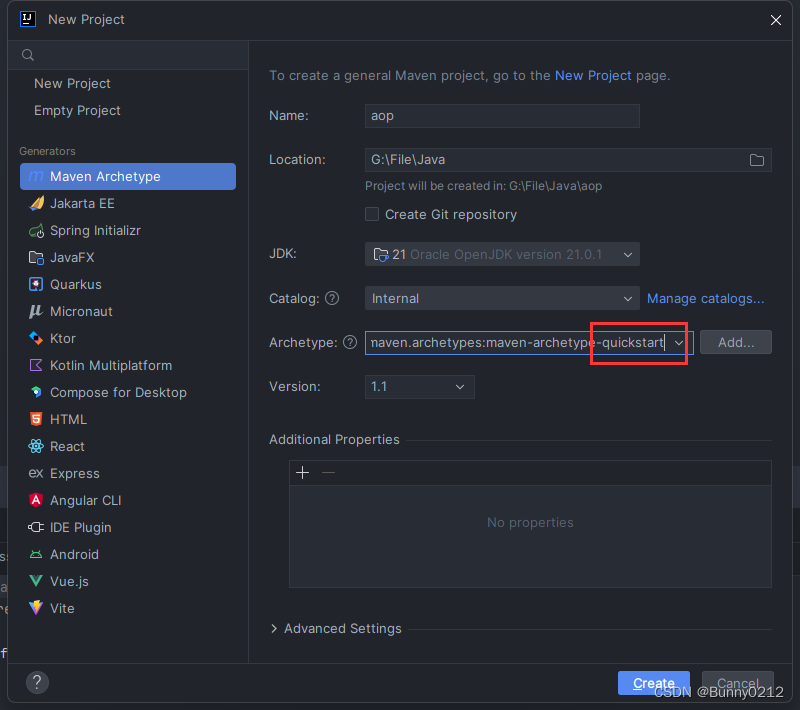
Spring版本
如果你的版本有最新的,最简单的办法就是,将版本都换成统一的,因为发布时候都是每个版本统一发布的,如果出现不兼容的情况,最简单有效的办法就是:将版本换成统一的。
导入的有:
spring-contextspring-aopspring-aspectsspring-testjunit
<dependencies>
    <dependency>
        <groupId>org.springframework</groupId>
        <artifactId>spring-context</artifactId>
        <version>6.1.1</version>
    </dependency>
    <dependency>
        <groupId>org.springframework</groupId>
        <artifactId>spring-aop</artifactId>
        <version>6.1.1</version>
    </dependency>
    <dependency>
        <groupId>org.springframework</groupId>
        <artifactId>spring-aspects</artifactId>
        <version>6.1.1</version>
    </dependency>
          <dependency>
            <groupId>org.springframework</groupId>
            <artifactId>spring-test</artifactId>
            <version>6.1.1</version>
        </dependency>
        <dependency>
            <groupId>junit</groupId>
            <artifactId>junit</artifactId>
            <version>4.13.2</version>
        </dependency>
</dependencies>
新建Java文件Calculator接口
public interface Calculator {
    int add(int i, int j);

    int sub(int i, int j);

    int mul(int i, int j);

    int div(int i, int j);
}
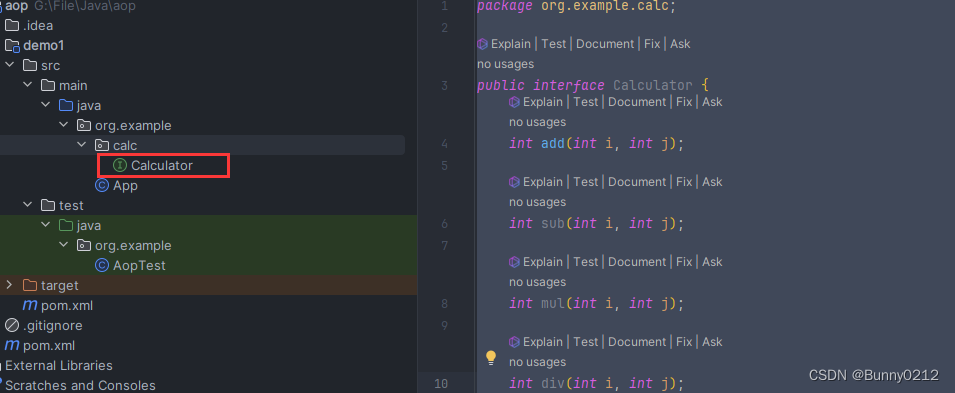
新建实现类CalculatorImpl
记得再上面加上@Component否则SpringBoot扫描不到!!!
package org.example.calc.impl;

import org.example.calc.Calculator;
import org.springframework.stereotype.Component;

@Component
public class CalculatorImpl implements Calculator {
    @Override
    public int add(int i, int j) {
        return 0;
    }

    @Override
    public int sub(int i, int j) {
        return 0;
    }

    @Override
    public int mul(int i, int j) {
        return 0;
    }

    @Override
    public int div(int i, int j) {
        return 0;
    }
}
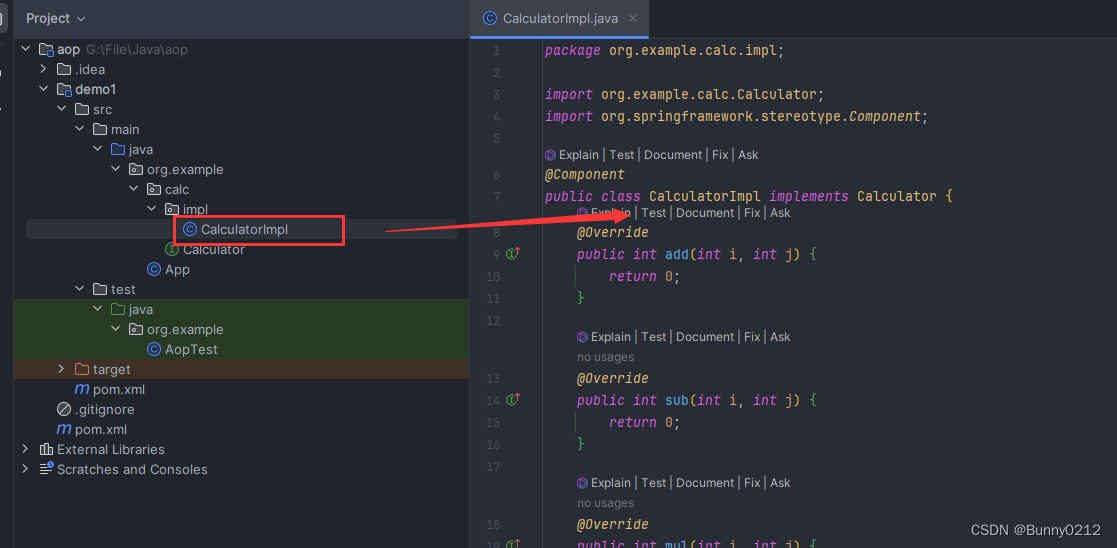
新建LogAspect切面
待会就在这个文件中写入切面方法,其中有这几个方法
环绕通知:上面四个都会包含在内!!!
Before 前置通知
After 后置通知
AfterReturning 返回通知
AfterThrowing 异常通知
Around 环绕通知
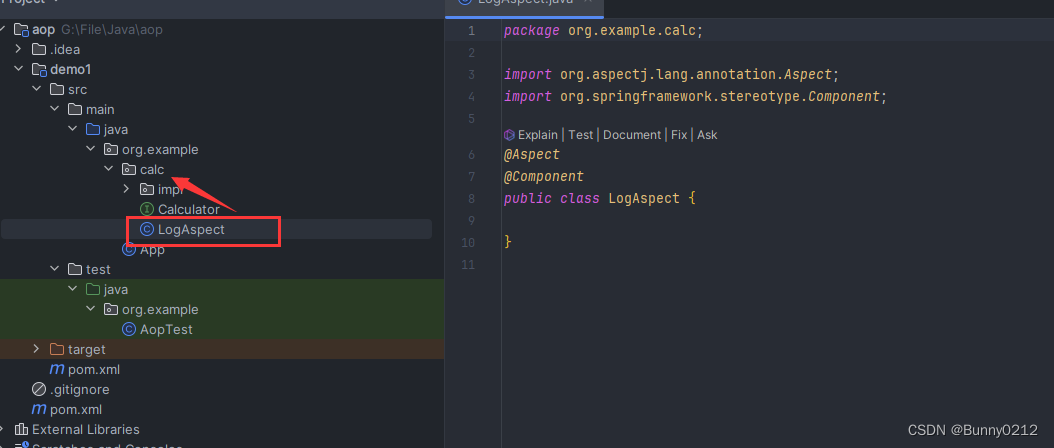
新建文件是这样的
package org.example.calc;

import org.aspectj.lang.annotation.Aspect;
import org.springframework.stereotype.Component;

@Aspect
@Component
public class LogAspect {

}
一定要在这个文件夹下新建否则不会生效
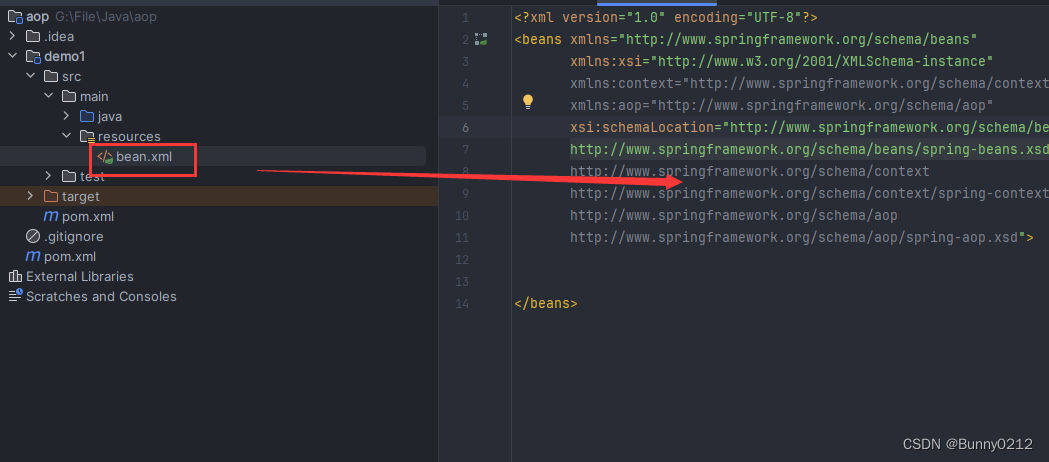
新建xml文件
文件内容是这样的还没有写入内容,这个文件名随便取一个,我就叫bean.xml
<?xml version="1.0" encoding="UTF-8"?>
<beans xmlns="http://www.springframework.org/schema/beans"
       xmlns:xsi="http://www.w3.org/2001/XMLSchema-instance"
       xmlns:context="http://www.springframework.org/schema/context"
       xmlns:aop="http://www.springframework.org/schema/aop"
       xsi:schemaLocation="http://www.springframework.org/schema/beans
       http://www.springframework.org/schema/beans/spring-beans.xsd
       http://www.springframework.org/schema/context
       http://www.springframework.org/schema/context/spring-context.xsd
       http://www.springframework.org/schema/aop
       http://www.springframework.org/schema/aop/spring-aop.xsd">


</beans>
创建切面
xml内容
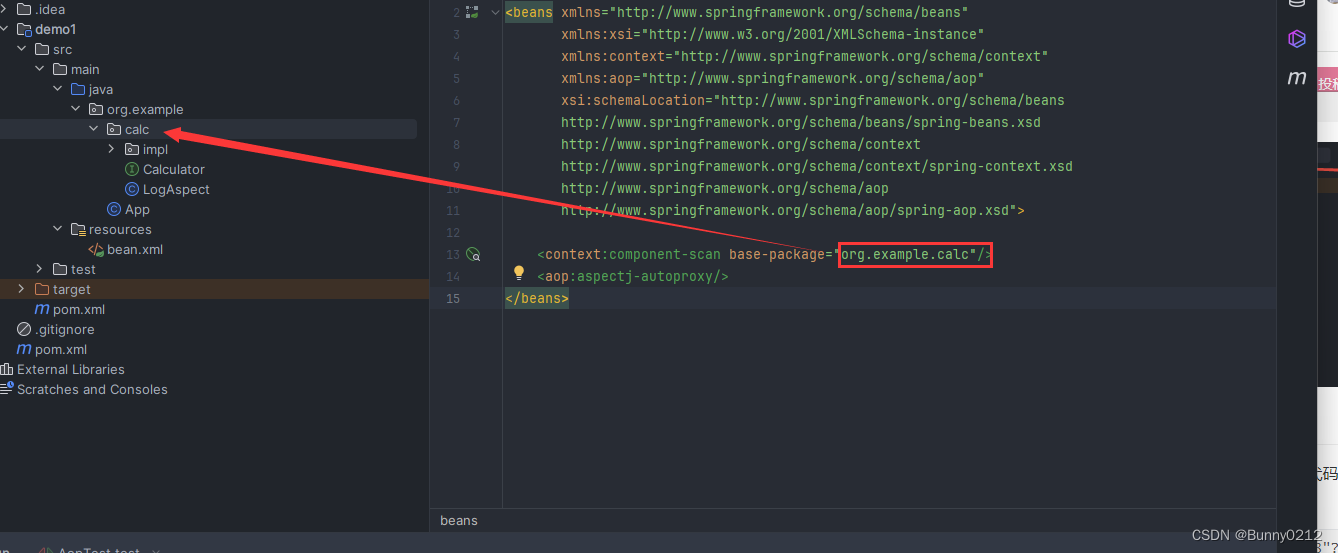
在你resource下创建的xml文件中添加下面代码,其中<context:component-scan base-package="指向的是目录下Calculator接口"/>。
这一步至关重要,否则后面找xml文件中包时如果找不到没有效果。
<?xml version="1.0" encoding="UTF-8"?>
<beans xmlns="http://www.springframework.org/schema/beans"
       xmlns:xsi="http://www.w3.org/2001/XMLSchema-instance"
       xmlns:context="http://www.springframework.org/schema/context"
       xmlns:aop="http://www.springframework.org/schema/aop"
       xsi:schemaLocation="http://www.springframework.org/schema/beans
       http://www.springframework.org/schema/beans/spring-beans.xsd
       http://www.springframework.org/schema/context
       http://www.springframework.org/schema/context/spring-context.xsd
       http://www.springframework.org/schema/aop
       http://www.springframework.org/schema/aop/spring-aop.xsd">

    <context:component-scan base-package="org.example.calc"/>
    <aop:aspectj-autoproxy/>
</beans>
LogAspect实现
Before简单的实现:前置操作
第一步先不搞复杂的先试试效果
在文件中写入
其中@Before(execution(表达式))
@Aspect
@Component
public class LogAspect {
    @Before(value = "execution(public int org.example.calc.Calculator.*(..))")
    public void beforeMethod() {
        System.out.println("前置操作");
    }
}

之后在测试文件中写下测试代码
import org.example.calc.Calculator;
import org.junit.Test;
import org.springframework.context.ApplicationContext;
import org.springframework.context.support.ClassPathXmlApplicationContext;

public class AopTest {
    @Test
    public void test() {
        ApplicationContext context=new ClassPathXmlApplicationContext("bean.xml");
        Calculator contextBean = context.getBean(Calculator.class);
        contextBean.add(1, 2);
    }
}

运行成功!!!
Before 带参数前置操作
要在方法中加入JoinPoint
@Aspect
@Component
public class LogAspect {
    @Before(value = "execution(public int org.example.calc.Calculator.*(..))")
    public void beforeMethod(JoinPoint joinPoint) {
        String name = joinPoint.getSignature().getName();// 获取连接点的签名信息
        Object[] args = joinPoint.getArgs();// 实参信息
        System.out.println("前置通知-->name" + name + "args" + Arrays.toString(args));
    }
}
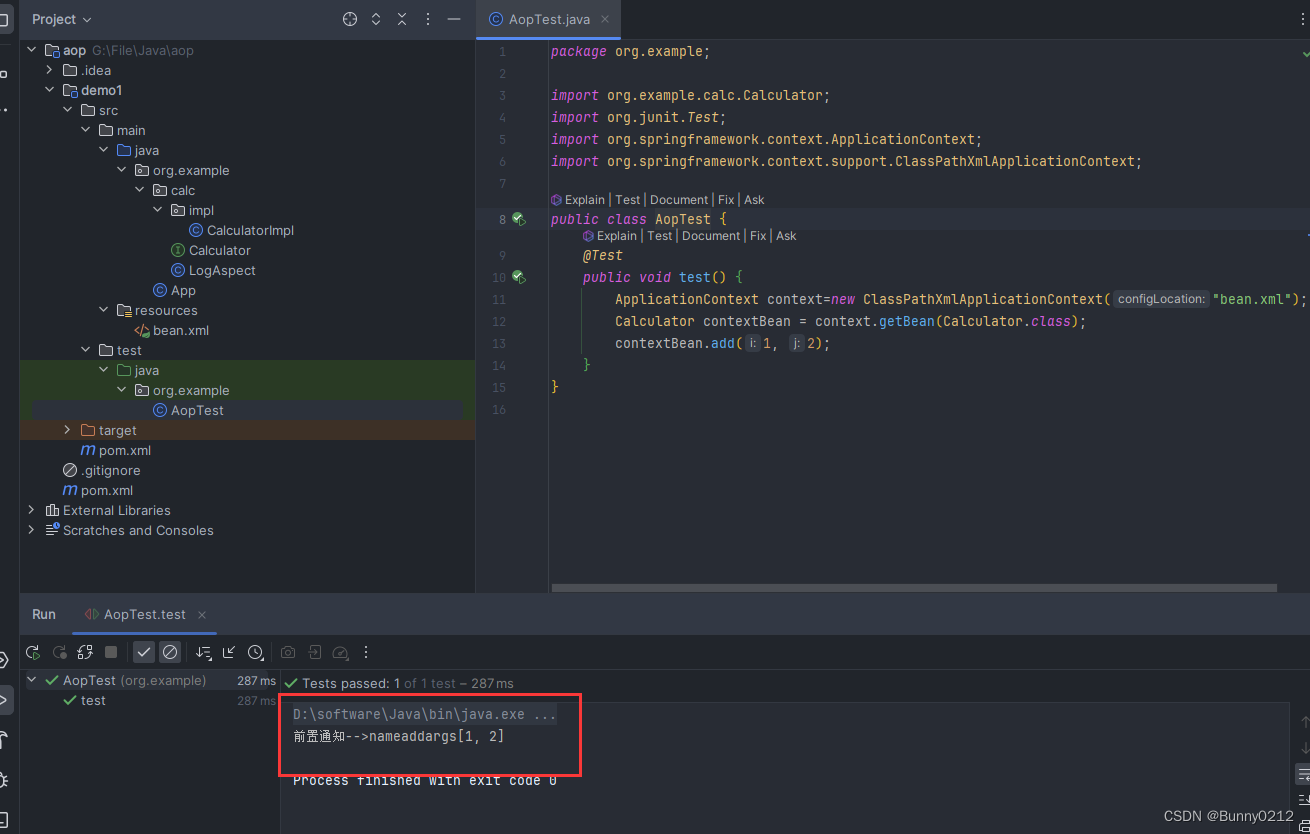
运行成功
复用value中表达式
因为有时一个项目中会有很多相同的表达式这是需要复用,可以做以下操作
只需要在这个文件中加入这个方法即可,方法名字可以随便取
需要注意的是这个里面不要填写value!!!
调用时要加括号不要只写方法名!!!
如:@After(value = "pointcut()")
@Pointcut("execution(public int org.example.calc.Calculator.*(..))")
public void pointcut() {
}
After 后置通知
package org.example.calc;

import org.aspectj.lang.JoinPoint;
import org.aspectj.lang.annotation.After;
import org.aspectj.lang.annotation.Aspect;
import org.aspectj.lang.annotation.Before;
import org.aspectj.lang.annotation.Pointcut;
import org.springframework.stereotype.Component;

import java.util.Arrays;

@Aspect
@Component
public class LogAspect {
    /**
     * 前置通知
     *
     * @param joinPoint JoinPoint
     */
    @Before(value = "execution(public int org.example.calc.Calculator.*(..))")
    public void beforeMethod(JoinPoint joinPoint) {
        String name = joinPoint.getSignature().getName();// 获取连接点的签名信息
        Object[] args = joinPoint.getArgs();// 实参信息
        System.out.println("前置通知-->name" + name + "args" + Arrays.toString(args));
    }

    /**
     * 后置通知
     *
     * @param joinPoint JoinPoint
     */
    @After(value = "pointcut()")
    public void afterMethod(JoinPoint joinPoint) {
        String name = joinPoint.getSignature().getName();
        Object[] args = joinPoint.getArgs();
        System.out.println("Logger-->后置通知,方法名称:" + name + ",参数:" + Arrays.toString(args));
    }

    @Pointcut("execution(public int org.example.calc.Calculator.*(..))")
    public void pointcut() {
    }
}
AfterReturning 返回通知&引入外部表达式
如果这个表达式是外部的如何引入?
直接在前面加上方法名即可
@AfterReturning(value = "org.example.calc.LogAspect.pointcut()")
返回通知写法
/**
 * 返回通知
 *
 * @param joinPoint JoinPoint
 */
@AfterReturning(value = "org.example.calc.LogAspect.pointcut()")
public void afterReturningMethod(JoinPoint joinPoint) {
    String name = joinPoint.getSignature().getName();
    Object[] args = joinPoint.getArgs();
    System.out.println("Logger-->返回通知,方法名称:" + name + ",参数:" + Arrays.toString(args));
}
AfterThrowing 异常通知
/**
 * 异常通知
 * @param joinPoint JoinPoint
 */
@AfterThrowing(value = "pointcut()")
public void afterThrowingMethod(JoinPoint joinPoint) {
    String name = joinPoint.getSignature().getName();
    Object[] args = joinPoint.getArgs();
    System.out.println("Logger-->异常通知,方法名称:" + name + ",参数:" + Arrays.toString(args));
}
Around 环绕通知
注意的是这次在方法中使用的是ProceedingJoinPoint!!!
@Around(value = "pointcut()")
public Object aroundMethod(ProceedingJoinPoint joinPoint) {
    String name = joinPoint.getSignature().getName();
    Object[] args = joinPoint.getArgs();
    Object result = null;

    try {
        System.out.println("环绕通知-->目标对象方法执行之前");
        result = joinPoint.proceed();
        System.out.println("环绕通知-->目标对象方法返回值之后
    } catch (Throwable e) {
        e.printStackTrace();
        System.out.println("环绕通知-->目标对象方法出现异常时");
    }finally {
        System.out.println("环绕通知-->目标对象方法执行完毕");
    }

    return result;
}
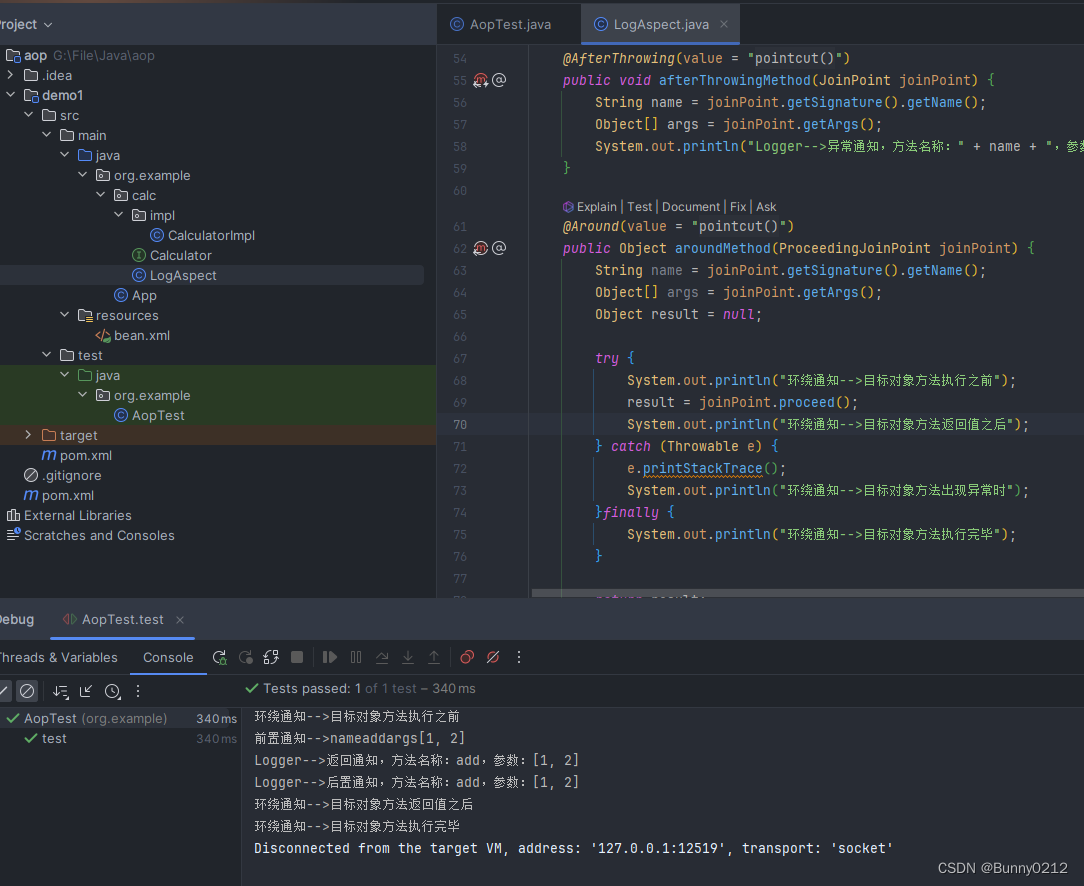
测试通过
在xml中配置切面
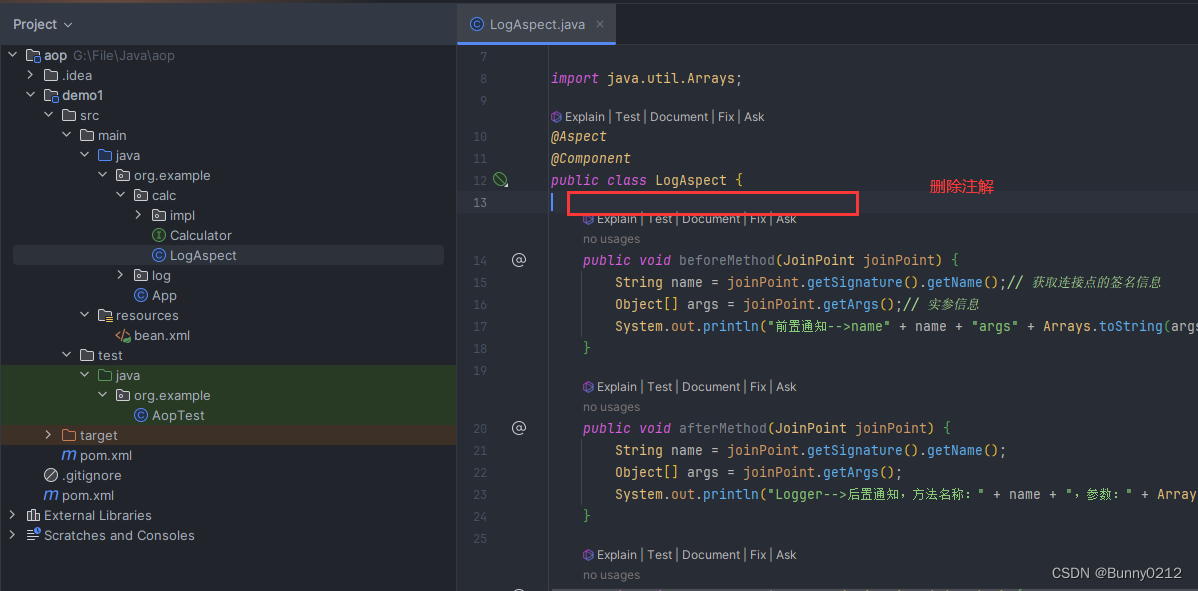
删除注解
因为在配置文件的xml中写入,所以要将5个注解全部删除,之后创建新的xml文件,你用旧的也可以。
import org.aspectj.lang.JoinPoint;
import org.aspectj.lang.ProceedingJoinPoint;
import org.aspectj.lang.annotation.*;
import org.springframework.stereotype.Component;

import java.util.Arrays;

@Aspect
@Component
public class LogAspect {

    public void beforeMethod(JoinPoint joinPoint) {
        String name = joinPoint.getSignature().getName();// 获取连接点的签名信息
        Object[] args = joinPoint.getArgs();// 实参信息
        System.out.println("前置通知-->name" + name + "args" + Arrays.toString(args));
    }

    public void afterMethod(JoinPoint joinPoint) {
        String name = joinPoint.getSignature().getName();
        Object[] args = joinPoint.getArgs();
        System.out.println("Logger-->后置通知,方法名称:" + name + ",参数:" + Arrays.toString(args));
    }

    public void afterReturningMethod(JoinPoint joinPoint) {
        String name = joinPoint.getSignature().getName();
        Object[] args = joinPoint.getArgs();
        System.out.println("Logger-->返回通知,方法名称:" + name + ",参数:" + Arrays.toString(args));
    }


    public void afterThrowingMethod(JoinPoint joinPoint) {
        String name = joinPoint.getSignature().getName();
        Object[] args = joinPoint.getArgs();
        System.out.println("Logger-->异常通知,方法名称:" + name + ",参数:" + Arrays.toString(args));
    }

    public Object aroundMethod(ProceedingJoinPoint joinPoint) {
        String name = joinPoint.getSignature().getName();
        Object[] args = joinPoint.getArgs();
        Object result = null;

        try {
            System.out.println("环绕通知-->目标对象方法执行之前");
            result = joinPoint.proceed();
            System.out.println("环绕通知-->目标对象方法返回值之后");
        } catch (Throwable e) {
            e.printStackTrace();
            System.out.println("环绕通知-->目标对象方法出现异常时");
        }finally {
            System.out.println("环绕通知-->目标对象方法执行完毕");
        }

        return result;
    }
}
xml文件中内容
新的基础内容如下
<?xml version="1.0" encoding="UTF-8"?>
<beans xmlns="http://www.springframework.org/schema/beans"
       xmlns:xsi="http://www.w3.org/2001/XMLSchema-instance"
       xmlns:context="http://www.springframework.org/schema/context"
       xmlns:aop="http://www.springframework.org/schema/aop"
       xsi:schemaLocation="http://www.springframework.org/schema/beans
       http://www.springframework.org/schema/beans/spring-beans.xsd
       http://www.springframework.org/schema/context
       http://www.springframework.org/schema/context/spring-context.xsd
       http://www.springframework.org/schema/aop
       http://www.springframework.org/schema/aop/spring-aop.xsd">

    <context:component-scan base-package="org.example.calc"/>
    <aop:config>
        <!-- 配置切面类 -->
        <aop:aspect ref="logAspect">
            <!-- 表达式 -->
            <aop:pointcut id="pointcut" expression="execution(public int org.example.calc.Calculator.*(..))"/>

            <!-- 前置操作 -->
            <aop:before method="beforeMethod" pointcut-ref="pointcut"/>

            <!-- 后置操作 -->
            <aop:after method="afterMethod" pointcut-ref="pointcut"/>

            <!-- 返回操作 -->
            <aop:after-returning method="afterReturningMethod" returning="result" pointcut-ref="pointcut"/>

            <!-- 异常通知 -->
            <aop:after-throwing method="afterThrowingMethod" throwing="ex" pointcut-ref="pointcut"/>

            <aop:around method="aroundMethod" pointcut-ref="pointcut"/>
        </aop:aspect>
    </aop:config>
</beans>
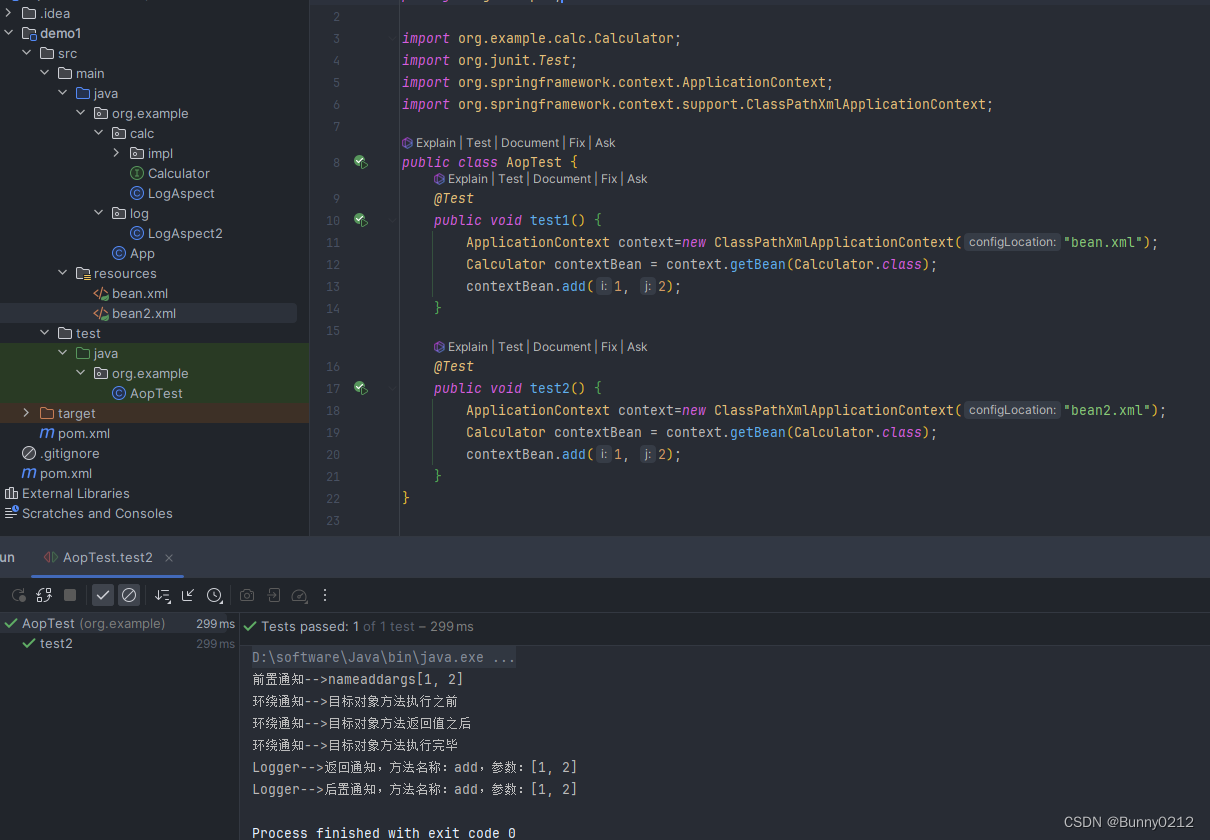
运行成功
xml文件解释
<?xml version="1.0" encoding="UTF-8"?>
<beans xmlns="http://www.springframework.org/schema/beans"
       xmlns:xsi="http://www.w3.org/2001/XMLSchema-instance"
       xmlns:context="http://www.springframework.org/schema/context"
       xmlns:aop="http://www.springframework.org/schema/aop"
       xsi:schemaLocation="http://www.springframework.org/schema/beans
       http://www.springframework.org/schema/beans/spring-beans.xsd
       http://www.springframework.org/schema/context
       http://www.springframework.org/schema/context/spring-context.xsd
       http://www.springframework.org/schema/aop
       http://www.springframework.org/schema/aop/spring-aop.xsd">

    <context:component-scan base-package="org.example.calc"/>
    <aop:config>
        <!-- 配置切面类 -->
        <aop:aspect ref="你的类开头字母小写">
            <!-- 表达式 -->
            <aop:pointcut id="这个名字随便取" expression="表达式的值"/>

            <!-- 前置操作 -->
            <aop:before method="前置操作方法,正常会有提示的" pointcut-ref="注意这里是pointcut-ref,是上面填写表达式的值,不要加括号!!!"/>

            <!-- 后置操作 -->
            <aop:after method="后置操作方法" pointcut-ref="注意这里是pointcut-ref,是上面填写表达式的值,不要加括号!!!"/>

            <!-- 返回操作 -->
            <aop:after-returning method="返回操作方法" returning="返回值,你的返回值是什么变量就填什么" pointcut-ref="注意这里是pointcut-ref,是上面填写表达式的值,不要加括号!!!"/>

            <!-- 异常通知 -->
            <aop:after-throwing method="异常通知方法" throwing="抛出异常命名,见下面图片" pointcut-ref="注意这里是pointcut-ref,是上面填写表达式的值,不要加括号!!!"/>

			 <!-- 环绕通知 -->
            <aop:around method="aroundMethod" pointcut-ref="注意这里是pointcut-ref,是上面填写表达式的值,不要加括号!!!"/>
        </aop:aspect>
    </aop:config>
</beans>
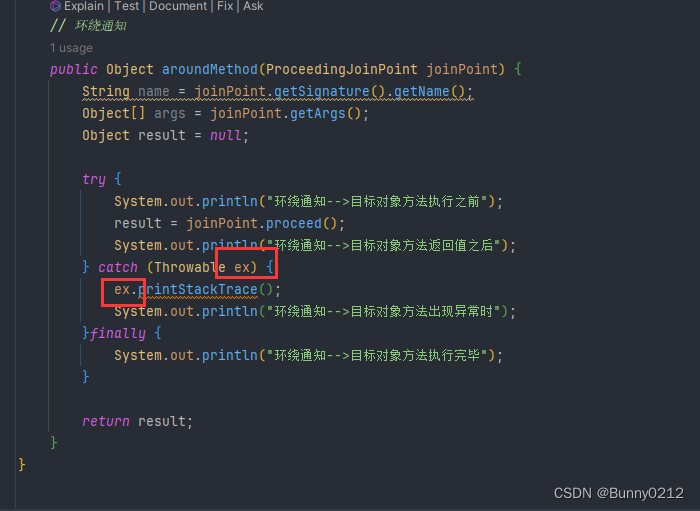
抛出异常名根据这个来的
不要加括号!!!"/>
        <!-- 返回操作 -->
        <aop:after-returning method="返回操作方法" returning="返回值,你的返回值是什么变量就填什么" pointcut-ref="注意这里是pointcut-ref,是上面填写表达式的值,不要加括号!!!"/>

        <!-- 异常通知 -->
        <aop:after-throwing method="异常通知方法" throwing="抛出异常命名,见下面图片" pointcut-ref="注意这里是pointcut-ref,是上面填写表达式的值,不要加括号!!!"/>

		 <!-- 环绕通知 -->
        <aop:around method="aroundMethod" pointcut-ref="注意这里是pointcut-ref,是上面填写表达式的值,不要加括号!!!"/>
    </aop:aspect>
</aop:config>
抛出异常名根据这个来的
本文来自互联网用户投稿,该文观点仅代表作者本人,不代表本站立场。本站仅提供信息存储空间服务,不拥有所有权,不承担相关法律责任。 如若内容造成侵权/违法违规/事实不符,请联系我的编程经验分享网邮箱:chenni525@qq.com进行投诉反馈,一经查实,立即删除!
- Python教程
- 深入理解 MySQL 中的 HAVING 关键字和聚合函数
- Qt之QChar编码(1)
- MyBatis入门基础篇
- 用Python脚本实现FFmpeg批量转换
- 众和策略股市行情分析:可转债打新跟打新股一样吗?
- 【华为OD机试真题2023C&D卷 JAVA&JS】执行任务赚积分
- 深度生成模型之GAN优化目标设计与改进 ->(个人学习记录笔记)
- 【C语言初阶】数组
- Python 编辑器pycharm下载与安装
- 十四、Three场景物体增加描边
- openFeign服务调用
- 那些年叫嚣着“出海”的制造企业,如今都怎么样了?
- Ceph分布式存储部署
- C++初阶 | [八] (上) vector
