【源码解析】从CountDownLatch角度聊聊AQS

使用案例
CountDownLatch的用法是通过构造参数输入需要等待的线程个数,countDown 进行操作,当state=0的时候,阻塞的await线程就可以继续执行任务。
    public static void main(String[] args) {
        CountDownLatch countDownLatch = new CountDownLatch(2);

        Thread t1 = new Thread(() -> {
            countDownLatch.countDown();
            System.out.println(Thread.currentThread().getName()+ " 线程执行了");
        },"t1");

        Thread t2 = new Thread(() -> {
            countDownLatch.countDown();
            System.out.println(Thread.currentThread().getName()+ " 线程执行了");
        },"t2");

        t1.start();
        t2.start();

        Thread t3 = new Thread(() -> {
            try {
                countDownLatch.await();
            } catch (InterruptedException e) {
                e.printStackTrace();
            }
            System.out.println(Thread.currentThread().getName()+ " 线程执行了");
        },"t3");

        Thread t4 = new Thread(() -> {
            try {
                countDownLatch.await();
            } catch (InterruptedException e) {
                e.printStackTrace();
            }
            System.out.println(Thread.currentThread().getName()+ " 线程执行了");
        },"t4");

        t3.start();
        t4.start();
    }
构造方法
通过构造参数,可以发现其实内部通过syn进行初始化一个内部对象。实现了AQS。也就是通过构造方法将state设置为对应的数值2
    public CountDownLatch(int count) {
        if (count < 0) throw new IllegalArgumentException("count < 0");
        // 构造一个内部sync
        this.sync = new Sync(count);
    }

     //内部类方法 实现类AQS
    private static final class Sync extends AbstractQueuedSynchronizer {}


        Sync(int count) {
            //继承是AQS类 将当前state 设置为count
            setState(count);
        }
await
    //当state = 0的时候,不阻塞
    public void await() throws InterruptedException {
        sync.acquireSharedInterruptibly(1);
    }
先判断当前线程是否中断,中断直接抛出异常
    public final void acquireSharedInterruptibly(int arg)
            throws InterruptedException {
        //是否中断
        if (Thread.interrupted())
            throw new InterruptedException();
        // 线程等待
        if (tryAcquireShared(arg) < 0)
            doAcquireSharedInterruptibly(arg);
    }
getState() 此时等于2 所以返回-1 进入doAcquireSharedInterruptibly这个逻辑中
    // 返回负数 获取锁失败
    // 返回0 获取锁成功  不唤醒后续节点
    // 返回正数 获取锁成功, 唤醒后续节点
    protected int tryAcquireShared(int arg) {
        throw new UnsupportedOperationException();
    }

        // state == 0 锁空闲,直接返回1
        protected int tryAcquireShared(int acquires) {
            return (getState() == 0) ? 1 : -1;
        }
doAcquireSharedInterruptibly的主要作用就是将当前线程封装成一个Node节点。加入到AQS队列中,注意是共享模式
 private void doAcquireSharedInterruptibly(int arg)
        throws InterruptedException {
        // 封装成一个node 加入AQS队列中 共享模式
        final Node node = addWaiter(Node.SHARED);
        boolean failed = true;
        try {
            //自选锁
            for (;;) {
                final Node p = node.predecessor();
                if (p == head) {
                    // state 不等于0 返回-1
                    int r = tryAcquireShared(arg);
                    // 第一次不会进入
                    if (r >= 0) {
                        //  // 2. 这里将唤醒t3的后续节点t4,以此类推,t4被唤醒后,会在t4的await中唤醒t4的后续节点
                        setHeadAndPropagate(node, r);
                        // t3节点删除
                        p.next = null; // help GC
                        failed = false;
                        return;
                    }
                }
                // 修改前驱节点waitstate = -1 挂起当前线程
                if (shouldParkAfterFailedAcquire(p, node) &&
                    parkAndCheckInterrupt())
                    throw new InterruptedException();
            }
        } finally {
            if (failed)
                cancelAcquire(node);
        }
    }

tryAcquireShared 返回的是-1 所以 shouldParkAfterFailedAcquire 会将head的waitStatus 设置为-1。然后t3 线程挂起
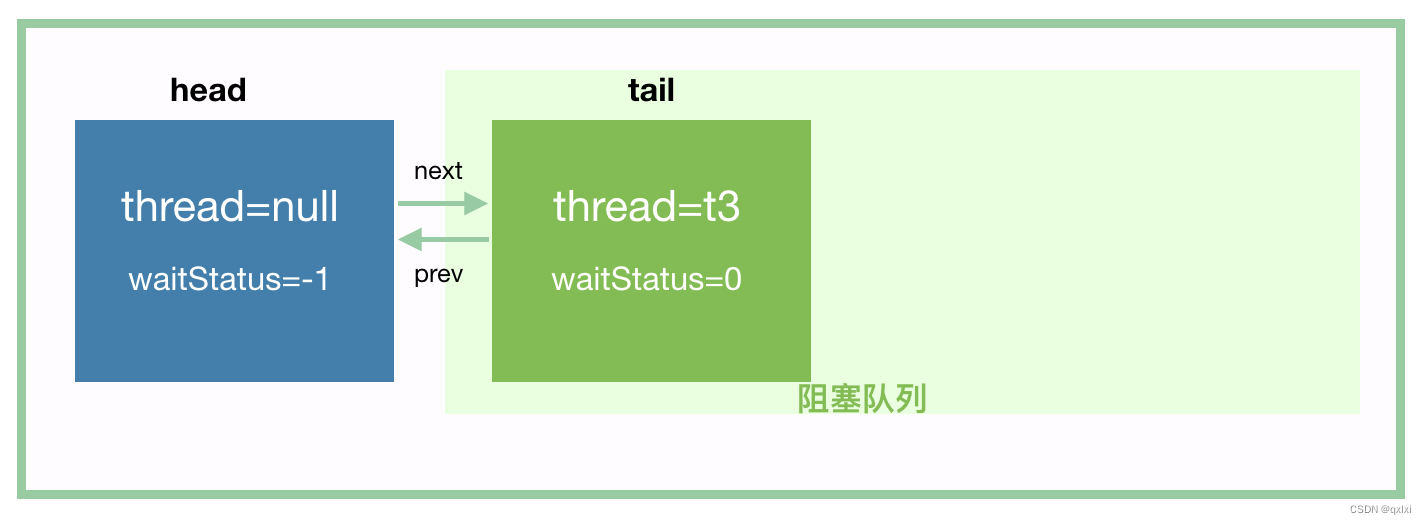
t4走到这里也会将t3进行waitStaus=-1 然后t4挂起

此时 线程t3 和 t4就等待state 等于0的线程唤醒。
countDown
    // 其实就是将state-1
    public void countDown() {
        sync.releaseShared(1);
    }
    public final boolean releaseShared(int arg) {
        if (tryReleaseShared(arg)) {
            doReleaseShared();
            return true;
        }
        return false;
    }
        protected boolean tryReleaseShared(int releases) {
            // Decrement count; signal when transition to zero
            // state = 0的时候  才返回true
            // 否则就是state -=1
            for (;;) {
                int c = getState();
                if (c == 0)
                    return false;
                int nextc = c-1;
                if (compareAndSetState(c, nextc))
                    return nextc == 0;
            }
        }
可以看到只有当 tryReleaseShared 返回true 的时候,才会进入到 doReleaseShared的逻辑,也就是state=0, 当进入unparkSuccessor,也就是先唤醒t3线程。
    private void doReleaseShared() {
        // 自选锁
        for (;;) {
            Node h = head;
            if (h != null && h != tail) {
                int ws = h.waitStatus;
                // 前面已经将pre节点 设置为-1
                if (ws == Node.SIGNAL) {
                    if (!compareAndSetWaitStatus(h, Node.SIGNAL, 0))
                        continue;            // loop to recheck cases
                    // 唤醒head的后继节点
                    unparkSuccessor(h);
                }
                else if (ws == 0 &&
                         !compareAndSetWaitStatus(h, 0, Node.PROPAGATE))
                    continue;                // loop on failed CAS
            }
            if (h == head)                   // loop if head changed
                break;
        }
    }
					int r = tryAcquireShared(arg);
                    // 第一次不会进入 当state=0 会进入这个方法
                    if (r >= 0) {
                        //  // 2. 这里将唤醒t3的后续节点t4,以此类推,t4被唤醒后,会在t4的await中唤醒t4的后续节点
                        setHeadAndPropagate(node, r);
                        // t3节点删除
                        p.next = null; // help GC
                        failed = false;
                        return;
                    }
将当前节点t3设置为head节点,唤醒后续的节点。
    private void setHeadAndPropagate(Node node, int propagate) {
        Node h = head; // Record old head for check below
        setHead(node);
        // 唤醒后续的节点
        if (propagate > 0 || h == null || h.waitStatus < 0 ||
            (h = head) == null || h.waitStatus < 0) {
            Node s = node.next;
            if (s == null || s.isShared())
                doReleaseShared();
        }
    }
    private void doReleaseShared() {
        // 自选锁
        for (;;) {
            Node h = head;
            if (h != null && h != tail) {
                int ws = h.waitStatus;
                // 前面已经将pre节点 设置为-1  会将-1的节点都唤醒。
                if (ws == Node.SIGNAL) {
                    if (!compareAndSetWaitStatus(h, Node.SIGNAL, 0))
                        continue;            // loop to recheck cases
                    // 唤醒head的后继节点
                    unparkSuccessor(h);
                }
                else if (ws == 0 &&
                         !compareAndSetWaitStatus(h, 0, Node.PROPAGATE))
                    continue;                // loop on failed CAS
            }
            if (h == head)                   // loop if head changed
                break;
        }
    }
使用场景
多个线程执行等待一个线程执行完毕。以及一个线程等待多个线程执行完毕,就可以组合使用进行等待。
或者一批任务执行的时候,必须全部执行完毕才完成,也是可以的。
总结
总体上来说,CownDownLatch的原理大概如下。
1.通过构造参数设置state的个数
2.使用await 将state的线程添加到aqs队列中并且waitStatus = -1
3.当countDown() 将state=0的时候,唤醒aqs中的第一个线程,之后该线程唤醒之后的所有线程。
本文来自互联网用户投稿,该文观点仅代表作者本人,不代表本站立场。本站仅提供信息存储空间服务,不拥有所有权,不承担相关法律责任。 如若内容造成侵权/违法违规/事实不符,请联系我的编程经验分享网邮箱:chenni525@qq.com进行投诉反馈,一经查实,立即删除!
- Python教程
- 深入理解 MySQL 中的 HAVING 关键字和聚合函数
- Qt之QChar编码(1)
- MyBatis入门基础篇
- 用Python脚本实现FFmpeg批量转换
- Ameya360成为埃肯有机硅授权代理!
- 2024.1.14~1.20 周内刷题总结
- IDEA常用快捷键二
- PS安装失败-182的解决办法
- Unity3D代码混淆方案详解
- 从零开始学Python系列课程第14课:Python中的循环结构(下)
- 萌宠宠物用品商城设计与制作-计算机毕业设计源码79718
- 如何使用jenkins、ant、selenium、testng搭建自动化测试框架
- 千玺喊你充电啦,每天都能听到千玺的声音是种什么体验,简直不要太酷~
- JavaScript——new关键字详解