Spring Cache
第一节 Spring Cache介绍
1. Spring Cache 简介
从3.1开始,Spring引入了对Cache的支持。其使用方法和原理都类似于Spring对事务管理的支持。
Spring Cache是作用在方法上的,其核心思想是这样的:
当调用一个缓存方法时会把该方法参数和返回结果作为一个键值对存放在缓存中,等到下次利用同样的参数来调用该方法时将不再执行该方法,而是直接从缓存中获取结果进行返回。所以在使用Spring Cache的时候要保证缓存的方法对于相同的方法参数要有相同的返回结果。
2. Spring Cache 注解
Spring为我们提供了几个注解来支持Spring Cache。其核心主要是@Cacheable和@CacheEvict。
2.1 @Cacheable
@Cacheable可以标记在一个方法上,也可以标记在一个类上。
-
当标记在一个方法上时表示该方法是支持缓存的
-
当标记在一个类上时则表示该类所有的方法都是支持缓存的
对于一个支持缓存的方法,Spring会在其被调用后将其返回值缓存起来,以保证下次利用同样的参数来执行该方法时可以直接从缓存中获取结果,而不需要再次执行该方法。需要注意的是当一个支持缓存的方法在对象内部被调用时是不会触发缓存功能的。
在支持Spring Cache的环境下,对于使用@Cacheable标注的方法,Spring在每次执行前都会检查Cache中是否存在相同key的缓存元素,如果存在就不再执行该方法,而是直接从缓存中获取结果进行返回,否则才会执行并将返回结果存入指定的缓存中。
@Cacheable常用属性有4个:cacheNames、keyGenerator、condition 和 unless。
-
cacheNames
cacheNames属性是必须指定的,其表示当前方法的返回值是会被缓存在哪个Cache上的,对应Cache的名称。其可以是一个Cache也可以是多个Cache,当需要指定多个Cache时其是一个数组
-
keyGenerator
keyGenerator属性是用来指定缓存数据时使用的键,当没有指定该属性时,Spring将使用默认策略生成key
-
condition
condition属性表示缓存的条件,这个条件与查询的参数有关。当有些查询条件不需要缓存时,可以通过condition来实现过滤。condition属性默认为空,表示将缓存所有的调用情形。
-
unless
unless属性表示缓存的条件,这个条件与查询的结果有关。当有些查询结果不需要缓存时,可以通过unless来实现过滤。unless属性默认为空,表示将缓存所有的调用情形。
2.2 @CachePut
@CachePut也可以声明一个方法支持缓存功能。与@Cacheable不同的是:使用@CachePut标注的方法在执行前不会去检查缓存中是否存在之前执行过的结果,而是每次都会执行该方法,并将执行结果以键值对的形式存入指定的缓存中。
2.3 @CacheEvict
@CacheEvict是用来标注在需要清除缓存元素的方法或类上的。当标记在一个类上时表示其中所有的方法的执行都会触发缓存的清除操作。
@CacheEvict可以指定的属性有value、key、condition、allEntries和beforeInvocation。其中value、key和condition的语义与@Cacheable对应的属性类似。
-
value: value表示清除操作是发生在哪些Cache上的(对应Cache的名称)
-
key: key表示需要清除的是哪个key,如未指定则会使用默认策略生成的key
-
condition: condition表示清除操作发生的条件。
-
allEntries: allEntries是boolean类型,表示是否需要清除缓存中的所有元素。默认为false,表示不需要。当指定了allEntries为true时,Spring Cache将忽略指定的key。有的时候我们需要Cache一下清除所有的元素,这比一个一个清除元素更有效率
-
beforeInvocation: 清除操作默认是在对应方法成功执行之后触发的,即方法如果因为抛出异常而未能成功返回时也不会触发清除操作。使用beforeInvocation可以改变触发清除操作的时机,当指定该属性值为true时,Spring会在调用该方法之前清除缓存中的指定元素。
第二节 Spring Cache 的EL 表达式
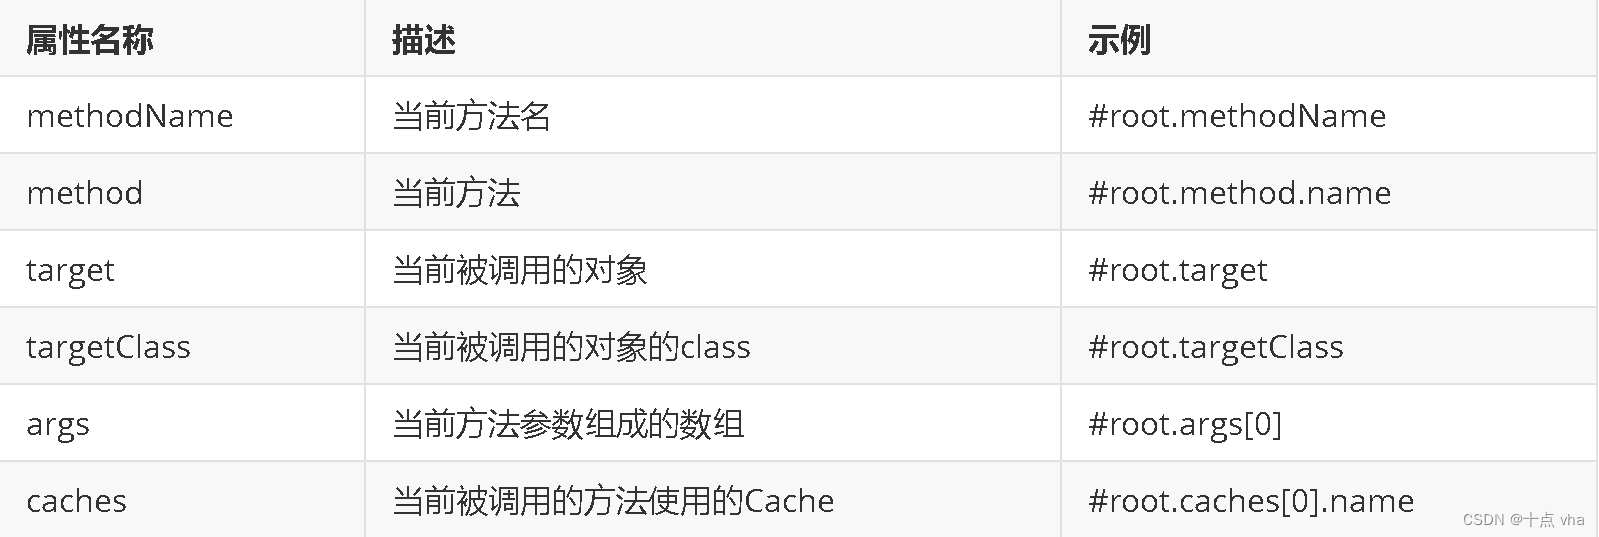
Spring提供了一个root对象可以用来生成key。通过该root对象我们可以获取到以下信息。

使用方法参数时我们可以直接使用 #参数名 或者 #p参数index
第三节 Spring Cache应用
1. yml配置
spring:
  redis:
    jedis:
      pool:
        max-wait: -1
        max-active: 100
        max-idle: 10
        min-idle: 2
    host: 127.0.0.1
    port: 6379
2. Cache配置
package com.qf.spring.boot.redis.cache.config;

import org.springframework.cache.CacheManager;
import org.springframework.cache.annotation.EnableCaching;
import org.springframework.context.annotation.Bean;
import org.springframework.context.annotation.Configuration;
import org.springframework.data.redis.cache.RedisCacheConfiguration;
import org.springframework.data.redis.cache.RedisCacheManager;
import org.springframework.data.redis.connection.RedisConnectionFactory;
import org.springframework.data.redis.serializer.GenericJackson2JsonRedisSerializer;
import org.springframework.data.redis.serializer.RedisSerializationContext;
import org.springframework.data.redis.serializer.StringRedisSerializer;

import java.time.Duration;

@Configuration
@EnableCaching //启用缓存
public class RedisConfiguration {

    private static final int defaultExpireTime = 300;
    /**
     * 缓存管理器
     *
     * @param connectionFactory
     * @return
     */
    @Bean
    public CacheManager cacheManager(RedisConnectionFactory connectionFactory) {
        RedisCacheConfiguration defaultCacheConfig = RedisCacheConfiguration.defaultCacheConfig()
        // 设置缓存管理器管理的缓存的默认过期时间
        .entryTtl(Duration.ofSeconds(defaultExpireTime))
         // 设置 key为string序列化
        .serializeKeysWith(RedisSerializationContext.SerializationPair.fromSerializer(new StringRedisSerializer()))
         // 设置value为json序列化
        .serializeValuesWith(RedisSerializationContext.SerializationPair.fromSerializer(new GenericJackson2JsonRedisSerializer()));
        return RedisCacheManager.builder(connectionFactory)
                .cacheDefaults(defaultCacheConfig)
                .build();
    }
}
3. 创建查询实体
package com.qf.spring.boot.redis.cache.model;

import lombok.Data;
import lombok.experimental.Accessors;

@Data
@Accessors(chain = true)
public class User {

    private String name;

    private String sex;
}
4. 创建业务层
package com.qf.spring.boot.redis.cache.service;

public interface UserService {

}


package com.qf.spring.boot.redis.cache.service.impl;

@Service
public class UserServiceImpl implements UserService {

}
5. @Cacheable注解
5.1 基本使用
package com.qf.spring.boot.redis.cache.service;

import com.qf.spring.boot.redis.cache.model.User;

import java.util.List;

public interface UserService {

    List<User> getAllUser();
}


package com.qf.spring.boot.redis.cache.service.impl;

import com.qf.spring.boot.redis.cache.model.User;
import com.qf.spring.boot.redis.cache.service.UserService;
import org.springframework.cache.annotation.Cacheable;
import org.springframework.stereotype.Service;

import java.util.Arrays;
import java.util.List;

@Service
public class UserServiceImpl implements UserService {


    @Cacheable("userCache") //指定缓存的名称
    @Override
    public List<User> getAllUser() {
        return Arrays.asList(new User().setName("张三").setSex("男"), new User().setName("里斯").setSex("女"));
    }
}
编写测试案例
package com.qf.spring.boot.redis.cache;

import com.qf.spring.boot.redis.cache.service.UserService;
import org.junit.jupiter.api.Test;
import org.springframework.beans.factory.annotation.Autowired;
import org.springframework.boot.test.context.SpringBootTest;

@SpringBootTest
class SpringBootRedisCacheApplicationTests {

    @Autowired
    private UserService userService;

    @Test
    void cacheTest() {
        userService.getAllUser().forEach(System.out::println);
    }

}
执行测试,然后使用Redis Desktop Manager查看缓存结果。缓存确实存在,但缓存的键命名却不友好,可以使用 keyGenerator 属性来自定义缓存的键名称。
5.2 自定义键生成器
在 RedisConfiguration 中配置自定义键的生成器
@Bean
public KeyGenerator keyGenerator(){
    return (target, method, params) -> {
        StringBuilder builder = new StringBuilder();
        builder.append(target.getClass().getName()).append(".");//类名
        builder.append(method.getName()); //方法名
        if(params.length > 0){
            String paramInfo = Arrays.toString(params);//参数信息
            if(!"[]".equals(paramInfo.replace(" ","")))//参数信息不为空字符串
                builder.append(".").append(Arrays.toString(params));
        }
        return builder.toString();
    };
}
在缓存时,指定键生成器
@Cacheable(cacheNames = "userCache", keyGenerator = "keyGenerator")再次测试,查看缓存结果
5.3 unless 应用
//unless属性的值如果为true,表示不进行缓存
//#result表示返回结果,因为结果是List集合,所以可以使用size()方法进行判断,如果结果小于5条,则不缓存
@Cacheable(cacheNames = "userCache", keyGenerator = "keyGenerator", unless = "#result.size() < 5")
删除 Redis 中的缓存,再次测试,查看缓存结果
5.4 condition 应用
新增业务接口及实现
package com.qf.spring.boot.redis.cache.service;

import com.qf.spring.boot.redis.cache.model.User;

import java.util.List;

public interface UserService {

    List<User> getAllUser();

    List<User> searchUsers(String name);
}


package com.qf.spring.boot.redis.cache.service.impl;

import com.qf.spring.boot.redis.cache.model.User;
import com.qf.spring.boot.redis.cache.service.UserService;
import org.springframework.cache.annotation.Cacheable;
import org.springframework.stereotype.Service;

import java.util.Arrays;
import java.util.Collections;
import java.util.List;

@Service
public class UserServiceImpl implements UserService {


    //unless属性的值如果为true,表示不进行缓存
    //#result表示返回结果,因为结果是List集合,所以可以使用size()方法进行判断,如果结果小于5条,则不缓存
    @Cacheable(cacheNames = "userCache", keyGenerator = "keyGenerator", unless = "#result.size() < 5")
    @Override
    public List<User> getAllUser() {
        return Arrays.asList(new User().setName("张三").setSex("男"), new User().setName("里斯").setSex("女"));
    }

    @Cacheable(cacheNames = "userCache", keyGenerator = "keyGenerator", condition = "!#p0.equals('管理员')")
    @Override
    public List<User> searchUsers(String name) {
        if("管理员".equals(name)) return Collections.singletonList(new User().setName("管理员").setSex("男"));
        return Arrays.asList(new User().setName(name + "1").setSex("其他"), new User().setName(name+"2").setSex("男"));
    }
}
修改测试案例
package com.qf.spring.boot.redis.cache;

import com.qf.spring.boot.redis.cache.service.UserService;
import org.junit.jupiter.api.Test;
import org.springframework.beans.factory.annotation.Autowired;
import org.springframework.boot.test.context.SpringBootTest;

@SpringBootTest
class SpringBootRedisCacheApplicationTests {

    @Autowired
    private UserService userService;

    @Test
    void cacheTest() {
        userService.getAllUser().forEach(System.out::println);
        userService.searchUsers("管理员").forEach(System.out::println);
    }

}
执行测试,查看缓存结果。
将查看条件由 "管理员" 调整为 "测试员",再次执行,查看缓存结果。
6. @CacheEvict 注解
6.1 新增业务接口及实现
int addUser(User user);

@CacheEvict(cacheNames = "userCache", allEntries = true)
@Override
public int addUser(User user) {
    return 1;
}
6.2 编写测试案例
@Test
void cacheEvictTest(){
    userService.addUser(new User().setName("新增人员").setSex("男"));
}
6.3 beforeInvocation 属性测试
7. 数据库访问测试
本文来自互联网用户投稿,该文观点仅代表作者本人,不代表本站立场。本站仅提供信息存储空间服务,不拥有所有权,不承担相关法律责任。 如若内容造成侵权/违法违规/事实不符,请联系我的编程经验分享网邮箱:chenni525@qq.com进行投诉反馈,一经查实,立即删除!
- Python教程
- 深入理解 MySQL 中的 HAVING 关键字和聚合函数
- Qt之QChar编码(1)
- MyBatis入门基础篇
- 用Python脚本实现FFmpeg批量转换
- L1-058 6翻了(Java)
- 这款 AI 编码工具 CodeFuse 很惊艳
- 创建数组(数组基本方法)
- 大规模数据可视化(纯文字干货科普)
- 设计模式之桥接模式
- MySQL 8.0中引入的选项和变量(四)
- 自己构建webpack+vue3+ts
- SmartX 超融合和分布式存储支持哪些信创硬件?如何选型配置?
- 网络地址IP如何使用动态代理修改?变更IP地址是否会受到网速影响?
- 车辆违规实线变道检测系统:融合Gold-YOLO改进YOLOv8