微服务原理
微服务篇
文章目录
SpringCloud常见组件
SpringCloud包含的组件很多,有很多功能是重复的。其中最常用组件包括:
- 注册中心组件:Eureka、Nacos等
- 负载均衡组件:Ribbon
- 远程调用组件:OpenFeign
- 网关组件:Zuul、Gateway
- 服务保护组件:Hystrix、Sentinel
- 服务配置管理组件:SpringCloudConfig、Nacos
Nacos篇
要研究Nacos源码不能直接用打包好的Nacos服务端jar包来运行,需要下载源码自己编译来运行。
下载源码
Nacos的GitHub地址:https://github.com/alibaba/nacos
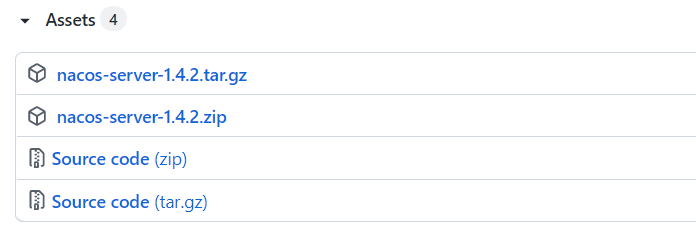
找到其release页面:https://github.com/alibaba/nacos/tags,找到其中的1.4.2.版本:

点击进入后,下载Source code(zip):
导入Nacos源码
编写一个简单的订单-用户微服务,将之前下载好的Nacos源码解压到该微服务项目目录中,使用IDEA将其作为一个module导入:
选择项目结构选项:
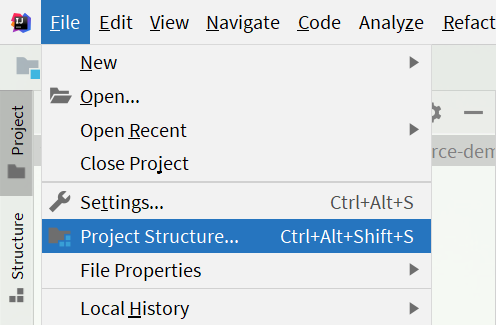
然后点击导入module:
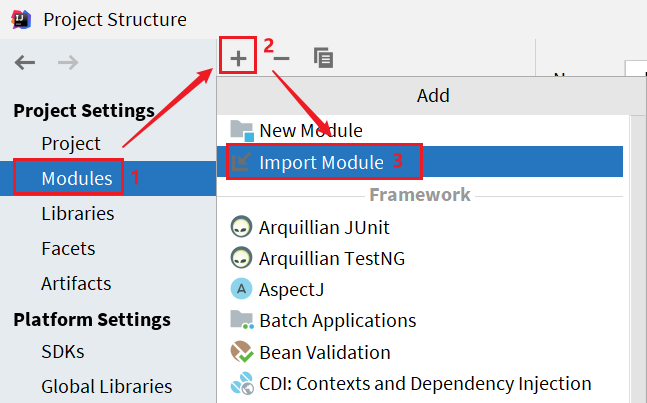
在弹出窗口中,选择nacos源码目录:

然后选择maven模块,finish:
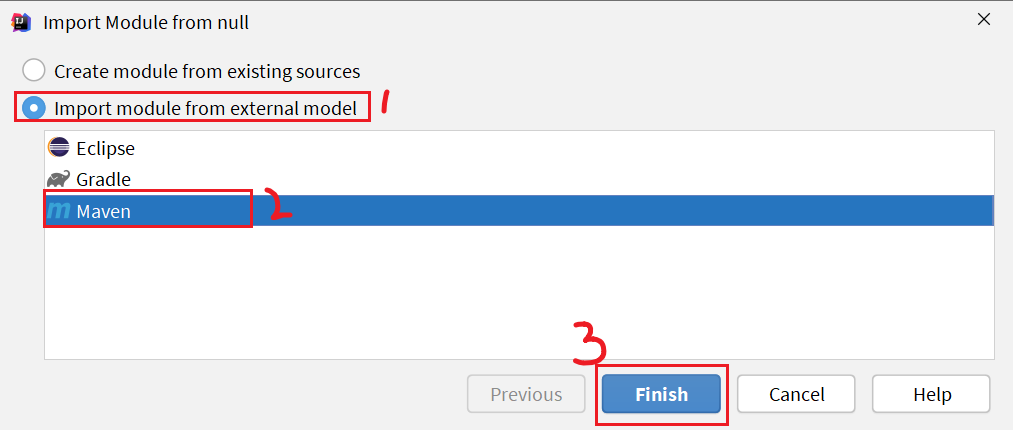
最后,点击OK即可:
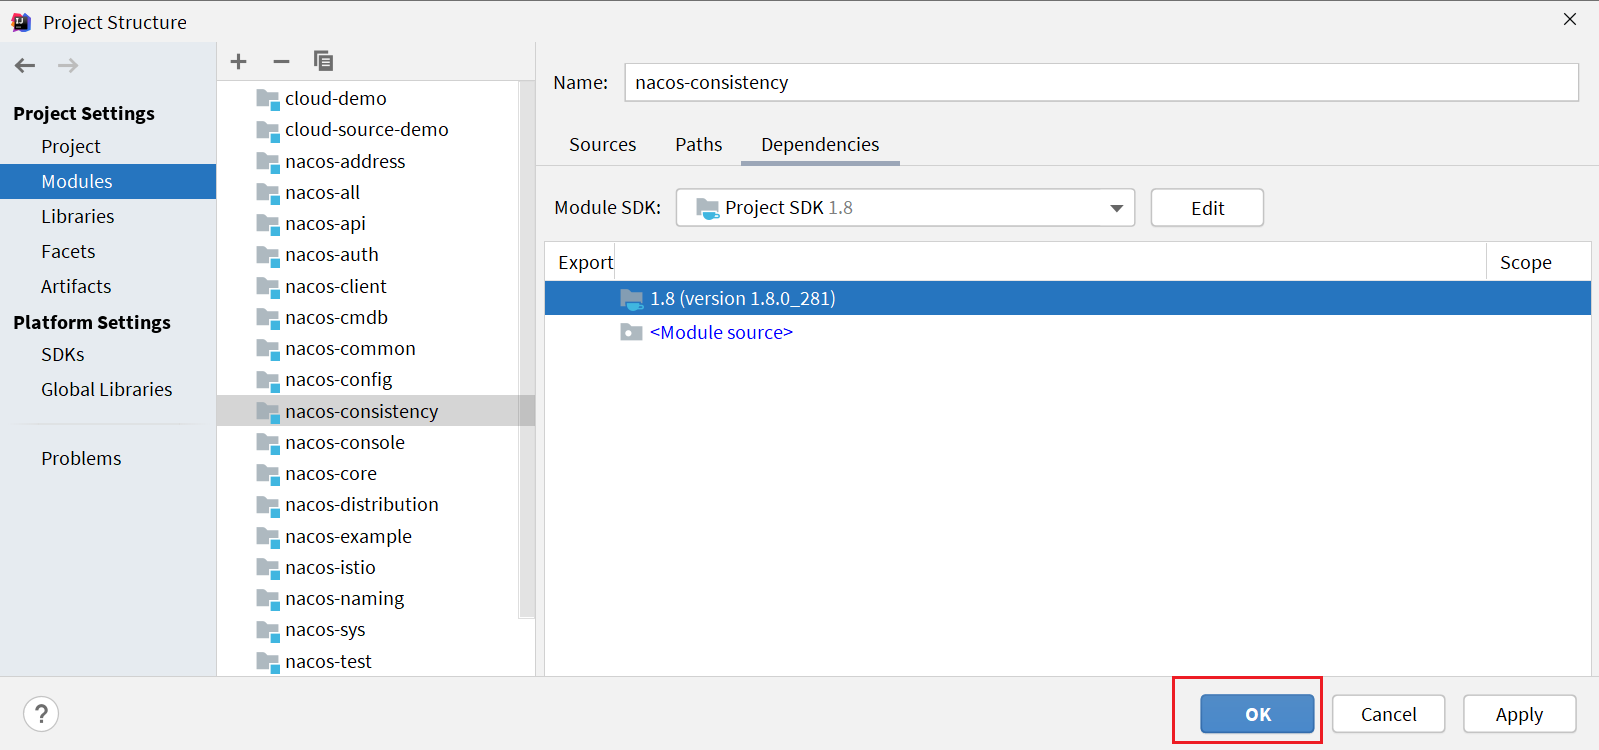
proto编译
Nacos底层的数据通信会基于protobuf对数据做序列化和反序列化。并将对应的proto文件定义在了consistency这个子模块中
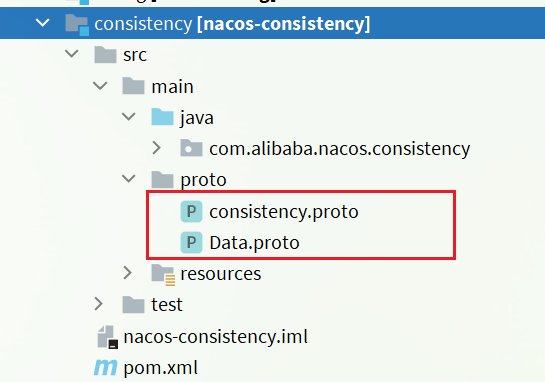
需要先将proto文件编译成对应的Java代码。
protobuf定义
protobuf的全称是Protocol Buffer,是Google提供的一种数据序列化协议,Google官方对其的定义:
Protocol Buffers 是一种轻便高效的结构化数据存储格式,可以用于结构化数据序列化,很适合做数据存储或 RPC 数据交换格式。它可用于通讯协议、数据存储等领域的语言无关、平台无关、可扩展的序列化结构数据格式。
可以简单理解为,是一种跨语言、跨平台的数据传输格式。与json的功能类似,但是无论是性能,还是数据大小都比json要好很多。
protobuf的之所以可以跨语言,就是因为数据定义的格式为.proto格式,需要基于protoc编译为对应的语言。
安装protoc
Protobuf的GitHub地址: https://github.com/protocolbuffers/protobuf/releases
下载windows版本,解压到任意非中文目录下,其中的bin目录中的protoc.exe可以帮助编译。
然后将这个bin目录配置到你的环境变量path中,可以参考JDK的配置方式:
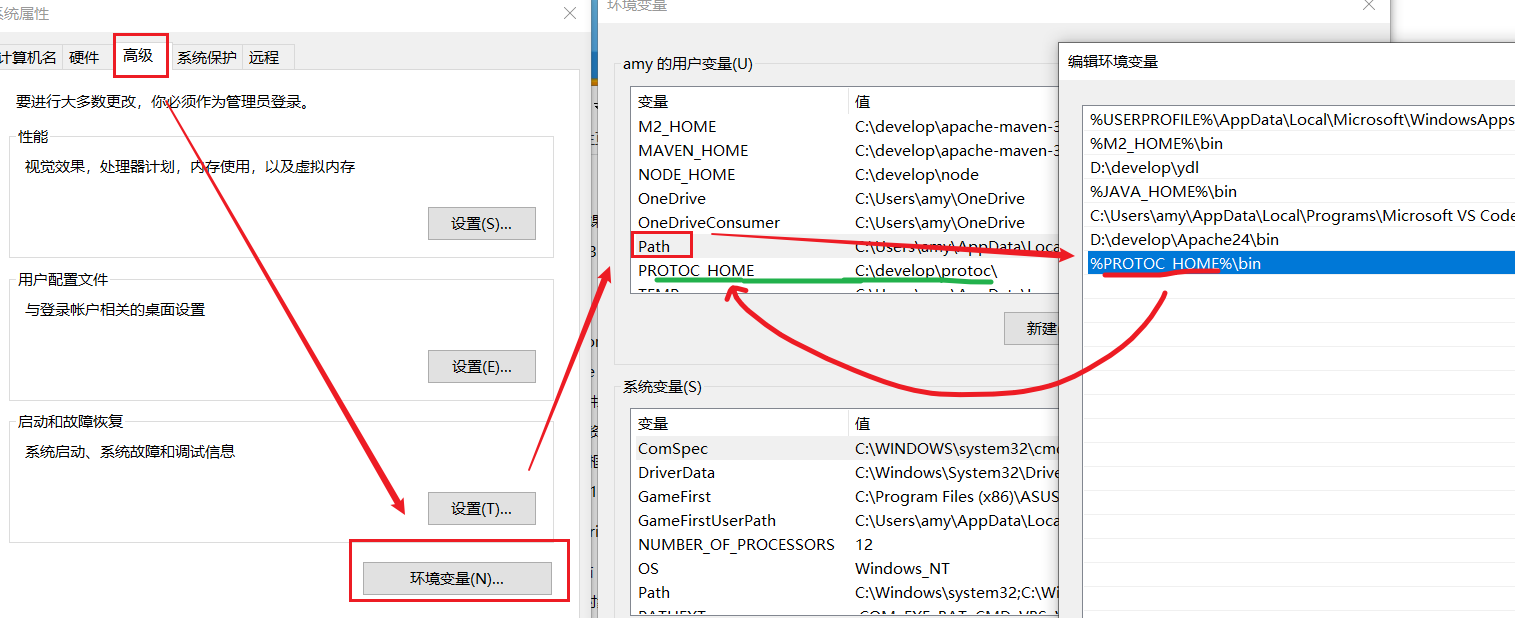
编译proto
进入Nacos的consistency模块下的src/main目录下,打开cmd窗口,运行下面两个命令:
protoc --java_out=./java ./proto/consistency.proto
protoc --java_out=./java ./proto/Data.proto
运行之后,打开IDEA,在Nacos的consistency模块中会编译出以下Java代码:
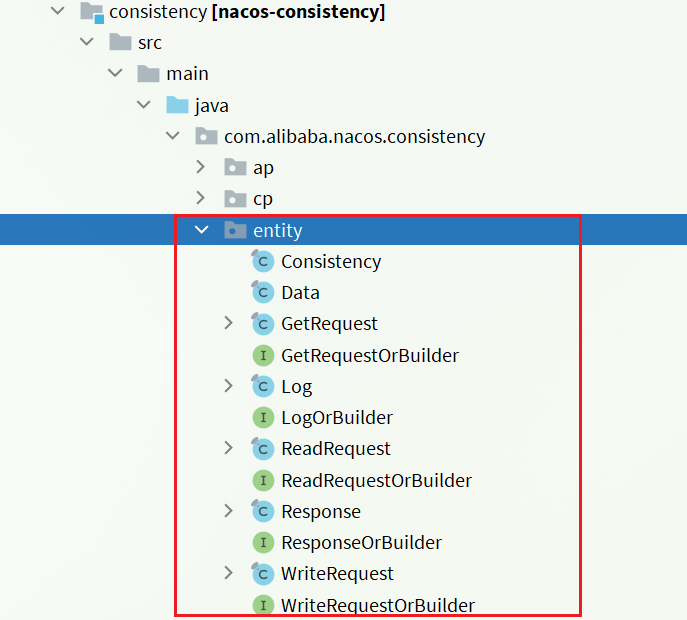
运行Nacos服务
Nacos服务端的入口是在console模块中的Nacos的启动类

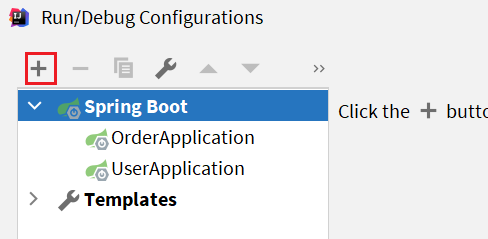
因为Nacos的默认启动方式为集群启动,所以如果想要使其单机启动,需要按照以下步骤操作:
- 新建一个SpringBootApplication:
- 然后填写应用信息
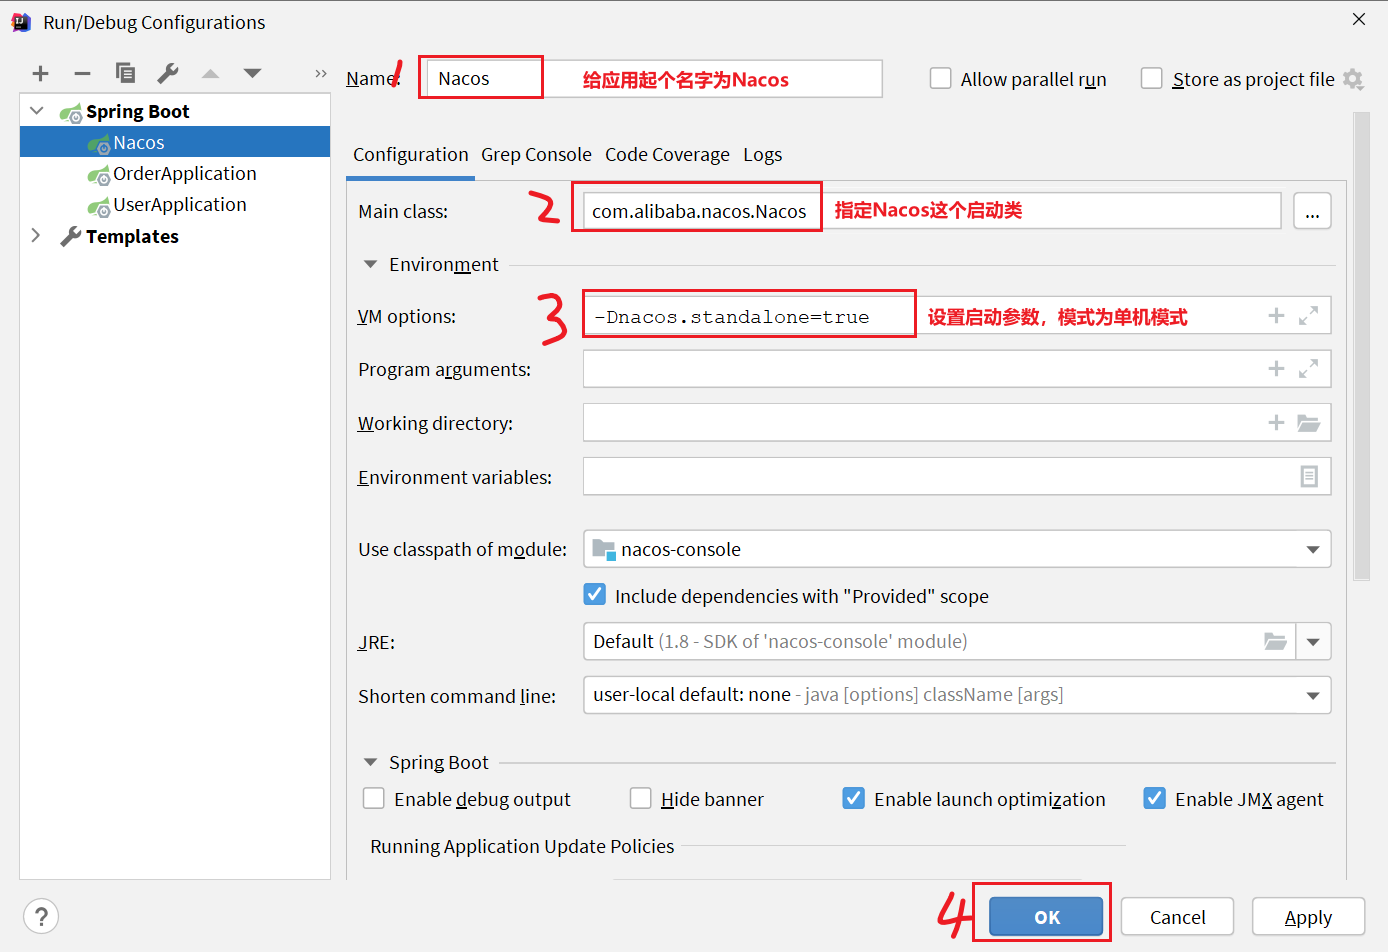
-
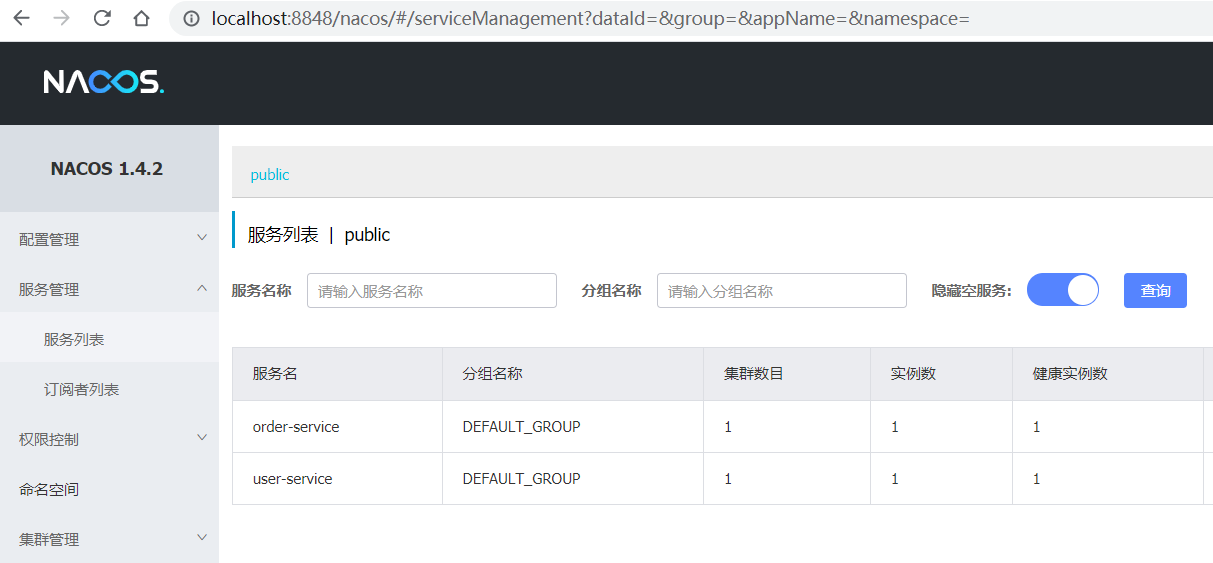
运行Nacos这个main函数,将order-service和user-service服务启动后,可以查看nacos控制台
服务注册
服务注册到Nacos以后,会保存在一个本地注册表中,其结构如下
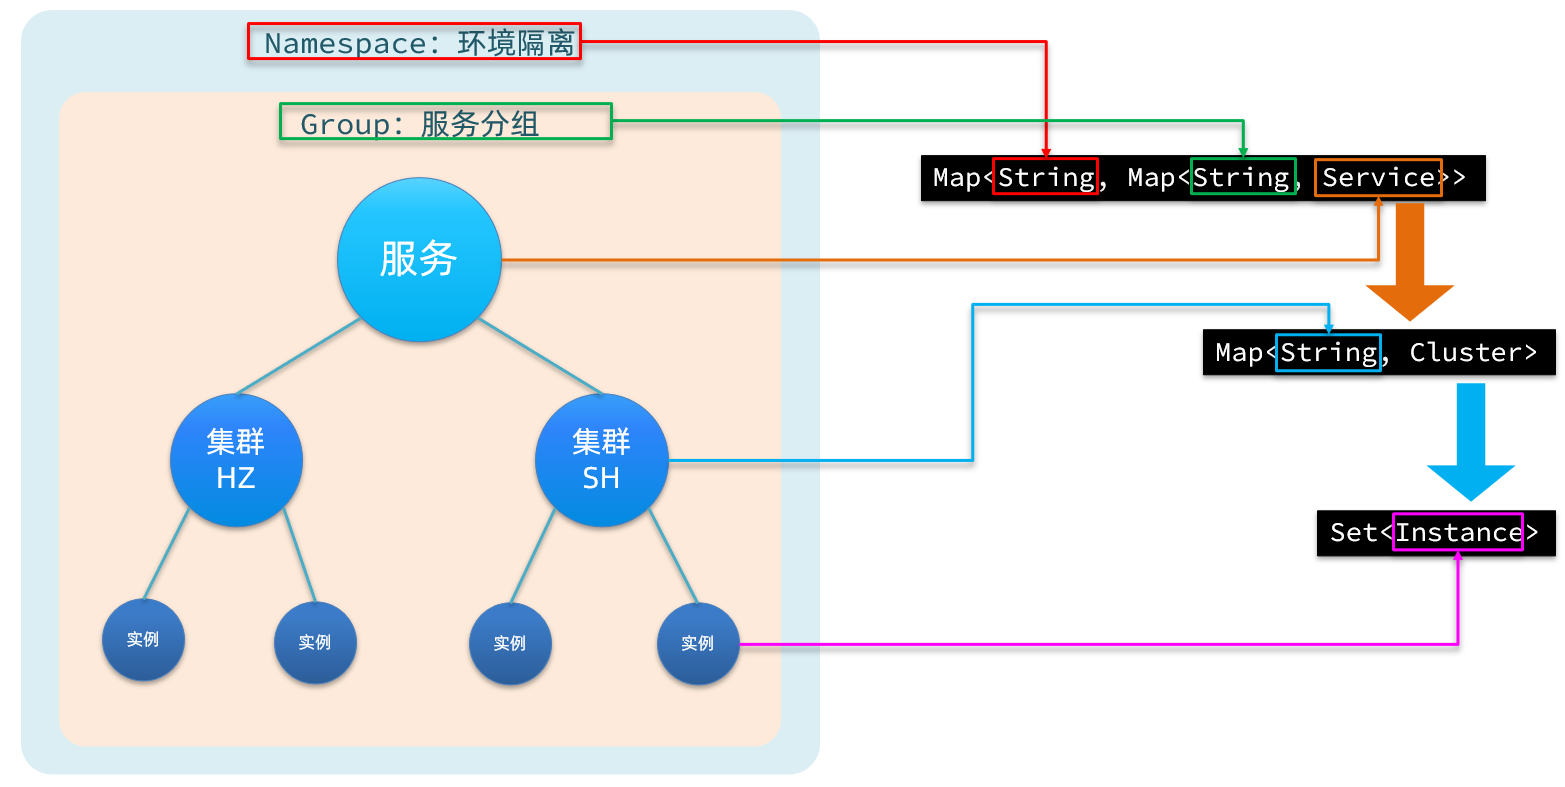
首先最外层是一个Map,结构为:Map<String, Map<String, Service>>:
- key:是namespace_id,起到环境隔离的作用。namespace下可以有多个group。
- value:又是一个
Map<String, Service>,代表分组及组内的服务。一个组内可以有多个服务。- key:代表group分组,不过作为key时格式是group_name:service_name
- value:分组下的某一个服务,例如userservice,用户服务。类型为
Service,内部也包含一个Map<String,Cluster>,一个服务下可以有多个集群。- key:集群名称。
- value:
Cluster类型,包含集群的具体信息。一个集群中可能包含多个实例,也就是具体的节点信息,其中包含一个Set<Instance>,就是该集群下的实例的集合。- Instance:实例信息,包含实例的IP、Port、健康状态、权重等等信息。
每一个服务去注册到Nacos时,就会把信息组织并存入这个Map中。
服务注册接口
Nacos提供了服务注册的API接口,客户端需要向该接口发送请求,即可实现服务注册。
接口说明:注册一个实例到Nacos服务。
请求类型:POST
请求路径:/nacos/v1/ns/instance
请求参数:
| 名称 | 类型 | 是否必选 | 描述 |
|---|---|---|---|
| ip | 字符串 | 是 | 服务实例IP |
| port | int | 是 | 服务实例port |
| namespaceId | 字符串 | 否 | 命名空间ID |
| weight | double | 否 | 权重 |
| enabled | boolean | 否 | 是否上线 |
| healthy | boolean | 否 | 是否健康 |
| metadata | 字符串 | 否 | 扩展信息 |
| clusterName | 字符串 | 否 | 集群名 |
| serviceName | 字符串 | 是 | 服务名 |
| groupName | 字符串 | 否 | 分组名 |
| ephemeral | boolean | 否 | 是否临时实例 |
错误编码:
| 错误代码 | 描述 | 语义 |
|---|---|---|
| 400 | Bad Request | 客户端请求中的语法错误 |
| 403 | Forbidden | 没有权限 |
| 404 | Not Found | 无法找到资源 |
| 500 | Internal Server Error | 服务器内部错误 |
| 200 | OK | 正常 |
客户端
首先需要找到服务注册的入口。
NacosServiceRegistryAutoConfiguration
因为Nacos的客户端是基于SpringBoot的自动装配实现的,可以在nacos-discovery依赖:spring-cloud-starter-alibaba-nacos-discovery-2.2.6.RELEASE.jar

可以看到,有很多个自动配置类被加载了,其中跟服务注册有关的就是NacosServiceRegistryAutoConfiguration这个类。
在这个类中,包含了一个跟自动注册有关的Bean:
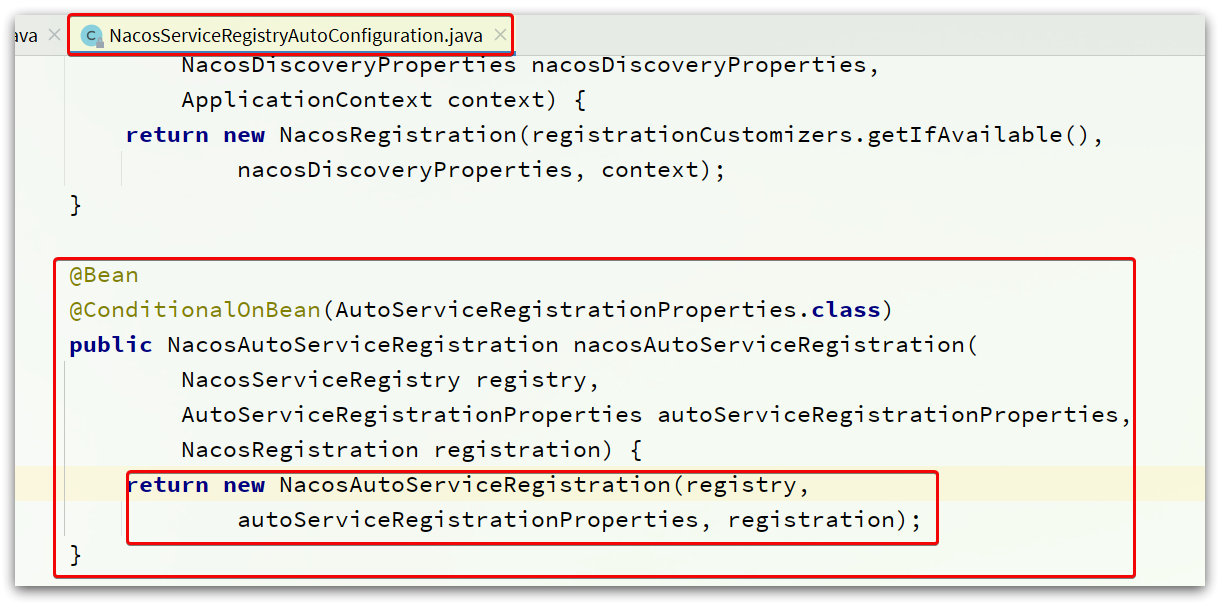
NacosAutoServiceRegistration
源码如图:
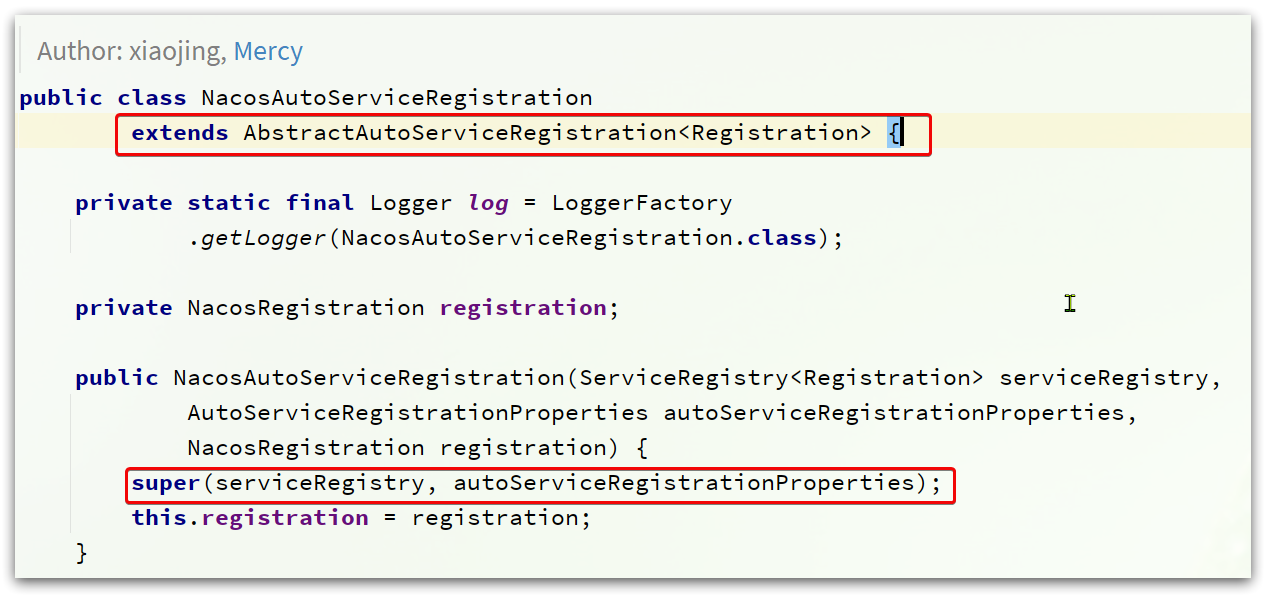
在初始化时,其父类AbstractAutoServiceRegistration也被初始化了。
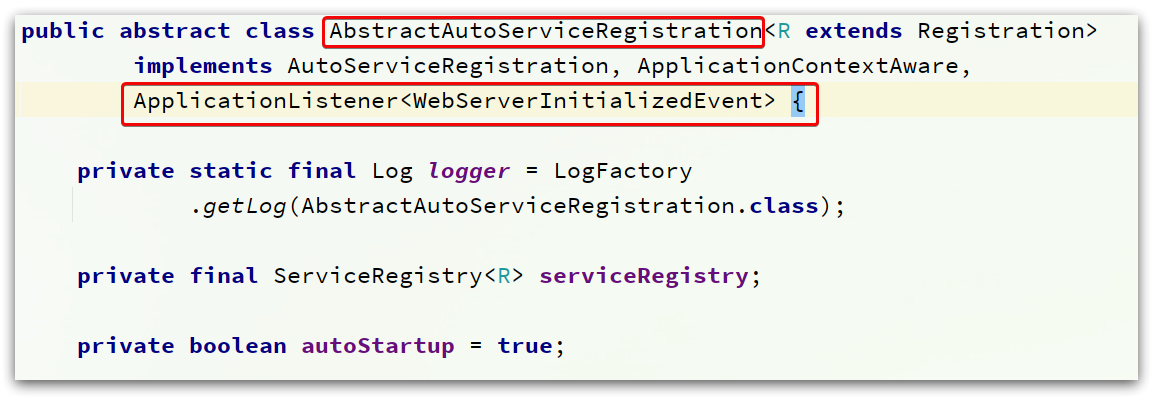
它实现了ApplicationListener接口,监听Spring容器启动过程中的事件。
在监听到WebServerInitializedEvent(web服务初始化完成)的事件后,执行了bind 方法。

其中的bind方法如下:
public void bind(WebServerInitializedEvent event) {
    // 获取 ApplicationContext
    ApplicationContext context = event.getApplicationContext();
    // 判断服务的 namespace,一般都是null
    if (context instanceof ConfigurableWebServerApplicationContext) {
        if ("management".equals(((ConfigurableWebServerApplicationContext) context)
                                .getServerNamespace())) {
            return;
        }
    }
    // 记录当前 web 服务的端口
    this.port.compareAndSet(0, event.getWebServer().getPort());
    // 启动当前服务注册流程
    this.start();
}
start方法流程:
public void start() {
		if (!isEnabled()) {
			if (logger.isDebugEnabled()) {
				logger.debug("Discovery Lifecycle disabled. Not starting");
			}
			return;
		}

		// 当前服务处于未运行状态时,才进行初始化
		if (!this.running.get()) {
            // 发布服务开始注册的事件
			this.context.publishEvent(
					new InstancePreRegisteredEvent(this, getRegistration()));
            // ☆☆☆☆开始注册☆☆☆☆
			register();
			if (shouldRegisterManagement()) {
				registerManagement();
			}
            // 发布注册完成事件
			this.context.publishEvent(
					new InstanceRegisteredEvent<>(this, getConfiguration()));
            // 服务状态设置为运行状态,基于AtomicBoolean
			this.running.compareAndSet(false, true);
		}

	}
其最关键的register()方法就是完成服务注册的关键
protected void register() {
    this.serviceRegistry.register(getRegistration());
}
此处的this.serviceRegistry就是NacosServiceRegistry:

NacosServiceRegistry
NacosServiceRegistry是Spring的ServiceRegistry接口的实现类,而ServiceRegistry接口是服务注册、发现的规约接口,定义了register、deregister等方法的声明。
NacosServiceRegistry对register的实现如下:
@Override
public void register(Registration registration) {
	// 判断serviceId是否为空,也就是spring.application.name不能为空
    if (StringUtils.isEmpty(registration.getServiceId())) {
        log.warn("No service to register for nacos client...");
        return;
    }
    // 获取Nacos的命名服务,其实就是注册中心服务
    NamingService namingService = namingService();
    // 获取 serviceId 和 Group
    String serviceId = registration.getServiceId();
    String group = nacosDiscoveryProperties.getGroup();
	// 封装服务实例的基本信息,如 cluster-name、是否为临时实例、权重、IP、端口等
    Instance instance = getNacosInstanceFromRegistration(registration);

    try {
        // 开始注册服务
        namingService.registerInstance(serviceId, group, instance);
        log.info("nacos registry, {} {} {}:{} register finished", group, serviceId,
                 instance.getIp(), instance.getPort());
    }
    catch (Exception e) {
        if (nacosDiscoveryProperties.isFailFast()) {
            log.error("nacos registry, {} register failed...{},", serviceId,
                      registration.toString(), e);
            rethrowRuntimeException(e);
        }
        else {
            log.warn("Failfast is false. {} register failed...{},", serviceId,
                     registration.toString(), e);
        }
    }
}
方法中最终是调用NamingService的registerInstance方法实现注册的。而NamingService接口的默认实现就是NacosNamingService。
NacosNamingService
NacosNamingService提供了服务注册、订阅等功能。其中registerInstance就是注册服务实例:
@Override
public void registerInstance(String serviceName, String groupName, Instance instance) throws NacosException {
    // 检查超时参数是否异常。心跳超时时间(默认15秒)必须大于心跳周期(默认5秒)
    NamingUtils.checkInstanceIsLegal(instance);
    // 拼接得到新的服务名,格式为:groupName@@serviceId
    String groupedServiceName = NamingUtils.getGroupedName(serviceName, groupName);
    // 判断是否为临时实例,默认为 true。
    if (instance.isEphemeral()) {
        // 如果是临时实例,需要定时向 Nacos 服务发送心跳
        BeatInfo beatInfo = beatReactor.buildBeatInfo(groupedServiceName, instance);
        beatReactor.addBeatInfo(groupedServiceName, beatInfo);
    }
    // 发送注册服务实例的请求
    serverProxy.registerService(groupedServiceName, groupName, instance);
}
最终,由NacosProxy的registerService方法,完成服务注册。
public void registerService(String serviceName, String groupName, Instance instance) throws NacosException {

    NAMING_LOGGER.info("[REGISTER-SERVICE] {} registering service {} with instance: {}", namespaceId, serviceName,
                       instance);
	// 组织请求参数
    final Map<String, String> params = new HashMap<String, String>(16);
    params.put(CommonParams.NAMESPACE_ID, namespaceId);
    params.put(CommonParams.SERVICE_NAME, serviceName);
    params.put(CommonParams.GROUP_NAME, groupName);
    params.put(CommonParams.CLUSTER_NAME, instance.getClusterName());
    params.put("ip", instance.getIp());
    params.put("port", String.valueOf(instance.getPort()));
    params.put("weight", String.valueOf(instance.getWeight()));
    params.put("enable", String.valueOf(instance.isEnabled()));
    params.put("healthy", String.valueOf(instance.isHealthy()));
    params.put("ephemeral", String.valueOf(instance.isEphemeral()));
    params.put("metadata", JacksonUtils.toJson(instance.getMetadata()));
	// 通过POST请求将上述参数,发送到 /nacos/v1/ns/instance
    reqApi(UtilAndComs.nacosUrlInstance, params, HttpMethod.POST);

}
这里提交的信息就是Nacos服务注册接口需要的完整参数,核心参数有:
- namespace_id:环境
- service_name:服务名称
- group_name:组名称
- cluster_name:集群名称
- ip: 当前实例的ip地址
- port: 当前实例的端口
客户端注册
注册流程图:

服务端
在nacos-console的模块中,会引入nacos-naming这个模块:

模块结构如下:

其中的com.alibaba.nacos.naming.controllers包下就有服务注册、发现等相关的各种接口,其中的服务注册是在InstanceController类中:
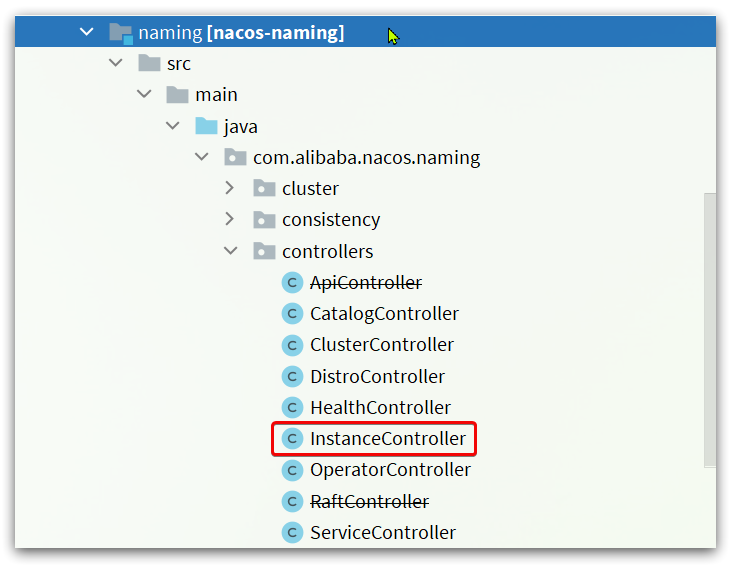
InstanceController
进入InstanceController类,可以看到一个register方法,即为服务注册的方法
@CanDistro
@PostMapping
@Secured(parser = NamingResourceParser.class, action = ActionTypes.WRITE)
public String register(HttpServletRequest request) throws Exception {
	// 尝试获取namespaceId
    final String namespaceId = WebUtils
        .optional(request, CommonParams.NAMESPACE_ID, Constants.DEFAULT_NAMESPACE_ID);
    // 尝试获取serviceName,其格式为 group_name@@service_name
    final String serviceName = WebUtils.required(request, CommonParams.SERVICE_NAME);
    NamingUtils.checkServiceNameFormat(serviceName);
	// 解析出实例信息,封装为Instance对象
    final Instance instance = parseInstance(request);
	// 注册实例
    serviceManager.registerInstance(namespaceId, serviceName, instance);
    return "ok";
}
这里进入serviceManager.registerInstance()方法中。
ServiceManager
ServiceManager就是Nacos中管理服务、实例信息的核心API,其中就包含Nacos的服务注册表
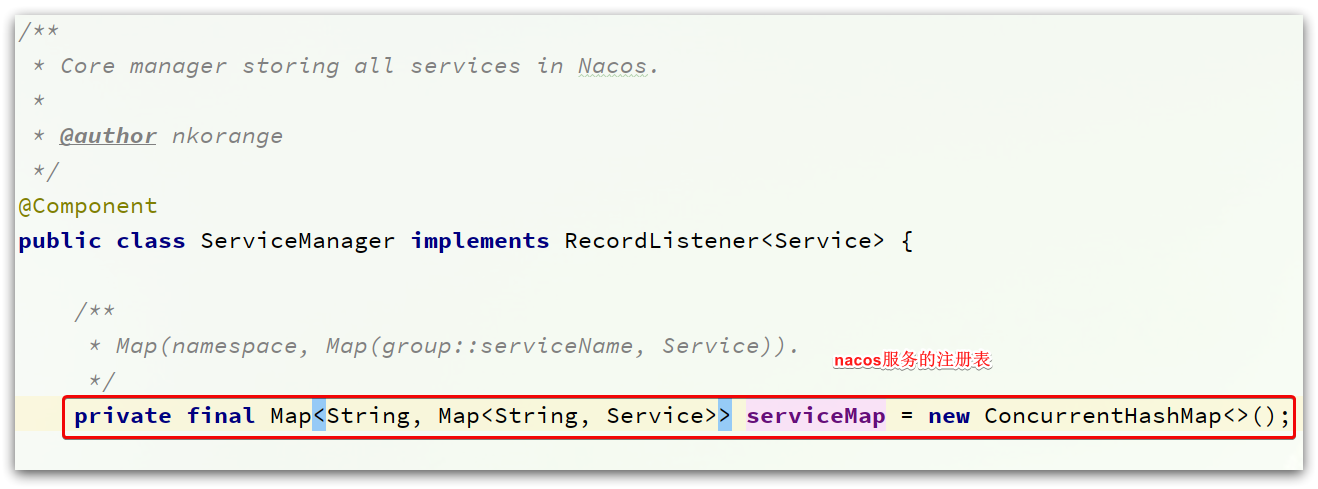
而其中的registerInstance方法就是注册服务实例的方法
/**
     * Register an instance to a service in AP mode.
     *
     * <p>This method creates service or cluster silently if they don't exist.
     *
     * @param namespaceId id of namespace
     * @param serviceName service name
     * @param instance    instance to register
     * @throws Exception any error occurred in the process
     */
public void registerInstance(String namespaceId, String serviceName, Instance instance) throws NacosException {
	// 创建一个空的service(如果是第一次来注册实例,要先创建一个空service出来,放入注册表)
    // 此时不包含实例信息
    createEmptyService(namespaceId, serviceName, instance.isEphemeral());
    // 拿到创建好的service
    Service service = getService(namespaceId, serviceName);
    // 拿不到则抛异常
    if (service == null) {
        throw new NacosException(NacosException.INVALID_PARAM,
                                 "service not found, namespace: " + namespaceId + ", service: " + serviceName);
    }
    // 添加要注册的实例到service中
    addInstance(namespaceId, serviceName, instance.isEphemeral(), instance);
}
服务创建完毕,接下来就是添加实例到服务中
/**
     * Add instance to service.
     *
     * @param namespaceId namespace
     * @param serviceName service name
     * @param ephemeral   whether instance is ephemeral
     * @param ips         instances
     * @throws NacosException nacos exception
     */
public void addInstance(String namespaceId, String serviceName, boolean ephemeral, Instance... ips)
    throws NacosException {
	// 监听服务列表用到的key,服务唯一标识,例如:com.alibaba.nacos.naming.iplist.ephemeral.public##DEFAULT_GROUP@@order-service
    String key = KeyBuilder.buildInstanceListKey(namespaceId, serviceName, ephemeral);
    // 获取服务
    Service service = getService(namespaceId, serviceName);
    // 同步锁,避免并发修改的安全问题
    synchronized (service) {
        // 1)获取要更新的实例列表
        List<Instance> instanceList = addIpAddresses(service, ephemeral, ips);
		// 2)封装实例列表到Instances对象
        Instances instances = new Instances();
        instances.setInstanceList(instanceList);
		// 3)完成 注册表更新 以及 Nacos集群的数据同步
        consistencyService.put(key, instances);
    }
}
该方法中对修改服务列表的动作加锁处理,确保线程安全。而在同步代码块中,包含下面几步:
-
获取要更新的实例列表,
addIpAddresses(service, ephemeral, ips); -
将更新后的数据封装到
Instances对象中,后面更新注册表时使用 -
调用
consistencyService.put()方法完成Nacos集群的数据同步,保证集群一致性。
注意:在第1步的addIPAddress中,会拷贝旧的实例列表,添加新实例到列表中。在第3步中,完成对实例状态更新后,则会用新列表直接覆盖旧实例列表。而在更新过程中,旧实例列表不受影响,用户依然可以读取。
这样在更新列表状态过程中,无需阻塞用户的读操作,也不会导致用户读取到脏数据,性能比较好。这种方案称为CopyOnWrite方案。
更新服务列表
实例列表的更新所对应的方法是addIpAddresses(service, ephemeral, ips);
private List<Instance> addIpAddresses(Service service, boolean ephemeral, Instance... ips) throws NacosException {
    return updateIpAddresses(service, UtilsAndCommons.UPDATE_INSTANCE_ACTION_ADD, ephemeral, ips);
}
进入updateIpAddresses方法
public List<Instance> updateIpAddresses(Service service, String action, boolean ephemeral, Instance... ips)
    throws NacosException {
	// 根据namespaceId、serviceName获取当前服务的实例列表,返回值是Datum
    // 第一次来,肯定是null
    Datum datum = consistencyService
        .get(KeyBuilder.buildInstanceListKey(service.getNamespaceId(), service.getName(), ephemeral));
	// 得到服务中现有的实例列表
    List<Instance> currentIPs = service.allIPs(ephemeral);
    // 创建map,保存实例列表,key为ip地址,value是Instance对象
    Map<String, Instance> currentInstances = new HashMap<>(currentIPs.size());
    // 创建Set集合,保存实例的instanceId
    Set<String> currentInstanceIds = Sets.newHashSet();
	// 遍历要现有的实例列表
    for (Instance instance : currentIPs) {
        // 添加到map中
        currentInstances.put(instance.toIpAddr(), instance);
        // 添加instanceId到set中
        currentInstanceIds.add(instance.getInstanceId());
    }

    // 创建map,用来保存更新后的实例列表
    Map<String, Instance> instanceMap;
    if (datum != null && null != datum.value) {
        // 如果服务中已经有旧的数据,则先保存旧的实例列表
        instanceMap = setValid(((Instances) datum.value).getInstanceList(), currentInstances);
    } else {
        // 如果没有旧数据,则直接创建新的map
        instanceMap = new HashMap<>(ips.length);
    }
	// 遍历实例列表
    for (Instance instance : ips) {
        // 判断服务中是否包含要注册的实例的cluster信息
        if (!service.getClusterMap().containsKey(instance.getClusterName())) {
            // 如果不包含,创建新的cluster
            Cluster cluster = new Cluster(instance.getClusterName(), service);
            cluster.init();
            // 将集群放入service的注册表
            service.getClusterMap().put(instance.getClusterName(), cluster);
            Loggers.SRV_LOG
                .warn("cluster: {} not found, ip: {}, will create new cluster with default configuration.",
                      instance.getClusterName(), instance.toJson());
        }
		// 删除实例 or 新增实例 ?
        if (UtilsAndCommons.UPDATE_INSTANCE_ACTION_REMOVE.equals(action)) {
            instanceMap.remove(instance.getDatumKey());
        } else {
            // 新增实例,instance生成全新的instanceId
            Instance oldInstance = instanceMap.get(instance.getDatumKey());
            if (oldInstance != null) {
                instance.setInstanceId(oldInstance.getInstanceId());
            } else {
                instance.setInstanceId(instance.generateInstanceId(currentInstanceIds));
            }
            // 放入instance列表
            instanceMap.put(instance.getDatumKey(), instance);
        }

    }

    if (instanceMap.size() <= 0 && UtilsAndCommons.UPDATE_INSTANCE_ACTION_ADD.equals(action)) {
        throw new IllegalArgumentException(
            "ip list can not be empty, service: " + service.getName() + ", ip list: " + JacksonUtils
            .toJson(instanceMap.values()));
    }
	// 将instanceMap中的所有实例转为List返回
    return new ArrayList<>(instanceMap.values());
}
简单来讲,就是先获取旧的实例列表,然后把新的实例信息与旧的做对比,新的实例就添加,老的实例同步ID。然后返回最新的实例列表。
Nacos集群一致性
在完成本地服务列表更新后,Nacos又实现了集群一致性更新,调用的是consistencyService.put(key, instances);
这里的ConsistencyService接口,代表集群一致性的接口,有很多中不同实现:

进入DelegateConsistencyServiceImpl
@Override
public void put(String key, Record value) throws NacosException {
    // 根据实例是否是临时实例,判断委托对象
    mapConsistencyService(key).put(key, value);
}
其中的mapConsistencyService(key)方法就是选择委托方式的
private ConsistencyService mapConsistencyService(String key) {
    // 判断是否是临时实例:
    // 是,选择 ephemeralConsistencyService,也就是 DistroConsistencyServiceImpl类
    // 否,选择 persistentConsistencyService,也就是PersistentConsistencyServiceDelegateImpl
    return KeyBuilder.matchEphemeralKey(key) ? ephemeralConsistencyService : persistentConsistencyService;
}
默认情况下,所有实例都是临时实例,所以关注DistroConsistencyServiceImpl即可。
DistroConsistencyServiceImpl
DistroConsistencyServiceImpl类的put方法来实现临时实例的一致性。
public void put(String key, Record value) throws NacosException {
    // 先将要更新的实例信息写入本地实例列表
    onPut(key, value);
    // 开始集群同步
    distroProtocol.sync(new DistroKey(key, KeyBuilder.INSTANCE_LIST_KEY_PREFIX), DataOperation.CHANGE,
                        globalConfig.getTaskDispatchPeriod() / 2);
}
onPut(key, value):其中value就是Instances,要更新的服务信息。这行主要是基于线程池方式,异步的将Service信息写入注册表中(就是那个多重Map)distroProtocol.sync():就是通过Distro协议将数据同步给集群中的其它Nacos节点
更新本地实例列表
放入阻塞队列
onPut方法如下:
public void onPut(String key, Record value) {
	// 判断是否是临时实例
    if (KeyBuilder.matchEphemeralInstanceListKey(key)) {
        // 封装 Instances 信息到 数据集:Datum
        Datum<Instances> datum = new Datum<>();
        datum.value = (Instances) value;
        datum.key = key;
        datum.timestamp.incrementAndGet();
        // 放入DataStore
        dataStore.put(key, datum);
    }

    if (!listeners.containsKey(key)) {
        return;
    }
	// 放入阻塞队列,这里的 notifier维护了一个阻塞队列,并且基于线程池异步执行队列中的任务
    notifier.addTask(key, DataOperation.CHANGE);
}
notifier的类型就是DistroConsistencyServiceImpl.Notifier,内部维护了一个阻塞队列,存放服务列表变更的事件:

addTask时,将任务加入该阻塞队列:
// DistroConsistencyServiceImpl.Notifier类的 addTask 方法:
public void addTask(String datumKey, DataOperation action) {

    if (services.containsKey(datumKey) && action == DataOperation.CHANGE) {
        return;
    }
    if (action == DataOperation.CHANGE) {
        services.put(datumKey, StringUtils.EMPTY);
    }
    // 任务放入阻塞队列
    tasks.offer(Pair.with(datumKey, action));
}
Notifier异步更新
同时,notifier还是一个Runnable,通过一个单线程的线程池来不断从阻塞队列中获取任务,执行服务列表的更新。来看下其中的run方法:
// DistroConsistencyServiceImpl.Notifier类的run方法:
@Override
public void run() {
    Loggers.DISTRO.info("distro notifier started");
	// 死循环,不断执行任务。因为是阻塞队列,不会导致CPU负载过高
    for (; ; ) {
        try {
            // 从阻塞队列中获取任务
            Pair<String, DataOperation> pair = tasks.take();
            // 处理任务,更新服务列表
            handle(pair);
        } catch (Throwable e) {
            Loggers.DISTRO.error("[NACOS-DISTRO] Error while handling notifying task", e);
        }
    }
}
handle方法:
// DistroConsistencyServiceImpl.Notifier类的 handle 方法:
private void handle(Pair<String, DataOperation> pair) {
    try {
        String datumKey = pair.getValue0();
        DataOperation action = pair.getValue1();

        services.remove(datumKey);

        int count = 0;

        if (!listeners.containsKey(datumKey)) {
            return;
        }
		// 遍历,找到变化的service,这里的 RecordListener就是 Service
        for (RecordListener listener : listeners.get(datumKey)) {

            count++;

            try {
                // 服务的实例列表CHANGE事件
                if (action == DataOperation.CHANGE) {
                    // 更新服务列表
                    listener.onChange(datumKey, dataStore.get(datumKey).value);
                    continue;
                }
				// 服务的实例列表 DELETE 事件
                if (action == DataOperation.DELETE) {
                    listener.onDelete(datumKey);
                    continue;
                }
            } catch (Throwable e) {
                Loggers.DISTRO.error("[NACOS-DISTRO] error while notifying listener of key: {}", datumKey, e);
            }
        }

        if (Loggers.DISTRO.isDebugEnabled()) {
            Loggers.DISTRO
                .debug("[NACOS-DISTRO] datum change notified, key: {}, listener count: {}, action: {}",
                       datumKey, count, action.name());
        }
    } catch (Throwable e) {
        Loggers.DISTRO.error("[NACOS-DISTRO] Error while handling notifying task", e);
    }
}
覆盖实例列表
在Service的onChange方法中,就可以看到更新实例列表的逻辑了:
@Override
public void onChange(String key, Instances value) throws Exception {

    Loggers.SRV_LOG.info("[NACOS-RAFT] datum is changed, key: {}, value: {}", key, value);

	// 更新实例列表
    updateIPs(value.getInstanceList(), KeyBuilder.matchEphemeralInstanceListKey(key));

    recalculateChecksum();
}
updateIPs方法:
public void updateIPs(Collection<Instance> instances, boolean ephemeral) {
    // 准备一个Map,key是cluster,值是集群下的Instance集合
    Map<String, List<Instance>> ipMap = new HashMap<>(clusterMap.size());
    // 获取服务的所有cluster名称
    for (String clusterName : clusterMap.keySet()) {
        ipMap.put(clusterName, new ArrayList<>());
    }
    // 遍历要更新的实例
    for (Instance instance : instances) {
        try {
            if (instance == null) {
                Loggers.SRV_LOG.error("[NACOS-DOM] received malformed ip: null");
                continue;
            }
			// 判断实例是否包含clusterName,没有的话用默认cluster
            if (StringUtils.isEmpty(instance.getClusterName())) {
                instance.setClusterName(UtilsAndCommons.DEFAULT_CLUSTER_NAME);
            }
			// 判断cluster是否存在,不存在则创建新的cluster
            if (!clusterMap.containsKey(instance.getClusterName())) {
                Loggers.SRV_LOG
                    .warn("cluster: {} not found, ip: {}, will create new cluster with default configuration.",
                          instance.getClusterName(), instance.toJson());
                Cluster cluster = new Cluster(instance.getClusterName(), this);
                cluster.init();
                getClusterMap().put(instance.getClusterName(), cluster);
            }
			// 获取当前cluster实例的集合,不存在则创建新的
            List<Instance> clusterIPs = ipMap.get(instance.getClusterName());
            if (clusterIPs == null) {
                clusterIPs = new LinkedList<>();
                ipMap.put(instance.getClusterName(), clusterIPs);
            }
			// 添加新的实例到 Instance 集合
            clusterIPs.add(instance);
        } catch (Exception e) {
            Loggers.SRV_LOG.error("[NACOS-DOM] failed to process ip: " + instance, e);
        }
    }

    for (Map.Entry<String, List<Instance>> entry : ipMap.entrySet()) {
        //make every ip mine
        List<Instance> entryIPs = entry.getValue();
        // 将实例集合更新到 clusterMap(注册表)
        clusterMap.get(entry.getKey()).updateIps(entryIPs, ephemeral);
    }

    setLastModifiedMillis(System.currentTimeMillis());
    // 发布服务变更的通知消息
    getPushService().serviceChanged(this);
    StringBuilder stringBuilder = new StringBuilder();

    for (Instance instance : allIPs()) {
        stringBuilder.append(instance.toIpAddr()).append("_").append(instance.isHealthy()).append(",");
    }

    Loggers.EVT_LOG.info("[IP-UPDATED] namespace: {}, service: {}, ips: {}", getNamespaceId(), getName(),
                         stringBuilder.toString());

}
第45行的代码clusterMap.get(entry.getKey()).updateIps(entryIPs, ephemeral);,就是在更新注册表:
public void updateIps(List<Instance> ips, boolean ephemeral) {
    // 获取旧实例列表
    Set<Instance> toUpdateInstances = ephemeral ? ephemeralInstances : persistentInstances;

    HashMap<String, Instance> oldIpMap = new HashMap<>(toUpdateInstances.size());

    for (Instance ip : toUpdateInstances) {
        oldIpMap.put(ip.getDatumKey(), ip);
    }

	// 检查新加入实例的状态
    List<Instance> newIPs = subtract(ips, oldIpMap.values());
    if (newIPs.size() > 0) {
        Loggers.EVT_LOG
            .info("{} {SYNC} {IP-NEW} cluster: {}, new ips size: {}, content: {}", getService().getName(),
                  getName(), newIPs.size(), newIPs.toString());

        for (Instance ip : newIPs) {
            HealthCheckStatus.reset(ip);
        }
    }
	// 移除要删除的实例
    List<Instance> deadIPs = subtract(oldIpMap.values(), ips);

    if (deadIPs.size() > 0) {
        Loggers.EVT_LOG
            .info("{} {SYNC} {IP-DEAD} cluster: {}, dead ips size: {}, content: {}", getService().getName(),
                  getName(), deadIPs.size(), deadIPs.toString());

        for (Instance ip : deadIPs) {
            HealthCheckStatus.remv(ip);
        }
    }

    toUpdateInstances = new HashSet<>(ips);
	// 直接覆盖旧实例列表
    if (ephemeral) {
        ephemeralInstances = toUpdateInstances;
    } else {
        persistentInstances = toUpdateInstances;
    }
}
集群数据同步
在DistroConsistencyServiceImpl的put方法中分为两步:

其中的onPut方法已经分析过了。
下面的distroProtocol.sync()就是集群同步的逻辑了。
DistroProtocol类的sync方法如下:
public void sync(DistroKey distroKey, DataOperation action, long delay) {
    // 遍历 Nacos 集群中除自己以外的其它节点
    for (Member each : memberManager.allMembersWithoutSelf()) {
        DistroKey distroKeyWithTarget = new DistroKey(distroKey.getResourceKey(), distroKey.getResourceType(),
                                                      each.getAddress());
        // 定义一个Distro的同步任务
        DistroDelayTask distroDelayTask = new DistroDelayTask(distroKeyWithTarget, action, delay);
        // 交给线程池去执行
        distroTaskEngineHolder.getDelayTaskExecuteEngine().addTask(distroKeyWithTarget, distroDelayTask);
        if (Loggers.DISTRO.isDebugEnabled()) {
            Loggers.DISTRO.debug("[DISTRO-SCHEDULE] {} to {}", distroKey, each.getAddress());
        }
    }
}
其中同步的任务封装为一个DistroDelayTask对象。交给了distroTaskEngineHolder.getDelayTaskExecuteEngine()执行,这行代码的返回值是NacosDelayTaskExecuteEngine,这个类维护了一个线程池,并且接收任务,执行任务。
执行任务的方法为processTasks()方法:
protected void processTasks() {
    Collection<Object> keys = getAllTaskKeys();
    for (Object taskKey : keys) {
        AbstractDelayTask task = removeTask(taskKey);
        if (null == task) {
            continue;
        }
        NacosTaskProcessor processor = getProcessor(taskKey);
        if (null == processor) {
            getEngineLog().error("processor not found for task, so discarded. " + task);
            continue;
        }
        try {
            // 尝试执行同步任务,如果失败会重试
            if (!processor.process(task)) {
                retryFailedTask(taskKey, task);
            }
        } catch (Throwable e) {
            getEngineLog().error("Nacos task execute error : " + e.toString(), e);
            retryFailedTask(taskKey, task);
        }
    }
}
可以看出来基于Distro模式的同步是异步进行的,并且失败时会将任务重新入队并充实,因此不保证同步结果的强一致性,属于AP模式的一致性策略。
服务端注册
流程图:
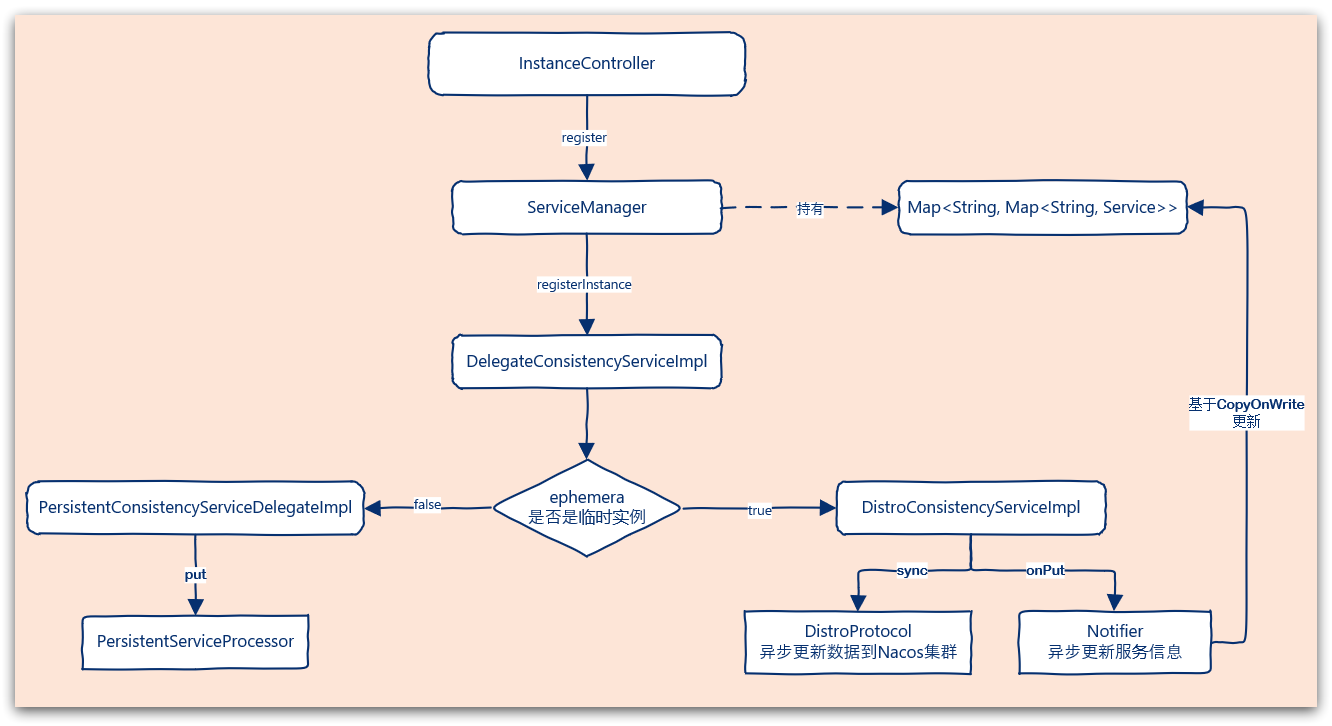
总结
Nacos的注册表结构是什么样的?
Nacos是多级存储模型,最外层通过namespace来实现环境隔离,然后是group分组,分组下就是服务,一个服务有可以分为不同的集群,集群中包含多个实例。因此其注册表结构为一个Map,类型是:
Map<String, Map<String, Service>>,
外层key是namespace_id,内层key是group+serviceName.
Service内部维护一个Map,结构是:Map<String,Cluster>,key是clusterName,值是集群信息
Cluster内部维护一个Set集合,元素是Instance类型,代表集群中的多个实例。
Nacos如何支撑阿里内部数十万服务注册压力?
Nacos内部接收到注册的请求时,不会立即写数据,而是将服务注册的任务放入一个阻塞队列就立即响应给客户端。然后利用线程池读取阻塞队列中的任务,异步来完成实例更新,从而提高并发写能力。
Nacos如何避免并发读写冲突问题?
Nacos在更新实例列表时,会采用CopyOnWrite技术,首先将旧的实例列表拷贝一份,然后更新拷贝的实例列表,再用更新后的实例列表来覆盖旧的实例列表。
这样在更新的过程中,就不会对读实例列表的请求产生影响,也不会出现脏读问题了。
Nacos与Eureka的区别?
Nacos与Eureka有相同点,也有不同之处,可以从以下几点来描述:
- 接口方式:Nacos与Eureka都对外暴露了Rest风格的API接口,用来实现服务注册、发现等功能。
- 实例类型:Nacos的实例有永久和临时实例之分;而Eureka只支持临时实例。
- 健康检测:Nacos对临时实例采用心跳模式检测,对永久实例采用主动请求来检测;Eureka只支持心跳模式。
- 服务发现:Nacos支持定时拉取和订阅推送两种模式;Eureka只支持定时拉取模式。
服务心跳
Nacos的实例分为临时实例和永久实例两种,可以通过在yaml 文件配置:
spring:
  application:
    name: order-service
  cloud:
    nacos:
      discovery:
        ephemeral: false # 设置实例为永久实例。true:临时; false:永久
      server-addr: 192.168.150.1:8845
临时实例基于心跳方式做健康检测,而永久实例则是由Nacos主动探测实例状态。
其中Nacos提供的心跳的API接口为:
接口描述:发送某个实例的心跳
请求类型:PUT
请求路径:/nacos/v1/ns/instance/beat
请求参数:
| 名称 | 类型 | 是否必选 | 描述 |
|---|---|---|---|
| serviceName | 字符串 | 是 | 服务名 |
| groupName | 字符串 | 否 | 分组名 |
| ephemeral | boolean | 否 | 是否临时实例 |
| beat | JSON格式字符串 | 是 | 实例心跳内容 |
错误编码:
| 错误代码 | 描述 | 语义 |
|---|---|---|
| 400 | Bad Request | 客户端请求中的语法错误 |
| 403 | Forbidden | 没有权限 |
| 404 | Not Found | 无法找到资源 |
| 500 | Internal Server Error | 服务器内部错误 |
| 200 | OK | 正常 |
客户端
在服务注册中的NacosNamingService这个类实现了服务的注册,同时也实现了服务心跳:
@Override
public void registerInstance(String serviceName, String groupName, Instance instance) throws NacosException {
    NamingUtils.checkInstanceIsLegal(instance);
    String groupedServiceName = NamingUtils.getGroupedName(serviceName, groupName);
    // 判断是否是临时实例。
    if (instance.isEphemeral()) {
        // 如果是临时实例,则构建心跳信息BeatInfo
        BeatInfo beatInfo = beatReactor.buildBeatInfo(groupedServiceName, instance);
        // 添加心跳任务
        beatReactor.addBeatInfo(groupedServiceName, beatInfo);
    }
    serverProxy.registerService(groupedServiceName, groupName, instance);
}
BeatInfo
这里的BeanInfo就包含心跳需要的各种信息。
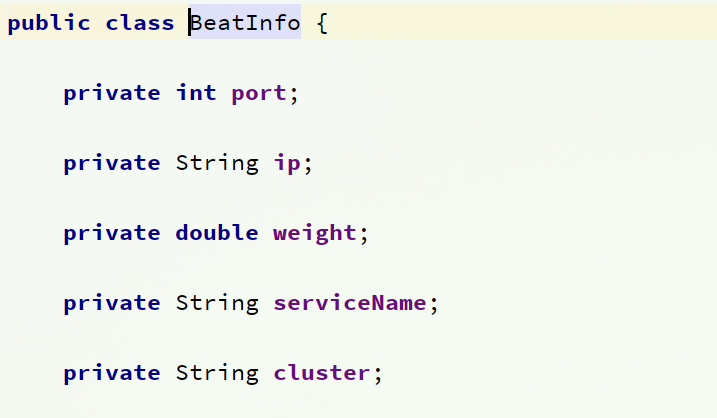
BeatReactor
BeatRector这个类维护了一个线程池
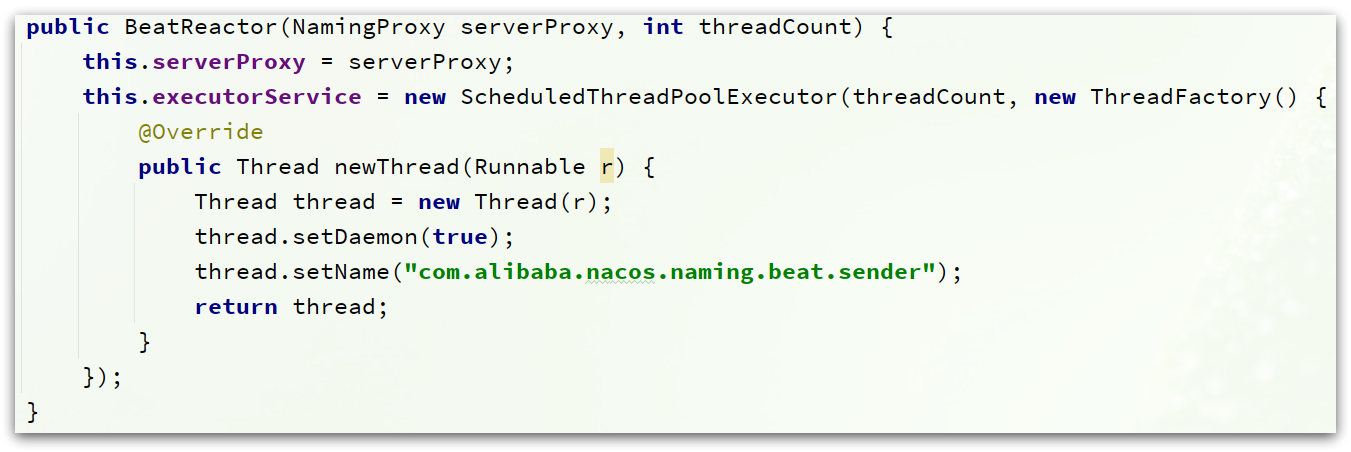
当调用BeatReactor的.addBeatInfo(groupedServiceName, beatInfo)方法时,就会执行心跳:
public void addBeatInfo(String serviceName, BeatInfo beatInfo) {
    NAMING_LOGGER.info("[BEAT] adding beat: {} to beat map.", beatInfo);
    String key = buildKey(serviceName, beatInfo.getIp(), beatInfo.getPort());
    BeatInfo existBeat = null;
    //fix #1733
    if ((existBeat = dom2Beat.remove(key)) != null) {
        existBeat.setStopped(true);
    }
    dom2Beat.put(key, beatInfo);
    // 利用线程池,定期执行心跳任务,周期为 beatInfo.getPeriod()
    executorService.schedule(new BeatTask(beatInfo), beatInfo.getPeriod(), TimeUnit.MILLISECONDS);
    MetricsMonitor.getDom2BeatSizeMonitor().set(dom2Beat.size());
}
心跳周期的默认值在com.alibaba.nacos.api.common.Constants类中

可以看到是5秒,默认5秒一次心跳。
BeatTask
心跳的任务封装在BeatTask这个类中,是一个Runnable,其run方法如下
@Override
public void run() {
    if (beatInfo.isStopped()) {
        return;
    }
    // 获取心跳周期
    long nextTime = beatInfo.getPeriod();
    try {
        // 发送心跳
        JsonNode result = serverProxy.sendBeat(beatInfo, BeatReactor.this.lightBeatEnabled);
        long interval = result.get("clientBeatInterval").asLong();
        boolean lightBeatEnabled = false;
        if (result.has(CommonParams.LIGHT_BEAT_ENABLED)) {
            lightBeatEnabled = result.get(CommonParams.LIGHT_BEAT_ENABLED).asBoolean();
        }
        BeatReactor.this.lightBeatEnabled = lightBeatEnabled;
        if (interval > 0) {
            nextTime = interval;
        }
        // 判断心跳结果
        int code = NamingResponseCode.OK;
        if (result.has(CommonParams.CODE)) {
            code = result.get(CommonParams.CODE).asInt();
        }
        if (code == NamingResponseCode.RESOURCE_NOT_FOUND) {
            // 如果失败,则需要 重新注册实例
            Instance instance = new Instance();
            instance.setPort(beatInfo.getPort());
            instance.setIp(beatInfo.getIp());
            instance.setWeight(beatInfo.getWeight());
            instance.setMetadata(beatInfo.getMetadata());
            instance.setClusterName(beatInfo.getCluster());
            instance.setServiceName(beatInfo.getServiceName());
            instance.setInstanceId(instance.getInstanceId());
            instance.setEphemeral(true);
            try {
                serverProxy.registerService(beatInfo.getServiceName(),
                                            NamingUtils.getGroupName(beatInfo.getServiceName()), instance);
            } catch (Exception ignore) {
            }
        }
    } catch (NacosException ex) {
        NAMING_LOGGER.error("[CLIENT-BEAT] failed to send beat: {}, code: {}, msg: {}",
                            JacksonUtils.toJson(beatInfo), ex.getErrCode(), ex.getErrMsg());

    } catch (Exception unknownEx) {
        NAMING_LOGGER.error("[CLIENT-BEAT] failed to send beat: {}, unknown exception msg: {}",
                            JacksonUtils.toJson(beatInfo), unknownEx.getMessage(), unknownEx);
    } finally {
        executorService.schedule(new BeatTask(beatInfo), nextTime, TimeUnit.MILLISECONDS);
    }
}
发送心跳
最终心跳的发送还是通过NamingProxy的sendBeat方法来实现:
public JsonNode sendBeat(BeatInfo beatInfo, boolean lightBeatEnabled) throws NacosException {

    if (NAMING_LOGGER.isDebugEnabled()) {
        NAMING_LOGGER.debug("[BEAT] {} sending beat to server: {}", namespaceId, beatInfo.toString());
    }
    // 组织请求参数
    Map<String, String> params = new HashMap<String, String>(8);
    Map<String, String> bodyMap = new HashMap<String, String>(2);
    if (!lightBeatEnabled) {
        bodyMap.put("beat", JacksonUtils.toJson(beatInfo));
    }
    params.put(CommonParams.NAMESPACE_ID, namespaceId);
    params.put(CommonParams.SERVICE_NAME, beatInfo.getServiceName());
    params.put(CommonParams.CLUSTER_NAME, beatInfo.getCluster());
    params.put("ip", beatInfo.getIp());
    params.put("port", String.valueOf(beatInfo.getPort()));
    // 发送请求,这个地址就是:/v1/ns/instance/beat
    String result = reqApi(UtilAndComs.nacosUrlBase + "/instance/beat", params, bodyMap, HttpMethod.PUT);
    return JacksonUtils.toObj(result);
}
服务端
对于临时实例,服务端代码分两部分:
-
InstanceController提供了一个接口,处理客户端的心跳请求
-
定时检测实例心跳是否按期执行
InstanceController
与服务注册时一样,在nacos-naming模块中的InstanceController类中,定义了一个方法用来处理心跳请求
@CanDistro
@PutMapping("/beat")
@Secured(parser = NamingResourceParser.class, action = ActionTypes.WRITE)
public ObjectNode beat(HttpServletRequest request) throws Exception {
	// 解析心跳的请求参数
    ObjectNode result = JacksonUtils.createEmptyJsonNode();
    result.put(SwitchEntry.CLIENT_BEAT_INTERVAL, switchDomain.getClientBeatInterval());

    String beat = WebUtils.optional(request, "beat", StringUtils.EMPTY);
    RsInfo clientBeat = null;
    if (StringUtils.isNotBlank(beat)) {
        clientBeat = JacksonUtils.toObj(beat, RsInfo.class);
    }
    String clusterName = WebUtils
        .optional(request, CommonParams.CLUSTER_NAME, UtilsAndCommons.DEFAULT_CLUSTER_NAME);
    String ip = WebUtils.optional(request, "ip", StringUtils.EMPTY);
    int port = Integer.parseInt(WebUtils.optional(request, "port", "0"));
    if (clientBeat != null) {
        if (StringUtils.isNotBlank(clientBeat.getCluster())) {
            clusterName = clientBeat.getCluster();
        } else {
            // fix #2533
            clientBeat.setCluster(clusterName);
        }
        ip = clientBeat.getIp();
        port = clientBeat.getPort();
    }
    String namespaceId = WebUtils.optional(request, CommonParams.NAMESPACE_ID, Constants.DEFAULT_NAMESPACE_ID);
    String serviceName = WebUtils.required(request, CommonParams.SERVICE_NAME);
    NamingUtils.checkServiceNameFormat(serviceName);
    Loggers.SRV_LOG.debug("[CLIENT-BEAT] full arguments: beat: {}, serviceName: {}", clientBeat, serviceName);
    // 尝试根据参数中的namespaceId、serviceName、clusterName、ip、port等信息
    // 从Nacos的注册表中 获取实例
    Instance instance = serviceManager.getInstance(namespaceId, serviceName, clusterName, ip, port);
	// 如果获取失败,说明心跳失败,实例尚未注册
    if (instance == null) {
        if (clientBeat == null) {
            result.put(CommonParams.CODE, NamingResponseCode.RESOURCE_NOT_FOUND);
            return result;
        }

        Loggers.SRV_LOG.warn("[CLIENT-BEAT] The instance has been removed for health mechanism, "
                             + "perform data compensation operations, beat: {}, serviceName: {}", clientBeat, serviceName);
		// 这里重新注册一个实例
        instance = new Instance();
        instance.setPort(clientBeat.getPort());
        instance.setIp(clientBeat.getIp());
        instance.setWeight(clientBeat.getWeight());
        instance.setMetadata(clientBeat.getMetadata());
        instance.setClusterName(clusterName);
        instance.setServiceName(serviceName);
        instance.setInstanceId(instance.getInstanceId());
        instance.setEphemeral(clientBeat.isEphemeral());

        serviceManager.registerInstance(namespaceId, serviceName, instance);
    }
	// 尝试基于namespaceId和serviceName从 注册表中获取Service服务
    Service service = serviceManager.getService(namespaceId, serviceName);
	// 如果不存在,说明服务不存在,返回404
    if (service == null) {
        throw new NacosException(NacosException.SERVER_ERROR,
                                 "service not found: " + serviceName + "@" + namespaceId);
    }
    if (clientBeat == null) {
        clientBeat = new RsInfo();
        clientBeat.setIp(ip);
        clientBeat.setPort(port);
        clientBeat.setCluster(clusterName);
    }
    // 如果心跳没问题,开始处理心跳结果
    service.processClientBeat(clientBeat);

    result.put(CommonParams.CODE, NamingResponseCode.OK);
    if (instance.containsMetadata(PreservedMetadataKeys.HEART_BEAT_INTERVAL)) {
        result.put(SwitchEntry.CLIENT_BEAT_INTERVAL, instance.getInstanceHeartBeatInterval());
    }
    result.put(SwitchEntry.LIGHT_BEAT_ENABLED, switchDomain.isLightBeatEnabled());
    return result;
}
最终,在确认心跳请求对应的服务、实例都在的情况下,开始交给Service类处理这次心跳请求。调用了Service的processClientBeat方法。
处理心跳请求
查看Service的service.processClientBeat(clientBeat);方法
public void processClientBeat(final RsInfo rsInfo) {
    ClientBeatProcessor clientBeatProcessor = new ClientBeatProcessor();
    clientBeatProcessor.setService(this);
    clientBeatProcessor.setRsInfo(rsInfo);
    HealthCheckReactor.scheduleNow(clientBeatProcessor);
}
可以看到心跳信息被封装到了 ClientBeatProcessor类中,交给了HealthCheckReactor处理,HealthCheckReactor就是对线程池的封装,不用过多查看。
关键的业务逻辑都在ClientBeatProcessor这个类中,它是一个Runnable,其中的run方法如下
@Override
public void run() {
    Service service = this.service;
    if (Loggers.EVT_LOG.isDebugEnabled()) {
        Loggers.EVT_LOG.debug("[CLIENT-BEAT] processing beat: {}", rsInfo.toString());
    }

    String ip = rsInfo.getIp();
    String clusterName = rsInfo.getCluster();
    int port = rsInfo.getPort();
    // 获取集群信息
    Cluster cluster = service.getClusterMap().get(clusterName);
    // 获取集群中的所有实例信息
    List<Instance> instances = cluster.allIPs(true);

    for (Instance instance : instances) {
        // 找到心跳的这个实例
        if (instance.getIp().equals(ip) && instance.getPort() == port) {
            if (Loggers.EVT_LOG.isDebugEnabled()) {
                Loggers.EVT_LOG.debug("[CLIENT-BEAT] refresh beat: {}", rsInfo.toString());
            }
            // 更新实例的最后一次心跳时间 lastBeat
            instance.setLastBeat(System.currentTimeMillis());
            if (!instance.isMarked()) {
                if (!instance.isHealthy()) {
                    instance.setHealthy(true);
                    Loggers.EVT_LOG
                        .info("service: {} {POS} {IP-ENABLED} valid: {}:{}@{}, region: {}, msg: client beat ok",
                              cluster.getService().getName(), ip, port, cluster.getName(),
                              UtilsAndCommons.LOCALHOST_SITE);
                    getPushService().serviceChanged(service);
                }
            }
        }
    }
}
处理心跳请求的核心就是更新心跳实例的最后一次心跳时间,lastBeat,这个会成为判断实例心跳是否过期的关键指标!
心跳异常检测
在服务注册时,一定会创建一个Service对象,而Service中有一个init方法,会在注册时被调用
public void init() {
    // 开启心跳检测的任务
    HealthCheckReactor.scheduleCheck(clientBeatCheckTask);
    for (Map.Entry<String, Cluster> entry : clusterMap.entrySet()) {
        entry.getValue().setService(this);
        entry.getValue().init();
    }
}
其中HealthCheckReactor.scheduleCheck就是执行心跳检测的定时任务

可以看到,该任务是5000ms执行一次,也就是5秒对实例的心跳状态做一次检测。
此处的ClientBeatCheckTask同样是一个Runnable,其中的run方法为
@Override
public void run() {
    try {
        // 找到所有临时实例的列表
        List<Instance> instances = service.allIPs(true);

        // first set health status of instances:
        for (Instance instance : instances) {
            // 判断 心跳间隔(当前时间 - 最后一次心跳时间) 是否大于 心跳超时时间,默认15秒
            if (System.currentTimeMillis() - instance.getLastBeat() > instance.getInstanceHeartBeatTimeOut()) {
                if (!instance.isMarked()) {
                    if (instance.isHealthy()) {
                        // 如果超时,标记实例为不健康 healthy = false
                        instance.setHealthy(false);

                        // 发布实例状态变更的事件
                        getPushService().serviceChanged(service);
                        ApplicationUtils.publishEvent(new InstanceHeartbeatTimeoutEvent(this, instance));
                    }
                }
            }
        }

        if (!getGlobalConfig().isExpireInstance()) {
            return;
        }

        // then remove obsolete instances:
        for (Instance instance : instances) {

            if (instance.isMarked()) {
                continue;
            }
           // 判断心跳间隔(当前时间 - 最后一次心跳时间)是否大于 实例被删除的最长超时时间,默认30秒
            if (System.currentTimeMillis() - instance.getLastBeat() > instance.getIpDeleteTimeout()) {
                // 如果是超过了30秒,则删除实例
                Loggers.SRV_LOG.info("[AUTO-DELETE-IP] service: {}, ip: {}", service.getName(),
                                     JacksonUtils.toJson(instance));
                deleteIp(instance);
            }
        }

    } catch (Exception e) {
        Loggers.SRV_LOG.warn("Exception while processing client beat time out.", e);
    }

}
其中的超时时间同样是在com.alibaba.nacos.api.common.Constants这个类中

主动健康检测
对于非临时实例(ephemeral=false),Nacos会采用主动的健康检测,定时向实例发送请求,根据响应来判断实例健康状态。
入口在ServiceManager类中的registerInstance方法

创建空服务
public void createEmptyService(String namespaceId, String serviceName, boolean local) throws NacosException {
    // 如果服务不存在,创建新的服务
    createServiceIfAbsent(namespaceId, serviceName, local, null);
}
创建服务流程
public void createServiceIfAbsent(String namespaceId, String serviceName, boolean local, Cluster cluster)
    throws NacosException {
    // 尝试获取服务
    Service service = getService(namespaceId, serviceName);
    if (service == null) {
		// 发现服务不存在,开始创建新服务
        Loggers.SRV_LOG.info("creating empty service {}:{}", namespaceId, serviceName);
        service = new Service();
        service.setName(serviceName);
        service.setNamespaceId(namespaceId);
        service.setGroupName(NamingUtils.getGroupName(serviceName));
        // now validate the service. if failed, exception will be thrown
        service.setLastModifiedMillis(System.currentTimeMillis());
        service.recalculateChecksum();
        if (cluster != null) {
            cluster.setService(service);
            service.getClusterMap().put(cluster.getName(), cluster);
        }
        service.validate();
		// ** 写入注册表并初始化 **
        putServiceAndInit(service);
        if (!local) {
            addOrReplaceService(service);
        }
    }
}
关键在putServiceAndInit(service)方法中:
private void putServiceAndInit(Service service) throws NacosException {
    // 将服务写入注册表
    putService(service);
    service = getService(service.getNamespaceId(), service.getName());
    // 完成服务的初始化
    service.init();
    consistencyService
        .listen(KeyBuilder.buildInstanceListKey(service.getNamespaceId(), service.getName(), true), service);
    consistencyService
        .listen(KeyBuilder.buildInstanceListKey(service.getNamespaceId(), service.getName(), false), service);
    Loggers.SRV_LOG.info("[NEW-SERVICE] {}", service.toJson());
}
进入初始化逻辑:service.init(),这个会进入Service类中:
/**
     * Init service.
     */
public void init() {
    // 开启临时实例的心跳监测任务
    HealthCheckReactor.scheduleCheck(clientBeatCheckTask);
    // 遍历注册表中的集群
    for (Map.Entry<String, Cluster> entry : clusterMap.entrySet()) {
        entry.getValue().setService(this);
        // 完成集群初识化
        entry.getValue().init();
    }
}
这里集群的初始化 entry.getValue().init();会进入Cluster类型的init()方法:
/**
     * Init cluster.
     */
public void init() {
    if (inited) {
        return;
    }
    // 创建健康检测的任务
    checkTask = new HealthCheckTask(this);
	// 这里会开启对 非临时实例的 定时健康检测
    HealthCheckReactor.scheduleCheck(checkTask);
    inited = true;
}
这里的HealthCheckReactor.scheduleCheck(checkTask);会开启定时任务,对非临时实例做健康检测。检测逻辑定义在HealthCheckTask这个类中,是一个Runnable,其中的run方法:
public void run() {

    try {
        if (distroMapper.responsible(cluster.getService().getName()) && switchDomain
            .isHealthCheckEnabled(cluster.getService().getName())) {
            // 开始健康检测
            healthCheckProcessor.process(this);
			// 记录日志 。。。
        }
    } catch (Throwable e) {
       // 记录日志 。。。
    } finally {
        if (!cancelled) {
            // 结束后,再次进行任务调度,一定延迟后执行
            HealthCheckReactor.scheduleCheck(this);

            // 。。。
        }
    }
}
健康检测逻辑定义在healthCheckProcessor.process(this);方法中,在HealthCheckProcessor接口中,这个接口也有很多实现,默认是TcpSuperSenseProcessor:

进入TcpSuperSenseProcessor的process方法:
@Override
public void process(HealthCheckTask task) {
    // 获取所有 非临时实例的 集合
    List<Instance> ips = task.getCluster().allIPs(false);

    if (CollectionUtils.isEmpty(ips)) {
        return;
    }

    for (Instance ip : ips) {
		// 封装健康检测信息到 Beat
        Beat beat = new Beat(ip, task);
        // 放入一个阻塞队列中
        taskQueue.add(beat);
        MetricsMonitor.getTcpHealthCheckMonitor().incrementAndGet();
    }
}
可以看到,所有的健康检测任务都被放入一个阻塞队列,而不是立即执行了。这里又采用了异步执行的策略,可以看到Nacos中大量这样的设计。
而TcpSuperSenseProcessor本身就是一个Runnable,在它的构造函数中会把自己放入线程池中去执行,其run方法如下
public void run() {
    while (true) {
        try {
            // 处理任务
            processTask();
            // ...
        } catch (Throwable e) {
            SRV_LOG.error("[HEALTH-CHECK] error while processing NIO task", e);
        }
    }
}
通过processTask来处理健康检测的任务
private void processTask() throws Exception {
    // 将任务封装为一个 TaskProcessor,并放入集合
    Collection<Callable<Void>> tasks = new LinkedList<>();
    do {
        Beat beat = taskQueue.poll(CONNECT_TIMEOUT_MS / 2, TimeUnit.MILLISECONDS);
        if (beat == null) {
            return;
        }

        tasks.add(new TaskProcessor(beat));
    } while (taskQueue.size() > 0 && tasks.size() < NIO_THREAD_COUNT * 64);
	// 批量处理集合中的任务
    for (Future<?> f : GlobalExecutor.invokeAllTcpSuperSenseTask(tasks)) {
        f.get();
    }
}
任务被封装到了TaskProcessor中执行,TaskProcessor是一个Callable其中的call方法
@Override
public Void call() {
    // 获取检测任务已经等待的时长
    long waited = System.currentTimeMillis() - beat.getStartTime();
    if (waited > MAX_WAIT_TIME_MILLISECONDS) {
        Loggers.SRV_LOG.warn("beat task waited too long: " + waited + "ms");
    }

    SocketChannel channel = null;
    try {
        // 获取实例信息
        Instance instance = beat.getIp();
		// 通过NIO建立TCP连接
        channel = SocketChannel.open();
        channel.configureBlocking(false);
        // only by setting this can we make the socket close event asynchronous
        channel.socket().setSoLinger(false, -1);
        channel.socket().setReuseAddress(true);
        channel.socket().setKeepAlive(true);
        channel.socket().setTcpNoDelay(true);

        Cluster cluster = beat.getTask().getCluster();
        int port = cluster.isUseIPPort4Check() ? instance.getPort() : cluster.getDefCkport();
        channel.connect(new InetSocketAddress(instance.getIp(), port));
		// 注册连接、读取事件
        SelectionKey key = channel.register(selector, SelectionKey.OP_CONNECT | SelectionKey.OP_READ);
        key.attach(beat);
        keyMap.put(beat.toString(), new BeatKey(key));

        beat.setStartTime(System.currentTimeMillis());

        GlobalExecutor
            .scheduleTcpSuperSenseTask(new TimeOutTask(key), CONNECT_TIMEOUT_MS, TimeUnit.MILLISECONDS);
    } catch (Exception e) {
        beat.finishCheck(false, false, switchDomain.getTcpHealthParams().getMax(),
                         "tcp:error:" + e.getMessage());

        if (channel != null) {
            try {
                channel.close();
            } catch (Exception ignore) {
            }
        }
    }

    return null;
}
总结
Nacos的健康检测有两种模式:
- 临时实例:
- 采用客户端心跳检测模式,心跳周期5秒
- 心跳间隔超过15秒则标记为不健康
- 心跳间隔超过30秒则从服务列表删除
- 永久实例:
- 采用服务端主动健康检测方式
- 周期为2000 + 5000毫秒内的随机数
- 检测异常只会标记为不健康,不会删除
与eureka相比,Nacos与Eureka在临时实例上都是基于心跳模式实现,差别不大,主要是心跳周期不同,eureka是30秒,Nacos是5秒。
另外,Nacos支持永久实例,而Eureka不支持,Eureka只提供了心跳模式的健康监测,而没有主动检测功能。
服务发现
Nacos提供了一个根据serviced查询实例列表的接口:
接口描述:查询服务下的实例列表
请求类型:GET
请求路径:/nacos/v1/ns/instance/list
请求参数:
| 名称 | 类型 | 是否必选 | 描述 |
|---|---|---|---|
| serviceName | 字符串 | 是 | 服务名 |
| groupName | 字符串 | 否 | 分组名 |
| namespaceId | 字符串 | 否 | 命名空间ID |
| clusters | 字符串,多个集群用逗号分隔 | 否 | 集群名称 |
| healthyOnly | boolean | 否,默认为false | 是否只返回健康实例 |
错误编码:
| 错误代码 | 描述 | 语义 |
|---|---|---|
| 400 | Bad Request | 客户端请求中的语法错误 |
| 403 | Forbidden | 没有权限 |
| 404 | Not Found | 无法找到资源 |
| 500 | Internal Server Error | 服务器内部错误 |
| 200 | OK | 正常 |
客户端
定期更新服务列表
NacosNamingService
NacosNamingService这个类不仅仅提供了服务注册功能,同样提供了服务发现的功能。
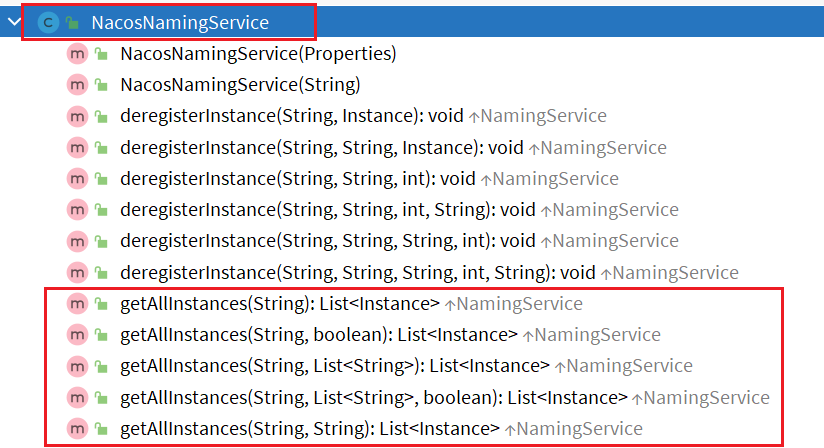
多个重载的方法最终都会进入一个方法:
@Override
public List<Instance> getAllInstances(String serviceName, String groupName, List<String> clusters,
                                      boolean subscribe) throws NacosException {

    ServiceInfo serviceInfo;
    // 1.判断是否需要订阅服务信息(默认为 true)
    if (subscribe) {
        // 1.1.订阅服务信息
        serviceInfo = hostReactor.getServiceInfo(NamingUtils.getGroupedName(serviceName, groupName),
                                                 StringUtils.join(clusters, ","));
    } else {
        // 1.2.直接去nacos拉取服务信息
        serviceInfo = hostReactor
            .getServiceInfoDirectlyFromServer(NamingUtils.getGroupedName(serviceName, groupName),
                                              StringUtils.join(clusters, ","));
    }
    // 2.从服务信息中获取实例列表并返回
    List<Instance> list;
    if (serviceInfo == null || CollectionUtils.isEmpty(list = serviceInfo.getHosts())) {
        return new ArrayList<Instance>();
    }
    return list;
}
HostReactor
订阅服务消息是由HostReactor类的getServiceInfo()方法来实现的。
public ServiceInfo getServiceInfo(final String serviceName, final String clusters) {

    NAMING_LOGGER.debug("failover-mode: " + failoverReactor.isFailoverSwitch());
    // 由 服务名@@集群名拼接 key
    String key = ServiceInfo.getKey(serviceName, clusters);
    if (failoverReactor.isFailoverSwitch()) {
        return failoverReactor.getService(key);
    }
    // 读取本地服务列表的缓存,缓存是一个Map,格式:Map<String, ServiceInfo>
    ServiceInfo serviceObj = getServiceInfo0(serviceName, clusters);
    // 判断缓存是否存在
    if (null == serviceObj) {
        // 不存在,创建空ServiceInfo
        serviceObj = new ServiceInfo(serviceName, clusters);
        // 放入缓存
        serviceInfoMap.put(serviceObj.getKey(), serviceObj);
        // 放入待更新的服务列表(updatingMap)中
        updatingMap.put(serviceName, new Object());
        // 立即更新服务列表
        updateServiceNow(serviceName, clusters);
        // 从待更新列表中移除
        updatingMap.remove(serviceName);

    } else if (updatingMap.containsKey(serviceName)) {
        // 缓存中有,但是需要更新
        if (UPDATE_HOLD_INTERVAL > 0) {
            // hold a moment waiting for update finish 等待5秒中,待更新完成
            synchronized (serviceObj) {
                try {
                    serviceObj.wait(UPDATE_HOLD_INTERVAL);
                } catch (InterruptedException e) {
                    NAMING_LOGGER
                        .error("[getServiceInfo] serviceName:" + serviceName + ", clusters:" + clusters, e);
                }
            }
        }
    }
    // 开启定时更新服务列表的功能
    scheduleUpdateIfAbsent(serviceName, clusters);
    // 返回缓存中的服务信息
    return serviceInfoMap.get(serviceObj.getKey());
}
基本逻辑是先从本地缓存读,根据结果来选择
-
如果本地缓存没有,立即去nacos读取,
updateServiceNow(serviceName, clusters)
-
如果本地缓存有,则开启定时更新功能,并返回缓存结果:
scheduleUpdateIfAbsent(serviceName, clusters)
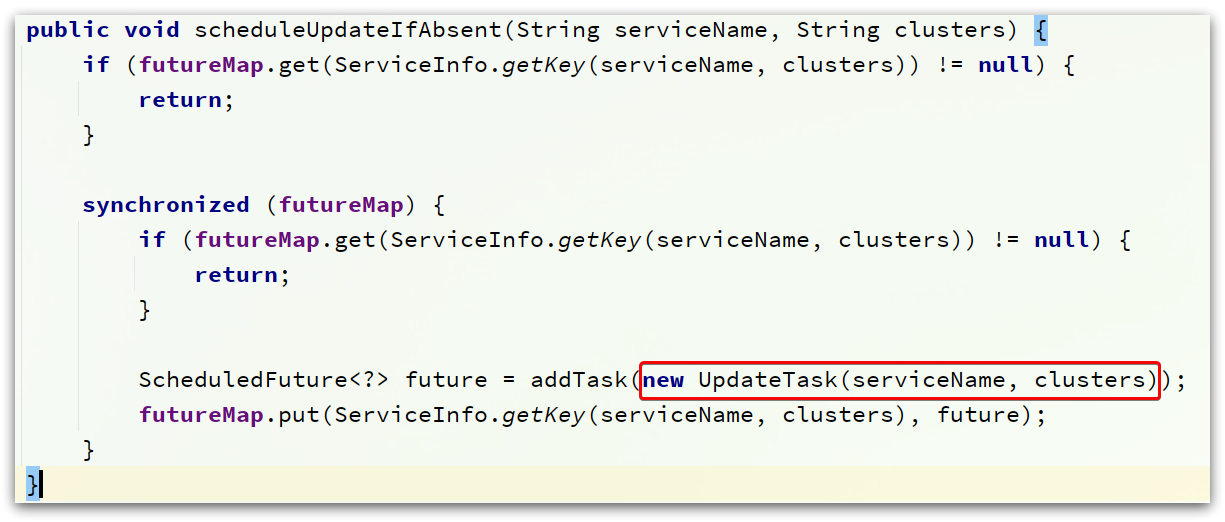
在UpdateTask中,最终还是调用updateService方法
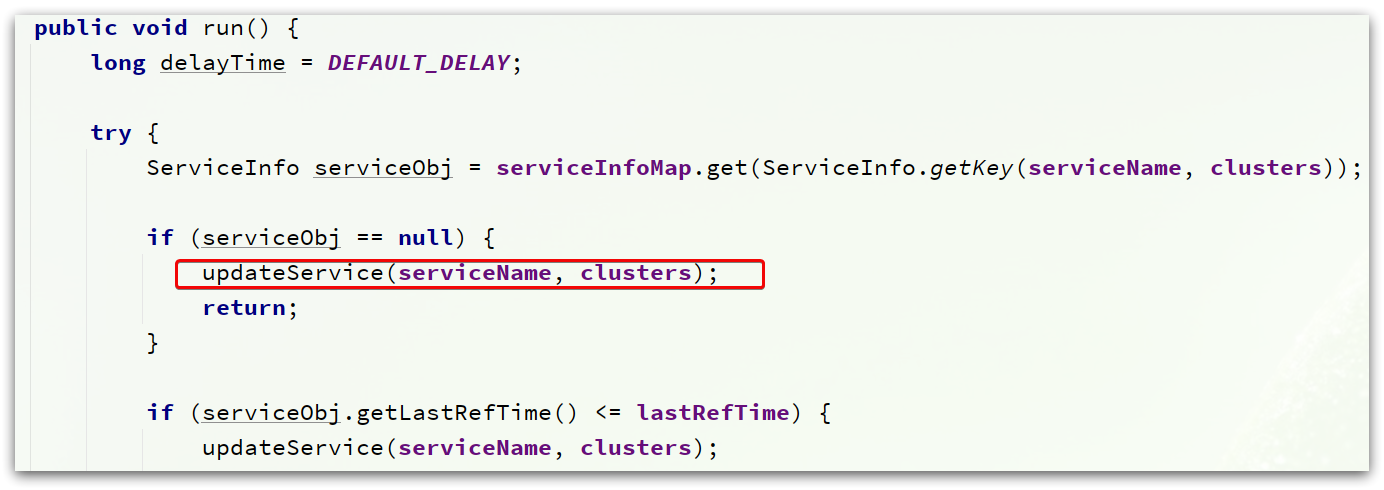
不管是立即更新服务列表,还是定时更新服务列表,最终都会执行HostReactor中的updateService()方法:
public void updateService(String serviceName, String clusters) throws NacosException {
    ServiceInfo oldService = getServiceInfo0(serviceName, clusters);
    try {
		// 基于ServerProxy发起远程调用,查询服务列表
        String result = serverProxy.queryList(serviceName, clusters, pushReceiver.getUdpPort(), false);

        if (StringUtils.isNotEmpty(result)) {
            // 处理查询结果
            processServiceJson(result);
        }
    } finally {
        if (oldService != null) {
            synchronized (oldService) {
                oldService.notifyAll();
            }
        }
    }
}
ServerProxy
而ServerProxy的queryList方法如下:
public String queryList(String serviceName, String clusters, int udpPort, boolean healthyOnly)
    throws NacosException {
	// 准备请求参数
    final Map<String, String> params = new HashMap<String, String>(8);
    params.put(CommonParams.NAMESPACE_ID, namespaceId);
    params.put(CommonParams.SERVICE_NAME, serviceName);
    params.put("clusters", clusters);
    params.put("udpPort", String.valueOf(udpPort));
    params.put("clientIP", NetUtils.localIP());
    params.put("healthyOnly", String.valueOf(healthyOnly));
	// 发起请求,地址与API接口一致
    return reqApi(UtilAndComs.nacosUrlBase + "/instance/list", params, HttpMethod.GET);
}
处理服务变更通知
除了定时更新服务列表的功能外,Nacos还支持服务列表变更时的主动推送功能。
在HostReactor类的构造函数中,有非常重要的几个步骤
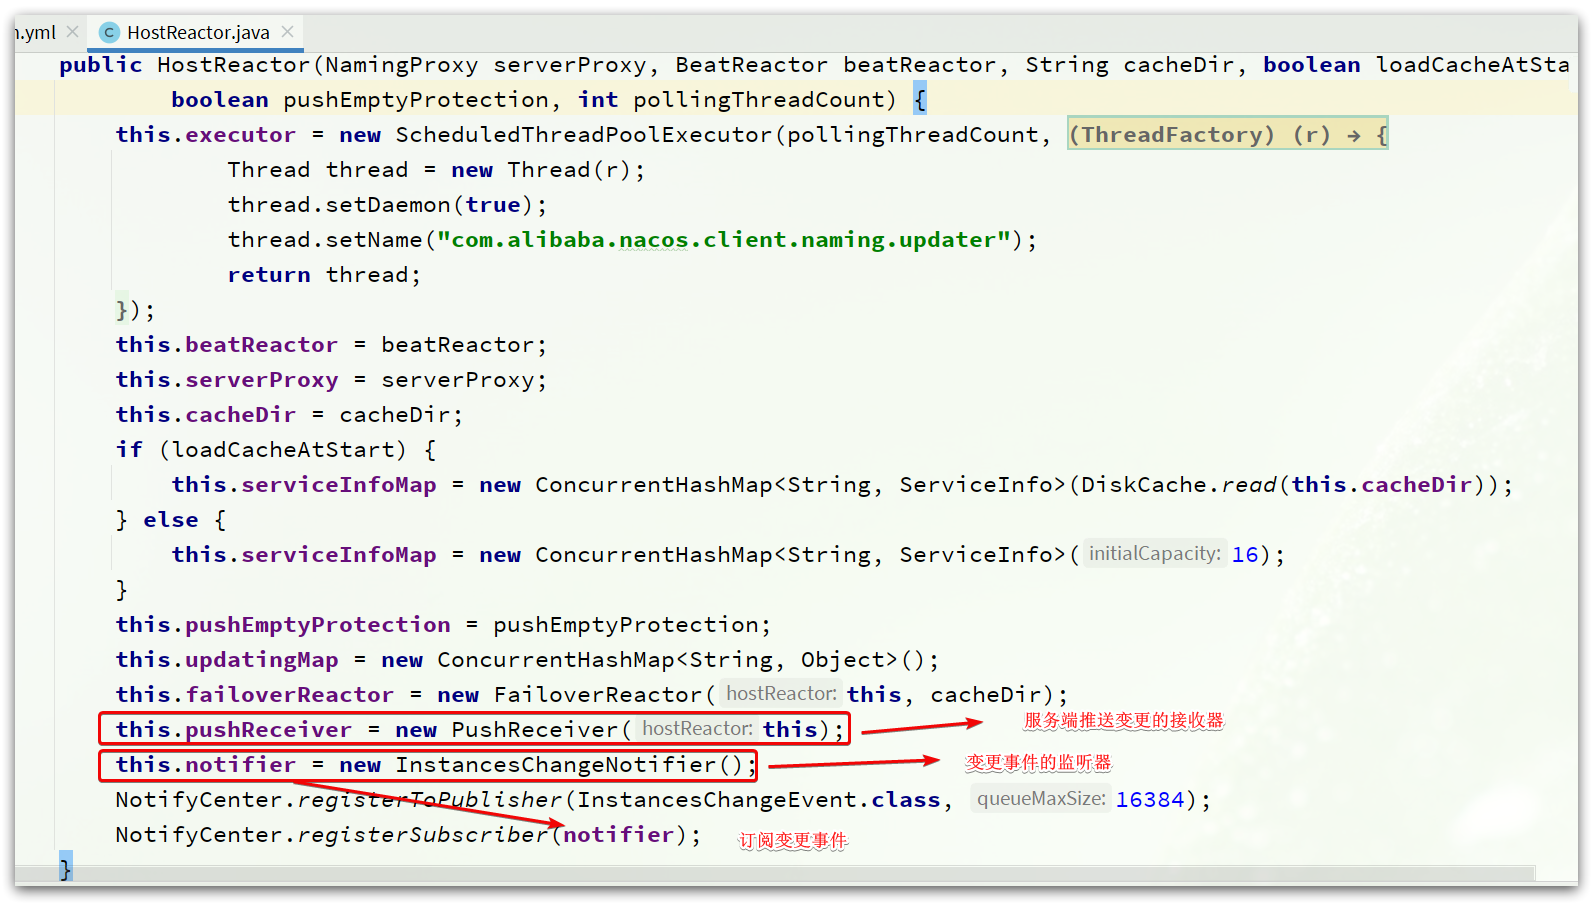
基本思路:
- 通过PushReceiver监听服务端推送的变更数据。
- 解析数据后,通过NotifyCenter发布服务变更的事件。
- InstanceChangeNotifier监听变更事件,完成对服务列表的更新。
PushReceiver
PushReceiver这个类会以UDP方式接收Nacos服务端推送的服务变更数据。
其构造函数
public PushReceiver(HostReactor hostReactor) {
    try {
        this.hostReactor = hostReactor;
        // 创建 UDP客户端
        String udpPort = getPushReceiverUdpPort();
        if (StringUtils.isEmpty(udpPort)) {
            this.udpSocket = new DatagramSocket();
        } else {
            this.udpSocket = new DatagramSocket(new InetSocketAddress(Integer.parseInt(udpPort)));
        }
        // 准备线程池
        this.executorService = new ScheduledThreadPoolExecutor(1, new ThreadFactory() {
            @Override
            public Thread newThread(Runnable r) {
                Thread thread = new Thread(r);
                thread.setDaemon(true);
                thread.setName("com.alibaba.nacos.naming.push.receiver");
                return thread;
            }
        });
		// 开启线程任务,准备接收变更数据
        this.executorService.execute(this);
    } catch (Exception e) {
        NAMING_LOGGER.error("[NA] init udp socket failed", e);
    }
}
PushReceiver构造函数中基于线程池来运行任务。这是因为PushReceiver本身也是一个Runnable,其中的run方法业务逻辑如下
@Override
public void run() {
    while (!closed) {
        try {
            // byte[] is initialized with 0 full filled by default
            byte[] buffer = new byte[UDP_MSS];
            DatagramPacket packet = new DatagramPacket(buffer, buffer.length);
			// 接收推送数据
            udpSocket.receive(packet);
			// 解析为json字符串
            String json = new String(IoUtils.tryDecompress(packet.getData()), UTF_8).trim();
            NAMING_LOGGER.info("received push data: " + json + " from " + packet.getAddress().toString());
			// 反序列化为对象
            PushPacket pushPacket = JacksonUtils.toObj(json, PushPacket.class);
            String ack;
            if ("dom".equals(pushPacket.type) || "service".equals(pushPacket.type)) {
                // 交给 HostReactor去处理
                hostReactor.processServiceJson(pushPacket.data);

                // send ack to server 发送ACK回执,略。。
        } catch (Exception e) {
            if (closed) {
                return;
            }
            NAMING_LOGGER.error("[NA] error while receiving push data", e);
        }
    }
}
HostReactor
通知数据的处理由交给了HostReactor的processServiceJson方法
public ServiceInfo processServiceJson(String json) {
    // 解析出ServiceInfo信息
    ServiceInfo serviceInfo = JacksonUtils.toObj(json, ServiceInfo.class);
    String serviceKey = serviceInfo.getKey();
    if (serviceKey == null) {
        return null;
    }
    // 查询缓存中的 ServiceInfo
    ServiceInfo oldService = serviceInfoMap.get(serviceKey);

    // 如果缓存存在,则需要校验哪些数据要更新
    boolean changed = false;
    if (oldService != null) {
		// 拉取的数据是否已经过期
        if (oldService.getLastRefTime() > serviceInfo.getLastRefTime()) {
            NAMING_LOGGER.warn("out of date data received, old-t: " + oldService.getLastRefTime() + ", new-t: "
                               + serviceInfo.getLastRefTime());
        }
        // 放入缓存
        serviceInfoMap.put(serviceInfo.getKey(), serviceInfo);

        // 中间是缓存与新数据的对比,得到newHosts:新增的实例;remvHosts:待移除的实例;
        // modHosts:需要修改的实例
        if (newHosts.size() > 0 || remvHosts.size() > 0 || modHosts.size() > 0) {
            // 发布实例变更的事件
            NotifyCenter.publishEvent(new InstancesChangeEvent(
                serviceInfo.getName(), serviceInfo.getGroupName(),
                serviceInfo.getClusters(), serviceInfo.getHosts()));
            DiskCache.write(serviceInfo, cacheDir);
        }

    } else {
        // 本地缓存不存在
        changed = true;
        // 放入缓存
        serviceInfoMap.put(serviceInfo.getKey(), serviceInfo);
        // 直接发布实例变更的事件
        NotifyCenter.publishEvent(new InstancesChangeEvent(
            serviceInfo.getName(), serviceInfo.getGroupName(),
            serviceInfo.getClusters(), serviceInfo.getHosts()));
        serviceInfo.setJsonFromServer(json);
        DiskCache.write(serviceInfo, cacheDir);
    }
	// 。。。
    return serviceInfo;
}
服务端
拉取服务列表接口
InstanceController类中提供了拉取服务列表的接口
/**
     * Get all instance of input service.
     *
     * @param request http request
     * @return list of instance
     * @throws Exception any error during list
     */
@GetMapping("/list")
@Secured(parser = NamingResourceParser.class, action = ActionTypes.READ)
public ObjectNode list(HttpServletRequest request) throws Exception {
    // 从request中获取namespaceId和serviceName
    String namespaceId = WebUtils.optional(request, CommonParams.NAMESPACE_ID, Constants.DEFAULT_NAMESPACE_ID);
    String serviceName = WebUtils.required(request, CommonParams.SERVICE_NAME);
    NamingUtils.checkServiceNameFormat(serviceName);

    String agent = WebUtils.getUserAgent(request);
    String clusters = WebUtils.optional(request, "clusters", StringUtils.EMPTY);
    String clientIP = WebUtils.optional(request, "clientIP", StringUtils.EMPTY);
    // 获取客户端的 UDP端口
    int udpPort = Integer.parseInt(WebUtils.optional(request, "udpPort", "0"));
    String env = WebUtils.optional(request, "env", StringUtils.EMPTY);
    boolean isCheck = Boolean.parseBoolean(WebUtils.optional(request, "isCheck", "false"));

    String app = WebUtils.optional(request, "app", StringUtils.EMPTY);

    String tenant = WebUtils.optional(request, "tid", StringUtils.EMPTY);

    boolean healthyOnly = Boolean.parseBoolean(WebUtils.optional(request, "healthyOnly", "false"));

    // 获取服务列表
    return doSrvIpxt(namespaceId, serviceName, agent, clusters, clientIP, udpPort, env, isCheck, app, tenant,
                     healthyOnly);
}
进入doSrvIpxt()方法来获取服务列表
public ObjectNode doSrvIpxt(String namespaceId, String serviceName, String agent,
                            String clusters, String clientIP,
                            int udpPort, String env, boolean isCheck,
                            String app, String tid, boolean healthyOnly) throws Exception {
    ClientInfo clientInfo = new ClientInfo(agent);
    ObjectNode result = JacksonUtils.createEmptyJsonNode();
    // 获取服务列表信息
    Service service = serviceManager.getService(namespaceId, serviceName);
    long cacheMillis = switchDomain.getDefaultCacheMillis();

    // now try to enable the push
    try {
        if (udpPort > 0 && pushService.canEnablePush(agent)) {
			// 添加当前客户端 IP、UDP端口到 PushService 中
            pushService
                .addClient(namespaceId, serviceName, clusters, agent, new InetSocketAddress(clientIP, udpPort),
                           pushDataSource, tid, app);
            cacheMillis = switchDomain.getPushCacheMillis(serviceName);
        }
    } catch (Exception e) {
        Loggers.SRV_LOG
            .error("[NACOS-API] failed to added push client {}, {}:{}", clientInfo, clientIP, udpPort, e);
        cacheMillis = switchDomain.getDefaultCacheMillis();
    }

    if (service == null) {
        // 如果没找到,返回空
        if (Loggers.SRV_LOG.isDebugEnabled()) {
            Loggers.SRV_LOG.debug("no instance to serve for service: {}", serviceName);
        }
        result.put("name", serviceName);
        result.put("clusters", clusters);
        result.put("cacheMillis", cacheMillis);
        result.replace("hosts", JacksonUtils.createEmptyArrayNode());
        return result;
    }
	// 结果的检测,异常实例的剔除等逻辑省略
    // 最终封装结果并返回 。。。

    result.replace("hosts", hosts);
    if (clientInfo.type == ClientInfo.ClientType.JAVA
        && clientInfo.version.compareTo(VersionUtil.parseVersion("1.0.0")) >= 0) {
        result.put("dom", serviceName);
    } else {
        result.put("dom", NamingUtils.getServiceName(serviceName));
    }
    result.put("name", serviceName);
    result.put("cacheMillis", cacheMillis);
    result.put("lastRefTime", System.currentTimeMillis());
    result.put("checksum", service.getChecksum());
    result.put("useSpecifiedURL", false);
    result.put("clusters", clusters);
    result.put("env", env);
    result.replace("metadata", JacksonUtils.transferToJsonNode(service.getMetadata()));
    return result;
}
发布服务变更的UDP通知
InstanceController中的doSrvIpxt()方法中,有这样一行代码
pushService.addClient(namespaceId, serviceName, clusters, agent,
                      new InetSocketAddress(clientIP, udpPort),
                           pushDataSource, tid, app);
其实是把消费者的UDP端口、IP等信息封装为一个PushClient对象,存储PushService中。方便以后服务变更后推送消息。
PushService类本身实现了ApplicationListener接口:

这个是事件监听器接口,监听的是ServiceChangeEvent(服务变更事件)。
当服务列表变化时,就会发起通知:

总结
Nacos的服务发现分为两种模式:
- 模式一:主动拉取模式,消费者定期主动从Nacos拉取服务列表并缓存起来,再服务调用时优先读取本地缓存中的服务列表。
- 模式二:订阅模式,消费者订阅Nacos中的服务列表,并基于UDP协议来接收服务变更通知。当Nacos中的服务列表更新时,会发送UDP广播给所有订阅者。
与Eureka相比,Nacos的订阅模式服务状态更新更及时,消费者更容易及时发现服务列表的变化,剔除故障服务。
Sentinel篇
Sentinel实现限流、隔离、降级、熔断等功能,本质要做的就是两件事情:
- 统计数据:统计某个资源的访问数据(QPS、RT等信息)
- 规则判断:判断限流规则、隔离规则、降级规则、熔断规则是否满足
这里的资源就是希望被Sentinel保护的业务,例如项目中定义的controller方法就是默认被Sentinel保护的资源。
ProcessorSlotChain
实现上述功能的核心骨架是一个叫做ProcessorSlotChain的类。这个类基于责任链模式来设计,将不同的功能(限流、降级、系统保护)封装为一个个的Slot,请求进入后逐个执行即可。
其工作流如图:
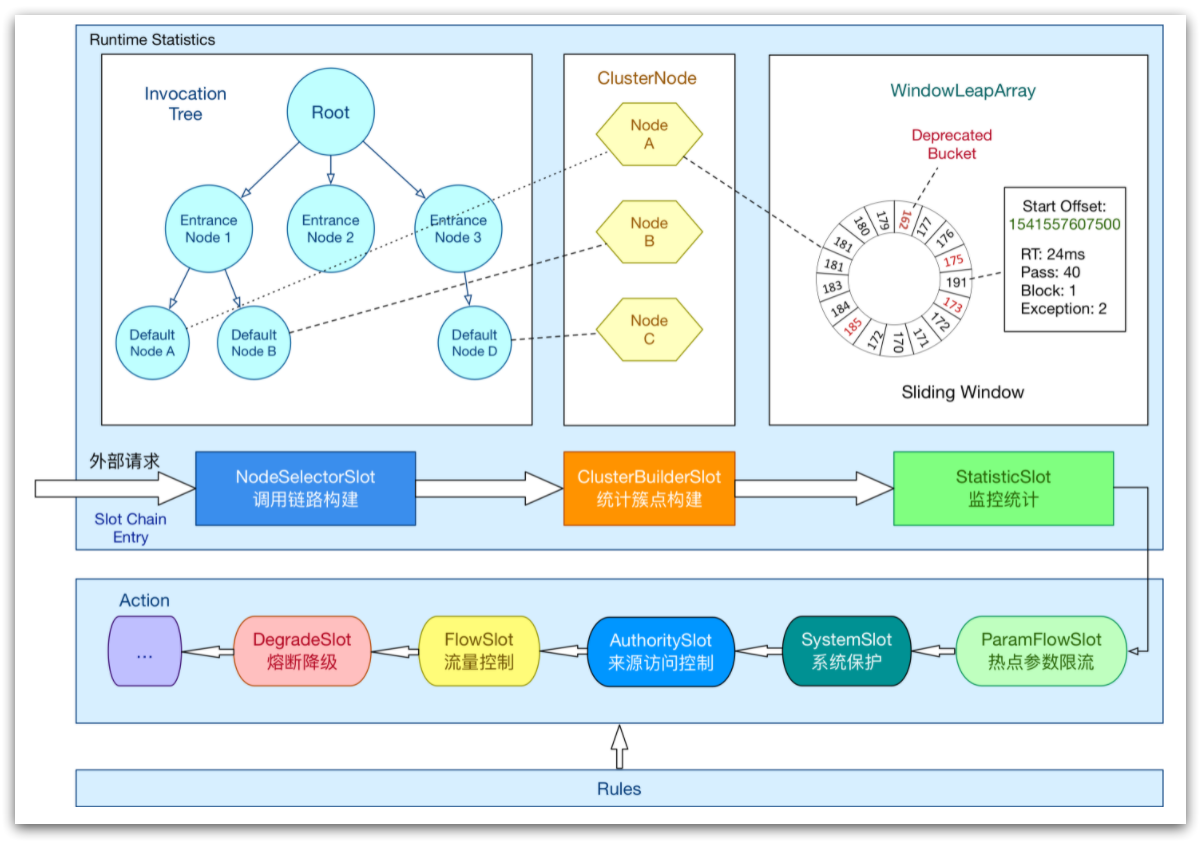
责任链中的Slot也分为两大类:
- 统计数据构建部分(statistic)
- NodeSelectorSlot:负责构建簇点链路中的节点(DefaultNode),将这些节点形成链路树
- ClusterBuilderSlot:负责构建某个资源的ClusterNode,ClusterNode可以保存资源的运行信息(响应时间、QPS、block 数目、线程数、异常数等)以及来源信息(origin名称)
- StatisticSlot:负责统计实时调用数据,包括运行信息、来源信息等
- 规则判断部分(rule checking)
- AuthoritySlot:负责授权规则(来源控制)
- SystemSlot:负责系统保护规则
- ParamFlowSlot:负责热点参数限流规则
- FlowSlot:负责限流规则
- DegradeSlot:负责降级规则
Node
Sentinel中的簇点链路是由一个个的Node组成的,Node是一个接口,包括下面的实现
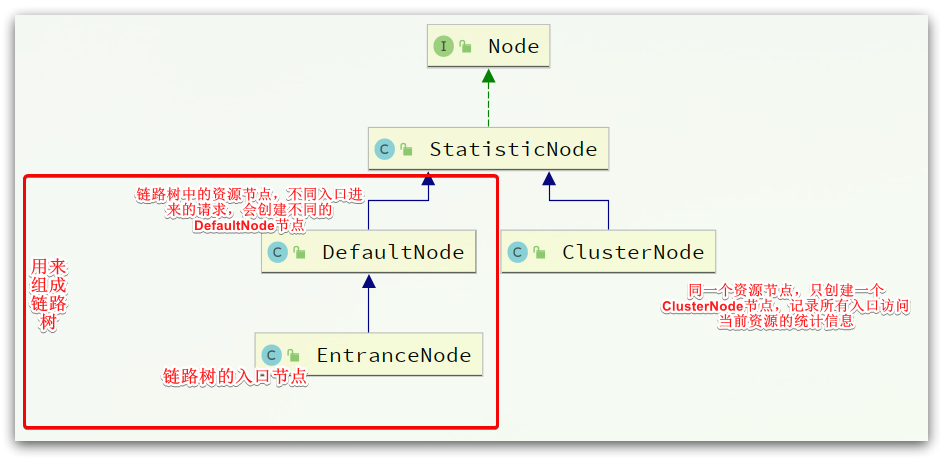 所有的节点都可以记录对资源的访问统计数据,所以都是StatisticNode的子类。
按照作用分为两类Node:
- DefaultNode:代表链路树中的每一个资源,一个资源出现在不同链路中时,会创建不同的DefaultNode节点。而树的入口节点叫EntranceNode,是一种特殊的DefaultNode
- ClusterNode:代表资源,一个资源不管出现在多少链路中,只会有一个ClusterNode。记录的是当前资源被访问的所有统计数据之和。
DefaultNode记录的是资源在当前链路中的访问数据,用来实现基于链路模式的限流规则。ClusterNode记录的是资源在所有链路中的访问数据,实现默认模式、关联模式的限流规则。
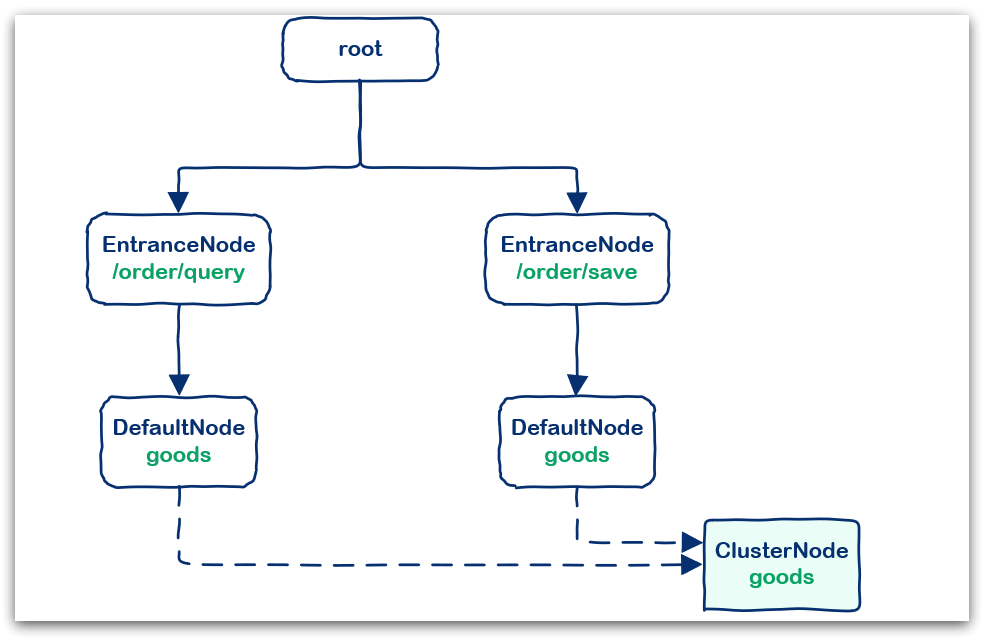
例如在一个SpringMVC项目中,其中包含两个业务:
- 业务一:controller中的资源
/order/query访问了service中的资源/goods。 - 业务2:controller中的资源
/order/save访问了service中的资源/goods
创建的链路图:
Entry
默认情况下,Sentinel会将controller中的方法作为被保护资源,如何将自己的一段代码标记为一个Sentinel的资源呢?
Sentinel中的资源用Entry来表示。声明Entry的API示例:
// 资源名可使用任意有业务语义的字符串,比如方法名、接口名或其它可唯一标识的字符串。
try (Entry entry = SphU.entry("resourceName")) {
  // 被保护的业务逻辑
  // do something here...
} catch (BlockException ex) {
  // 资源访问阻止,被限流或被降级
  // 在此处进行相应的处理操作
}
自定义资源
例如在order-service订单服务中,将queryOrderById()查询订单id的方法标记为一个资源。
实现步骤
- 在order-service引入sentinel依赖
<!--sentinel-->
<dependency>
    <groupId>com.alibaba.cloud</groupId>
    <artifactId>spring-cloud-starter-alibaba-sentinel</artifactId>
</dependency>
- 配置Sentinel地址
spring:
  cloud:
    sentinel:
      transport:
        dashboard: localhost:8809 # 这里sentinel使用的端口号为8809
- 修改OrderService类中的queryOrderById方法
public Order queryOrderById(Long orderId) {
    // 创建Entry,标记资源,资源名为resource1
    try (Entry entry = SphU.entry("resource1")) {
        // 1.查询订单,这里是假数据
        Order order = Order.build(101L, 4999L, "小米 MIX4", 1, 1L, null);
        // 2.查询用户,基于Feign的远程调用
        User user = userClient.findById(order.getUserId());
        // 3.设置
        order.setUser(user);
        // 4.返回
        return order;
    }catch (BlockException e){
        log.error("被限流或降级", e);
        return null;
    }
}
- 打开浏览器访问order服务,然后打开sentinel控制台,查看簇点链路。

基于注解标记资源
之前在学习Sentinel的时候,已经知道可以通过个方法添加@SentinelResource注解的形式来标记资源。
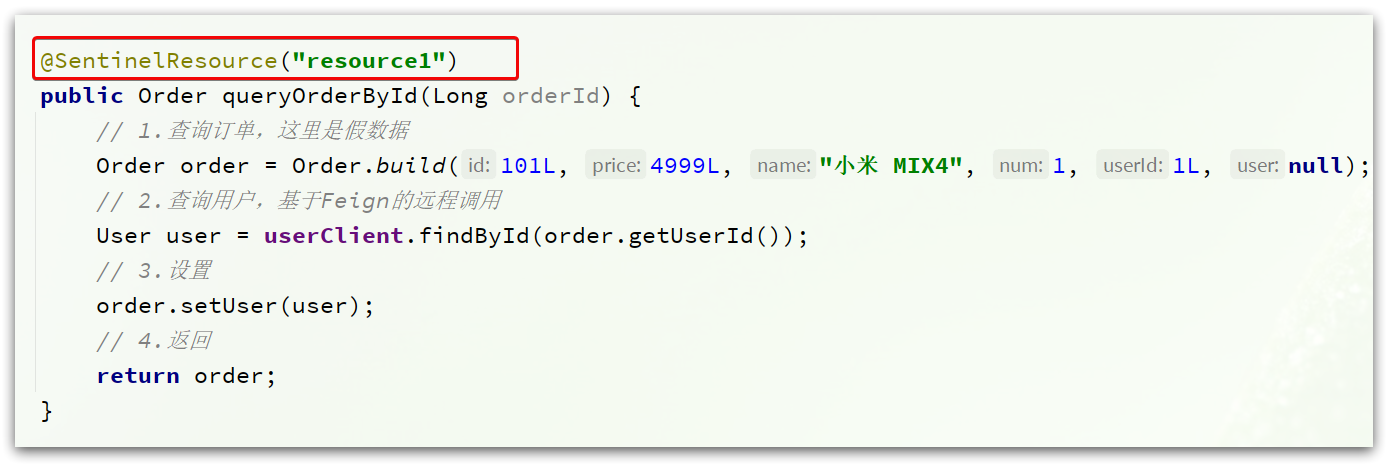
通过查看引入的sentinel依赖包来了解其原理
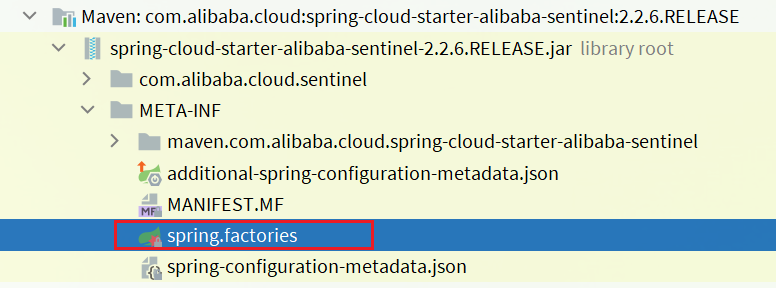
其中的spring.factories声明需要就是自动装配的配置类,内容如下:

查看下SentinelAutoConfiguration这个类:
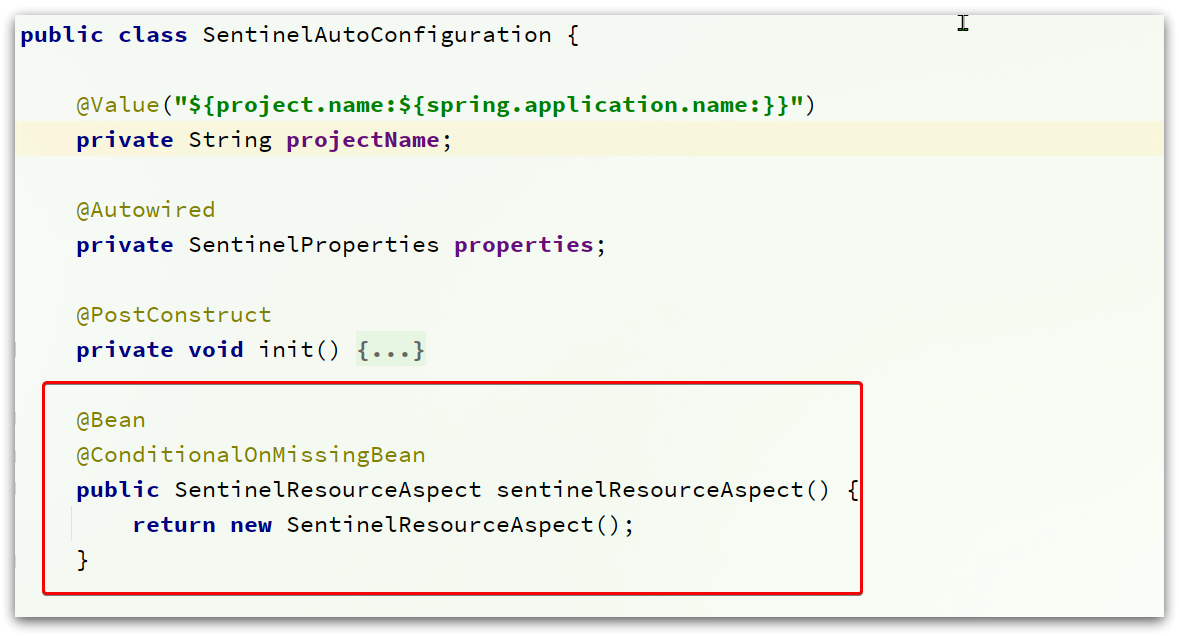
可以看到,在这里声明了一个Bean:SentinelResourceAspect:
/**
 * Aspect for methods with {@link SentinelResource} annotation.
 *
 * @author Eric Zhao
 */
@Aspect
public class SentinelResourceAspect extends AbstractSentinelAspectSupport {
	// 切点是添加了 @SentinelResource注解的类
    @Pointcut("@annotation(com.alibaba.csp.sentinel.annotation.SentinelResource)")
    public void sentinelResourceAnnotationPointcut() {
    }

    // 环绕增强
    @Around("sentinelResourceAnnotationPointcut()")
    public Object invokeResourceWithSentinel(ProceedingJoinPoint pjp) throws Throwable {
        // 获取受保护的方法
        Method originMethod = resolveMethod(pjp);
		// 获取 @SentinelResource注解
        SentinelResource annotation = originMethod.getAnnotation(SentinelResource.class);
        if (annotation == null) {
            // Should not go through here.
            throw new IllegalStateException("Wrong state for SentinelResource annotation");
        }
        // 获取注解上的资源名称
        String resourceName = getResourceName(annotation.value(), originMethod);
        EntryType entryType = annotation.entryType();
        int resourceType = annotation.resourceType();
        Entry entry = null;
        try {
            // 创建资源 Entry
            entry = SphU.entry(resourceName, resourceType, entryType, pjp.getArgs());
            // 执行受保护的方法
            Object result = pjp.proceed();
            return result;
        } catch (BlockException ex) {
            return handleBlockException(pjp, annotation, ex);
        } catch (Throwable ex) {
            Class<? extends Throwable>[] exceptionsToIgnore = annotation.exceptionsToIgnore();
            // The ignore list will be checked first.
            if (exceptionsToIgnore.length > 0 && exceptionBelongsTo(ex, exceptionsToIgnore)) {
                throw ex;
            }
            if (exceptionBelongsTo(ex, annotation.exceptionsToTrace())) {
                traceException(ex);
                return handleFallback(pjp, annotation, ex);
            }

            // No fallback function can handle the exception, so throw it out.
            throw ex;
        } finally {
            if (entry != null) {
                entry.exit(1, pjp.getArgs());
            }
        }
    }
}
简单来说,@SentinelResource注解就是一个标记,而Sentinel基于AOP思想,对被标记的方法做环绕增强,完成资源(Entry)的创建。
Context
从上面得知,在簇点链路中除了有controller方法、service方法两个资源外,还多出了一个默认的入口节点:
sentinel_spring_web_context是一个EntranceNode类型的节点,这个节点是在初始化Context的时候由Sentinel自己创建的。
Context定义
Context 代表调用链路上下文,贯穿一次调用链路中的所有资源( Entry),基于ThreadLocal。Context 维持着入口节点(entranceNode)、本次调用链路的 curNode(当前资源节点)、调用来源(origin)等信息。
后续的Slot都可以通过Context拿到DefaultNode或者ClusterNode,从而获取统计数据,完成规则判断。Context初始化的过程中,会创建EntranceNode,contextName就是EntranceNode的名称。
对应的API如下:
// 创建context,包含两个参数:context名称、 来源名称
ContextUtil.enter("contextName", "originName");
Context初始化
通过再次查看引入的Sentinel依赖包
自动装配
其中的spring.factories声明需要就是自动装配的配置类,内容如下:

先看SentinelWebAutoConfiguration这个类:

这个类实现了WebMvcConfigurer接口,这个是SpringMVC自定义配置用到的类,可以配置HandlerInterceptor

可以看到这里配置了一个SentinelWebInterceptor的拦截器。
SentinelWebInterceptor的声明如下:

发现它继承了AbstractSentinelInterceptor这个类

HandlerInterceptor拦截器会拦截一切进入controller的方法,执行preHandle前置拦截方法,而Context的初始化就是在这里完成的。
AbstractSentinelInterceptor
查看这个类的preHandle实现
@Override
public boolean preHandle(HttpServletRequest request, HttpServletResponse response, Object handler)
    throws Exception {
    try {
        // 获取资源名称,一般是controller方法的@RequestMapping路径,例如/order/{orderId}
        String resourceName = getResourceName(request);
        if (StringUtil.isEmpty(resourceName)) {
            return true;
        }
        // 从request中获取请求来源,将来做 授权规则 判断时会用
        String origin = parseOrigin(request);

        // 获取 contextName,默认是sentinel_spring_web_context
        String contextName = getContextName(request);
        // 创建 Context
        ContextUtil.enter(contextName, origin);
        // 创建资源,名称就是当前请求的controller方法的映射路径
        Entry entry = SphU.entry(resourceName, ResourceTypeConstants.COMMON_WEB, EntryType.IN);
        request.setAttribute(baseWebMvcConfig.getRequestAttributeName(), entry);
        return true;
    } catch (BlockException e) {
        try {
            handleBlockException(request, response, e);
        } finally {
            ContextUtil.exit();
        }
        return false;
    }
}
ContextUtil
创建Context的方法为ContextUtil.enter(contextName, origin)
进入此方法:
public static Context enter(String name, String origin) {
    if (Constants.CONTEXT_DEFAULT_NAME.equals(name)) {
        throw new ContextNameDefineException(
            "The " + Constants.CONTEXT_DEFAULT_NAME + " can't be permit to defined!");
    }
    return trueEnter(name, origin);
}
进入trueEnter方法:
protected static Context trueEnter(String name, String origin) {
    // 尝试获取context
    Context context = contextHolder.get();
    // 判空
    if (context == null) {
        // 如果为空,开始初始化
        Map<String, DefaultNode> localCacheNameMap = contextNameNodeMap;
        // 尝试获取入口节点
        DefaultNode node = localCacheNameMap.get(name);
        if (node == null) {
            LOCK.lock();
            try {
                node = contextNameNodeMap.get(name);
                if (node == null) {
                    // 入口节点为空,初始化入口节点 EntranceNode
                    node = new EntranceNode(new StringResourceWrapper(name, EntryType.IN), null);
                    // 添加入口节点到 ROOT
                    Constants.ROOT.addChild(node);
                    // 将入口节点放入缓存
                    Map<String, DefaultNode> newMap = new HashMap<>(contextNameNodeMap.size() + 1);
                    newMap.putAll(contextNameNodeMap);
                    newMap.put(name, node);
                    contextNameNodeMap = newMap;
                }
            } finally {
                LOCK.unlock();
            }
        }
        // 创建Context,参数为:入口节点 和 contextName
        context = new Context(node, name);
        // 设置请求来源 origin
        context.setOrigin(origin);
        // 放入ThreadLocal
        contextHolder.set(context);
    }
    // 返回
    return context;
}
ProcessorSlotChain执行流程
跟踪源码验证下ProcessorSlotChain的执行流程。
首先回到AbstractSentinelInterceptor类的preHandle入口方法:

还有SentinelResourceAspect的环绕增强方法:

可以看到,任何一个资源必定要执行SphU.entry()这个方法:
public static Entry entry(String name, int resourceType, EntryType trafficType, Object[] args)
    throws BlockException {
    return Env.sph.entryWithType(name, resourceType, trafficType, 1, args);
}
继续进入Env.sph.entryWithType(name, resourceType, trafficType, 1, args):
@Override
public Entry entryWithType(String name, int resourceType, EntryType entryType, int count, boolean prioritized,
                           Object[] args) throws BlockException {
    // 将 资源名称等基本信息 封装为一个 StringResourceWrapper对象
    StringResourceWrapper resource = new StringResourceWrapper(name, entryType, resourceType);
    // 继续
    return entryWithPriority(resource, count, prioritized, args);
}
进入entryWithPriority方法:
private Entry entryWithPriority(ResourceWrapper resourceWrapper, int count, boolean prioritized, Object... args)
    throws BlockException {
    // 获取 Context
    Context context = ContextUtil.getContext();

    if (context == null) {
        // Using default context.
        context = InternalContextUtil.internalEnter(Constants.CONTEXT_DEFAULT_NAME);
    }
、	// 获取 Slot执行链,同一个资源,会创建一个执行链,放入缓存
    ProcessorSlot<Object> chain = lookProcessChain(resourceWrapper);

	// 创建 Entry,并将 resource、chain、context 记录在 Entry中
    Entry e = new CtEntry(resourceWrapper, chain, context);
    try {
        // 执行 slotChain
        chain.entry(context, resourceWrapper, null, count, prioritized, args);
    } catch (BlockException e1) {
        e.exit(count, args);
        throw e1;
    } catch (Throwable e1) {
        // This should not happen, unless there are errors existing in Sentinel internal.
        RecordLog.info("Sentinel unexpected exception", e1);
    }
    return e;
}
在这段代码中,会获取ProcessorSlotChain对象,然后基于chain.entry()开始执行slotChain中的每一个Slot. 而这里创建的是其实现类:DefaultProcessorSlotChain.
获取ProcessorSlotChain以后会保存到一个Map中,key是ResourceWrapper,值是ProcessorSlotChain.
所以,一个资源只会有一个ProcessorSlotChain。
DefaultProcessorSlotChain
进入DefaultProcessorSlotChain的entry方法:
@Override
public void entry(Context context, ResourceWrapper resourceWrapper, Object t, int count, boolean prioritized, Object... args)
    throws Throwable {
    // first,就是责任链中的第一个 slot
    first.transformEntry(context, resourceWrapper, t, count, prioritized, args);
}
这里的first,类型是AbstractLinkedProcessorSlot:

查看继承关系:
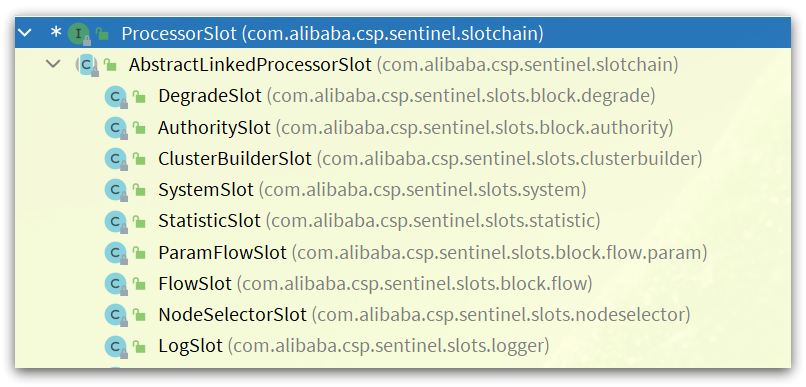
因此,first一定是这些实现类中的一个,按照最早讲的责任链顺序,first应该就是 NodeSelectorSlot。
不过,既然是基于责任链模式,所以这里只要记住下一个slot就可以了,也就是next:
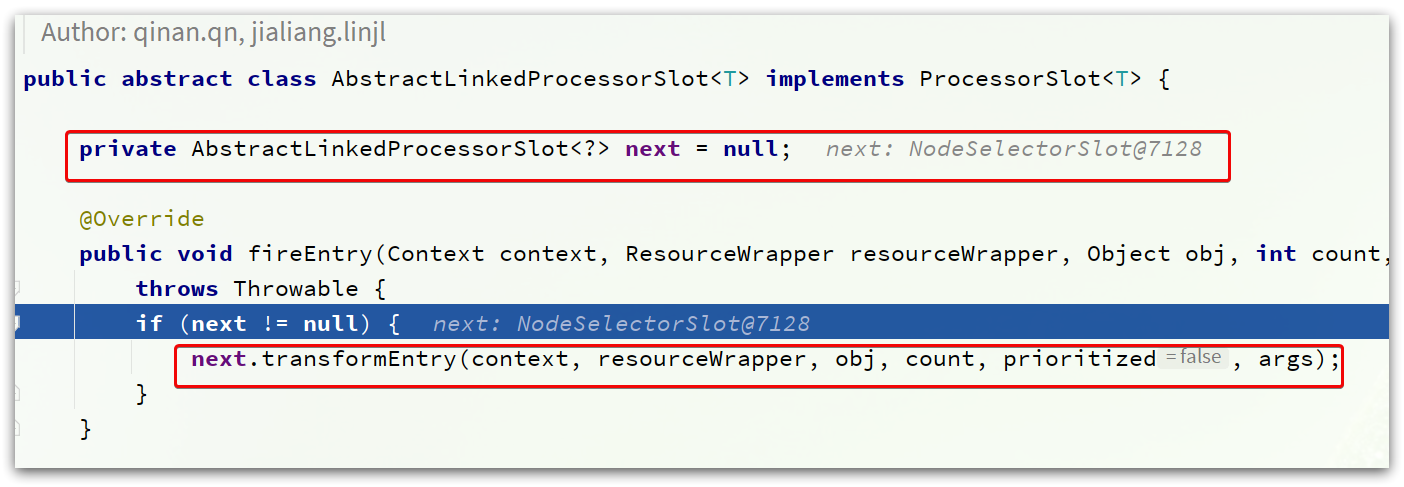
next确实是NodeSelectSlot类型。
而NodeSelectSlot的next一定是ClusterBuilderSlot,依次类推:
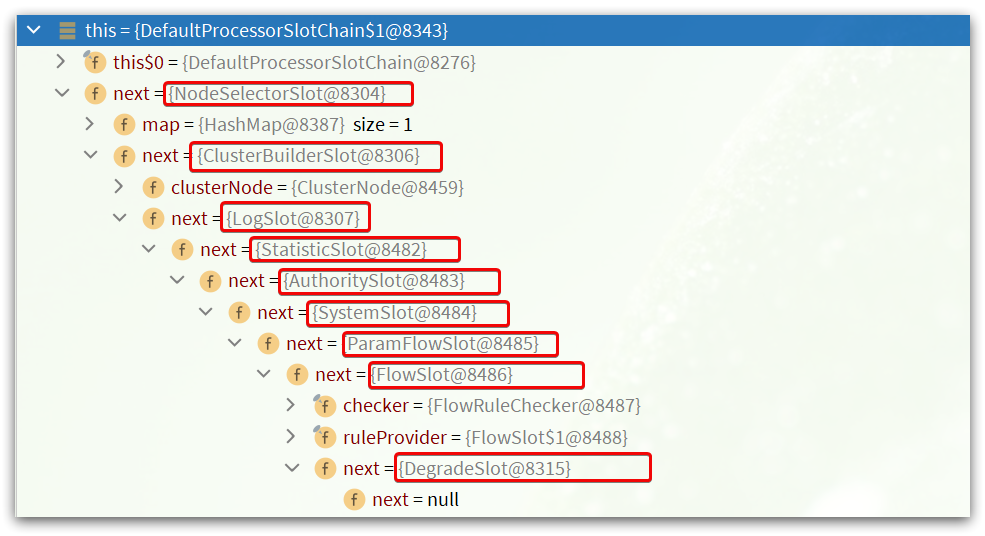
责任链就建立起来了。
NodeSelectorSlot
NodeSelectorSlot负责构建簇点链路中的节点(DefaultNode),将这些节点形成链路树。
核心代码:
@Override
public void entry(Context context, ResourceWrapper resourceWrapper, Object obj, int count, boolean prioritized, Object... args)
    throws Throwable {
  	// 尝试获取 当前资源的 DefaultNode
    DefaultNode node = map.get(context.getName());
    if (node == null) {
        synchronized (this) {
            node = map.get(context.getName());
            if (node == null) {
                // 如果为空,为当前资源创建一个新的 DefaultNode
                node = new DefaultNode(resourceWrapper, null);
                HashMap<String, DefaultNode> cacheMap = new HashMap<String, DefaultNode>(map.size());
                cacheMap.putAll(map);
                // 放入缓存中,注意这里的 key是contextName,
                // 这样不同链路进入相同资源,就会创建多个 DefaultNode
                cacheMap.put(context.getName(), node);
                map = cacheMap;
                // 当前节点加入上一节点的 child中,这样就构成了调用链路树
                ((DefaultNode) context.getLastNode()).addChild(node);
            }

        }
    }
	// context中的curNode(当前节点)设置为新的 node
    context.setCurNode(node);
    // 执行下一个 slot
    fireEntry(context, resourceWrapper, node, count, prioritized, args);
}
这个Slot完成了这么几件事情:
- 为当前资源创建 DefaultNode。
- 将DefaultNode放入缓存中,key是contextName,这样不同链路入口的请求,将会创建多个DefaultNode,相同链路则只有一个DefaultNode。
- 将当前资源的DefaultNode设置为上一个资源的childNode。
- 将当前资源的DefaultNode设置为Context中的curNode(当前节点)。
下一个slot,就是ClusterBuilderSlot。
ClusterBuilderSlot
ClusterBuilderSlot负责构建某个资源的ClusterNode,核心代码:
@Override
public void entry(Context context, ResourceWrapper resourceWrapper, DefaultNode node,
                  int count, boolean prioritized, Object... args)
    throws Throwable {
    // 判空,注意ClusterNode是共享的成员变量,也就是说一个资源只有一个ClusterNode,与链路无关
    if (clusterNode == null) {
        synchronized (lock) {
            if (clusterNode == null) {
                // 创建 cluster node.
                clusterNode = new ClusterNode(resourceWrapper.getName(), resourceWrapper.getResourceType());
                HashMap<ResourceWrapper, ClusterNode> newMap = new HashMap<>(Math.max(clusterNodeMap.size(), 16));
                newMap.putAll(clusterNodeMap);
                // 放入缓存,可以是nodeId,也就是resource名称
                newMap.put(node.getId(), clusterNode);
                clusterNodeMap = newMap;
            }
        }
    }
    // 将资源的 DefaultNode与 ClusterNode关联
    node.setClusterNode(clusterNode);
	// 记录请求来源 origin 将 origin放入 entry
    if (!"".equals(context.getOrigin())) {
        Node originNode = node.getClusterNode().getOrCreateOriginNode(context.getOrigin());
        context.getCurEntry().setOriginNode(originNode);
    }
	// 继续下一个slot
    fireEntry(context, resourceWrapper, node, count, prioritized, args);
}
StatisticSlot
StatisticSlot负责统计实时调用数据,包括运行信息(访问次数、线程数)、来源信息等。
StatisticSlot是实现限流的关键,其中基于滑动时间窗口算法维护了计数器,统计进入某个资源的请求次数。
核心代码:
@Override
public void entry(Context context, ResourceWrapper resourceWrapper, DefaultNode node,
                  int count, boolean prioritized, Object... args) throws Throwable {
    try {
        // 放行到下一个 slot,做限流、降级等判断
        fireEntry(context, resourceWrapper, node, count, prioritized, args);

        // 请求通过了, 线程计数器 +1 ,用作线程隔离
        node.increaseThreadNum();
        // 请求计数器 +1 用作限流
        node.addPassRequest(count);

        if (context.getCurEntry().getOriginNode() != null) {
            // 如果有 origin,来源计数器也都要 +1
            context.getCurEntry().getOriginNode().increaseThreadNum();
            context.getCurEntry().getOriginNode().addPassRequest(count);
        }

        if (resourceWrapper.getEntryType() == EntryType.IN) {
            // 如果是入口资源,还要给全局计数器 +1.
            Constants.ENTRY_NODE.increaseThreadNum();
            Constants.ENTRY_NODE.addPassRequest(count);
        }

        // 请求通过后的回调.
        for (ProcessorSlotEntryCallback<DefaultNode> handler : StatisticSlotCallbackRegistry.getEntryCallbacks()) {
            handler.onPass(context, resourceWrapper, node, count, args);
        }
    } catch (Throwable e) {
        // 各种异常处理就省略了。。。
        context.getCurEntry().setError(e);

        throw e;
    }
}
另外,需要注意的是,所有的计数+1动作都包括两部分,以 node.addPassRequest(count)为例:
@Override
public void addPassRequest(int count) {
    // DefaultNode的计数器,代表当前链路的 计数器
    super.addPassRequest(count);
    // ClusterNode计数器,代表当前资源的 总计数器
    this.clusterNode.addPassRequest(count);
}
接下来,进入规则校验的相关slot了,依次是:
- AuthoritySlot:负责授权规则(来源控制)
- SystemSlot:负责系统保护规则
- ParamFlowSlot:负责热点参数限流规则
- FlowSlot:负责限流规则
- DegradeSlot:负责降级规则
AuthoritySlot
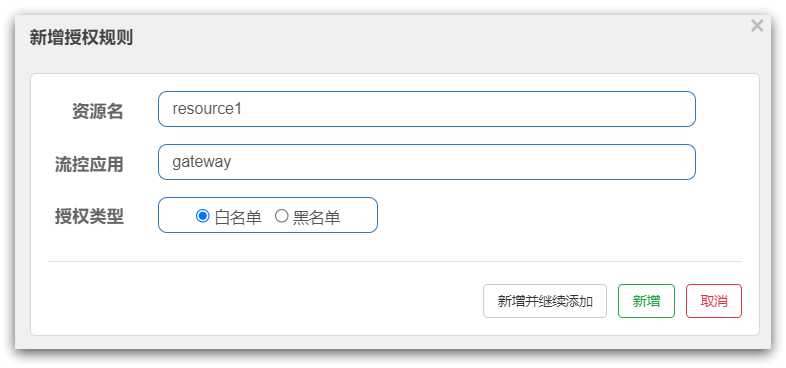
负责请求来源origin的授权规则判断,如图:
核心API
@Override
public void entry(Context context, ResourceWrapper resourceWrapper, DefaultNode node, int count, boolean prioritized, Object... args)
    throws Throwable {
    // 校验黑白名单
    checkBlackWhiteAuthority(resourceWrapper, context);
    // 进入下一个 slot
    fireEntry(context, resourceWrapper, node, count, prioritized, args);
}
黑白名单校验逻辑
void checkBlackWhiteAuthority(ResourceWrapper resource, Context context) throws AuthorityException {
    // 获取授权规则
    Map<String, Set<AuthorityRule>> authorityRules = AuthorityRuleManager.getAuthorityRules();

    if (authorityRules == null) {
        return;
    }

    Set<AuthorityRule> rules = authorityRules.get(resource.getName());
    if (rules == null) {
        return;
    }
	// 遍历规则并判断
    for (AuthorityRule rule : rules) {
        if (!AuthorityRuleChecker.passCheck(rule, context)) {
            // 规则不通过,直接抛出异常
            throw new AuthorityException(context.getOrigin(), rule);
        }
    }
}
再看下AuthorityRuleChecker.passCheck(rule, context)方法
static boolean passCheck(AuthorityRule rule, Context context) {
    // 得到请求来源 origin
    String requester = context.getOrigin();

    // 来源为空,或者规则为空,都直接放行
    if (StringUtil.isEmpty(requester) || StringUtil.isEmpty(rule.getLimitApp())) {
        return true;
    }

    // rule.getLimitApp()得到的就是 白名单 或 黑名单 的字符串,这里先用 indexOf方法判断
    int pos = rule.getLimitApp().indexOf(requester);
    boolean contain = pos > -1;

    if (contain) {
        // 如果包含 origin,还要进一步做精确判断,把名单列表以","分割,逐个判断
        boolean exactlyMatch = false;
        String[] appArray = rule.getLimitApp().split(",");
        for (String app : appArray) {
            if (requester.equals(app)) {
                exactlyMatch = true;
                break;
            }
        }
        contain = exactlyMatch;
    }
	// 如果是黑名单,并且包含origin,则返回false
    int strategy = rule.getStrategy();
    if (strategy == RuleConstant.AUTHORITY_BLACK && contain) {
        return false;
    }
	// 如果是白名单,并且不包含origin,则返回false
    if (strategy == RuleConstant.AUTHORITY_WHITE && !contain) {
        return false;
    }
	// 其它情况返回true
    return true;
}
SystemSlot
SystemSlot是对系统保护的规则校验:
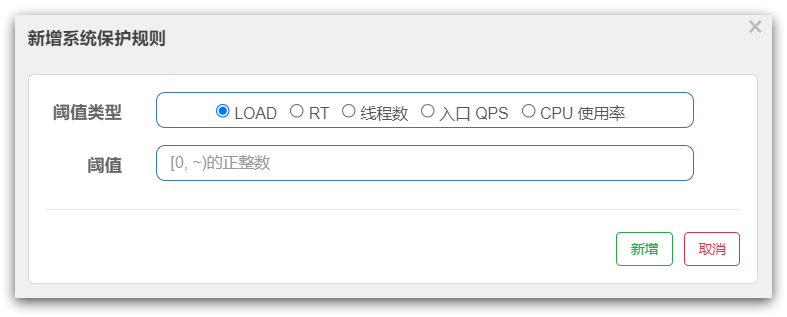
核心API
@Override
public void entry(Context context, ResourceWrapper resourceWrapper, DefaultNode node,
                  int count,boolean prioritized, Object... args) throws Throwable {
    // 系统规则校验
    SystemRuleManager.checkSystem(resourceWrapper);
    // 进入下一个 slot
    fireEntry(context, resourceWrapper, node, count, prioritized, args);
}
来看下SystemRuleManager.checkSystem(resourceWrapper)的代码:
public static void checkSystem(ResourceWrapper resourceWrapper) throws BlockException {
    if (resourceWrapper == null) {
        return;
    }
    // Ensure the checking switch is on.
    if (!checkSystemStatus.get()) {
        return;
    }

    // 只针对入口资源做校验,其它直接返回
    if (resourceWrapper.getEntryType() != EntryType.IN) {
        return;
    }

    // 全局 QPS校验
    double currentQps = Constants.ENTRY_NODE == null ? 0.0 : Constants.ENTRY_NODE.successQps();
    if (currentQps > qps) {
        throw new SystemBlockException(resourceWrapper.getName(), "qps");
    }

    // 全局 线程数 校验
    int currentThread = Constants.ENTRY_NODE == null ? 0 : Constants.ENTRY_NODE.curThreadNum();
    if (currentThread > maxThread) {
        throw new SystemBlockException(resourceWrapper.getName(), "thread");
    }
	// 全局平均 RT校验
    double rt = Constants.ENTRY_NODE == null ? 0 : Constants.ENTRY_NODE.avgRt();
    if (rt > maxRt) {
        throw new SystemBlockException(resourceWrapper.getName(), "rt");
    }

    // 全局 系统负载 校验
    if (highestSystemLoadIsSet && getCurrentSystemAvgLoad() > highestSystemLoad) {
        if (!checkBbr(currentThread)) {
            throw new SystemBlockException(resourceWrapper.getName(), "load");
        }
    }

    // 全局 CPU使用率 校验
    if (highestCpuUsageIsSet && getCurrentCpuUsage() > highestCpuUsage) {
        throw new SystemBlockException(resourceWrapper.getName(), "cpu");
    }
}
ParamFlowSlot
ParamFlowSlot就是热点参数限流,如图:
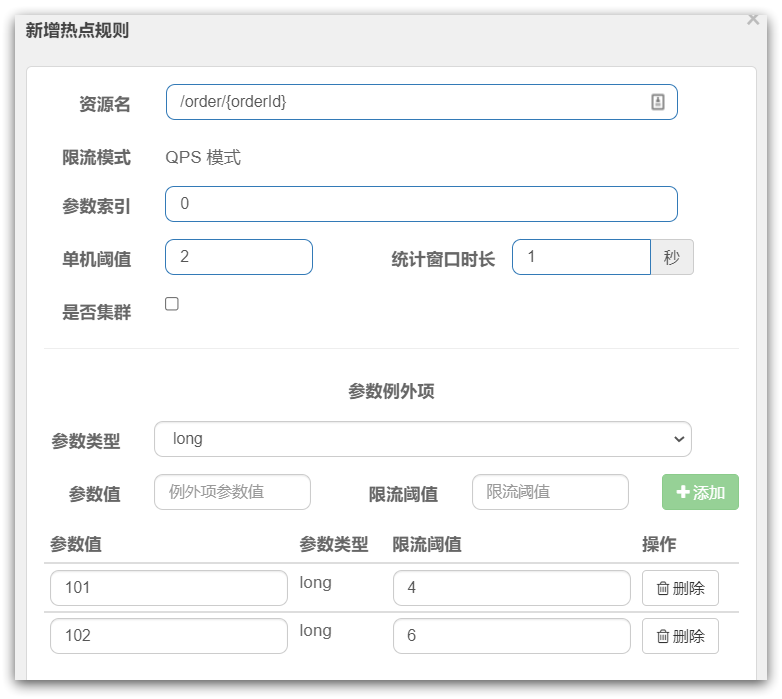
是针对进入资源的请求,针对不同的请求参数值分别统计QPS的限流方式。
-
这里的单机阈值,就是最大令牌数量:maxCount
-
这里的统计窗口时长,就是统计时长:duration
含义是每隔duration时间长度内,最多生产maxCount个令牌,上图配置的含义是每1秒钟生产2个令牌。
核心API
@Override
public void entry(Context context, ResourceWrapper resourceWrapper, DefaultNode node,
                  int count, boolean prioritized, Object... args) throws Throwable {
    // 如果没有设置热点规则,直接放行
    if (!ParamFlowRuleManager.hasRules(resourceWrapper.getName())) {
        fireEntry(context, resourceWrapper, node, count, prioritized, args);
        return;
    }
	// 热点规则判断
    checkFlow(resourceWrapper, count, args);
    // 进入下一个 slot
    fireEntry(context, resourceWrapper, node, count, prioritized, args);
}
令牌桶
热点规则判断采用了令牌桶算法来实现参数限流,为每一个不同参数值设置令牌桶,Sentinel的令牌桶有两部分组成:

这两个Map的key都是请求的参数值,value却不同,其中:
- tokenCounters:用来记录剩余令牌数量
- timeCounters:用来记录上一个请求的时间
当一个携带参数的请求到来后,基本判断流程是这样的:
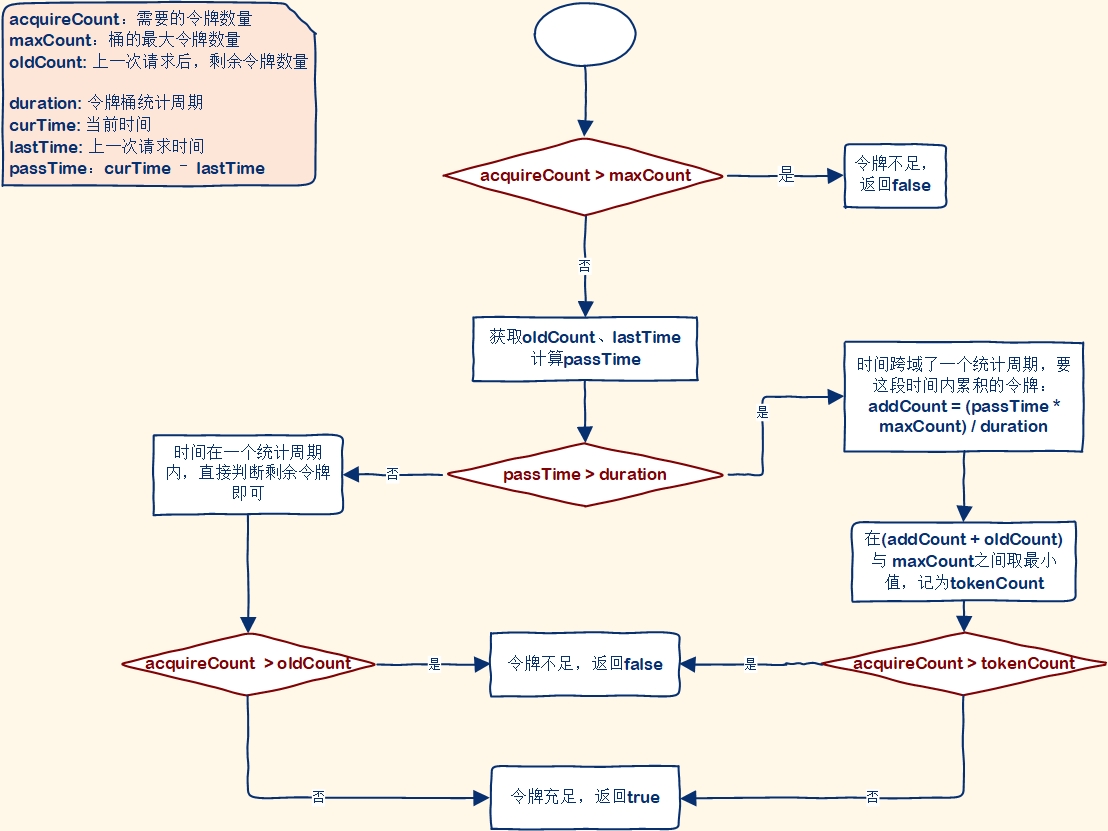
FlowSlot
FlowSlot是负责限流规则的判断,如图:
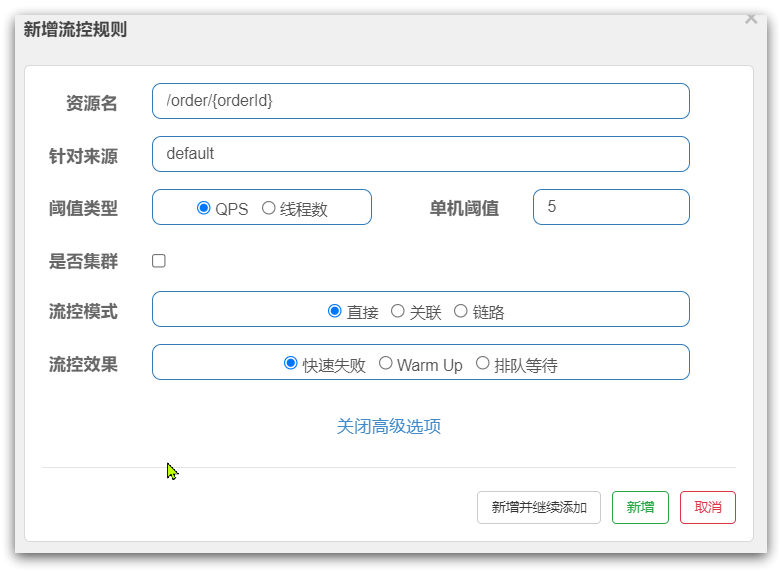
包括:
- 三种流控模式:直接模式、关联模式、链路模式
- 三种流控效果:快速失败、warm up、排队等待
三种流控模式,从底层数据统计角度,分为两类:
- 对进入资源的所有请求(ClusterNode)做限流统计:直接模式、关联模式
- 对进入资源的部分链路(DefaultNode)做限流统计:链路模式
三种流控效果,从限流算法来看,分为两类:
- 滑动时间窗口算法:快速失败、warm up
- 漏桶算法:排队等待效果
核心流程
核心API:
@Override
public void entry(Context context, ResourceWrapper resourceWrapper, DefaultNode node, int count,
                  boolean prioritized, Object... args) throws Throwable {
    // 限流规则检测
    checkFlow(resourceWrapper, context, node, count, prioritized);
	// 放行
    fireEntry(context, resourceWrapper, node, count, prioritized, args);
}
checkFlow方法:
void checkFlow(ResourceWrapper resource, Context context, DefaultNode node, int count, boolean prioritized)
    throws BlockException {
    // checker是 FlowRuleChecker 类的一个对象
    checker.checkFlow(ruleProvider, resource, context, node, count, prioritized);
}
跟入FlowRuleChecker:
public void checkFlow(Function<String, Collection<FlowRule>> ruleProvider,
                      ResourceWrapper resource,Context context, DefaultNode node,
                      int count, boolean prioritized) throws BlockException {
        if (ruleProvider == null || resource == null) {
            return;
        }
        // 获取当前资源的所有限流规则
        Collection<FlowRule> rules = ruleProvider.apply(resource.getName());
        if (rules != null) {
            for (FlowRule rule : rules) {
                // 遍历,逐个规则做校验
                if (!canPassCheck(rule, context, node, count, prioritized)) {
                    throw new FlowException(rule.getLimitApp(), rule);
                }
            }
        }
    }
这里的FlowRule就是限流规则接口,其中的几个成员变量,刚好对应表单参数:
public class FlowRule extends AbstractRule {
    /**
     * 阈值类型 (0: 线程, 1: QPS).
     */
    private int grade = RuleConstant.FLOW_GRADE_QPS;
    /**
     * 阈值.
     */
    private double count;
    /**
     * 三种限流模式.
     *
     * {@link RuleConstant#STRATEGY_DIRECT} 直连模式;
     * {@link RuleConstant#STRATEGY_RELATE} 关联模式;
     * {@link RuleConstant#STRATEGY_CHAIN} 链路模式.
     */
    private int strategy = RuleConstant.STRATEGY_DIRECT;
    /**
     * 关联模式关联的资源名称.
     */
    private String refResource;
    /**
     * 3种流控效果.
     * 0. 快速失败, 1. warm up, 2. 排队等待, 3. warm up + 排队等待
     */
    private int controlBehavior = RuleConstant.CONTROL_BEHAVIOR_DEFAULT;
	// 预热时长
    private int warmUpPeriodSec = 10;
    /**
     * 队列最大等待时间.
     */
    private int maxQueueingTimeMs = 500;
    // 。。。 略
}
校验的逻辑定义在FlowRuleChecker的canPassCheck方法中:
public boolean canPassCheck(/*@NonNull*/ FlowRule rule, Context context, DefaultNode node, int acquireCount,
                            boolean prioritized) {
    // 获取限流资源名称
    String limitApp = rule.getLimitApp();
    if (limitApp == null) {
        return true;
    }
	// 校验规则
    return passLocalCheck(rule, context, node, acquireCount, prioritized);
}
进入passLocalCheck():
private static boolean passLocalCheck(FlowRule rule, Context context, DefaultNode node,
                                      int acquireCount,  boolean prioritized) {
    // 基于限流模式判断要统计的节点,
    // 如果是直连模式,关联模式,对ClusterNode统计,如果是链路模式,则对DefaultNode统计
    Node selectedNode = selectNodeByRequesterAndStrategy(rule, context, node);
    if (selectedNode == null) {
        return true;
    }
	// 判断规则
    return rule.getRater().canPass(selectedNode, acquireCount, prioritized);
}
这里对规则的判断先要通过FlowRule#getRater()获取流量控制器TrafficShapingController,然后再做限流。
而TrafficShapingController有3种实现:

- DefaultController:快速失败,默认的方式,基于滑动时间窗口算法
- WarmUpController:预热模式,基于滑动时间窗口算法,只不过阈值是动态的
- RateLimiterController:排队等待模式,基于漏桶算法
最终的限流判断都在TrafficShapingController的canPass方法中。
滑动时间窗口
滑动时间窗口的功能分两部分来看:
- 一是时间区间窗口的QPS计数功能,这个是在StatisticSlot中调用的
- 二是对滑动窗口内的时间区间窗口QPS累加,这个是在FlowRule中调用的
先来看时间区间窗口的QPS计数功能。
时间窗口请求量统计
在StatisticSlot部分,有这样一段代码:

这段代码就是在统计通过该节点的QPS,跟入代码,进入到了DefaultNoed内部:

发现同时对DefaultNode和ClusterNode在做QPS统计,我们知道DefaultNode和ClusterNode都是StatisticNode的子类,这里调用addPassRequest()方法,最终都会进入StatisticNode中。
随便跟入一个:
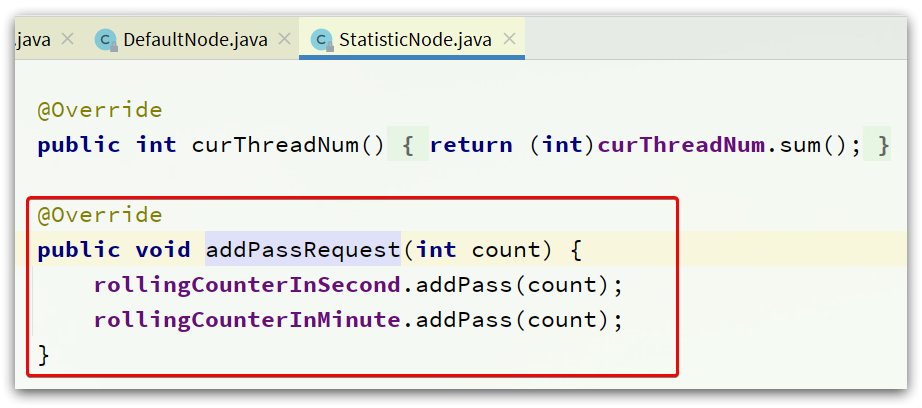
这里有秒、分两种纬度的统计,对应两个计数器。找到对应的成员变量,可以看到:
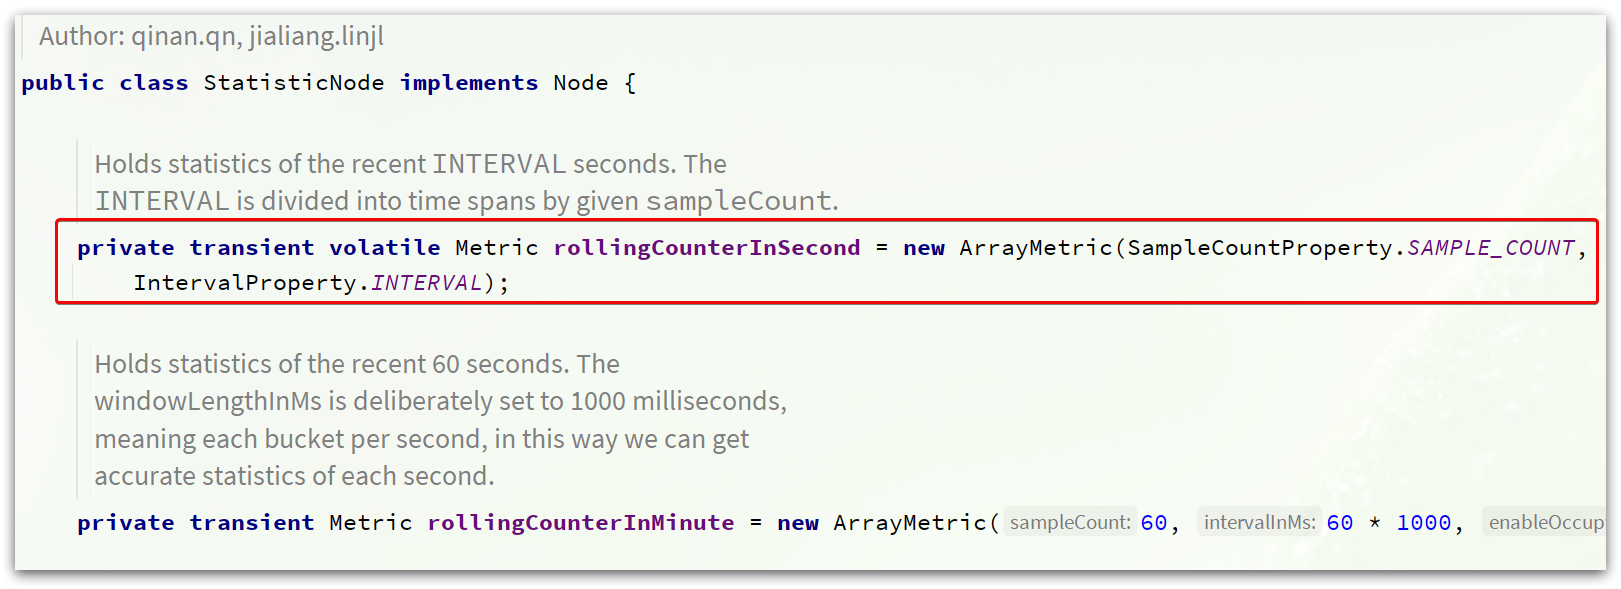
两个计数器都是ArrayMetric类型,并且传入了两个参数:
// intervalInMs:是滑动窗口的时间间隔,默认为 1 秒
// sampleCount: 时间窗口的分隔数量,默认为 2,就是把 1秒分为 2个小时间窗
public ArrayMetric(int sampleCount, int intervalInMs) {
    this.data = new OccupiableBucketLeapArray(sampleCount, intervalInMs);
}
如图:

接着进入ArrayMetric类的addPass方法:
@Override
public void addPass(int count) {
    // 获取当前时间所在的时间窗
    WindowWrap<MetricBucket> wrap = data.currentWindow();
    // 计数器 +1
    wrap.value().addPass(count);
}
计数器如何知道当前所在的窗口是哪个?
这里的data是一个LeapArray:

LeapArray的四个属性:
public abstract class LeapArray<T> {
    // 小窗口的时间长度,默认是500ms ,值 = intervalInMs / sampleCount
    protected int windowLengthInMs;
    // 滑动窗口内的 小窗口 数量,默认为 2
    protected int sampleCount;
    // 滑动窗口的时间间隔,默认为 1000ms
    protected int intervalInMs;
    // 滑动窗口的时间间隔,单位为秒,默认为 1
    private double intervalInSecond;
}
LeapArray是一个环形数组,因为时间是无限的,数组长度不可能无限,因此数组中每一个格子放入一个时间窗(window),当数组放满后,角标归0,覆盖最初的window。

因为滑动窗口最多分成sampleCount数量的小窗口,因此数组长度只要大于sampleCount,那么最近的一个滑动窗口内的2个小窗口就永远不会被覆盖,就不用担心旧数据被覆盖的问题了。
跟入 data.currentWindow();方法:
public WindowWrap<T> currentWindow(long timeMillis) {
    if (timeMillis < 0) {
        return null;
    }
	// 计算当前时间对应的数组角标
    int idx = calculateTimeIdx(timeMillis);
    // 计算当前时间所在窗口的开始时间.
    long windowStart = calculateWindowStart(timeMillis);

    /*
         * 先根据角标获取数组中保存的 oldWindow 对象,可能是旧数据,需要判断.
         *
         * (1) oldWindow 不存在, 说明是第一次,创建新 window并存入,然后返回即可
         * (2) oldWindow的 starTime = 本次请求的 windowStar, 说明正是要找的窗口,直接返回.
         * (3) oldWindow的 starTime < 本次请求的 windowStar, 说明是旧数据,需要被覆盖,创建
         *     新窗口,覆盖旧窗口
         */
    while (true) {
        WindowWrap<T> old = array.get(idx);
        if (old == null) {
            // 创建新 window
            WindowWrap<T> window = new WindowWrap<T>(windowLengthInMs, windowStart, newEmptyBucket(timeMillis));
            // 基于CAS写入数组,避免线程安全问题
            if (array.compareAndSet(idx, null, window)) {
                // 写入成功,返回新的 window
                return window;
            } else {
                // 写入失败,说明有并发更新,等待其它人更新完成即可
                Thread.yield();
            }
        } else if (windowStart == old.windowStart()) {
            return old;
        } else if (windowStart > old.windowStart()) {
            if (updateLock.tryLock()) {
                try {
                    // 获取并发锁,覆盖旧窗口并返回
                    return resetWindowTo(old, windowStart);
                } finally {
                    updateLock.unlock();
                }
            } else {
                // 获取锁失败,等待其它线程处理就可以了
                Thread.yield();
            }
        } else if (windowStart < old.windowStart()) {
            // 这种情况不应该存在,写这里只是以防万一。
            return new WindowWrap<T>(windowLengthInMs, windowStart, newEmptyBucket(timeMillis));
        }
    }
}
找到当前时间所在窗口(WindowWrap)后,只要调用WindowWrap对象中的add方法,计数器+1即可。
这里只负责统计每个窗口的请求量,不负责拦截。限流拦截要看FlowSlot中的逻辑。
滑动窗口QPS计算
FlowSlot的限流判断最终都由TrafficShapingController接口中的canPass方法来实现。该接口有三个实现类:
- DefaultController:快速失败,默认的方式,基于滑动时间窗口算法
- WarmUpController:预热模式,基于滑动时间窗口算法,只不过阈值是动态的
- RateLimiterController:排队等待模式,基于漏桶算法
因此跟入默认的DefaultController中的canPass方法来分析:
@Override
public boolean canPass(Node node, int acquireCount, boolean prioritized) {
    // 计算目前为止滑动窗口内已经存在的请求量
    int curCount = avgUsedTokens(node);
    // 判断:已使用请求量 + 需要的请求量(1) 是否大于 窗口的请求阈值
    if (curCount + acquireCount > count) {
        // 大于,说明超出阈值,返回false
        if (prioritized && grade == RuleConstant.FLOW_GRADE_QPS) {
            long currentTime;
            long waitInMs;
            currentTime = TimeUtil.currentTimeMillis();
            waitInMs = node.tryOccupyNext(currentTime, acquireCount, count);
            if (waitInMs < OccupyTimeoutProperty.getOccupyTimeout()) {
                node.addWaitingRequest(currentTime + waitInMs, acquireCount);
                node.addOccupiedPass(acquireCount);
                sleep(waitInMs);

                // PriorityWaitException indicates that the request will pass after waiting for {@link @waitInMs}.
                throw new PriorityWaitException(waitInMs);
            }
        }
        return false;
    }
    // 小于等于,说明在阈值范围内,返回true
    return true;
}
所以判断的关键就是int curCount = avgUsedTokens(node);
private int avgUsedTokens(Node node) {
    if (node == null) {
        return DEFAULT_AVG_USED_TOKENS;
    }
    return grade == RuleConstant.FLOW_GRADE_THREAD ? node.curThreadNum() : (int)(node.passQps());
}
因为我们采用的是限流,走node.passQps()逻辑:
// 这里又进入了 StatisticNode类
@Override
public double passQps() {
    // 请求量 ÷ 滑动窗口时间间隔 ,得到的就是QPS
    return rollingCounterInSecond.pass() / rollingCounterInSecond.getWindowIntervalInSec();
}
那么rollingCounterInSecond.pass()是如何得到请求量的呢?
// rollingCounterInSecond 本质是ArrayMetric,之前说过
@Override
public long pass() {
    // 获取当前窗口
    data.currentWindow();
    long pass = 0;
    // 获取 当前时间的 滑动窗口范围内 的所有小窗口
    List<MetricBucket> list = data.values();
	// 遍历
    for (MetricBucket window : list) {
        // 累加求和
        pass += window.pass();
    }
    // 返回
    return pass;
}
来看看data.values()如何获取 滑动窗口范围内的所有小窗口:
// 此处进入LeapArray类中:

public List<T> values(long timeMillis) {
    if (timeMillis < 0) {
        return new ArrayList<T>();
    }
    // 创建空集合,大小等于 LeapArray长度
    int size = array.length();
    List<T> result = new ArrayList<T>(size);
	// 遍历 LeapArray
    for (int i = 0; i < size; i++) {
        // 获取每一个小窗口
        WindowWrap<T> windowWrap = array.get(i);
        // 判断这个小窗口是否在 滑动窗口时间范围内(1秒内)
        if (windowWrap == null || isWindowDeprecated(timeMillis, windowWrap)) {
            // 不在范围内,则跳过
            continue;
        }
        // 在范围内,则添加到集合中
        result.add(windowWrap.value());
    }
    // 返回集合
    return result;
}
那么,isWindowDeprecated(timeMillis, windowWrap)又是如何判断窗口是否符合要求呢?
public boolean isWindowDeprecated(long time, WindowWrap<T> windowWrap) {
    // 当前时间 - 窗口开始时间  是否大于 滑动窗口的最大间隔(1秒)
    // 也就是说,我们要统计的时 距离当前时间1秒内的 小窗口的 count之和
    return time - windowWrap.windowStart() > intervalInMs;
}
漏铜
这次跟入默认的RateLimiterController中的canPass方法来分析:
@Override
public boolean canPass(Node node, int acquireCount, boolean prioritized) {
    // Pass when acquire count is less or equal than 0.
    if (acquireCount <= 0) {
        return true;
    }
    // 阈值小于等于 0 ,阻止请求
    if (count <= 0) {
        return false;
    }
	// 获取当前时间
    long currentTime = TimeUtil.currentTimeMillis();
    // 计算两次请求之间允许的最小时间间隔
    long costTime = Math.round(1.0 * (acquireCount) / count * 1000);

    // 计算本次请求 允许执行的时间点 = 最近一次请求的可执行时间 + 两次请求的最小间隔
    long expectedTime = costTime + latestPassedTime.get();
	// 如果允许执行的时间点小于当前时间,说明可以立即执行
    if (expectedTime <= currentTime) {
        // 更新上一次的请求的执行时间
        latestPassedTime.set(currentTime);
        return true;
    } else {
        // 不能立即执行,需要计算 预期等待时长
        // 预期等待时长 = 两次请求的最小间隔 +最近一次请求的可执行时间 - 当前时间
        long waitTime = costTime + latestPassedTime.get() - TimeUtil.currentTimeMillis();
        // 如果预期等待时间超出阈值,则拒绝请求
        if (waitTime > maxQueueingTimeMs) {
            return false;
        } else {
            // 预期等待时间小于阈值,更新最近一次请求的可执行时间,加上costTime
            long oldTime = latestPassedTime.addAndGet(costTime);
            try {
                // 保险起见,再判断一次预期等待时间,是否超过阈值
                waitTime = oldTime - TimeUtil.currentTimeMillis();
                if (waitTime > maxQueueingTimeMs) {
                    // 如果超过,则把刚才 加 的时间再 减回来
                    latestPassedTime.addAndGet(-costTime);
                    // 拒绝
                    return false;
                }
                // in race condition waitTime may <= 0
                if (waitTime > 0) {
                    // 预期等待时间在阈值范围内,休眠要等待的时间,醒来后继续执行
                    Thread.sleep(waitTime);
                }
                return true;
            } catch (InterruptedException e) {
            }
        }
    }
    return false;
}

DegradeSlot
最后一关,就是降级规则判断了。
Sentinel的降级是基于状态机来实现的:
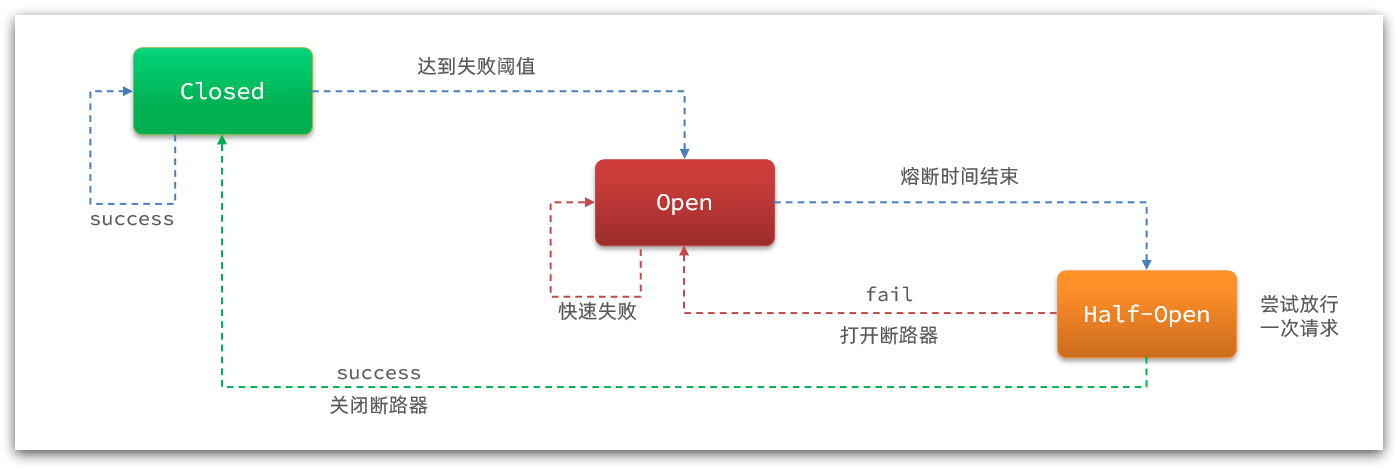
对应的实现在DegradeSlot类中,核心API:
@Override
public void entry(Context context, ResourceWrapper resourceWrapper, DefaultNode node,
                  int count, boolean prioritized, Object... args) throws Throwable {
    // 熔断降级规则判断
    performChecking(context, resourceWrapper);
	// 继续下一个slot
    fireEntry(context, resourceWrapper, node, count, prioritized, args);
}
继续进入performChecking方法:
void performChecking(Context context, ResourceWrapper r) throws BlockException {
    // 获取当前资源上的所有的断路器 CircuitBreaker
    List<CircuitBreaker> circuitBreakers = DegradeRuleManager.getCircuitBreakers(r.getName());
    if (circuitBreakers == null || circuitBreakers.isEmpty()) {
        return;
    }
    for (CircuitBreaker cb : circuitBreakers) {
        // 遍历断路器,逐个判断
        if (!cb.tryPass(context)) {
            throw new DegradeException(cb.getRule().getLimitApp(), cb.getRule());
        }
    }
}
CircuitBreaker
进入CircuitBreaker的tryPass方法中:
@Override
public boolean tryPass(Context context) {
    // 判断状态机状态
    if (currentState.get() == State.CLOSED) {
        // 如果是closed状态,直接放行
        return true;
    }
    if (currentState.get() == State.OPEN) {
        // 如果是OPEN状态,断路器打开
        // 继续判断OPEN时间窗是否结束,如果是则把状态从OPEN切换到 HALF_OPEN,返回true
        return retryTimeoutArrived() && fromOpenToHalfOpen(context);
    }
    // OPEN状态,并且时间窗未到,返回false
    return false;
}
有关时间窗的判断在retryTimeoutArrived()方法:
protected boolean retryTimeoutArrived() {
    // 当前时间 大于 下一次 HalfOpen的重试时间
    return TimeUtil.currentTimeMillis() >= nextRetryTimestamp;
}
OPEN到HALF_OPEN切换在fromOpenToHalfOpen(context)方法:
protected boolean fromOpenToHalfOpen(Context context) {
    // 基于CAS修改状态,从 OPEN到 HALF_OPEN
    if (currentState.compareAndSet(State.OPEN, State.HALF_OPEN)) {
        // 状态变更的事件通知
        notifyObservers(State.OPEN, State.HALF_OPEN, null);
        // 得到当前资源
        Entry entry = context.getCurEntry();
        // 给资源设置监听器,在资源Entry销毁时(资源业务执行完毕时)触发
        entry.whenTerminate(new BiConsumer<Context, Entry>() {
            @Override
            public void accept(Context context, Entry entry) {
                // 判断 资源业务是否异常
                if (entry.getBlockError() != null) {
                    // 如果异常,则再次进入OPEN状态
                    currentState.compareAndSet(State.HALF_OPEN, State.OPEN);
                    notifyObservers(State.HALF_OPEN, State.OPEN, 1.0d);
                }
            }
        });
        return true;
    }
    return false;
}
这里出现了从OPEN到HALF_OPEN、从HALF_OPEN到OPEN的变化,但是还有几个没有:
- 从CLOSED到OPEN
- 从HALF_OPEN到CLOSED
触发断路器
请求经过所有插槽 后,一定会执行exit方法,而在DegradeSlot的exit方法中:
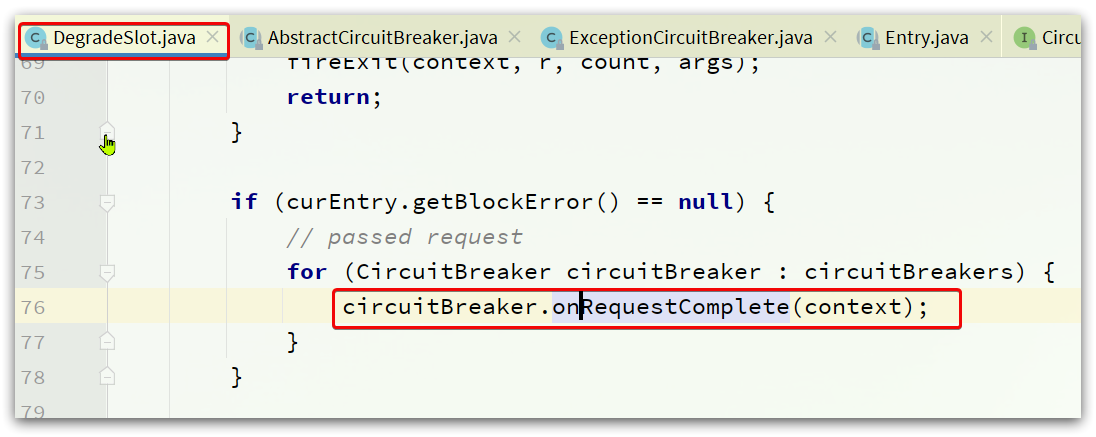
会调用CircuitBreaker的onRequestComplete方法。而CircuitBreaker有两个实现:

这里以异常比例熔断为例来看,进入ExceptionCircuitBreaker的onRequestComplete方法:
@Override
public void onRequestComplete(Context context) {
    // 获取资源 Entry
    Entry entry = context.getCurEntry();
    if (entry == null) {
        return;
    }
    // 尝试获取 资源中的 异常
    Throwable error = entry.getError();
    // 获取计数器,同样采用了滑动窗口来计数
    SimpleErrorCounter counter = stat.currentWindow().value();
    if (error != null) {
        // 如果出现异常,则 error计数器 +1
        counter.getErrorCount().add(1);
    }
    // 不管是否出现异常,total计数器 +1
    counter.getTotalCount().add(1);
	// 判断异常比例是否超出阈值
    handleStateChangeWhenThresholdExceeded(error);
}
来看阈值判断的方法:
private void handleStateChangeWhenThresholdExceeded(Throwable error) {
    // 如果当前已经是OPEN状态,不做处理
    if (currentState.get() == State.OPEN) {
        return;
    }
	// 如果已经是 HALF_OPEN 状态,判断是否需求切换状态
    if (currentState.get() == State.HALF_OPEN) {
        if (error == null) {
            // 没有异常,则从 HALF_OPEN 到 CLOSED
            fromHalfOpenToClose();
        } else {
            // 有一次,再次进入OPEN
            fromHalfOpenToOpen(1.0d);
        }
        return;
    }
	// 说明当前是CLOSE状态,需要判断是否触发阈值
    List<SimpleErrorCounter> counters = stat.values();
    long errCount = 0;
    long totalCount = 0;
    // 累加计算 异常请求数量、总请求数量
    for (SimpleErrorCounter counter : counters) {
        errCount += counter.errorCount.sum();
        totalCount += counter.totalCount.sum();
    }
    // 如果总请求数量未达到阈值,什么都不做
    if (totalCount < minRequestAmount) {
        return;
    }
    double curCount = errCount;
    if (strategy == DEGRADE_GRADE_EXCEPTION_RATIO) {
        // 计算请求的异常比例
        curCount = errCount * 1.0d / totalCount;
    }
    // 如果比例超过阈值,切换到 OPEN
    if (curCount > threshold) {
        transformToOpen(curCount);
    }
}
总结
Sentinel的限流与Gateway的限流有什么差别?
限流算法常见的有三种实现:滑动时间窗口、令牌桶算法、漏桶算法。Gateway则采用了基于Redis实现的令牌桶算法。
而Sentinel内部却比较复杂:
- 默认限流模式是基于滑动时间窗口算法
- 排队等待的限流模式则基于漏桶算法
- 而热点参数限流则是基于令牌桶算法
Sentinel的线程隔离与Hystix的线程隔离有什么差别?
Hystix默认是基于线程池实现的线程隔离,每一个被隔离的业务都要创建一个独立的线程池,线程过多会带来额外的CPU开销,性能一般,但是隔离性更强。
Sentinel是基于信号量(计数器)实现的线程隔离,不用创建线程池,性能较好,但是隔离性一般。
本文来自互联网用户投稿,该文观点仅代表作者本人,不代表本站立场。本站仅提供信息存储空间服务,不拥有所有权,不承担相关法律责任。 如若内容造成侵权/违法违规/事实不符,请联系我的编程经验分享网邮箱:chenni525@qq.com进行投诉反馈,一经查实,立即删除!
- Python教程
- 深入理解 MySQL 中的 HAVING 关键字和聚合函数
- Qt之QChar编码(1)
- MyBatis入门基础篇
- 用Python脚本实现FFmpeg批量转换
- [Vulnhub靶机] DriftingBlues: 7
- 【Manacher】LeetCode-5. 最长回文子串
- 安捷伦8720ES矢量网络分析仪
- Godot游戏引擎有啥优势
- 常见BUG如何在测试过程中分析定位
- AutoBookmark Adobe Acrobat快速自动批量添加书签/目录
- 深入学习《大学计算机》系列之第1章 1.4节——从二进制起源窥见的奥秘
- jQuery遍历(树遍历)
- Yolov5训练自己的数据集(最详细教程)
- Python爬虫使用代理IP的实现动态页面抓取